Brookstone BodyForm is a rowing machine designed for in-home physical exercise by adults. It features magnetic resistance for a smoother, more satisfying workout. The device has a monitor that displays various metrics such as time, repetitions, calories burned, and total count. The rower's seat is adjustable, and the footpads are designed for a comfortable and secure rowing experience. Safety features include adjustable height stabilizers for added stability, ensuring a safe and effective workout.
Brookstone BodyForm is a rowing machine designed for in-home physical exercise by adults. It features magnetic resistance for a smoother, more satisfying workout. The device has a monitor that displays various metrics such as time, repetitions, calories burned, and total count. The rower's seat is adjustable, and the footpads are designed for a comfortable and secure rowing experience. Safety features include adjustable height stabilizers for added stability, ensuring a safe and effective workout.


-
 1
1
-
 2
2
-
 3
3
-
 4
4
-
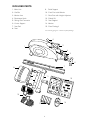 5
5
-
 6
6
-
 7
7
-
 8
8
-
 9
9
-
 10
10
-
 11
11
-
 12
12
-
 13
13
-
 14
14
-
 15
15
-
 16
16
-
 17
17
-
 18
18
-
 19
19
-
 20
20


Brookstone BodyForm is a rowing machine designed for in-home physical exercise by adults. It features magnetic resistance for a smoother, more satisfying workout. The device has a monitor that displays various metrics such as time, repetitions, calories burned, and total count. The rower's seat is adjustable, and the footpads are designed for a comfortable and secure rowing experience. Safety features include adjustable height stabilizers for added stability, ensuring a safe and effective workout.
Ask a question and I''ll find the answer in the document
Finding information in a document is now easier with AI
Related papers
-
Brookstone Flip Calculator User manual
-
-
-
-
-
-
-
-
-
Other documents
-
 NENNBO L13 User manual
-
Tunturi R 215 User manual
-
 Tutti Bambini 211459 Assembly Instructions Manual
-
 Oar Board Rower User manual
-
Trojan Cambridge 300 Owner's manual
-
Ericsson MBR L21 4G LTE User manual
-
-
-
-


