
MODEL G0504
16" HORIZONTAL
RESAW BANDSAW
Owner's Manual
COPYRIGHT © MAY, 2003 BY GRIZZLY INDUSTRIAL, INC. REVISED MARCH, 2007.
WARNING: NO PORTION OF THIS MANUAL MAY BE REPRODUCED IN ANY SHAPE
OR FORM WITHOUT THE WRITTEN APPROVAL OF GRIZZLY INDUSTRIAL, INC.
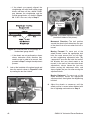
#TR5063 PRINTED IN TAIWAN


Table of Contents
SECTION 1: GENERAL INFORMATION ......................................................................................... 3
Commentary ............................................................................................................................... 3
Machine Data Sheet .................................................................................................................
4
SECTION 2: SAFETY .......................................................................................................................
5
Additional Safety Instructions for Bandsaws ..............................................................................
7
Additional Safety Instructions for Hydraulics ..............................................................................
8
SECTION 3: CIRCUIT REQUIREMENTS ........................................................................................
9
3-Phase Power ...........................................................................................................................
9
Grounding ................................................................................................................................. 10
Converting to 440V ..................................................................................................................
10
SECTION 4: MACHINE FEATURES ..............................................................................................
12
Main Features ..........................................................................................................................
12
Control Panel ...........................................................................................................................
14
SECTION 5: SET UP ......................................................................................................................
15
About this Section ....................................................................................................................
15
Unpacking ................................................................................................................................ 15
Piece Inventory ........................................................................................................................
15
Hardware Recognition Chart ....................................................................................................
16
Clean Up ..................................................................................................................................
17
Site Considerations ..................................................................................................................
17
Removing Resaw from Crate Pallet .........................................................................................
18
Mounting Resaw to the Floor ...................................................................................................
18
Installing & Tensioning Blade ...................................................................................................
19
Adjusting Blade Guides ............................................................................................................
20
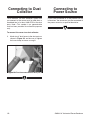
Connecting to Dust Collector ...................................................................................................
22
Connecting to Power Source ...................................................................................................
22
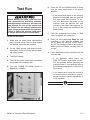
Test Run ...................................................................................................................................
23
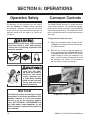
SECTION 6: OPERATIONS ...........................................................................................................
24
Operation Safety ......................................................................................................................
24
Conveyor Controls ...................................................................................................................
24
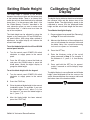
Setting Blade Height ................................................................................................................
25
Calibrating Digital Display ........................................................................................................
25
Setting Memory Button ............................................................................................................. 26
Using Memory Preset Keys ..................................................................................................... 26
Resawing .................................................................................................................................. 27
Blade Information .....................................................................................................................
28
Accessories .............................................................................................................................. 29
SECTION 7: MAINTENANCE ........................................................................................................
30
Cleaning ................................................................................................................................... 30
Miscellaneous ........................................................................................................................... 30
V-Belts ...................................................................................................................................... 30
Bearings ................................................................................................................................... 30
Grease Fittings .........................................................................................................................
31
Hydraulic Fluid Schedule .........................................................................................................
32
Hydraulic System Minor Service ..............................................................................................
32
Hydraulic System Major Service ..............................................................................................
33

SECTION 8: SERVICE ADJUSTMENTS ....................................................................................... 35
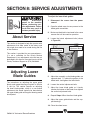
About Service ...........................................................................................................................
35
Adjusting Lower Blade Guides .................................................................................................
35
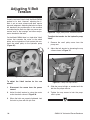
Adjusting V-Belt Tension ..........................................................................................................
36
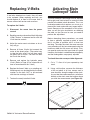
Replacing V-Belts .....................................................................................................................
37
Adjusting Main Conveyor Table ...............................................................................................
37
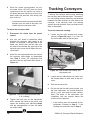
Tracking Conveyors .................................................................................................................
38
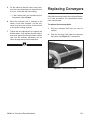
Replacing Conveyors ...............................................................................................................
39
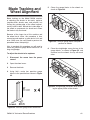
Blade Tracking and Wheel Alignment ......................................................................................
41
Troubleshooting ........................................................................................................................ 44
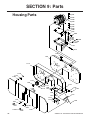
SECTION 9: Parts ..........................................................................................................................
46
Housing Parts ...........................................................................................................................
46
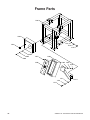
Frame Parts .............................................................................................................................
48
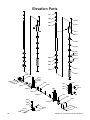
Elevation Parts .........................................................................................................................
50
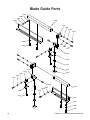
Blade Guide Parts ....................................................................................................................
52
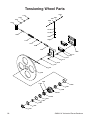
Tensioning Wheel Parts ...........................................................................................................
54
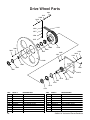
Drive Wheel Parts ....................................................................................................................
56
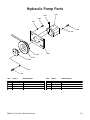
Hydraulic Pump Parts ..............................................................................................................
57
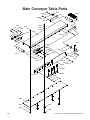
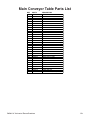
Main Conveyor Table Parts .....................................................................................................
58
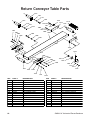
Return Conveyor Table Parts ..................................................................................................
60
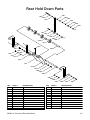
Rear Hold Down Parts ............................................................................................................. 61
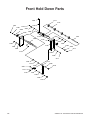
Front Hold Down Parts ............................................................................................................. 62
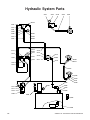
Hydraulic System Parts ............................................................................................................ 64
Electrical System Parts 1 .........................................................................................................
66
Electrical System Parts 2 .........................................................................................................
67
WARRANTY AND RETURNS ........................................................................................................
69

G0504 16" Horizontal Resaw Bandsaw -3-
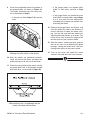
Grizzly Industrial, Inc. is proud to offer the Model
G0504 16" Horizontal Resaw Bandsaw. This
resaw bandsaw is part of Grizzly’s growing fam
-
ily of fine woodworking machinery. When used
according to the guidelines stated in this manual,
you can expect years of trouble-free, enjoyable
operation, and proof of Grizzly’s commitment to
customer satisfaction.
We are also pleased to provide this manual for
the Model G0504. It was written to guide you
through assembly, review safety considerations,
and cover general operating procedures. It repre
-
sents our latest effort to produce the best docu
-
mentation possible.
If you have any comments or criticisms that
you feel we should address in our next printing,
please contact us at:
Grizzly Industrial, Inc.
C
⁄O Technical Documentation
P.O. Box 2069
Bellingham, WA 98227
Email: [email protected]
Most important, we stand behind our machines.
We have excellent regional service departments
at your disposal should the need arise.
If you have any service questions or parts
requests, please call or write to us at the location
listed below.
Grizzly Industrial, Inc
1203 Lycoming Mall Circle
Muncy, PA 17756
Phone:(570) 546-9663
Fax:(800) 438-5901
E-Mail: [email protected]
Web Site: http://www.grizzly.com
The specifications, drawings, and photographs
illustrated in this manual represent the Model
G0504 as supplied when the manual was pre
-
pared. However, owing to Grizzly’s policy of con
-
tinuous improvement, changes may be made at
any time with no obligation on the part of Grizzly.
For your convenience, we always keep current
Grizzly manuals available on our website at
www.grizzly.com. Any updates to your machine
will be reflected in these manuals as soon as
they are complete.
Read this entire manu-
al before operating the
machine, or you will
greatly increase your
chances of serious per
-
sonal injury!
Commentary
SECTION 1: GENERAL INFORMATION

-4- G0504 16" Horizontal Resaw Bandsaw
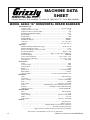
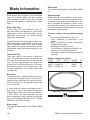
Overall Dimensions:
Conveyor Table .................................................................................... 16" W x 102" D
Height From Floor To Table .....................................................................................
40"
Height From Floor To Return Table .........................................................................
30"
Overall Height (With Door Open) ..........................................................................
83
1
⁄2"
Overall Width ............................................................................................................
85"
Overall Depth .........................................................................................................
108"
Shipping Weight ............................................................................................. 4080 lbs.
Net Machine Weight ....................................................................................... 3300 lbs.
Crate Size ............................................................................................. 73" x 48" x 61"
Footprint ............................................................................................
32
1
⁄4" W x 45
1
⁄4" L
Capacities:
Maximum Workpiece Width and Height ................................................. 16" W x 10" H
Minimum Workpiece Length ..................................................................................16" L
Distance From Blade to Conveyor Table ...........................................................
1
⁄4"-10"
Saw Wheel Diameter .............................................................................. Ø28" x
15
⁄16"W
Saw Blade Size ......................................................180" L x 1" W x .035" T (.063 kerf)
Saw Blade Speed ......................................................................................... 7300 FPM
Feed Conveyor Belt Size ..............................................................
15
1
⁄4" x 215
3
⁄4" x 1pc
Return Conveyor Belt Size ..............................................................
7
1
⁄4" x 215
3
⁄4" x 1pc
Feed Speed ................................................................................................... 0-61 FPM
Construction:
Frame ...................................................................................................................
Steel
Conveyor Table .....................................................................................................
Steel
Conveyor Belt ....................................................................................................
Rubber
Wheels ..................................................................................................................
Steel
Wheel Cover .....................................................................................Pre-Formed Steel
Blade Guides ....................................................................................................
Ceramic
Pressure Roller .........................................................4" Cast Iron w/Polyurethane Tire
Main Motor:
Type .....................................................................................................
TEFC Induction
Horsepower ......................................................................................................... 25 HP
Phase / Voltage ...........................................................................3-Phase / 220V/440V
Amps ..................................................................................................................
60/30A
Cycle / RPM ................................................................................ 60 Hertz / 1725 RPM
Switch ...................................................220V Magnetic w/Thermal Overload Protector
Bearings .............................................................. Shielded & Lubricated Ball Bearings
Hydraulic Pressure .......................................................................775 PSI (55KG/CM
2
)
Elevation Motor:
Type .....................................................................................................
TEFC Induction
Horsepower ..........................................................................................................
1
⁄2 HP
Phase ⁄ Voltage ...........................................................................3-Phase / 220V/440V
Amps ................................................................................................................
2.2/1.1A
Cycle ⁄ RPM ................................................................................. 60 Hertz / 1725 RPM
Features:
.............................................................................................................4" Dust Port x 2
...........................................................................................................Return Conveyor
................................................................Hydraulic Blade Tension Control & Indicator
.....................................................................................Powered Saw Wheel Elevation
...................................Digital Position Controller for Accurate Saw Wheel Positioning
Specifications, while deemed accurate, are not guaranteed.
Customer Service #: (570) 546-9663 • To Order Call: (800) 523-4777 • Fax #: (800) 438-5901
MODEL G0504 16" HORIZONTAL RESAW BANDSAW
MACHINE DATA
SHEET
Machine Data Sheet

G0504 16" Horizontal Resaw Bandsaw -5-
SECTION 2: SAFETY
safety

-6- G0504 16" Horizontal Resaw Bandsaw

G0504 16" Horizontal Resaw Bandsaw -7-
Additional Safety Instructions for Bandsaws
9. THIS MACHINE IS NOT DESIGNED TO
CUT METAL or other material except
wood.
10. DO NOT MANUALLY STOP OR SLOW
BLADE after turning the saw off. Allow
it to come to a complete stop before you
leave it unattended.
11. ALL INSPECTIONS, ADJUSTMENTS,
AND MAINTENANCE MUST BE DONE
WITH THE POWER OFF and the circuit
breaker shut off. Wait for all moving parts
to come to a complete stop.
12. HABITS – GOOD AND BAD – ARE
HARD TO BREAK. Develop good habits
in your shop and safety will become sec
-
ond-nature to you.
13. IF AT ANY TIME YOU ARE EXPERIENC-
ING DIFFICULTIES PERFORMING THE
INTENDED OPERATION, STOP USING
THE BANDSAW! Then contact our ser
-
vice department or ask a qualified expert
how the operation should be performed.
14. MAKE SURE BLADE IS PROPERLY
TENSIONED BEFORE OPERATING
MACHINE.
15. KEEP LOOSE CLOTHING AND LONG
HAIR AWAY FROM MOVING CONVEY
-
ORS!
1. DO NOT OPERATE WITH DULL OR
BADLY WORN BLADES.
Dull blades
require more demand on the motor and are
less likely to cut precisely. Inspect blades
before each use.
2. NEVER POSITION FINGERS OR THUMBS
IN LINE WITH THE CUT. Serious personal
injury could occur.
3. DO NOT OPERATE THIS BANDSAW
WITHOUT WHEEL GUARDS, PULLEY
GUARDS, AND BLADE GUARDS IN
PLACE.
4. WHEN REPLACING BLADES, make sure
the teeth face toward the front of the saw.
5. CUTS SHOULD ALWAYS BE FULLY
SUPPORTED against the side of the con-
veyor table and by the pressure rollers.
6. DO NOT BACK WORKPIECE AWAY
from the blade while the saw is running.
If you need to back the work out, stop the
bandsaw and wait for the blade to stop. DO
NOT twist or put excessive stress on blade
while backing work away.
7. BLADE SHOULD BE RUNNING AT FULL
SPEED before beginning a cut.
8. ALWAYS FEED STOCK EVENLY AND
SMOOTHLY. DO NOT change conveyor
speeds during a cut.
No list of safety guidelines can be com-
plete. Every shop environment is different.
Always consider safety first, as it applies
to your individual working conditions. Use
this and other machinery with caution and
respect. Failure to do so could result in
serious personal injury, damage to equip-
ment, or poor work results.
Like all machines there is danger associ-
ated with the Model G0504. Accidents are
frequently caused by lack of familiarity or
failure to pay attention. Use this machine
with respect and caution to lessen the pos
-
sibility of operator injury. If normal safety
precautions are overlooked or ignored, seri
-
ous personal injury may occur.

-8- G0504 16" Horizontal Resaw Bandsaw
Additional Safety Instructions for Hydraulics
4. STOP THE MACHINE IF YOU NOTICE
A HYDRAULIC LEAK.
Allowing the
machine to continue running with a leak
may increase the hazard of the situation.
5. DEPRESSURIZE THE HYDRAULIC
SYSTEM BEFORE ATTEMPTING TO
ADJUST ANY HYDRAULIC LINES OR
FITTINGS. Stop the resaw, open the con-
veyor speed valves, and make sure the
pressure gauge reads 0 PSI.
6. DEPRESSURIZE THE HYDRAULIC
SYSTEM BEFORE ATTEMPTING ANY
MAINTENANCE OR SERVICE. Stop the
resaw, open the conveyor speed valves,
and make sure the pressure gauge reads
0 PSI.
7. REGULARLY INSPECT AND PER
-
FORM THE PROPER MAINTENANCE
ON THE HYDRAULIC SYSTEM. A well-
maintained hydraulic system will have
much fewer problems and hazards than
a neglected system.
8. MAKE SURE ANY HYDRAULIC SYS
-
TEM MAINTENANCE IS PERFORMED
IN A CLEAN AND DUST-FREE WORK
AREA. Remove any sawdust, grime or
water from hydraulic system openings or
components before maintenance. Always
use lint-free rags when wiping compo
-
nents.
9. ONLY USE HIGH PRESSURE HYDRAU-
LIC HOSE AND STEEL HYDRAULIC
FITTINGS WHEN REPLACING COM
-
PONENTS IN THE HYDRAULIC SYS
-
TEM. DO NOT use brass or aluminum.
1. BE FAMILIAR WITH THE HAZARDS OF
HYDRAULIC INJECTION INJURIES.
— Leaking hydraulic fluid may have
enough pressure to penetrate skin.
Never use your hands to check for
suspected hydraulic leaks.
— Hydraulic fluid that is injected into
skin is a medical emergency that
may cause infection, disability,
amputation or death.
— The average injection injury may
be a small wound that has barely
broken the skin. DO NOT be fooled
by this type of injury. Immediately
get to an emergency medical facil
-
ity!
— Minimizing the time between the
injury and when the injected mate
-
rial is removed is critical to mini
-
mizing the seriousness of the inju
-
ry.
2. USE A PIECE OF CARDBOARD TO
CHECK FOR SUSPECTED HYDRAU-
LIC LEAKS.
Pressurized hydraulic fluid
may cause injection injuries and can be
extremely hot. Never use your hands to
check for suspected hydraulic leaks.
3. PROTECT YOUR EYES AROUND
HYDRAULIC SYSTEMS. Safety glasses
may not always protect your eyes from
hot, pressurized fluid. The best way to
protect yourself is to stay away from leaks
until you can depressurize the system.

G0504 16" Horizontal Resaw Bandsaw -9-
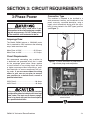
A fire may occur if your particular electrical
configuration does not comply with local and
state codes. The best way to ensure compli
-
ance is to check with your local municipality
or a qualified electrician.
Figure 1. A power disconnect is preferable to
high current plugs and receptacles.
Serious personal injury could occur if you
allow power to the machine before complet
-
ing the setup process. DO NOT allow power
to the machine until instructed to do so.
Amperage Draw
The Model G0504 features a 220/440V motor
that is prewired for 220V and draws the following
amps under maximum load:
Motor Draw at 220V .......................... 62.2 Amps
Motor Draw at 440V ...........................31.1 Amps
Circuit Requirements
We recommend connecting your machine to
a dedicated and grounded circuit that is rated
for the amperage given below. Never replace
a circuit breaker on an existing circuit with one
of higher amperage without consulting a quali
-
fied electrician to ensure compliance with wir
-
ing codes
. If you are unsure about the wiring
codes in your area or you plan to connect
your machine to a shared circuit, consult a
qualified electrician.
220V Circuit ...........................................
80 Amps
440V Circuit ...........................................
40 Amps
3-Phase Power
SECTION 3: CIRCUIT REQUIREMENTS
Connection Type
This machine is intended to be installed in a
semi-permanent location and hardwired to the
power source by a qualified electrician, using a
supply circuit disconnect device with the capa
-
bility of being locked in the OFF (open) position
(see Figure 1).
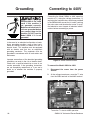
Figure 2. Power connection points inside the
electrical box.

-10- G0504 16" Horizontal Resaw Bandsaw
Converting the Model G0504 to 440V operation
consists of 1) wiring the voltage transformer, 2)
replacing the overload relays with those provided
in the G0504 440V conversion kit, and 3) rewiring
the main motor and the elevation motor. A quali
-
fied electrician must inspect all electrical modifi
-
cations before connecting to power.
Figure 3. Inside of electrical box.
In the event of an electrical malfunction or break-
down, grounding provides a path of least resis
-
tance for electric current to reduce the risk of
electric shock. This machine must be equipped
with an electric cord that has an equipment
grounding conductor. This conductor must be
grounded in accordance with all local codes and
ordinances.
Improper connections of the electrical-grounding
conductor can result in the risk of electric shock.
Check with a qualified electrician or one of our
service personnel if the grounding instructions
are not completely understood, or if you are in
doubt as to whether the machine is properly
grounded.
Electrocution or fire could
result if this machine is
not grounded correctly.
Make sure all electrical cir
-
cuits are grounded before
you connect them to the
machine. DO NOT use the
Model G0504 if it is not
grounded.
Converting to 440VGrounding
To convert the Model G0504 to 440V:
1. Disconnect the resaw from the power
source!
2. At the voltage transformer, move the T1 wire
from the 220V terminal to the 440V terminal.
Voltage Transformer
Main Motor Relay
Figure 4. Location on voltage transformer to
move the T1 wire for 440V operation.

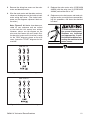
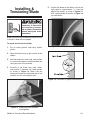
G0504 16" Horizontal Resaw Bandsaw -11-
3. Remove the wiring box covers on the main
motor and elevation motor.
4. Wire the main motor and elevation motor as
shown on the diagrams on the inside of each
motor wiring box cover. (The circled refer
-
ences on the diagrams represent labels on
the wires.
)
Note: Figures 5 & 6 below have been pro-
vided for your reference and are current
at the time that this manual was written.
However, always use the diagram on the
wire cover that comes with your motor! Also,
the electrical system on this machine is setup
for the "RUN" diagrams shown on the wire
cover. Ignore the "START" diagrams for this
machine.
Figure 5. Main motor 440V wiring.
Figure 6. Elevation motor 440V wiring.
5. Replace the main motor relay (LR3D-3359
48/65A) with the relay from kit (LR3D-3355
30/40A) and set the dial to “33.”
6. Replace any wire duct covers and motor wir-
ing box covers you might have removed dur
-
ing this procedure, and close the electrical
box door.
To avoid electrocution or
fire, ensure all wiring mod
-
ifications are inspected
and approved by a quali
-
fied electrician before con
-
necting the machine to the
power source.

-12- G0504 16" Horizontal Resaw Bandsaw
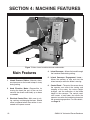
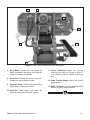
1. Infeed Pressure Rollers—Maintain down-
ward pressure on the board to keep it sturdy
during cutting.
2. Head Elevation Motor—Responsible for
moving the head (the part of the saw that
contains the wheels and blade) up or down
as needed.
3. Electrical Control Box—Main area for wir
-
ing, rewiring, and changing the fuses. Should
never be opened when the machine is con
-
nected to the power source!
4. Infeed Conveyor—Moves the board through
the bandsaw blade during cutting.
5. Infeed Conveyor Engagement Lever
—
Allows the operator to stop and start the
infeed conveyor while the blade is moving.
6. Control Panel—The part of the resaw where
the operator can control the starting and
stopping of the motor, the various height
changes, and the calibration of the blade
height to the conveyor. The control panel
also houses a load meter that allows the
operator to monitor the load being placed on
the resaw during operation. For more details,
see Page 14.
Figure 7. Main view of machine features and controls.
2
4
5
3
6
1
Main Features
SECTION 4: MACHINE FEATURES

G0504 16" Horizontal Resaw Bandsaw -13-
7. Main Motor—Powers the saw wheels for
blade movement and drives the hydraulic
pump for conveyor movement.
8. Dust Ports—Allows the resaw to be con
-
nected to a dust collection system.
9. Hydraulic Pump—Creates hydraulic oil flow
which drives the conveyor motors.
10. Hydraulic Tank—Holds and cools the
hydraulic fluid for the hydraulic system.
11. Return Conveyor—Allows the person
receiving the newly cut board to return it
to the operator without walking around the
saw.
12. Blade Tension Gauge—Shows the current
blade tension.
13. Blade Tensioner—Provides hydraulic blade
tension and easy tension release.
Figure 8. Rear view of machine features and controls.
12
13
11
7
10
9
8

-14- G0504 16" Horizontal Resaw Bandsaw
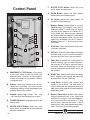
Control Panel
A. EMERGENCY STOP Button—Cuts power
to the main motor to stop the blade and
hydraulic pump. (
Caution—It takes approxi-
mately 30 seconds for the blade to come to
a complete stop
.)
B. Display—Shows the distance from the con
-
veyor belt to the blade. Also used to enter
and change settings, move blade height, and
program the memory function.
C. Keypad—Inputs height values. The + and
- keys manually jog the height up or down.
D. POWER ON Switch—Engages power to the
control panel.
E. MOTOR START Button—Starts the main
motor, which is responsible for the blade and
conveyor movement.
A
M
L
K
J
H
I
B
G
C
D
E
F
N
F. MOTOR STOP Button—Stops the main
motor, blade, and conveyors.
G. DOWN Button—Moves the head (blade)
down toward the infeed conveyor.
H. UP Button—Moves the head (blade) up
toward the infeed conveyor.
I. Memory Button—Moves blade to a preset
height change. For example, if you want to
produce multiple
1
⁄4" boards from a 5" board,
you can set the memory to X inches (X=
1
⁄4"
+ your blade kerf). After every cut, the head
will automatically move down X inches when
you press the memory button. You can then
repeat this procedure until the 5" board is
reduced to the last
1
⁄4" that can be cut from
that board.
J. STOP Key—Stops the elevation motor from
its current movement.
K. SET Key—Calibrates the height of the blade
from the table, or can be used in combina
-
tion with the
FUNC key to set the memory.
L. FUNC Key—Prepares the control panel for
special functions. Can be used in combina
-
tion with the
START key to manually type in
a numeric height on the keypad, or can be
used in combination with the SET key to set
the memory.
M. START Key—Moves the blade to the height
that is entered in the keypad. Must be used
in conjunction with the
FUNC key.
N. Load Meter—Displays the current load
placed on the machine. The load meter is
used to determine the appropriate conveyor
feed rate for each species of wood and each
blade being used.
O. Memory Preset Keys (A, B, C, D)—Allows
multiple dimension sizes to be saved and
recalled. For example, if you have 500 piec
-
es to resaw and the starting size is 2" thick
on all of them, then you can save 2" in the
A
memory key. After cutting down each piece,
press A to return to the starting height.
Figure 9. Control panel close-up.
O

G0504 16" Horizontal Resaw Bandsaw -15-
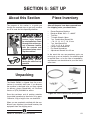
After all the parts have been removed from
the shipping crate, you should have:
• Resaw Bandsaw Machine
• Bandsaw Blade 180" x 1" x 0.035"
• Tool Box
• T-Handle Wrench 19mm
• 7 pc. Combination Wrench Set
—10, 12, 13, 14, 17, 19, 21 mm
• 7 pc. Hex Wrench Set
—2.5, 3, 4, 5, 6, 8, 10 mm
• Phillips Head Screwdriver
• Flat Head Screwdriver
• Adjustment Wrench 30 x 32 mm
In the event that any non-proprietary parts are
missing (e.g. nuts or washers), we would be glad
to replace them, or for the sake of expediency,
replacements can be obtained at your local hard
-
ware store.
The Model G0504 is shipped from the manu-
facturer in a carefully built crate. If you discover
the machine is damaged after you have signed
for delivery, please immediately call Customer
Service at (570) 546-9663
for advice.
Save the containers and all packing materials
for possible inspection by the carrier or its agent.
Otherwise, filing a freight claim can be difficult.
When you are completely satisfied with the con
-
dition of your shipment, you should inventory the
equipment from the shipping crate.
The purpose of this section is to guide you
through the required
steps to get your machine
out of its crate and into operating condition.
Wear safety glasses
during the entire set up
process!
This machine presents
serious injury hazards
to untrained users. Read
through this entire man
-
ual to become familiar
with the controls and
operations before start
-
ing the machine!
Figure 10. Piece inventory from packing crate.
Piece Inventory
Unpacking
About this Section
SECTION 5: SET UP

-16- G0504 16" Horizontal Resaw Bandsaw
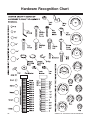
Hardware Recognition Chart

G0504 16" Horizontal Resaw Bandsaw -17-
1. Floor Load: The Model G0504 represents
a large weight load. Most commercial floors
are suitable for your machine. Some resi
-
dential floors may require additional build up
to support both the machine and operator.
2. Working Clearances: Consider existing
and anticipated needs, size of material to
be processed through each machine, and
space for auxiliary stands, work tables or
other machinery when establishing a loca
-
tion for your bandsaw.
3. Lighting and Outlets: Lighting should be
bright enough to eliminate shadow and pre
-
vent eye strain. Electrical circuits should be
dedicated or large enough to handle amper
-
age requirements. Outlets should be located
near each machine so power or extension
cords are clear of high-traffic areas. Observe
local electrical codes for proper installation
of new lighting, outlets, or circuits.
Unsupervised children and
visitors inside your shop
could cause serious per
-
sonal injury to themselves.
Lock all entrances to the
shop when you are away
and DO NOT allow unsuper
-
vised children or visitors in
your shop at any time!
The unpainted surfaces are coated with a waxy
oil to protect them from corrosion during ship
-
ment. Remove this protective coating with a sol
-
vent cleaner or citrus-based degreaser such as
Grizzly’s G7895 Degreaser. To clean thoroughly,
some parts may need to be removed. For opti
-
mum performance from your machine, make
sure you clean all moving parts or sliding
contact surfaces that are coated. Avoid chlo
-
rine-based solvents as they may damage painted
surfaces should they come in contact. Always
follow the manufacturer’s instructions when using
any type of cleaning product.
Gasoline and petroleum
products have low flash
points and could cause
an explosion or fire if
used to clean machinery.
DO NOT use gasoline or
petroleum products to
clean the machinery.
Smoking near solvents
could ignite an explosion
or fire and cause serious
injury. DO NOT smoke
while using solvents.
Many of the solvents
commonly used to clean
machinery can be toxic
when inhaled or ingest
-
ed. Lack of ventilation
while using these sol
-
vents could cause seri
-
ous personal health risks
or fire. Take precautions
from this hazard by only
using cleaning solvents
in a well ventilated area.
Site ConsiderationsClean Up

-18- G0504 16" Horizontal Resaw Bandsaw
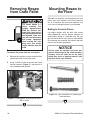
Removing Resaw
from Crate Pallet
To remove the resaw from the crate pallet:
1. Remove the lag bolts from the stand feet that
secure the resaw to the crate pallet.
2. Using a forklift, lift the resaw from the frame
location shown in
Figure 11, and move it to
your predetermined location.
Figure 11. Lifting points for moving the resaw
with a forklift.
The Model G0504 is a
heavy machine that
weighs approximately
3300 lbs. Serious per
-
sonal injury may occur if
safe moving methods are
not followed. To be safe,
you will need assistance
and power equipment
when moving the ship-
ping crate and remov
-
ing the machine from the
crate.
Mounting Resaw to
the Floor
Although not required, we recommend that you
mount your new machine to the floor. Because
this is an optional step and floor materials may
vary, floor mounting hardware is not included.
Bolting to Concrete Floors
Lag shield anchors with lag bolts and anchor
studs (Figure
12) are two popular methods for
anchoring an object to a concrete floor. We sug
-
gest you research the many options and methods
for mounting your machine and choose the best
that fits your specific application.
NOTICE
Anchor studs are stronger and more per-
manent alternatives to lag shield anchors;
however, they will stick out of the floor,
which may cause a tripping hazard if you
decide to move your machine.
Figure 12. Typical fasteners for mounting to
concrete floors.
Page is loading ...
Page is loading ...
Page is loading ...
Page is loading ...
Page is loading ...
Page is loading ...
Page is loading ...
Page is loading ...
Page is loading ...
Page is loading ...
Page is loading ...
Page is loading ...
Page is loading ...
Page is loading ...
Page is loading ...
Page is loading ...
Page is loading ...
Page is loading ...
Page is loading ...
Page is loading ...
Page is loading ...
Page is loading ...
Page is loading ...
Page is loading ...
Page is loading ...
Page is loading ...
Page is loading ...
Page is loading ...
Page is loading ...
Page is loading ...
Page is loading ...
Page is loading ...
Page is loading ...
Page is loading ...
Page is loading ...
Page is loading ...
Page is loading ...
Page is loading ...
Page is loading ...
Page is loading ...
Page is loading ...
Page is loading ...
Page is loading ...
Page is loading ...
Page is loading ...
Page is loading ...
Page is loading ...
Page is loading ...
Page is loading ...
Page is loading ...
Page is loading ...
Page is loading ...
Page is loading ...
Page is loading ...
Page is loading ...
Page is loading ...
-
 1
1
-
 2
2
-
 3
3
-
 4
4
-
 5
5
-
 6
6
-
 7
7
-
 8
8
-
 9
9
-
 10
10
-
 11
11
-
 12
12
-
 13
13
-
 14
14
-
 15
15
-
 16
16
-
 17
17
-
 18
18
-
 19
19
-
 20
20
-
 21
21
-
 22
22
-
 23
23
-
 24
24
-
 25
25
-
 26
26
-
 27
27
-
 28
28
-
 29
29
-
 30
30
-
 31
31
-
 32
32
-
 33
33
-
 34
34
-
 35
35
-
 36
36
-
 37
37
-
 38
38
-
 39
39
-
 40
40
-
 41
41
-
 42
42
-
 43
43
-
 44
44
-
 45
45
-
 46
46
-
 47
47
-
 48
48
-
 49
49
-
 50
50
-
 51
51
-
 52
52
-
 53
53
-
 54
54
-
 55
55
-
 56
56
-
 57
57
-
 58
58
-
 59
59
-
 60
60
-
 61
61
-
 62
62
-
 63
63
-
 64
64
-
 65
65
-
 66
66
-
 67
67
-
 68
68
-
 69
69
-
 70
70
-
 71
71
-
 72
72
-
 73
73
-
 74
74
-
 75
75
-
 76
76


Ask a question and I''ll find the answer in the document
Finding information in a document is now easier with AI
Related papers
Other documents
-
Global Industrial 298711 User manual
-
Gorilla Playsets 07-0015-G Operating instructions
-
 Panthers Report H3035 User manual
-
Conair UGR004/1200 User manual
-
Johnson Hardware VH-40 User manual
-
Xanté Ilumina Digital Production Press Operating instructions
-
 Hyd-Mech H-40 Operation and Maintenance Manual
-
 MK Diamond Products MK-770 Owner's manual
-
 Grizzly Industrial T1241 Operating instructions
-
Dodge Conveyor Pulley Owner's manual


