Page is loading ...
Português Italiano DeutschNederlands Español Français
English
Owner’s Manual
Bedienungsanleitung
Mode d'emploi
Manuale dell'utente
Manual del usuario
Manual do proprietário
Gebruikershandleiding
Owner’s Manual
Guitar Ampli er

Português Italiano DeutschNederlands Español Français
English
Two-channel switchable design with JC CLEAN channel and LEAD channel, plus a Solo function (p. 12)
• The JC CLEAN channel delivers clean sounds, and the LEAD channel gives you acoustic, clean, crunch, high-gain, and an original “dyna-amp”
sound. A total of ten amp types are provided by the CUBE-40XL, and eleven types are provided by the CUBE-80XL, covering the needs of a wide
range of musical styles.
• Use the Solo function to store and recall the sound settings you create. This is a great way to switch between backing sounds and solo sounds
while you perform.
• Foot switch (optional) can be used to switch EFX/SOLO on and o
A tuner function is included (p. 11)
• An easy-to-operate tuner is built in. This even supports at tuning and seven-string guitars. Chromatic tuning is possible, too.
Equipped with an AUX IN jack, which is convenient for your practice sessions (p. 9)
• Use this to play along with sounds from CD players and digital audio players.
Looper function lets you record, play back, and overdub the phrases you perform (p. 14)
• You can record a phrase you play, and then enjoy performing with that phrase as your backing. Maximum recording time is approximately 80
seconds.
“EFX” provides ve types of eff ects, plus independent reverb and delay (p. 6, p. 7)
• Onboard EFX section includes 5 types of digital e ect, CHORUS, FLANGER, PHASER, TREMOLO, and HEAVY OCTAVE.
• You can use a foot switch (optional) to turn EFX, delay, and reverb on/o ..
Before using this unit, carefully read the sections entitled: “IMPORTANT SAFETY INSTRUCTIONS” (inside front cover), “USING THE UNIT SAFELY”
(p. 2), and “IMPORTANT NOTES” (p. 3). These sections provide important information concerning the proper operation of the unit. Additionally,
in order to feel assured that you have gained a good grasp of every feature provided by your new unit, Owner’s manual should be read in its
entirety. The manual should be saved and kept on hand as a convenient reference.
Copyright © 2010 ROLAND CORPORATION
All rights reserved. No part of this publication may be reproduced in any form without the written permission of ROLAND CORPORATION
Roland is a registered trademark of Roland Corporation in the United States and/or other countries
Owner’s Manual
Guitar Ampli er
CUBE-40XL
This is a compact, high-performance DSP guitar amp with 40 W output and a 25 cm (10-inch) speaker.
CUBE-80XL
This is a high-performance DSP guitar amp with 80 W output and a 30 cm (12-inch) speaker.
Composite Object Sound Modeling (COSM) is Roland’s innovative and powerful sound modeling technology. COSM analyzes the many factors that
make up the original sound, such as the electrical and physical characteristics of the original, and then produces a digital model that can reproduce the
same sound.
2
WARNING
(for CUBE-80XL only)
Connect mains plug of this model to a mains
socket outlet with a protective earthing
connection.
Do not open or perform any internal modica-
tions on the unit.
Do not attempt to repair the unit, or replace
parts within it (except when this manual
provides specic instructions directing you
to do so). Refer all servicing to your retailer,
the nearest Roland Service Center, or an
authorized Roland distributor, as listed on the
“Information” page.
Never install the unit in any of the following
locations.
• Damp (e.g., baths, washrooms, on wet oors);
or are
• Exposed to steam or smoke; or are
• Subject to salt exposure; or are
• Humid; or are
• Exposed to rain; or are
• Dusty or sandy; or are
• Subject to high levels of vibration and
shakiness.
Make sure you always have the unit placed
so it is level and sure to remain stable. Never
place it on stands that could wobble, or on
inclined surfaces.
The unit should be connected to a power
supply only of the type described as marked
on the rear side of unit.
Do not excessively twist or bend the power
cord, nor place heavy objects on it. Doing
so can damage the cord, producing severed
elements and short circuits. Damaged cords
are re and shock hazards!
This unit, either alone or in combination with
an amplier and headphones or speakers,
may be capable of producing sound levels
that could cause permanent hearing loss. Do
not operate for a long period of time at a high
volume level, or at a level that is uncomfort-
able. If you experience any hearing loss or
ringing in the ears, you should immediately
stop using the unit, and consult an audiologist.
Do not place containers containing liquid on
this product. Never allow foreign objects (e.g.,
ammable objects, coins, wires) or liquids (e.g.,
water or juice) to enter this product. Doing so
may cause short circuits, faulty operation, or
other malfunctions.
WARNING
Immediately turn the power o, remove the
power cord from the outlet, and request servic-
ing by your retailer, the nearest Roland Service
Center, or an authorized Roland distributor, as
listed on the “Information” page when:
• The power-supply cord or the plug has been
damaged; or
• If smoke or unusual odor occurs
• Objects have fallen into, or liquid has been
spilled onto the unit; or
• The unit has been exposed to rain (or
otherwise has become wet); or
• The unit does not appear to operate
normally or exhibits a marked change in
performance.
In households with small children, an adult
should provide supervision until the child is
capable of following all the rules essential for
the safe operation of the unit.
Protect the unit from strong impact.
(Do not drop it!)
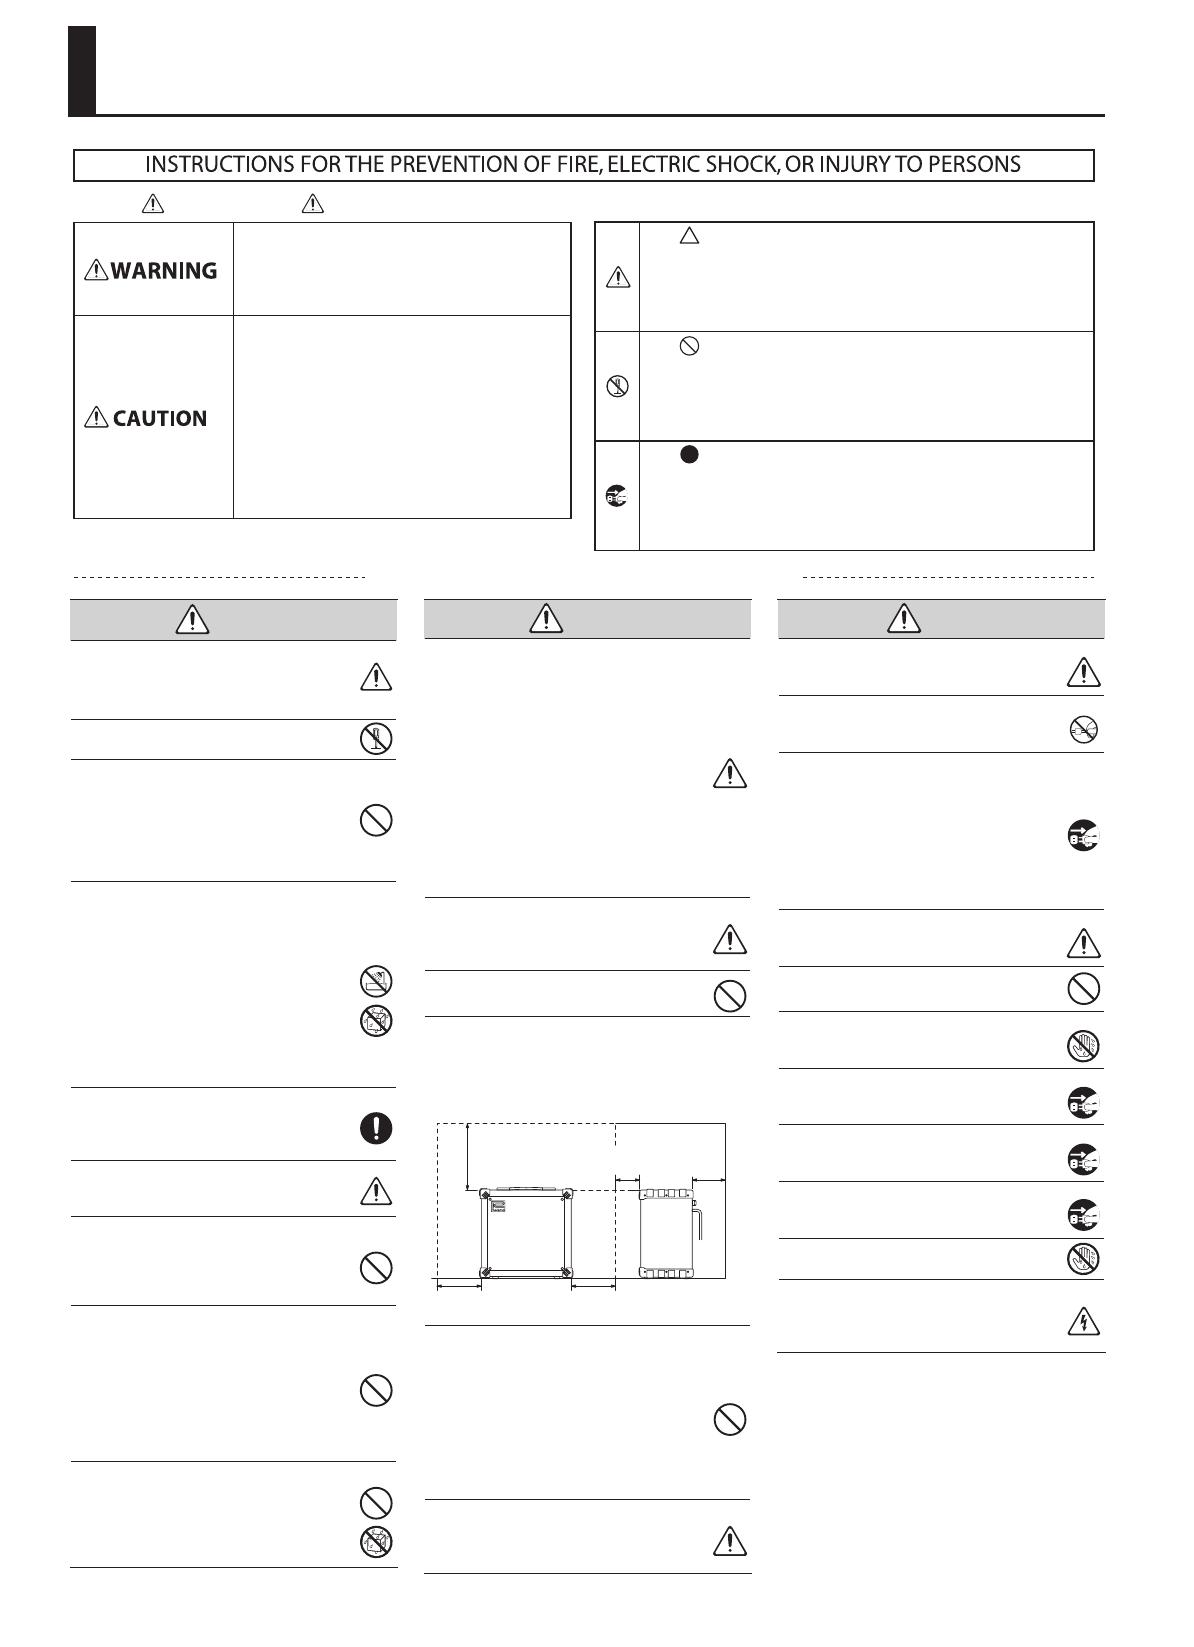
(for CUBE-80XL only)
A small amount of heat will radiate from the
unit during normal operation. Do not use the
unit in an area with less than the air space
shown below.
30 cm (12 in.)
or greater
20 cm (8 in.)
or greater
20 cm (8 in.)
or greater
5 cm (2 in.)
or greater
15 cm (6 in.)
or greater
Front Side
Do not force the unit’s power-supply cord to
share an outlet with an unreasonable number
of other devices. Be especially careful when
using extension cords—the total power used
by all devices you have connected to the
extension cord’s outlet must never exceed the
power rating (watts/amperes) for the extension
cord. Excessive loads can cause the insulation
on the cord to heat up and eventually melt
through.
Before using the unit in a foreign country,
consult with your retailer, the nearest Roland
Service Center, or an authorized Roland
distributor, as listed on the “Information” page.
CAUTION
The unit should be located so that its location
or position does not interfere with its proper
ventilation.
Always grasp only the plug on the
power-supply cord when plugging into, or
unplugging from an outlet.
At regular intervals, you should unplug the
power plug and clean it by using a dry cloth to
wipe all dust and other accumulations away
from its prongs. Also, disconnect the power
plug from the power outlet whenever the unit
is to remain unused for an extended period of
time. Any accumulation of dust between the
power plug and the power outlet can result in
poor insulation and lead to re.
Try to prevent cords and cables from becoming
entangled. Also, all cords and cables should be
placed so they are out of the reach of children.
Never climb on top of, nor place heavy objects
on the unit.
Never handle the power cord or its plug with
wet hands when plugging into, or unplugging
from, an outlet.
Before moving the unit, disconnect the power
plug from the outlet, and pull out all cords
from external devices.
Before cleaning the unit, turn o the power
and unplug the power cord from the outlet
(p. 7).
Whenever you suspect the possibility of
lightning in your area, pull the plug on the
power cord out of the outlet.
The cooling vents on the rear side of the unit
may become hot, so take care to avoid burns.
Do not remove the speaker grille and speaker
by any means. Speaker not user replaceable.
Shock hazardous voltages and currents are
present inside the enclosure.
USING THE UNIT SAFELY
Used for instructions intended to alert the
user to the risk of injury or material
damage should the unit be used
improperly.
* Material damage refers to damage or
other adverse effects caused with
respect to the home and all its
furnishings, as well to domestic animals
or pets.
Used for instructions intended to alert the
user to the risk of death or severe injury
should the unit be used improperly.
The symbol alerts the user to things that must be
carried out. The specific thing that must be done is
indicated by the design contained within the circle. In the
case of the symbol at left, it means that the power-cord
plug must be unplugged from the outlet.
The symbol alerts the user to important instructions or
warnings.The specific meaning of the symbol is
determined by the design contained within the triangle. In
the case of the symbol at left, it is used for general
cautions, warnings, or alerts to danger.
The symbol alerts the user to items that must never be
carried out (are forbidden). The specific thing that must
not be done is indicated by the design contained within
the circle. In the case of the symbol at left, it means that
the unit must never be disassembled.
About WARNING and CAUTION Notices
About the Symbols
ALWAYS OBSERVE THE FOLLOWING
3
Português Italiano DeutschNederlands Español Français
English
Power Supply
• Do not connect this unit to same electrical outlet that is being used
by an electrical appliance that is controlled by an inverter (such as a
refrigerator, washing machine, microwave oven, or air conditioner),
or that contains a motor. Depending on the way in which the
electrical appliance is used, power supply noise may cause this unit to
malfunction or may produce audible noise. If it is not practical to use a
separate electrical outlet, connect a power supply noise lter between
this unit and the electrical outlet.
• Before connecting this unit to other devices, turn o the power to all
units. This will help prevent malfunctions and/or damage to speakers
or other devices.
• Although the LEDs are switched o when the POWER switch is
switched o, this does not mean that the unit has been completely
disconnected from the source of power. If you need to turn o the
power completely, rst turn o the POWER switch, then unplug the
power cord from the power outlet. For this reason, the outlet into
which you choose to connect the power cord’s plug should be one
that is within easy reach and readily accessible.
Placement
• Using the unit near power ampliers (or other equipment containing
large power transformers) may induce hum. To alleviate the problem,
change the orientation of this unit; or move it farther away from the
source of interference.
• This device may interfere with radio and television reception. Do not
use this device in the vicinity of such receivers.
• Noise may be produced if wireless communications devices, such as
cell phones, are operated in the vicinity of this unit. Such noise could
occur when receiving or initiating a call, or while conversing. Should
you experience such problems, you should relocate such wireless
devices so they are at a greater distance from this unit, or switch them
o.
• Do not expose the unit to direct sunlight, place it near devices that
radiate heat, leave it inside an enclosed vehicle, or otherwise subject
it to temperature extremes. Also, do not allow lighting devices that
normally are used while their light source is very close to the unit (such
as a piano light), or powerful spotlights to shine upon the same area
of the unit for extended periods of time. Excessive heat can deform or
discolor the unit.
• When moved from one location to another where the temperature
and/or humidity is very dierent, water droplets (condensation) may
form inside the unit. Damage or malfunction may result if you attempt
to use the unit in this condition. Therefore, before using the unit, you
must allow it to stand for several hours, until the condensation has
completely evaporated.
• Do not allow rubber, vinyl, or similar materials to remain on this
unit for long periods of time. Such objects can discolor or otherwise
harmfully aect the nish.
• Do not paste stickers, decals, or the like to this instrument. Peeling
such matter o the instrument may damage the exterior nish.
• Depending on the material and temperature of the surface on which
you place the unit, its rubber feet may discolor or mar the surface.
You can place a piece of felt or cloth under the rubber feet to prevent
this from happening. If you do so, please make sure that the unit will
not slip or move accidentally.
• Do not put anything that contains water (e.g., ower vases) on this
unit. Also, avoid the use of insecticides, perfumes, alcohol, nail polish,
spray cans, etc., near the unit. Swiftly wipe away any liquid that spills
on the unit using a dry, soft cloth.
Maintenance
• For everyday cleaning wipe the unit with a soft, dry cloth or one that
has been slightly dampened with water. To remove stubborn dirt, use a
cloth impregnated with a mild, non-abrasive detergent. Afterwards, be
sure to wipe the unit thoroughly with a soft, dry cloth.
• Never use benzine, thinners, alcohol or solvents of any kind, to avoid
the possibility of discoloration and/or deformation.
Repairs and Data
• Please be aware that unit settings or the contents of the solo function
stored in memory may be lost when the unit is sent for servicing.
Important data should always be written down on paper. Roland
assumes no liability with respect to recovery of any lost data.
Additional Precautions
• Please be aware that unit settings or the contents of the solo function
stored in memory can be irretrievably lost as a result of a malfunction
or the improper operation of the unit. To protect yourself against the
risk of losing important data, we recommend that you periodically
write down on paper any important data you have stored in the unit’s
memory.
• Roland Corporation assumes no liability with respect to recovery
of any lost unit settings or contents of the solo function stored in
memory.
• Use a reasonable amount of care when using the unit’s buttons, sliders,
or other controls; and when using its jacks and connectors. Rough
handling can lead to malfunctions.
• When connecting / disconnecting all cables, grasp the connector
itself—never pull on the cable. This way you will avoid causing shorts,
or damage to the cable’s internal elements.
• A small amount of heat will radiate from the unit during normal
operation.
• To avoid disturbing your neighbors, try to keep the unit’s volume at
reasonable levels. You may prefer to use headphones, so you do not
need to be concerned about those around you.
• When you need to transport the unit, package it in the box (including
padding) that it came in, if possible. Otherwise, you will need to use
equivalent packaging materials.
• Some connection cables contain resistors. Do not use cables that
incorporate resistors for connecting to this unit. The use of such cables
can cause the sound level to be extremely low, or impossible to hear.
For information on cable specications, contact the manufacturer of
the cable.
• No sound is output from this unit’s speaker or any external speaker
when the RECORDING OUT/PHONES jack is in use.
• Wrap the power cord around the cord hook when transporting or
storing the unit.
• For CUBE-80XL only
When connecting to an external speaker, make sure the speaker
conforms to the following specications.
Impedance: 8 ohms or less
Allowable power input: 80 watts or greater
• For CUBE-80XL only
Only use speaker cable to connect the speaker. Do not use any
shielded cable designed for use with guitars.
• For CUBE-80XL only
Do not insert hands, ngers, etc, into the openings in the unit’s rear
panel. In particular, if the unit is to used in households with small
children, always provide adult supervision to ensure that children keep
their hands and feet out of these openings.
Copyright
• Recording, duplication, distribution, sale, lease, performance, or
broadcast of copyrighted material (musical works, visual works,
broadcasts, live performances, etc.) belonging to a third party in
part or in whole without the permission of the copyright owner is
forbidden by law.
• Do not use this unit for purposes that could infringe on a copyright
held by a third party. We assume no responsibility whatsoever with
regard to any infringements of third-party copyrights arising through
your use of this unit.
Trademarks
• The product names mentioned in this document are trademarks or
registered trademarks of their respective owners, and are not related
to Roland Corporation. In this manual, these names are used because
it is the most practical way of describing the sounds that are simulated
using COSM technology.
IMPORTANT NOTES

4
1. INPUT Jack
Connect your electric guitar here.
2. [SELECT] Switch
Switches between the JC CLEAN and LEAD channels.
The indicator shows you which channel is selected.
Channels can be switched using optional BOSS FS-5U, FS-5L or FS-6
foot switches.
3. [TUNER] Switch
Use this when you want to tune your guitar. When you turn on the
switch, it will light red, and you’ll be able to use the Tuner function.
For more detailed information, refer to”Using the Tuner Function” (p. 11)
JC CLEAN Channel
This is a model of Roland’s famous JC-120 Jazz Chorus guitar ampli er.
The ultra-clean, ultra- at sound o ers a smooth feel. This amp is ideal
for creating sounds in combination with a multi-e ects device.
4. [BRIGHT] Switch (CUBE-80XL only)
This makes the mid and high ranges more brilliant, for acrisper sound.
5. [VOLUME] Knob
This adjusts the volume level of the JC CLEAN channel.
Asan original function on this unit, this can produce apowerful crunch
at volume levels near the maximum.
Panel Descriptions
Control Panel
CUBE-40XL
15 16 19 2017 181311 12
1 6 7 8 9 10 215 2 3
3
2
6
7
8
9
10
21
5
1
CUBE-80XL
14 15 16 19 2117 181311 12
1 4 6 7 8 9 105 2 3
3
2
6
7
8
9
10
5
1
4
5
Português Italiano DeutschNederlands Español Français
English
LEAD Channel
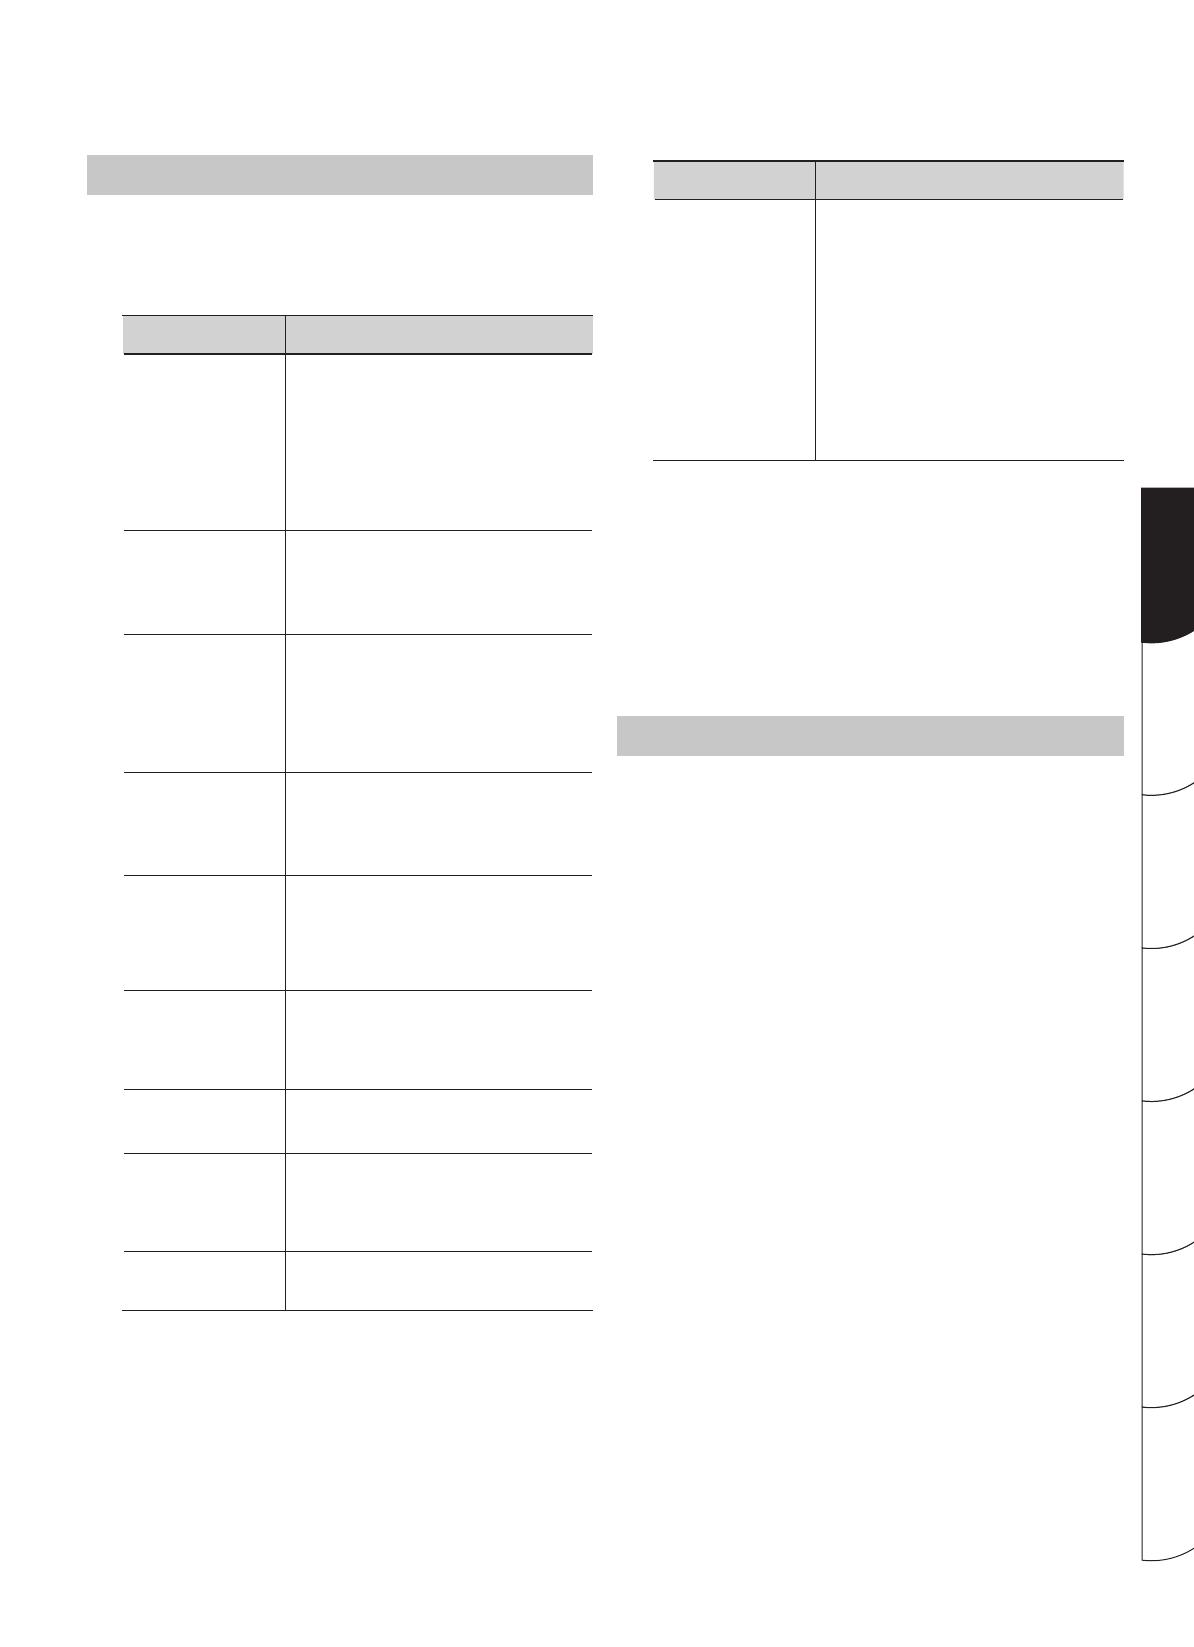
6. Type switch
Use this to select the COSM amp type.
If the Tuner function is on, use this to select the string that you’re
tuning.
Type Description
ACOUSTIC SIM
This is an original amp type that includes an
acoustic simulator.
It transforms the sounds from your electric guitar
into a clear, re ned acoustic-guitar sound.
Using this type together with a single-coil pickup
in the front position produces optimal sound
quality.
If you’re using humbucker pickups, turn down the
equalizer’s BASS and MIDDLE controls slightly.
BLACK PANEL
This is modeled on the classic Fender Twin Reverb
ampli er.
It’s used in a wide range of musical styles, from
country to blues, jazz, and rock.
It features rich lows and a bright high end.
DLX COMBO
(CUBE-80XL only)
This is modeled on the Fender Deluxe Reverb
ampli er.
This amp nds use in a full range of genres,
including surf music, blues, country, jazz, soul,
and hard rock.
It features clear, clean tones and sparkling
overdrive at high volumes.
BRIT COMBO
This is modeled on the Vox AC-30TB.
This is the rock ampli er that created the
Liverpool sound of the 1960s.
It can produce a broad range of sounds, from
clean to overdrive.
TWEED
This is modeled on the vintage Fender Tweed
Bassman 4 x 10” Combo.
It produces a clear mid to upper range with a
fat low end, and its unique crunch tones with
persistent distortion have earned it aloyal
following among blues and rock guitarists.
CLASSIC STACK
This is modeled on the features of aMarshall JMP
1987.
Used extensively in hard rock in the 1970s, this
is truly the perfect amp for the “top rock” guitar
sound.
METAL STACK
This is modeled on the Peavey EVH 5150.
This is a high-gain amp, so you can get heavy
distortion and sustain even at low volumes.
R-FIER
This super high-gain amp is modeled on the
Mesa/Boogie Recti er.
This is a super high-gain amp. It’s capable of
producing slash metal, grunge, and a wide range
of other lead sounds.
EXTREME
This original high-gain amp delivers thick lows
and intense distortion while still preserving the
sound’s clear de nition.
Type Description
DYNA AMP
This is an original amp type that lets you obtain
unprecedented tonal changes according to your
picking dynamics.
Soft picking produces a transparent clean amp
sound, whereas hard picking yields adeeply
distorted high-gain amp sound.
Once the sound is distorted, the tone then
changes according to the force used in picking,
greatly expanding your range of expression.
Setting the [GAIN] knob at the optimal position
provides maximum e ectiveness. Start with the
[GAIN] knob centered. Then adjust the [GAIN]
knob so that soft picking yields a clean tone and
hard picking produces heavy distortion.
* The product names mentioned in this document are trademarks
or registered trademarks of their respective owners, and are not
related to Roland Corporation. In this manual, these names are used
because it is the most practical way of describing the sounds that
are simulated using COSM technology.
7. [GAIN] Knob
This adjusts the distortion level for the LEAD channel.
8. [VOLUME] Knob
This adjusts the volume level for the LEAD channel.
SOLO Function
This lets you save the panel settings for sounds you create (such as
amp type, gain, equalizer, and various e ects) and call them up later.
On the CUBE-40XL/CUBE-80XL, this function is called “SOLO.”
The SOLO function is handy in situations like these:
• When you want to switch the amp type and e ect at the same time.
• When you want to switch the equalizer settings and volume level at
the same time.
You can store one setting each for the JC CLEAN channel and for the
LEAD channel.
9. SOLO [ON/OFF] Switch
This saves panel settings and calls up it.
10. [VOLUME] Knob
This adjusts the volume level for the called-up settings.
* For information on how to use the SOLO function, refer to “Using the
SOLO Function”(p. 12)
6
EQUALIZER
11. [BASS] Knob
This adjusts the sound level of the low-frequency range.
12. [MIDDLE] Knob
This adjusts the sound level of the middle-frequency range.
13. [TREBLE] Knob
This adjusts the sound level of the high-frequency range.
* When the LEAD channel Type switch is set to BLACK PANEL, DLX
COMBO (CUBE-80XL only), or TWEED, setting [BASS] knob, [MIDDLE]
knob and [TREBLE] knob all to 0 (zero) stops all sound.
PRESENCE (CUBE-80XL only)
14. [PRESENCE] Knob
This gives the midrange and high end a more lustrous contour. This is
e ective when you want to make the sound more airy and open.
EFX (E ects)
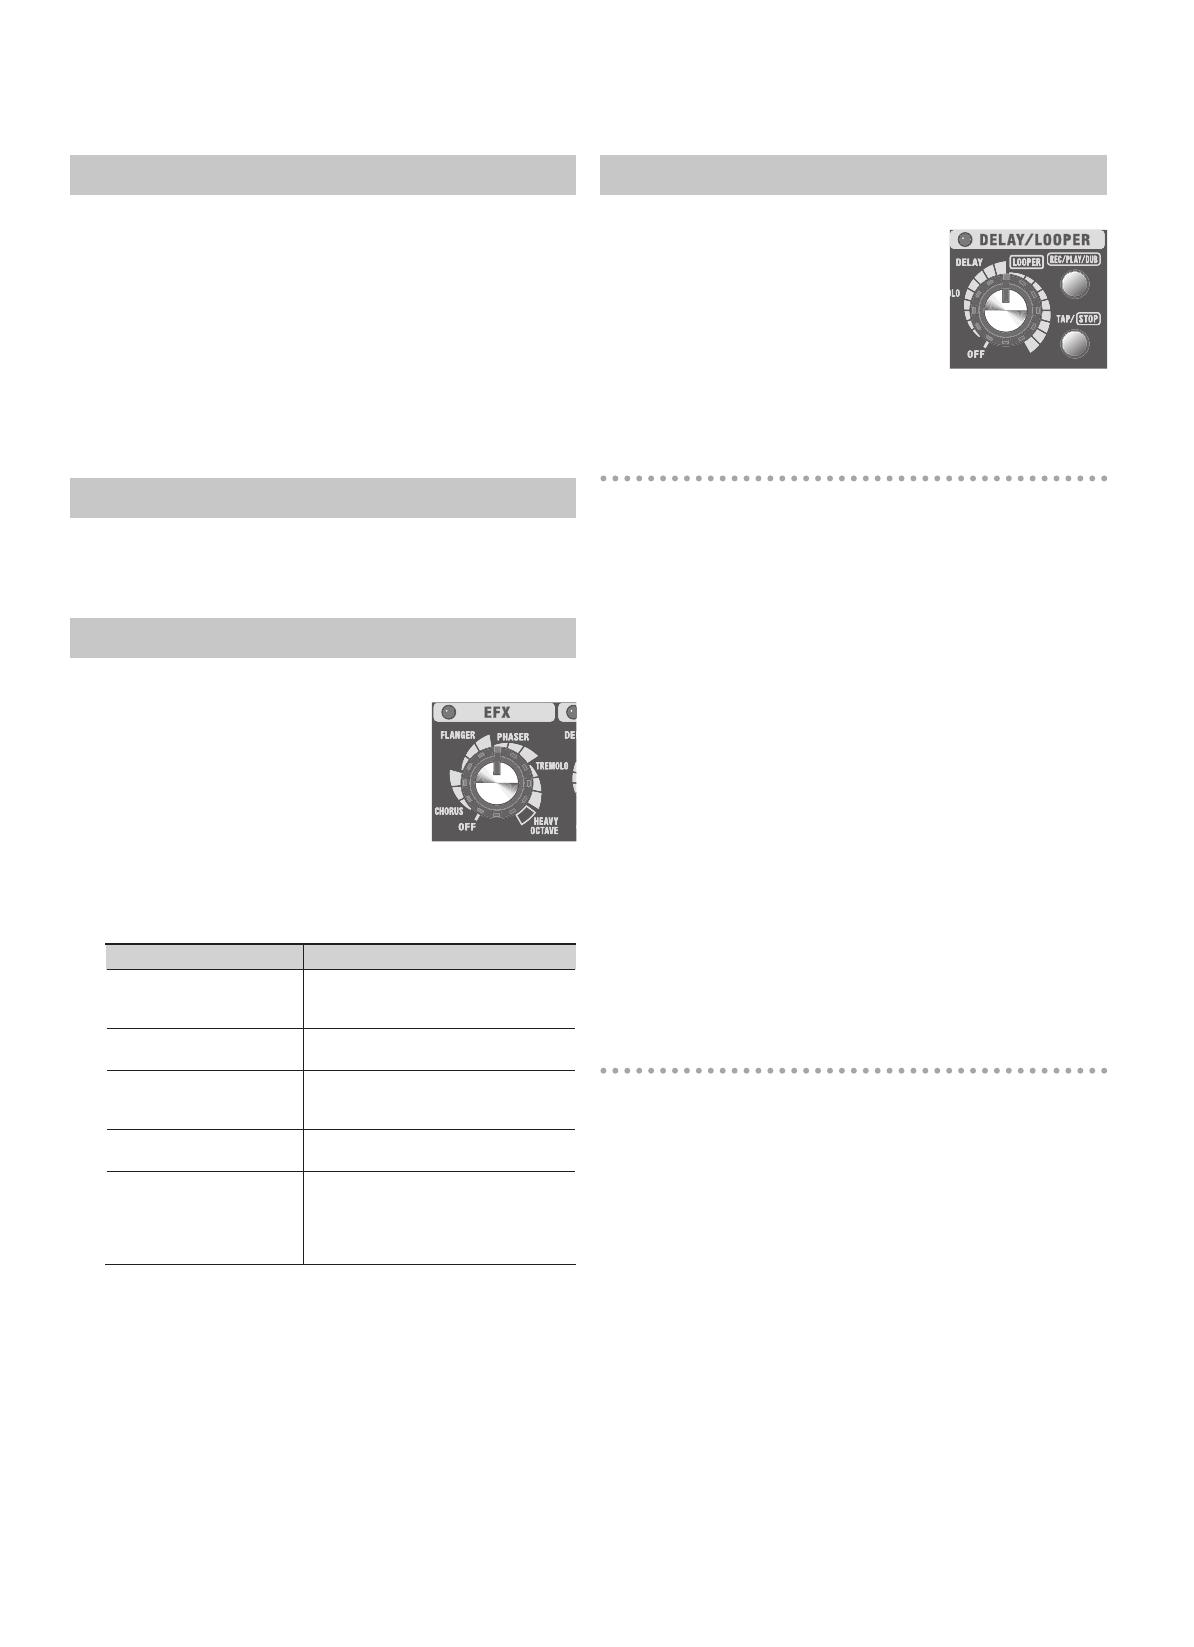
15. [EFX] (Eff ects) Knob
You can adjust the intensity of ve types of
e ects—chorus, anger, phaser, tremolo, and
heavy octave—by adjusting the positioning
of this knob.
The indicator lights up when this is on, and
goes out when it’s o . You can also switch
this on and o using an optional footswitch
pedal.
* The scale indications for CHORUS, FLANGER, PHASER, and TREMOLO
on the panel are just a general guide. Be sure to check the actual
sound as you adjust the eff ect.
Knob Position Description
CHORUS
This adds a slightly detuned sound to the
original sound, giving the sound greater
breadth and fullness.
FLANGER
This creates a anging e ect that creates a
sort of spinning sensation with the sound.
PHASER
This adds a phase-shifted signal to the
original sound, giving the sound aswirling
sensation.
TREMOLO
This e ect produces cyclical changes in the
volume level.
HEAVY OCTAVE
This adds sound lowered by an octave
to the original sound. Since you can play
chords even when using this e ect, you can
use it to fatten the sound of your chordal
playing as well.
DELAY/LOOPER
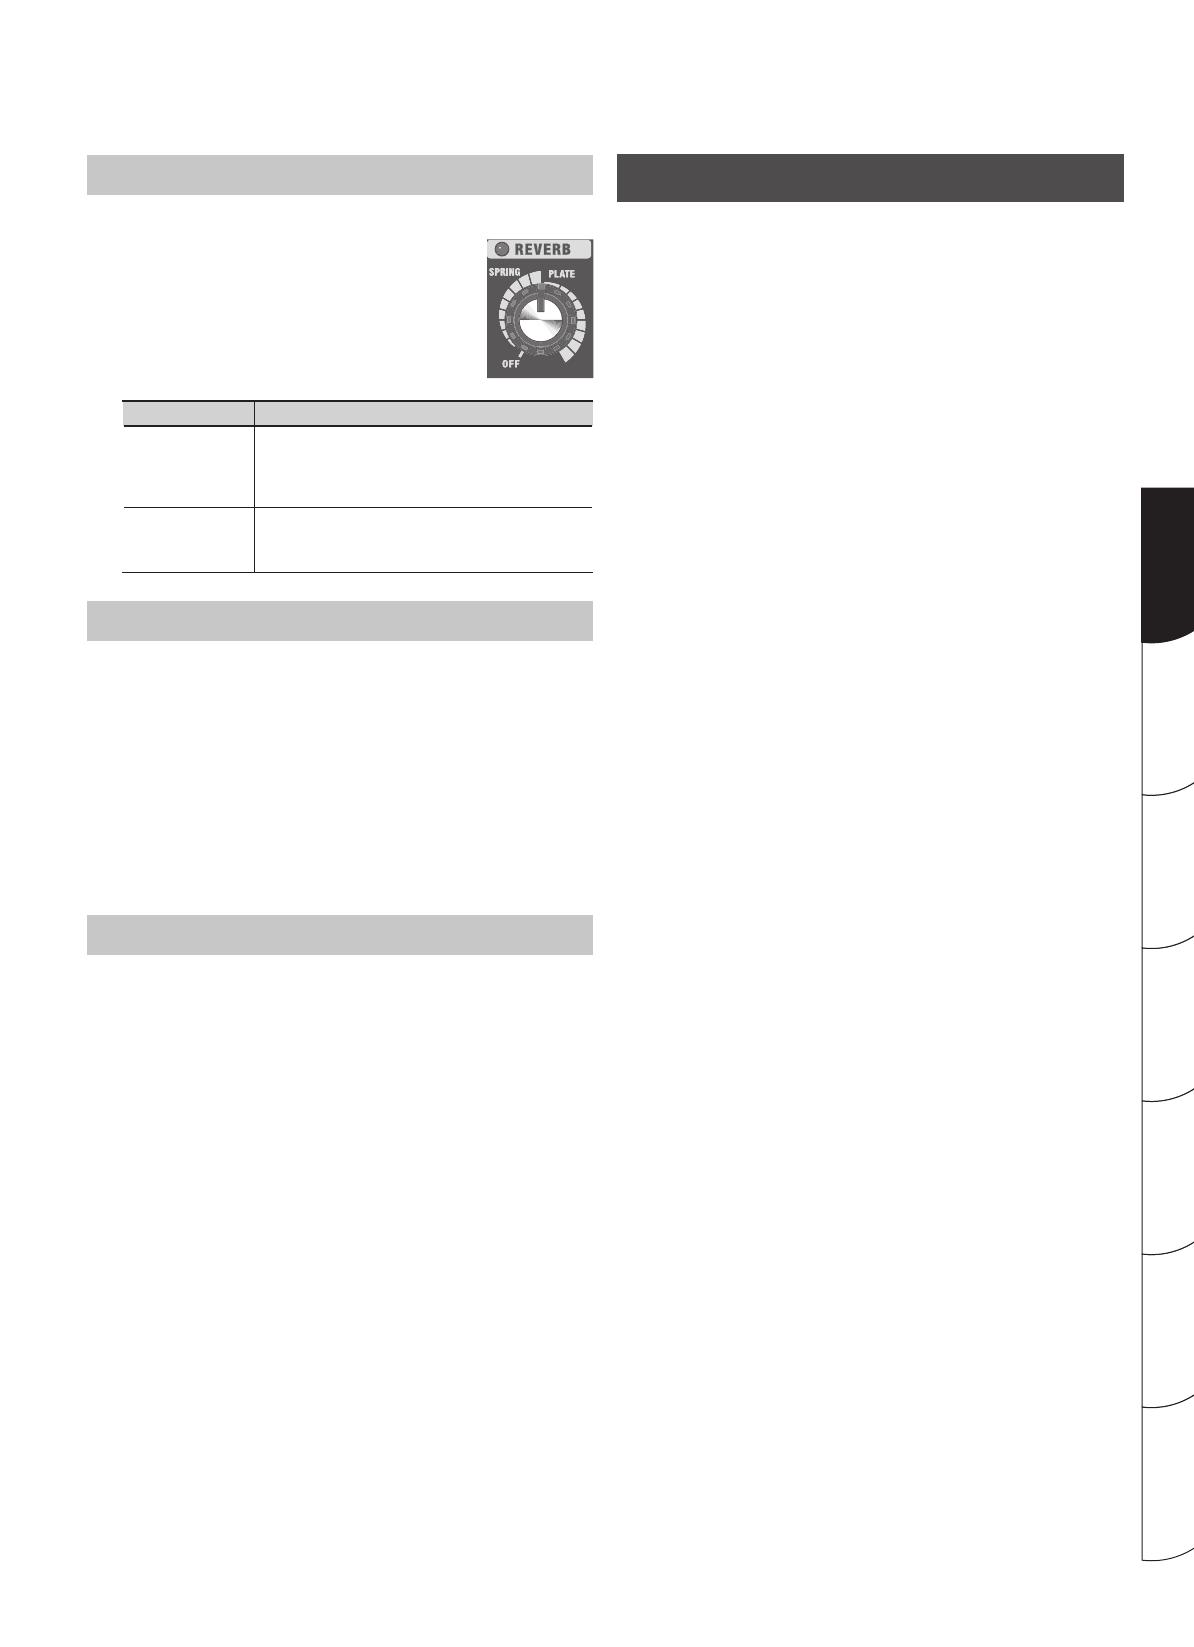
16. [DELAY/LOOPER] Knob
You can switch to DELAY or the LOOPER
function by positioning this knob.
When the knob is at DELAY, this functions as
a delay.
When the knob is positioned at LOOPER, this
functions as a looper.
The indicator lights up when delay or looper is on and goes out when
it’s o .
To use Delay
16. [DELAY/LOOPER] Knob
Set the knob in the DELAY position to turn Delay on. The position of
the knob within this range adjusts the volume of the delay sound.
You can also switch delay on and o using an optional footswitch
pedal.
* The scale indications for DELAY and LOOPER are just a general
guide. Be sure to check the actual sound as you adjust the eff ect.
17. [REC/PLAY/DUB] Switch
This will blink in synchronization with the delay time.
You can also use this to specify a short delay time in the range of
90—30 ms.
18. [TAP] Switch
Use this to set the delay time. When you press the switch twice, the
delay time will be set to the time interval at which you pressed the
switch. The maximum length is 2000 ms.
Setting the Delay Time for Short Delay
If you hold down the switch for one second or longer, the delay time
will be set to 30 ms. Each time you then press the [REC/PLAY/DUB]
switch, the delay time will change over four steps (30 ms/50 ms/70
ms/90 ms) to a maximum of 90 ms.
* The short delay cannot be set using the foot switch.
To use the Looper function
16. [DELAY/LOOPER] Knob
Set the knob in the Looper range to turn on the Looper function. The
position of the knob within this range speci es the Looper function’s
playback volume.
17. [REC/PLAY/DUB] Switch
Use this switch to record, play back, and overdub.
18. [STOP] Switch
This switch stops playback or erases the recording.
If the [DELAY/LOOPER] knob is in the LOOPER range, this switch stops
the Looper or erases the recording.
* For details on using the Looper function, refer to ”Using the
LOOPER” (p. 14)
* When the knob is positioned at LOOPER, no delay eff ect is applied.
To use the LOOPER and delay simultaneously, refer to”Using the
LOOPER Function and Delay at the Same Time” (p. 15)
7
Português Italiano DeutschNederlands Español Français
English
[REVERB]
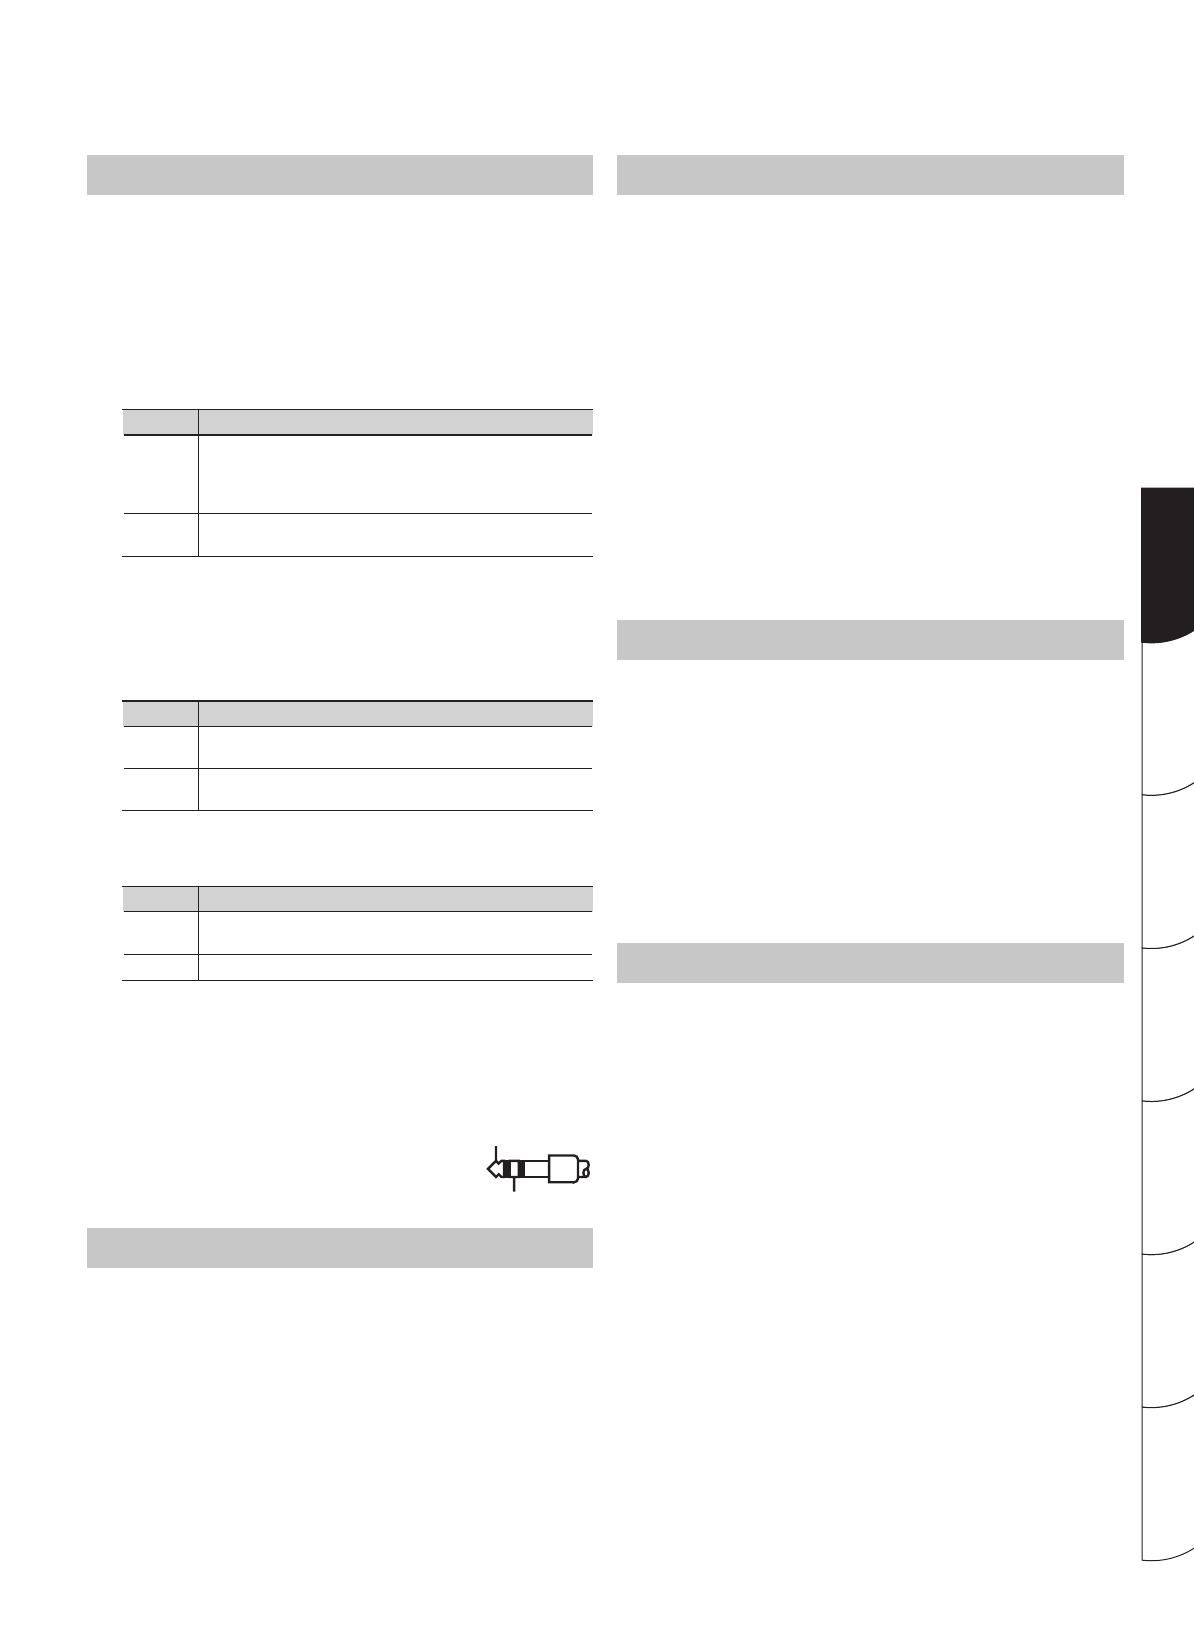
19. [REVERB] Knob
You can switch between use of two types of reverb by
changing the position of the knob. You can adjust the
intensity of the e ect by varying the knob position.
The indicator lights up when reverb is on and goes
out when the e ect is o . You can also switch reverb
on and o using an optional footswitch pedal.
Knob Position Description
SPRING
This is modeled on spring reverb.
It produces the distinctive reverberations of a
spring. Turning the knob clockwise makes the e ect
progressively more intense.
PLATE
This is a plate reverb.
This reverb features high-end sustain. Turning the knob
clockwise makes the e ect progressively more intense.
POWER SQUEEZER
(CUBE-40XL only)
20. [POWER SQUEEZER] Switch
The switch lights in red when the power squeezer function is on and
goes out when the power squeezer is o .
Switching on the Power Squeezer function allows you to reduce the
amp’s output to 2 watts.
Switching this on allows you to produce a sound that preserves the
same tone and balance at an output of 2 watts, for volume levels that
are more suitable for the average home.
* The Power Squeezer function aff ects only sounds input through the
INPUT jack. It has no eff ect on sounds input via the AUX IN jack.
POWER
21. [POWER] Switch
This switches the power on and o .
Switching the Power On and Off
* Turn on power to your various devices in the order speci ed. By
turning on devices in the wrong order, you risk causing malfunction
and/or damage to speakers and other devices.
1. Make sure that all [VOLUME] knobs on the CUBE-40XL/CUBE-
80XL and all the connected devices are set to 0.
2. Turn on all the devices connected to the CUBE-40XL/CUBE-
80XL’s input jacks (INPUT jack and AUX IN jack).
3. Turn on the CUBE-40XL/CUBE-80XL.
* Always make sure to have the volume level turned down before
switching on power. Even with the volume all the way down, you
may still hear some sound when the power is switched on, but this is
normal, and does not indicate a malfunction.
* This unit is equipped with a protection circuit. A brief interval (a
few seconds) after power up is required before the unit will operate
normally.
4. Adjust the volume levels for the devices.
5. Before switching off the power, lower the volume on all the
connected devices and then TURN OFF the devices in the
reverse order to which they were switched on.
* If you need to turn off the power completely, rst turn off the
POWER switch, then unplug the power cord from the power outlet.
Refer to Power Supply (p. 3).

8
Rear Panel
Speaker Cable
Recorder, etc.
CD Player
Digital Audio Player etc
External Speaker
INPUT
SOLOREVERB EFX CH SELECT
Foot switches Mixer, etc.
Headphones
CUBE-80XL
1 2 3 4 6 7
5 8
1
2
3
4
6
7
5
8
DELAY/REC/PLAY/DUB
DELAY/REC/PLAY/DUB
TAP/STOP
TAP/STOP
Recorder, etc.
CD Player
Digital Audio Player etc
SOLOREVERB EFX CH SELECT
Foot switches
Headphones
CUBE-40XL
16 2 3
8
1
6
2
3
8
RING RING RINGTIP TIP TIP
RING RING RINGTIP TIP TIP
B A
FS-6
FS-5U
RING
TIP
Settings for momentary-type foot
switches
* To prevent malfunction and/or damage to speakers or other devices, always turn down the volume, and turn off the power on all devices before
making any connections.
9
Português Italiano DeutschNederlands Español Français
English
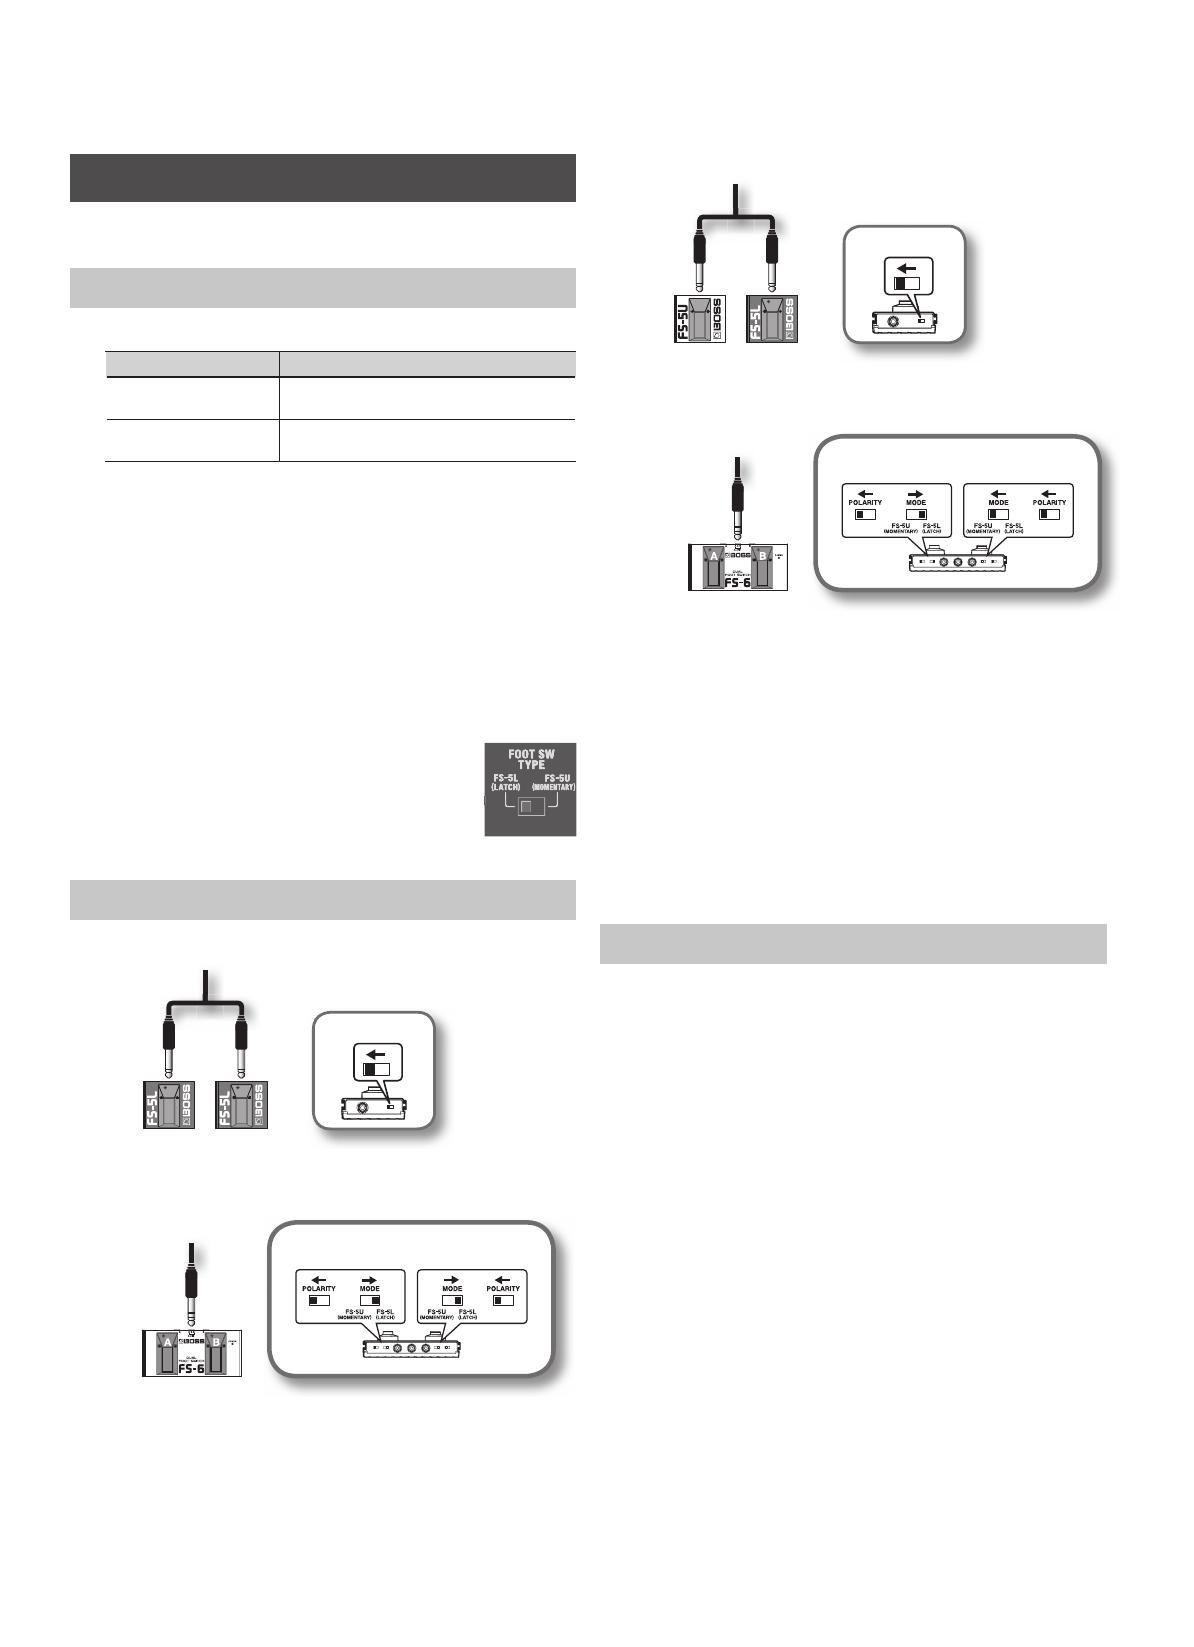
FOOT SW
By connecting a foot switch (BOSS FS-5U or FS-6; sold separately),
you’ll be able to use your foot to switch between channels, turn
EFX, Reverb, and Delay on/o , and control the Looper function. The
connection diagram at left is a connection example that shows how
to use a momentary-type foot switch (FS-5U, FS-6). For details on
connections and settings when using a latch-type foot switch (BOSS
FS-5L; sold separately), refer to”Using a Latch-type Foot Switch” (p. 10).
1. TIP: DELAY/REC/PLAY/DUB
RING: TAP/STOP
Switch Description
TIP
If the [DELAY/LOOPER] knob is in the DELAY area, the Delay will
be switched on/o .
If the knob is in the LOOPER area, the foot switch will have the
same function as the panel’s [REC/PLAY/DUB] switch.
RING
The foot switch will have the same function as the [TAP/STOP]
switch.
* You must use a momentary-type foot switch with the RING (TAP/
STOP) of this jack. It will not work correctly with a latch-type foot
switch (p. 10).
2. TIP: EFX
RING: REVERB
Switch Description
TIP
The foot switch will turn on/o the e ect selected by the [EFX]
knob.
RING
The foot switch will turn on/o the reverb set by the [REVERB]
knob.
3. TIP: CH SELECT
RING: SOLO
Switch Description
TIP
The foot switch will switch between the JC CLEAN channel and
the LEAD channel.
RING The foot switch will turn SOLO on/o .
4. [FOOT SW TYPE] Switch (CUBE-80XL only)
This selects the type of foot switch that is connected.
When shipped from the factory, the CUBE-40XL’s FOOT SW TYPE is set
to the momentary type. For details on how to change this setting, refer
to”Using a Latch-type Foot Switch” (p. 10).
* The CUBE’s FOOT SW (foot switch) jacks are
TRS type jacks, and support plugs of the type
shown in the illustration. Use TRS cables to
connect your foot switch.
EXT SPEAKER (CUBE-80XL only)
5. EXT SPEAKER Jack
This is for connecting an external speaker.
When an external speaker is connected, sound is played both from the
external speaker and from the unit’s built-in speaker.
* When connecting to an external speaker, make sure the speaker
conforms to the following speci cations.
Impedance: 8 ohms or less
Allowable power input: 80 watts or greater
* Only use speaker cable to connect the speaker. Do not use any
shielded cable designed for use with guitars.
RECORDING OUT/PHONES
6. RECORDING OUT/PHONES Jack
This functions either as an output jack for recording or as aphones
jack.
This features COSM speaker modeling, enabling production of
impressive guitar sound.
Adjust the volume using the [VOLUME] knobs for the JC CLEAN and
LEAD channels and the SOLO function.
* When a plug is connected to this jack, no sound is played from
either the unit or any connected external speaker. This is handy at
night or in other situations when you want to avoid high-volume
sound from the speakers.
When using as an output jack for recording
Use a monaural 1/4” phone plug to connect a recorder or other
recording device.
When using as a headphones jack
Connect headphones.
LINE OUT (CUBE-80XL only)
7. LINE OUT Jack
This is for connecting a PA system, recorder, or other external
equipment.
This features COSM speaker modeling, enabling production of
impressive guitar-amp sound.
You can use this in conjunction with an external PA system, or to
record your performance via direct line while monitoring the sound
from the CUBE’s speaker.
Adjust the output level using the [VOLUME] knobs for the JC CLEAN
and LEAD channels and the SOLO function.
* The sound from AUX IN is not output from LINE OUT.
AUX IN
8. AUX IN Jack
This lets you connect a CD player, digital audio player, electronic
instrument, or other such device and play it at the same time as the
guitar.
This accepts a stereo miniature phone plug. However, the speaker
and RECORDING OUT/PHONES output is monaural. Use a cable (sold
separately) that’s appropriate for the device you’re connecting.
* Determine the volume level by adjusting the volume control of the
connected device.
* When connection cables with resistors are used, the volume level
of equipment connected to the AUX IN jack may be low. If this
happens, use connection cables that do not contain resistors.
TIP
RING
10
Using a Latch-type Foot Switch
The CUBE-40XL/CUBE-80XL also support latch-type foot switches. If
you’re using a latch-type foot switch, make the following settings.
FOOT SW TYPE setting
There are two types of foot switches.
Type Operation
Momentary type
(BOSS FS-5U, etc)
This type remains on (or o ) while depressed
and switches o (or on) when released.
Latch type
(BOSS FS-5L, etc.)
This type switches on or o each time it is
depressed.
* The BOSS FS-6 can operate as either a momentary or latch-type
pedal switch.
CUBE-40XL
At the factory settings, the momentary type is selected. You can
change this setting as follows.
• To specify the latch type
Turn on the power while holding down the [TAP/STOP] switch.
• To specify the momentary type
Turn on the power while holding down the [REC/PLAY/DUB] switch.
CUBE-80XL
Set the [FOOT SW TYPE] switch on the rear panel
to FS-5L (LATCH).
* The setting you specify is remembered even
while the power is turned off .
Foot Switch Settings
(RING)
(TIP)
Polarity switch
BOSS FS-5L
REVERB
SOLO
EFX
CH SELECT
EFX
CH SELECT
REVERB
SOLO
B A
Set the switches as shown as bellow.
BOSS FS-6
(RING)
(TIP)
Polarity switch
BOSS FS-5L+FS-5U
DELAY/
REC/PLAY/DUB
TAP/STOP
DELAY/
REC/PLAY/DUB
TAP/STOP
B A
Set the switches as shown as bellow.
BOSS FS-6
* Even if FOOT SW TYPE is set to FS-5L (LATCH), you must always use
a momentary-type foot switch for TAP/STOP. This function will not
work correctly with a latch-type foot switch.
Important Notes When Using a Latch-type Footswitch Pedal
The on/o state of the footswitch pedal takes precedence over the
control panel for switching EFX, delay, or reverb on and o .
However, the on or o states of EFX, delay, or reverb stored in memory
using the SOLO function take precedence when saved SOLO-function
panel settings are called up. Such cases may result in con icting
indicator displays on the control panel and the footswitch pedal, but
this is not a malfunction.
Convenient Applications
You can use either of the following settings to control operation when
the panel settings for EFX, delay, and reverb are called up using the
SOLO function.
Foot switch priority mode
Make the on/o state of the footswitch pedal always take priority.
To make the setting:
Hold down the [SELECT] switch and switch on the power.
Memory priority mode (factory setting)
Make the on/o state saved using the SOLO function take priority.
To make the setting:
Hold down the [TUNER] switch and switch on the power.
* The changed setting remains in memory after the power is switched
off .

11
Português Italiano DeutschNederlands Español Français
English
Using the Tuner Function
CUBE-40XL and CUBE-80XL are equipped with a tuner function. In
addition to manual tuning, you can also use it as a chromatic tuner.
* Use manual tuning when the strings are substantially out of tune
(such as after changing strings).
CUBE-40XL
CUBE-80XL
Manual Tuning
1. Press the [TUNER] switch.
The unit enters the Tuner mode and the TUNER switch lights up.
Once in the Tuner mode, no sound is played from the speaker, the REC
OUT/PHONES jack, or the LINE OUT jack.
* The sound input to the AUX IN jack is output.
2. Use the TYPE switch to select the string that you want to
tune.
Knob Position Description
7B
Open seventh string of a seven-string guitar with an
additional low string (B)
6E
Open sixth string (E ) (CUBE-80XL only)
6E Open sixth string (E)
5A Open fth string (A)
4D Open fourth string (D)
3G Open third string (G)
2B Open second string (B)
1E Open rst string (E)
A
Open fth string (semitone down) (A )
A
Open fth string (whole tone down) (G)
* The reference pitch is A=440 Hz. This cannot be changed.
3. Play a single note on the open string that you want to tune.
Tune the string until the green indicator lights.
Flat
Lights red Lights green Lights red
SharpPitch is correct
* The red indicator blinks if the pitch is substantially out of tune.
4. When you have nished tuning, press the [TUNER] switch
once again.
Chromatic Tuning
If you hold down the [TUNER] switch for one second or longer, the
[TUNER] switch blinks and the unit becomes usable as a“chromatic
tuner,” which automatically determines the name ofthe note closest to
the one played.
As with manual tuning, chromatic tuning allows you to play asingle
note on the string that you want to tune. Tune the string until the
green indicator lights.
12
You can save and call up the panel settings (those enclosed by the line
in the gure) for sounds you create. On this unit, this function is called
“SOLO.” This is a convenient way to switch between a backing sound
and a solo sound.
You can save one setting each for the JC CLEAN channel and for the
LEAD channel. You can switch between a total of four sounds.
With the factory settings, the sample setting “Space Clean” is saved for
the JC CLEAN channel, and the “Extreme” setting (p. 16) is saved for the
LEAD channel.
CUBE-40XL
JC CLEAN
LEAD
CUBE-80XL
JC-CLEAN
LEAD
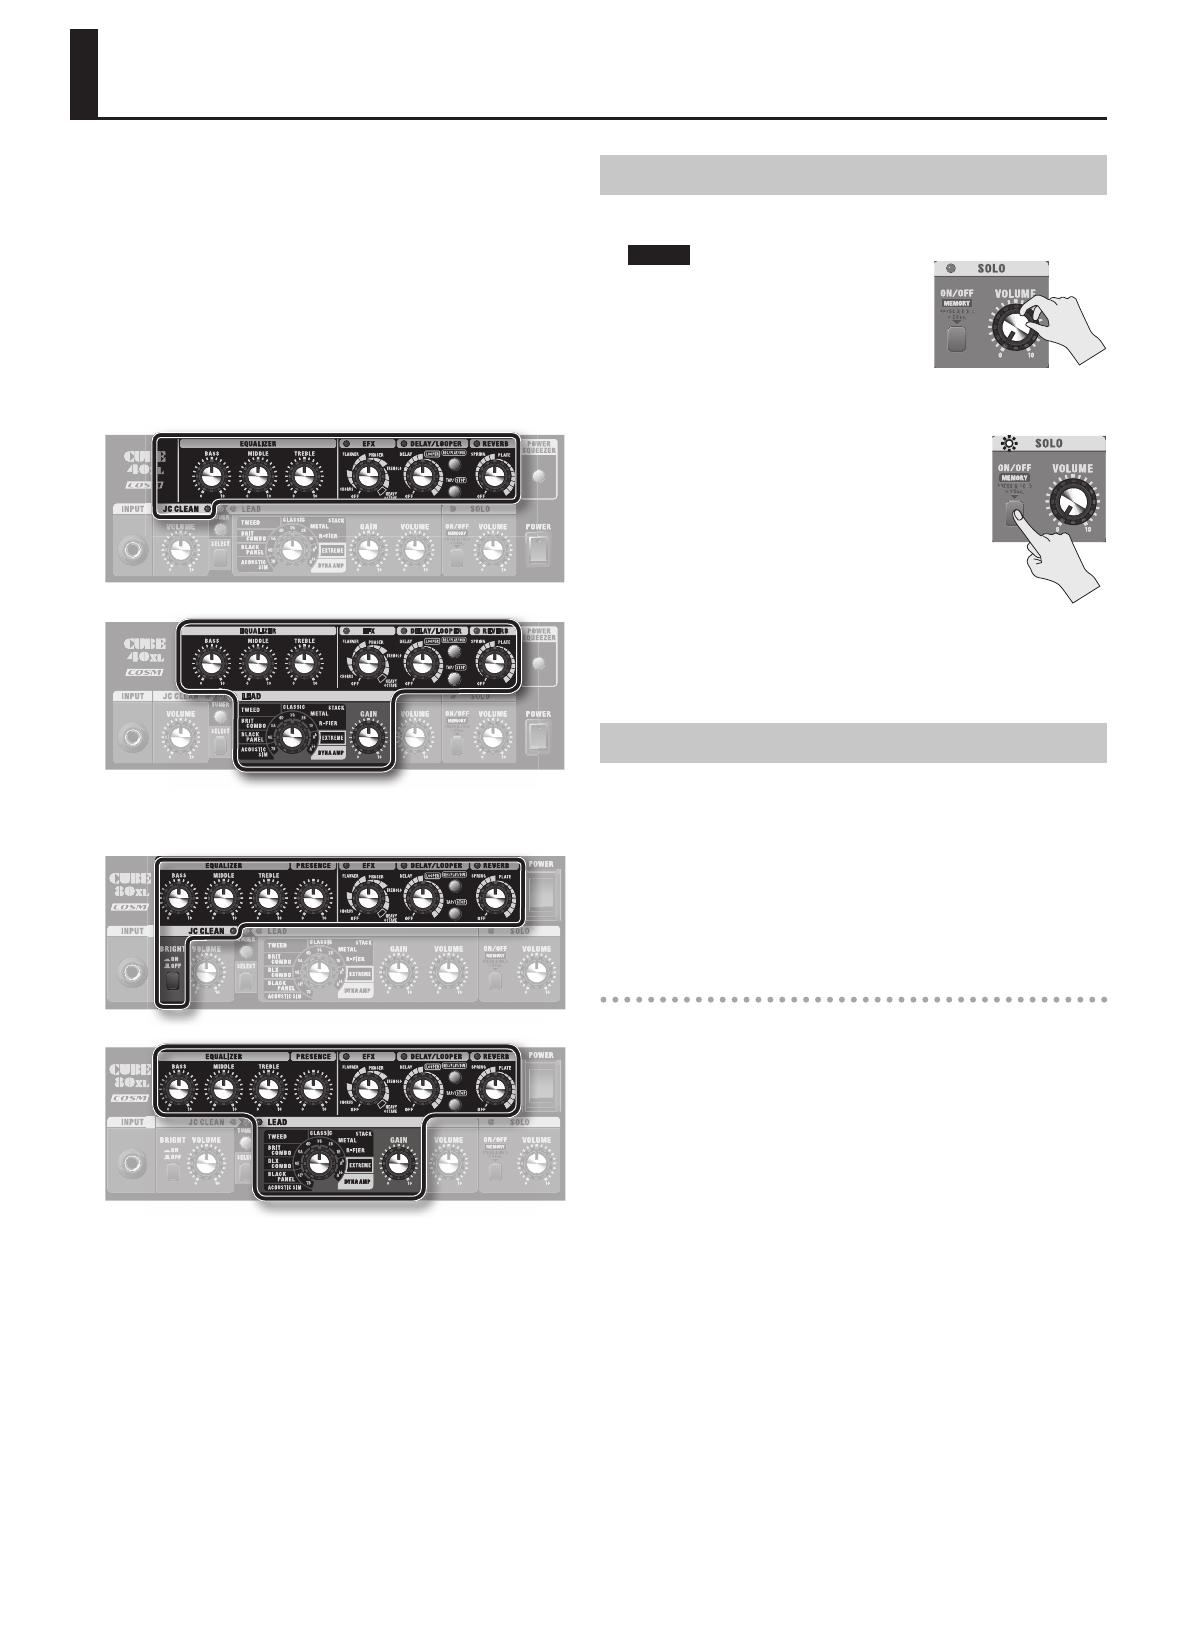
Saving the Panel Settings
1. Set the SOLO [VOLUME] knob to 0.
NOTE
If the SOLO volume is set high, the
sound may be unexpectedly loud
when the panel settings are saved.
Before saving, lower the volume to 0.
2. Create a sound.
3. Press and hold the SOLO [ON/OFF switch] on the panel for
several seconds.
The indicator will blink. When the panel settings
have been saved, the indicator will change from
blinking to lit.
* Never switch off the power while the indicator
is blinking.
4. Use the SOLO [VOLUME] knob to adjust
the volume.
* Saved panel settings remain in memory even after the power is
turned off .
Recalling the Saved Sound
1. With SOLO off , press the SOLO [ON/OFF] switch.
The SOLO indicator will light, and the saved panel settings will be
recalled. The sound you created and saved for JC CLEAN will be
recalled if the JC CLEAN channel is selected, and the sound you created
and saved for LEAD will be recalled if the LEAD channel is selected.
* If panel settings have not been saved, or if you’re using the CUBE for
the rst time, the factory settings will be recalled.
Editing the saved settings
1. Press the SOLO [ON/OFF] switch to call up the saved settings.
2. Turn the panel knob for the item you want to change, and
modify the setting.
The SOLO indicator goes out brie y when the position of the knob
coincides with the position stored in memory.
3. Hold down the SOLO [ON/OFF] switch for several seconds.
The indicator will blink. When the panel settings have been saved, the
indicator will change from blinking to lit.
* Never switch off the power while the indicator is blinking.
* Once the new settings have been saved, the previous settings in
eff ect before the changes cannot be called up again.
* To quit without saving the changes, press the SOLO [ON/OFF]switch
or the [SELECT] switch.
Using the SOLO Function

13
Português Italiano DeutschNederlands Español Français
English
Switching the SOLO Function and the LEAD
and JC CLEAN Channels
You can use the [SELECT] switch and the SOLO [ON/OFF] switch to
switch between the following four sounds
• Current JC CLEAN panel settings
• The SOLO sound you created and saved for JC CLEAN
• Current LEAD panel settings
• The SOLO sound you created and saved for LEAD
Channel SOLO OFF SOLO ON
JC CLEAN
Current JC CLEAN panel
settings
The SOLO sound you
created and saved for JC
CLEAN
LEAD
Current LEAD panel
settings
The SOLO sound you
created and saved for
LEAD
Use the [SELECT] switch to switch between the JC CLEAN channel and
LEAD channel.
Use the SOLO [ON/OFF] switch to switch between the current panel
settings and the saved settings.
Panel settings for JC CLEAN channel
SOLO settings saved for the JC CLEAN channel Lit
Unlit
Panel settings for LEAD channel
SOLO settings saved for the LEAD channel Lit
Unlit
* Note the following if you’ve set FOOT SW TYPE (p. 10) to FS-5L (LATCH)
• If a foot switch is connected to the SELECT/SOLO jack, the panel’s
[SELECT] switch and SOLO [ON/OFF] switch will be inoperable.
• If SOLO is on, and a foot switch is connected to the EFX/REVERB or
DELAY/REC/PLAY/DUB/TAP/STOP jack, the foot switch’s indicator
may not match the on/o status of the CUBE’s EFX, REVERB, or
DELAY. If you want the on/o status of the CUBE’s EFX, REVERB, or
DELAY to consistently conform to the foot switch’s indicator, change
the setting for the CUBE-40XL/CUBE-80XL to “Foot Switch Priority
Mode.” For details, see “Using a Latch-type Foot Switch” (p. 10).
Returning to the Factory-default Settings
Hold down the [TAP/STOP] switch and the SOLO [ON/OFF]
switch at the same time and switch on the power. The SOLO
indicator blinks and the settings saved with the SOLO function
are returned to their factory defaults.
14
Using the LOOPER
This function lets you record a phrase you perform, and then play it
back repeatedly. You can also overdub additional phrases onto the
recording.
On the CUBE-40XL and CUBE-80XL, this is called the Looper function.
You can also operate the LOOPER function using optional foot
switches.
* The recorded phrase is deleted when the unit is turned o .
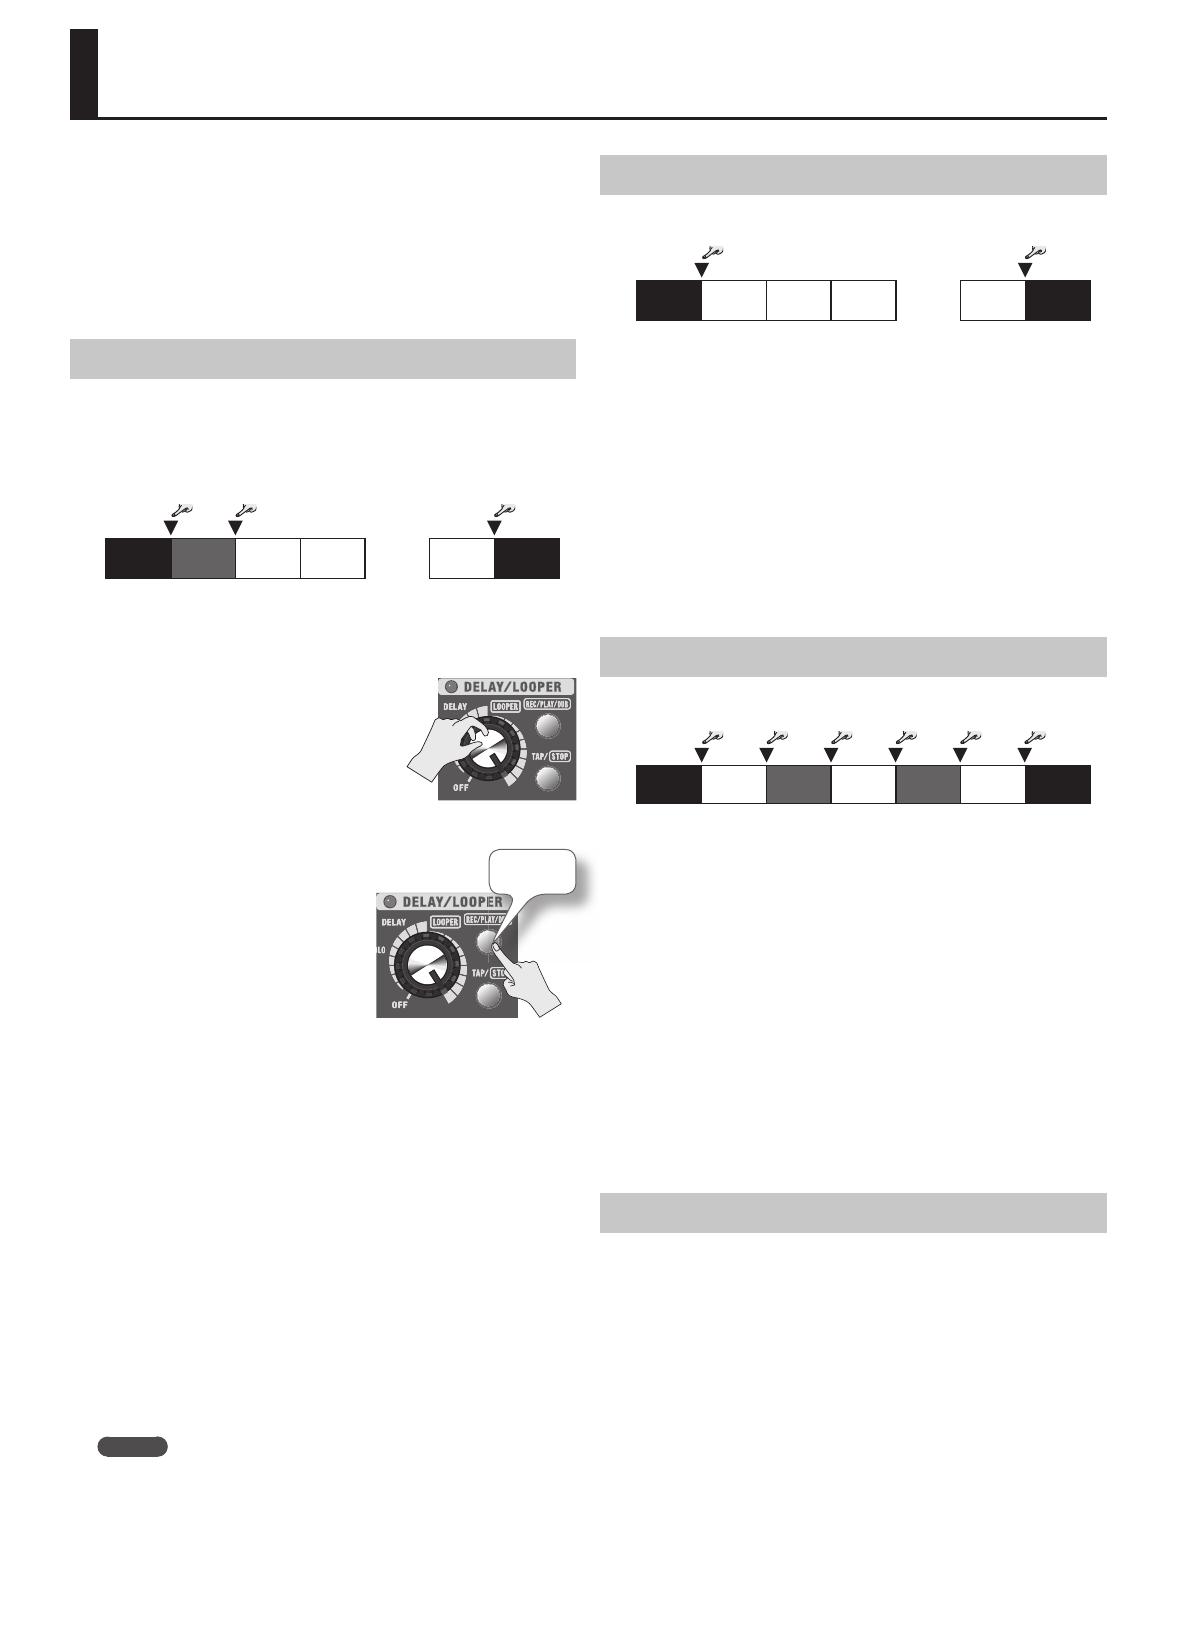
Recording a Phrase
Press the [REC/PLAY/DUB] switch to recording a phrase.
The basic operation will change as follows according to the state of the
phrase.
Pressing the [REC/PLAY/DUB] switch Pressing the
[TAP/STOP] switch
phrase operation
Stop Record Play Play Play Stop
• • •
1 2 3 4
1. Set the [DELAY/LOOPER] knob at LOOPER.
Set the knob at the maximum setting. With
the knob at the maximum, the phrase will be
played back at the same volume as when it
was recorded.
2. Press the [REC/PLAY/DUB] button to start recording.
When you press the [REC/PLAY/
DUB] switch it will blink red, and
you’ll enter recording-standby
mode. When you start playing, the
indicator will change from blinking
to steadily lit, and recording will
begin.
* If instead you depress the REC/
PLAY/DUB footswitch, the [REC/
PLAY/DUB] switch lights in red, and
recording starts immediately. For
details on connecting footswitches,
refer to “FOOT SW” (p. 9).
The memory of the CUBE-40XL and CUBE-80XL can record a phrase
approximately 80 seconds long. When you reach the maximum
recording time, recording will stop automatically and playback will
start.
3. Press the [REC/PLAY/DUB] switch to stop recording.
At the same time that you press the [REC/PLAY/DUB] switch, the [REC/
PLAY/DUB] switch lights in green and the recorded phrase will switch
to playback.
The phrase will continue playing repeatedly until you stop it.
4. To stop playback or overdubbing, press the [TAP/STOP]
button.
The phrase will stop playing.
If you want to play again, press the [REC/PLAY/DUB] switch.
MEMO
If a phrase has already been recorded, the PLAY indicator will blink
green.
Playing back the phrase
Pressing the [REC/PLAY/DUB] switch
phrase operation
Stop Play Play Play Play Stop
• • •
1 32
Pressing the
[TAP/STOP switch
1. With the [REC/PLAY/DUB] switch blinking green, press the
[REC/PLAY/DUB] switch.
* [REC/PLAY/DUB] will be unlit if no phrase has been recorded.
The [REC/PLAY/DUB] switch will light in green, and the phrase will play
repeatedly from the beginning.
2. Use the [DELAY/LOOPER] knob to adjust the volume of the
phrase.
3. Press the [TAP/STOP] switch to stop playback.
The [REC/PLAY/DUB] switch will blink green.
Overdubbing the phrase
Pressing the [REC/PLAY/DUB] switch
Pressing the
[TAP/STOP] switch
phrase operation
Stop Play Overdub Play Overdub Play Stop
1 2 23 3 4
1. With the [REC/PLAY/DUB] switch blinking green, press the
[REC/PLAY/DUB] switch.
The [REC/PLAY/DUB] switch will light in green, and the phrase will play
repeatedly from the beginning.
2. Press the [REC/PLAY/DUB] switch once again.
The [REC/PLAY/DUB] switch will light in orange, and overdubbing will
begin.
3. To stop recording, press the [REC/PLAY/DUB] switch.
The [REC/PLAY/DUB] switch will light in green, and the phrase will play
repeatedly from the beginning.
4. Press the [TAP/STOP] switch to stop playback.
The [REC/PLAY/DUB] switch will blink green.
Erasing the phrase
1. Hold down the [TAP/STOP] switch for two or more seconds.
The [REC/PLAY/DUB] switch will blink red, and the phrase will be
erased.
* The erased phrase cannot be recovered.
Blink red

15
Português Italiano DeutschNederlands Español Français
English
Using the LOOPER Function and Delay at the
Same Time
By taking advantage of the SOLO function, you can use the Looper
function and the delay at the same time.
Normally, you cannot use the delay when the [DELAY/LOOPER] knob is
in the LOOPER position. However, if panel settings that use the delay
are stored in the SOLO function, and you then turn SOLO on, you’ll be
able to use the delay while using the LOOPER function.
If you turn the SOLO function on while using the LOOPER function, and
then switch between JC CLEAN and LEAD, you’ll be able to record your
performance using the delay settings saved for each channel.
* Switching the delay on or off or changing the delay time is not
possible.
Copyright
* Recording, duplication, distribution, sale, lease, performance,
or broadcast of copyrighted material (musical works, visual
works, broadcasts, live performances, etc.) belonging to a
third party in part or in whole without the permission of the
copyright owner is forbidden by law.
* Do not use this unit for purposes that could infringe on a
copyright held by a third party. We assume no responsibility
whatsoever with regard to any infringements of third-party
copyrights arising through your use of this unit.

16
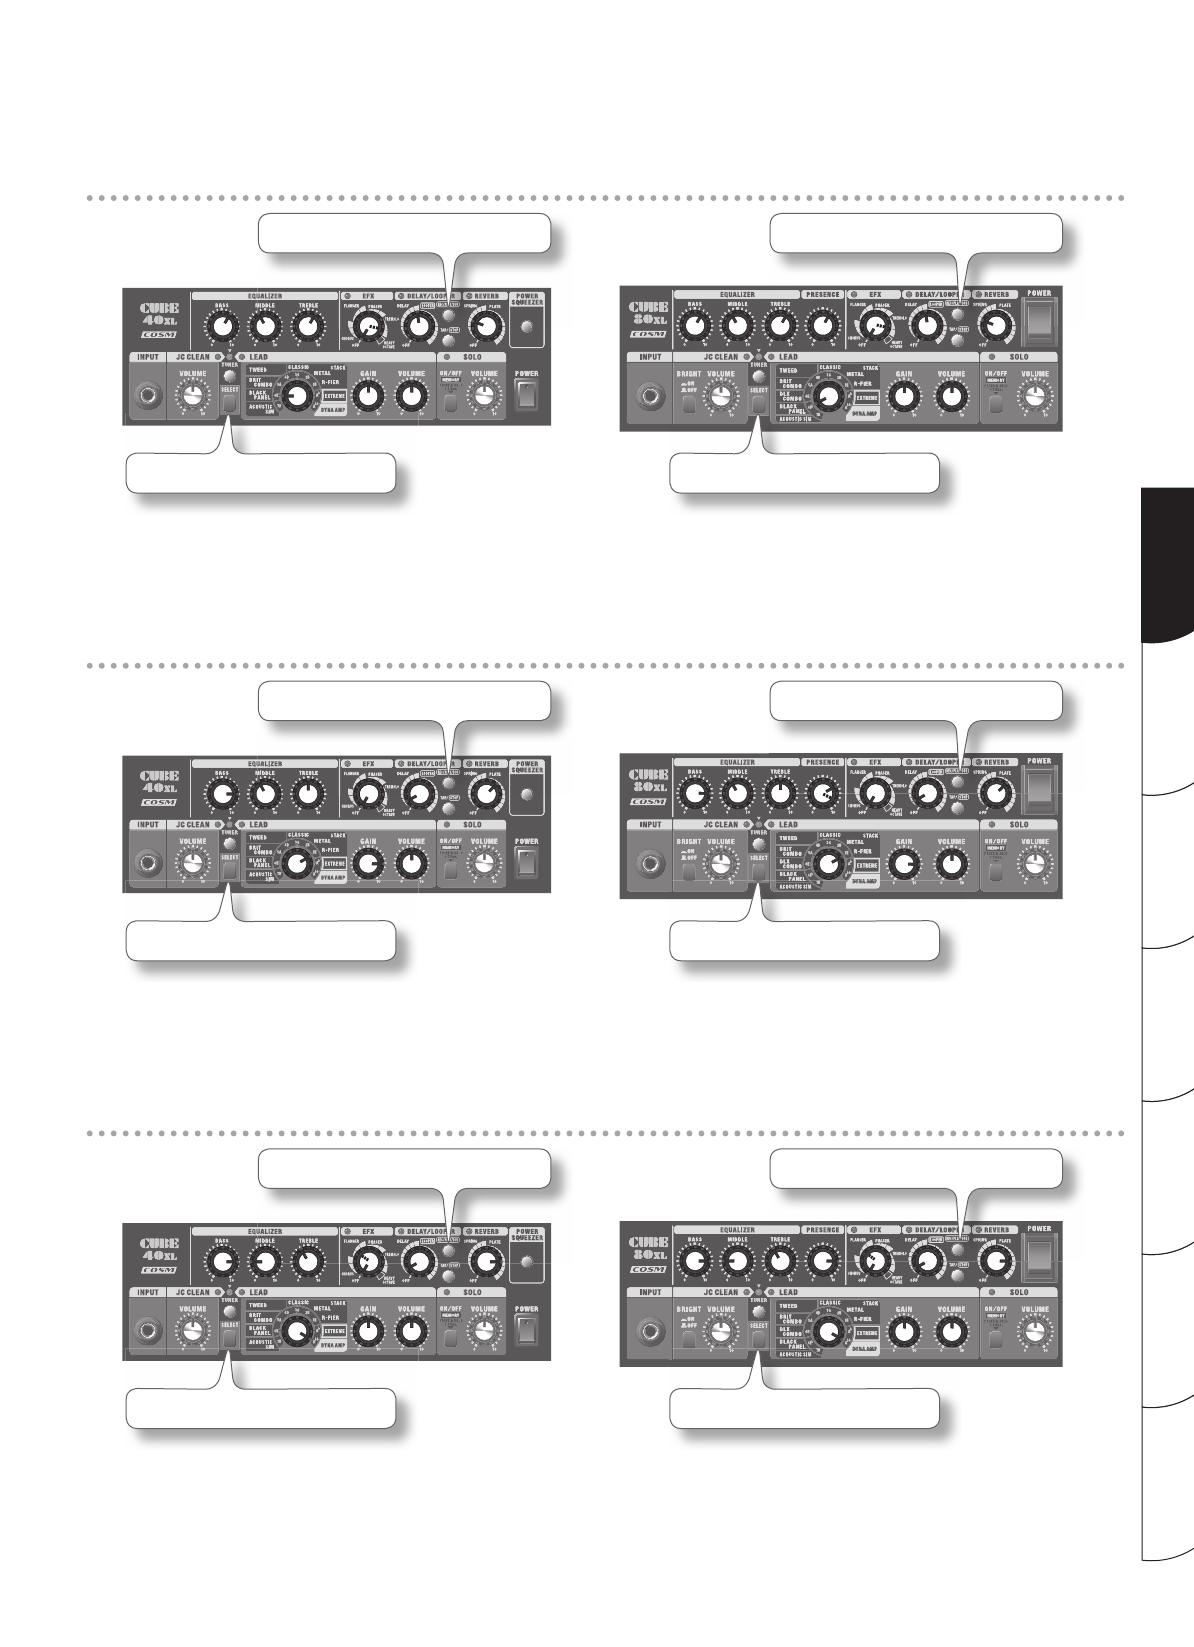
Sample Settings
* For information on how to set the delay time, refer to “DELAY/LOOPER” (p. 6)
Extreme
[SELECT] switch=LEAD
CUBE-40XL CUBE-80XL
[SELECT] switch=LEAD
This is an extreme sound with intense distortion.
This is a high-gain sound that packs a lot of punch in the low end, while delivering a great deal of edge in the upper range.
You can obtain variations in the sound by moving the [MIDDLE] knob.
If you turn on HEAVY OCTAVE, you can achieve an even greater sense of distortion in the low end.
Space Clean
Delay time = approx. 250 ms (reference)
[SELECT] switch=JC CLEAN
CUBE-40XL CUBE-80XL
Delay time = approx. 250 ms (reference)
[BRIGHT] switch=OFF
[BRIGHT] switch=OFF
[SELECT] switch=JC CLEAN
This is a transparent sound that uses spatial e ects.
Use the JC CLEAN amp, which is modeled on the Roland JC-120, and add chorus, long delay, and reverb.
Using this setting with a guitar that has single-coil pickups makes for arpeggios and chord strumming with beautiful resonance. If you’re using a guitar
with humbucker pickups on CUBE-80XL, turn the [BRIGHT] switch to ON to achieve a bright, open sound.
Setting the delay time to a value that makes the delay sound heard slightly ahead of the tempo of the phrase played produces a thicker sound.
Surf Line
[SELECT] switch=LEAD
CUBE-40XL CUBE-80XL
[SELECT] switch=LEAD
This sound is perfect for the surf music popular in the 1960s.
Using this setting with a guitar that has single-coil pickups makes for an edgy sound.
Applying deep spring reverb and using muting picking and chromatic runs (muted picking with glissandos) produces the classic surf sound.
17
Português Italiano DeutschNederlands Español Français
English
Rockabilly Slap
Delay time = approx. 90 ms (reference)
[SELECT] switch=LEAD
CUBE-40XL CUBE-80XL
Delay time = approx. 90 ms (reference)
[SELECT] switch=LEAD
This is the slapback-echo sound used in rockabilly and country.
The BLACK PANEL amp produces a clean sound that is bright and sweet, with a powerful midrange and high end supported by a thick bass.
By making the low and high ends more prominent while keeping them balanced, and also suppressing the midrange if the situation calls for it, you can
bring out the dazzling resonance of the guitar even more beautifully.
The sound of a guitar that has single-coil pickups with heavy tremolo and reverb applied is also distinctive.
Loud Metal
Delay time = approx. 600 ms (reference)
[SELECT] switch=LEAD
CUBE-40XL CUBE-80XL
Delay time = approx. 600 ms (reference)
[SELECT] switch=LEAD
This sound produces heavy low-end reverberations when lower strings are played while muted, and airy sustain when chords are played.
Playing with a humbucking rear pickup produces even more extreme distortion. What’s more, you can make the sound even heavier by using drop
tuning or other such settings.
When you want to make the distortion edgier on CUBE-80XL, boost the [PRESENCE] setting. Also, when you’re using this as the lead sound, raising the
midrange and applying a long delay produces a fat sound with sustain.
Dynamic Style
Delay time = approx. 650 ms (reference)
[SELECT] switch=LEAD
CUBE-40XL CUBE-80XL
Delay time = approx. 650 ms (reference)
[SELECT] switch=LEAD
DYNA AMP is an original amp that uses relative picking intensity to create changes in distortion depth.
First, adjust the [GAIN] knob so that a clean tone is obtained with soft picking and heavy distortion is obtained when you pick hard.
Now mixing arpeggios played with a gentle touch along with rmly picked chords and solos results in a guitar sound with huge dynamics.
Now, to create a broader, more open sound on CUBE-80XL, cut the midrange and raise the low end and presence.
Using this in combination with the EFX as well as delay and reverb creates a sound with an even greater feeling of scale.
18
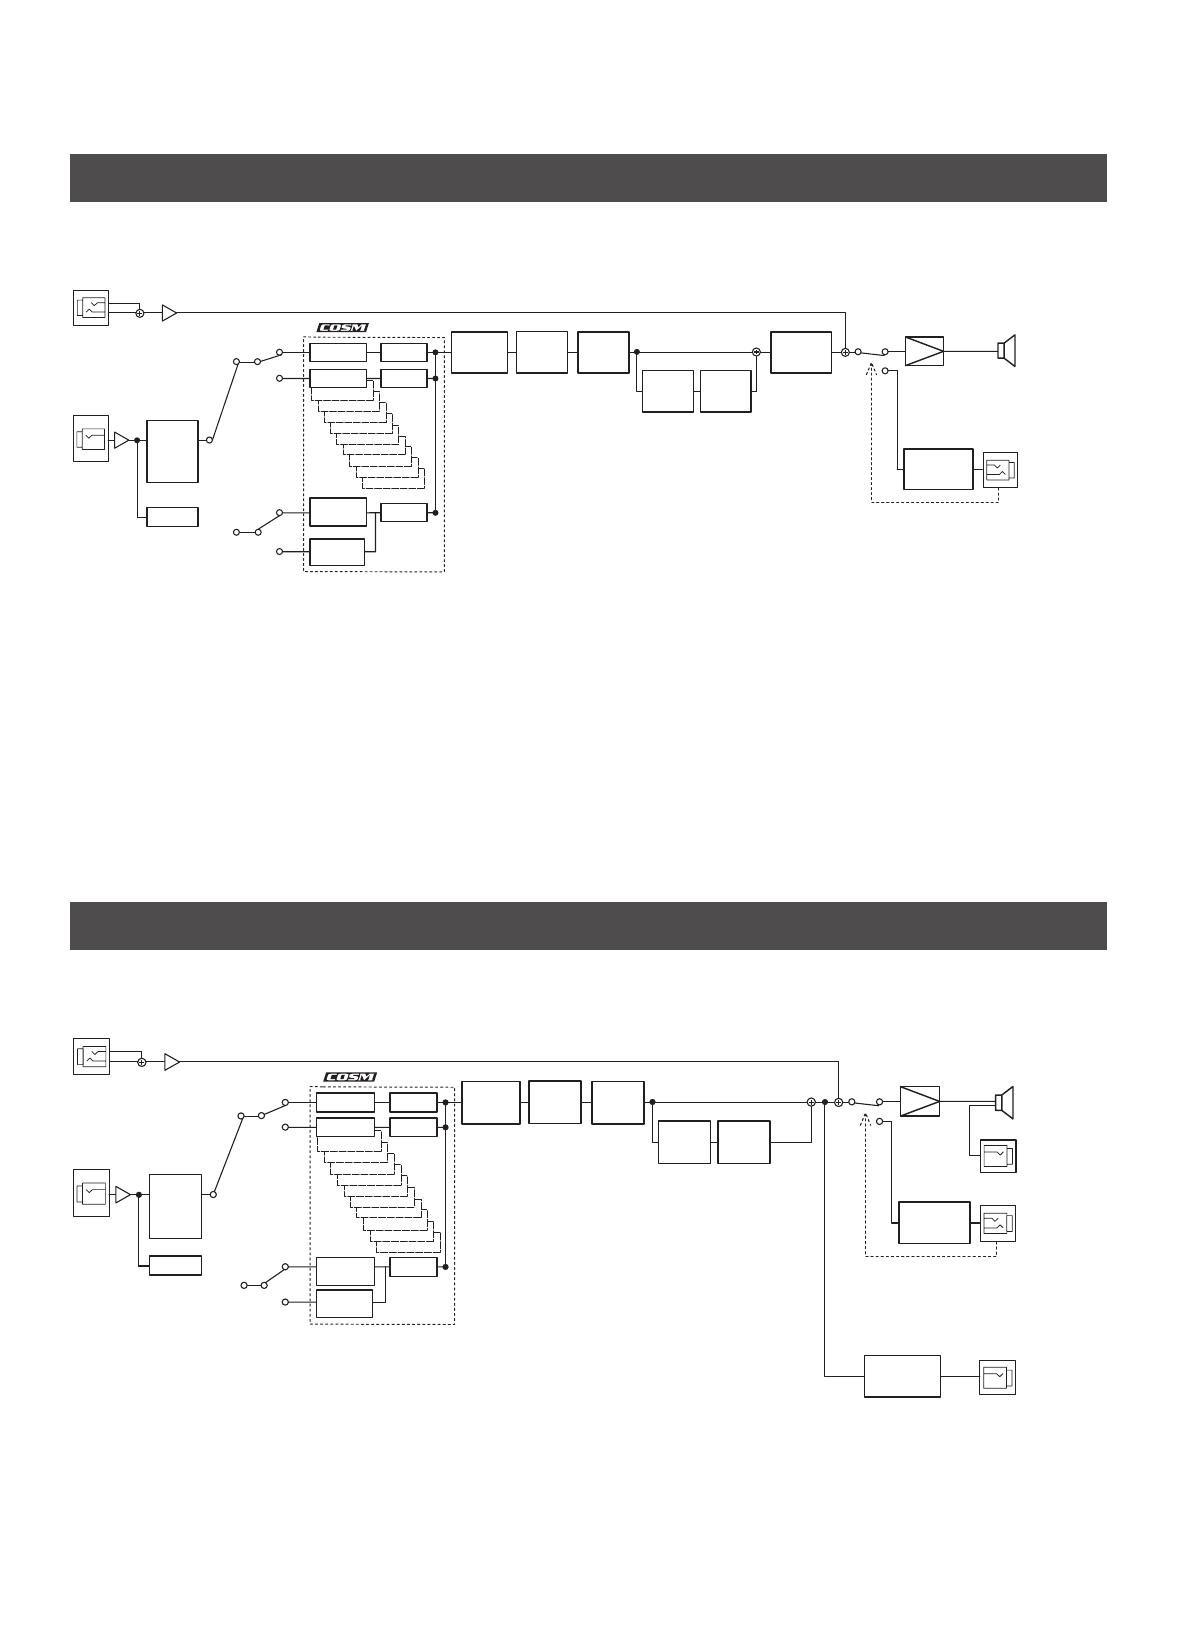
CUBE-40XL Block Diagram
SELECT
SELECT
AMPLIFIER
AUX IN
INPUT
MUTE
POWER
AMP
SPEAKER
RECORDING OUT /
PHONES
CABINET &
SPEAKER
SIMULATOR
JC CLEAN
SOLO
JC CLEAN
VOLUME
VOLUME
VOLUME
SOLO
EFX
CHORUS/
TREMOLO
DELAY
LOOPER
VOLUME
DYNA AMP
EXTREME
R-FIER
BLACK PANEL
BRIT COMBO
TWEED
CLASSIC STACK
METAL
ACOUSTIC SIM
LEAD
EFX
FLANGER/
PHASER/
HEAVY
OCTAVE
REVERB
POWER
SQUEEZER
TUNER
LOOPER
LEAD
SOLO
* No sound is played through
the unit’s speaker while the
REC OUT/PHONES jack is in
use.
CUBE-80XL Block Diagram
AMPLIFIER
AUX IN
INPUT
MUTE
POWER
AMP
SPEAKER
EXT SPEAKER
RECORDING OUT /
PHONES
CABINET &
SPEAKER
SIMULATOR
CABINET &
SPEAKER
SIMULATOR
JC CLEAN
VOLUME
SOLO
EFX
CHORUS/
TREMOLO
DELAY
LOOPER
VOLUME
LINE OUT
SELECT
SELECT
DYNA AMP
EXTREME
R-FIER
BLACK PANEL
DLX COMBO
BRIT COMBO
TWEED
CLASSIC STACK
METAL
VOLUME
ACOUSTIC SIM
LEAD
VOLUME
EFX
FLANGER/
PHASER/
HEAVY
OCTAVE
REVERB
TUNER
LOOPER
LEAD
SOLO
JC CLEAN
SOLO
* No sound is played through
the unit’s speaker while the
REC OUT/PHONES jack is in
use.

19
Português Italiano DeutschNederlands Español Français
English
CUBE-40XL/CUBE-80XL: Guitar Amplier
CUBE-40XL CUBE-80XL
Rated Power
Output
40 W 80 W
Nominal Input
Level (@ 1 kHz)
INPUT: -10 dBu/ 1 MΩ INPUT: -10 dBu/1 MΩ
AUX IN: -10 dBu AUX IN: -10 dBu
Speaker 25 cm (10 inches) 30 cm (12 inches)
Controls
[POWER] switch [POWER] switch
[SELECT] switch [SELECT] switch
[TUNER] switch [TUNER] switch
[POWER SQUEEZER] switch —
<JC CLEAN CH>
[VOLUME] knob
<JC CLEAN CH>
[VOLUME] knob, [BRIGHT] switch
<LEAD CH>
Type switch (ACOUSTIC SIM, BLACK PANEL, BRIT COMBO,TWEED CLASSIC
STACK, METAL STACK, R-FIER, EXTREME, DYNA AMP), [GAIN] knob,
[VOLUME] knob
<LEAD CH>
Type switch (ACOUSTIC SIM, BLACK PANEL, DLX COMBO, BRIT COMBO,
TWEED, CLASSIC STACK, METAL STACK, R-FIER , EXTREME, DYNA AMP),
[GAIN] knob, [VOLUME] knob
<SOLO>
[SOLO] switch, [VOLUME] knob
<SOLO>
[SOLO] switch, [VOLUME] knob
<EQUALIZER>
[BASS] knob, [MIDDLE] knob, [TREBLE] knob
<EQUALIZER>
[BASS] knob, [MIDDLE] knob, [TREBLE] knob
—
<PRESENCE>
[PRESENCE] knob
<EFX>
[EFX] knob (CHORUS, FLANGER, PHASER, TREMOLO, HEAVY OCTAVE)
<EFX>
[EFX] knob (CHORUS, FLANGER, PHASER, TREMOLO, HEAVY OCTAVE)
<DELAY/LOOPER>
[REC/PLAY/DUB] switch
[DELAY/LOOPER] knob
[TAP/STOP] switch
<DELAY/LOOPER>
[REC/PLAY/DUB] switch
[DELAY/LOOPER] knob
[TAP/STOP] switch
<REVERB>
[REVERB] knob (SPRING/PLATE)
<REVERB>
[REVERB] knob (SPRING/PLATE)
—
[FOOT SW TYPE] switch
(FS-5L/FS-5U)
Indicators
JC CLEAN CH, LEAD CH, SOLO, TUNER, EFX, DELAY/LOOPER, REC/PLAY/
DUB, REVERB, POWER SQUEEZER
JC CLEAN CH, LEAD CH, SOLO, TUNER, EFX, DELAY/LOOPER, REC/PLAY/
DUB, REVERB
Connectors
INPUT Jack (1/4” phone type),
AUX IN Jack (Stereo miniature phone type),
RECORDING OUT/PHONES Jack (Stereo 1/4” phone type),
FOOT SW Jack (CH SELECT, SOLO) (1/4” TRS phone type),
FOOT SW Jack (EFX, REVERB) (1/4” TRS phone type),
FOOT SW Jack (DELAY/REC/PLAY/DUB, TAP/STOP)
(1/4” TRS phone type)
INPUT Jack (1/4” phone type),
AUX IN Jack (Stereo miniature phone type),
LINE OUT Jack (1/4” phone type),
RECORDING OUT/PHONES Jack (Stereo 1/4” phone type),
EXT SPEAKER (1/4” phone type),
FOOT SW Jack (CH SELECT, SOLO) (1/4” TRS phone type),
FOOT SW Jack (EFX, REVERB) (1/4” TRS phone type),
FOOT SW Jack (DELAY/REC/PLAY/DUB, TAP/STOP)
(1/4” TRS phone type)
Power Consump-
tion
43 W 75 W
Dimensions
385 (W) X 265 (D) X 385 (H) mm
15-3/16 (W) x 10-7/16 (D) x 15-3/16 (H) inches
440 (W) x 265 (D) x 440 (H) mm
17-3/8 (W) x 10-7/16 (D) x 17-3/8 (H) inches
Weight 10 kg / 22 lbs 1 oz 16 kg / 35 lbs., 5 oz.
Accessory Owner’s Manual Owner’s Manual
Options Foot Switch (BOSS FS-5L, FS-5U, FS-6) Foot Switch (BOSS FS-5L, FS-5U, FS-6)
* 0 dBu = 0.775 Vrms
* In the interest of product improvement, the specications and/or appearance of this unit are subject to change without prior notice.
Specications
/