Sennheiser SK 500 G2 User manual
- Category
- Microphones
- Type
- User manual

SK 500
G2
Instructions for use
33
ew500_SK.book Seite 33 Dienstag, 4. November 2003 4:02 16

34
Thank you for choosing Sennheiser!
We have designed this product to give you reliable
operation over many years. Over half a century of
accumulated expertise in the design and manufacture of
high-quality electro-acoustic equipment have made
Sennheiser a world-leading company in this field.
Please take a few moments to read these instructions
carefully, as we want you to enjoy your new Sennheiser
product quickly and to the fullest.
ew500_SK.book Seite 34 Dienstag, 4. November 2003 4:02 16

35
Contents
The SK 500 G2 bodypack transmitter................................. 36
The channel bank system ................................................ 36
Safety instructions .................................................................. 37
Delivery includes ..................................................................... 37
Areas of application ................................................................ 38
The operating controls ........................................................... 39
Indications and displays ........................................................ 40
Preparing the bodypack transmitter for use ..................... 42
Inserting and replacing the batteries ........................... 42
Inserting and charging the accupack ............................ 42
Connecting the microphone/line cable ......................... 43
Attaching the microphones ............................................ 43
Attaching the transmitter to clothing .......................... 44
Using the bodypack transmitter .......................................... 45
Switching the transmitter on/off .................................. 45
Muting the transmitter .................................................... 46
Activating/deactivating the lock mode ........................ 46
The operating menu ............................................................... 47
The buttons ........................................................................ 47
Overview of menus ........................................................... 47
Working with the operating menu ................................ 48
Operating menu of the transmitter ............................... 50
Adjustment tips for the operating menu ........................... 52
Switching between channel banks ................................ 52
Switching between the channels 5....................................2
Selecting the frequencies to be stored
in the channel bank “U” ................................................... 52
Adjusting the sensitivity ................................................. 53
Selecting the standard display ....................................... 54
Entering a name ................................................................ 54
Loading the factory-preset default settings ............... 54
Activating/deactivating the pilot tone transmission 55
Activating/deactivating the lock mode ........................ 55
Exiting the operating menu ............................................ 55
Troubleshooting ...................................................................... 56
Error checklist .................................................................56
Recommendations and tips ............................................ 57
Care and maintenance ............................................................ 58
Specifications ........................................................................... 59
Connector assignment ..................................................... 60
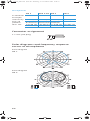
Polar diagrams and frequency response curves of
microphones ....................................................................... 60
Accessories ............................................................................... 61
ew500_SK.book Seite 35 Dienstag, 4. November 2003 4:02 16

36
The SK 500 G2 bodypack
transmitter
The SK 500 G2 bodypack transmitter is part of the
evolution wireless series ew 500 G2. With this series,
Sennheiser offers high-quality state-of-the-art RF
transmission systems with a high level of operational
reliability and ease of use. Transmitters and receivers
permit wireless transmission with studio-quality sound.
The excellent transmission reliability of the ew 500 G2
series is based on the use of
y further optimized PLL synthesizer and microprocessor
technology,
y the HDX noise reduction system,
y and the pilot tone squelch control.
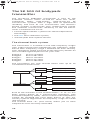
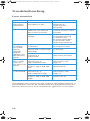
The channel bank system
The transmitter is available in five UHF frequency ranges
with 1440 transmission frequencies per frequency range.
Please note: Frequency usage is different for each country.
Your Sennheiser agent will have all the necessary details on
the available legal frequencies for your area.
Range A: 518 to 554 MHz
Range B: 626 to 662 MHz
Range C: 740 to 776 MHz
Range D: 786 to 822 MHz
Range E: 830 to 866 MHz
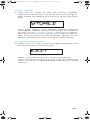
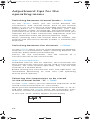
The transmitter has nine channel banks with up to 20
switchable channels each.
Each of the channels in the channel banks “1” to “8” has
been factory-preset to a transmission frequency (see
enclosed frequency table). These transmission frequencies
cannot be changed but have been preset so that e.g.
country-specific regulations on frequency usage are taken
into account.
The channel bank “U” (user bank) allows you to store
frequencies that are freely selectable.
channel bank 1... 8
channel bank U
channel 20
preset frequency
channel 1
channel 2
preset frequency
preset frequency
channel 20
channel 1
channel 2
freely selectable frequency
freely selectable frequency
freely selectable frequency
ew500_SK.book Seite 36 Dienstag, 4. November 2003 4:02 16

37
Safety instructions
Never open an electronic unit! If units are opened by
customers in breach of this instruction, the warranty
becomes null and void.
Use the unit in dry rooms only.
Use a damp cloth for cleaning the unit. Do not use any
cleansing agents or solvents.
Delivery includes
The packaging contains the following items:
y 1 SK 500 G2 bodypack transmitter
y 2 batteries
y 1 BPP 1 bodypack pouch
y 1 Instructions for use
ew500_SK.book Seite 37 Dienstag, 4. November 2003 4:02 16

38
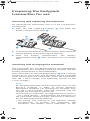
Areas of application
The transmitter can be combined with receivers of the
ew 500 G2 series (EM 500 G2 rack-mount receiver or
EK 500 G2 bodypack receiver). The receivers are available in
the same five UHF frequency ranges and are equipped with
the same channel bank system with factory-preset
frequencies. An advantage of the factory-preset
frequencies is that
y a transmission system is ready for immediate use after
switch-on,
y several transmission systems can be operated
simultaneously on the preset frequencies without
causing intermodulation interference.
Together with a matching receiver and a microphone or an
instrument cable, the transmitter is suitable for the
following areas of applications:
Four different microphones and an instrument cable are
available for the transmitter:
Transmitter Receiver (to be
ordered separately)
Area of
application
SK 500 G2
EM 500 G2 y Th
eater
y Presentation
y Sports (aerobic)
y Vocals
y Using instruments
wirelessly
EK 500 G2
y
Speech
y Vocals
y Presentation
y Camera-mounted
applications
Microphone/
instrument
cable
Type
Pick-up
pattern
Area of
application
ME 2 clip-on
microphone
condenser omni-
directional
y
Theater
y Presentation
(omni-
directional)
MKE 2-ew
clip-on
microphone
condenser omni-
directional
professional use:
y Theater
y Presentation
ME 3
headmic
condenser super-
cardioid
y
Sports (aerobic)
y Vocals
ME 4 clip-on
microphone
condenser cardioid
y
Theater
y Presentation
(high feedback
rejection)
CI 1 instrument
cable
–
y
Using
instruments
wirelessly
ew500_SK.book Seite 38 Dienstag, 4. November 2003 4:02 16

39
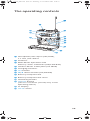
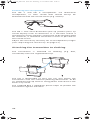
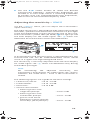
The operating controls
Microphone/line input (MIC/LINE),
3.5 mm jack socket
Antenna
Red LED for operation and
battery status indication (ON/LOW BAT)
Yellow LED for audio peak (AF PEAK)
Charging contacts
SET button
/ rocker button (UP/DOWN)
Battery compartment
Battery compartment cover
Unlocking button
ON/OFF button
(serves as the ESC (cancel) key in the
operating menu)
LC display
MUTE switch
ew500_SK.book Seite 39 Dienstag, 4. November 2003 4:02 16

40
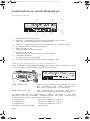
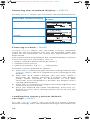
Indications and displays
LC display panel
Alphanumeric display
“B.CH“ – appears when the channel bank and
the channel number are displayed
“MHz“ – appears when the frequency is displayed
4-step battery status display
Lock mode icon
(lock mode is activated)
“PILOT” display
(pilot tone transmission is activated)
“MUTE” display
(audio input is muted)
7-step level display for audio signal “AF”
Operation and battery status indication
The red LED (LOW BAT/ON) provides information on the
current operating state of the transmitter:
Red LED lit up: The transmitter is switched on and
the capacity of the batteries/
BA 2015 accupack is sufficient.
Red LED flashing: The batteries are/the BA 2015
accupack is going flat (LOW BAT)!
In addition, the 4-step battery status display on the
display panel provides information on the remaining
battery/BA 2015 accupack capacity:
3 segments: capacity approx. 100 %
2 segments: capacity approx. 70 %
1 segment: capacity approx. 30 %
Battery icon flashing: LOW BAT
ew500_SK.book Seite 40 Dienstag, 4. November 2003 4:02 16

41
“MUTE” display
The “MUTE” display appears on the display panel when
the transmitter is muted (see “Muting the transmitter” on
page 46).
Modulation display
The level display for audio signal “AF” shows the
modulation of the transmitter.
When the transmitter’s audio input level is excessively
high, the level display for audio signal “AF” shows full
deflection for the duration of the overmodulation. In
addition, the yellow LED (AF PEAK) at the front of the
transmitter lights up.
“PILOT” display
The “PILOT” display appears on the display panel when
the pilot tone transmission is activated (see “Activating/
deactivating the pilot tone transmission” on page 55).
Display backlighting
After pressing a button, the display remains backlit for
approx. 15 seconds.
ew500_SK.book Seite 41 Dienstag, 4. November 2003 4:02 16

42
Preparing the bodypack
transmitter for use
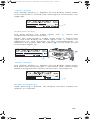
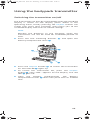
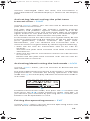
Inserting and replacing the batteries
For powering the transmitter, two 1.5 V AA size batteries
are required.
Press the two unlocking buttons and open the
battery compartment cover .
Insert the two batteries as shown above. Please observe
correct polarity when inserting the batteries.
Close the battery compartment. The battery
compartment cover locks into place with an audible
click.
Inserting and charging the accupack
The transmitter can also be powered via the rechargeable
Sennheiser BA 2015 accupack. Insert the accupack into the
battery compartment as described above.
The transmitter has two charging contacts and a sensing
contact on its short sides. The accupack can be recharged
while remaining in the transmitter. Insert the transmitter
into the L 2015 charger (see operating manual of the
L 2015 charger).
Note:
For accupack operation of the transmitter, only use the
BA 2015 accupack in order to ensure optimum
operational reliability. For charging the accupack, only
use the L 2015 charger. Both the accupack and the
charger are available as accessories.
The accupack is fitted with an integrated sensor which is
– via a third contact – monitored by the electronics of
the transmitter and the charger. The sensor is necessary
for the following control purposes:
y The taking into account of the different voltage
characteristics of primary cells (batteries) and
accupacks. The battery status indications on the
ew500_SK.book Seite 42 Dienstag, 4. November 2003 4:02 16

43
displays, the transmission of transmitter battery
status information to the rack-mount receivers and
the switch-off thresholds at the end of the operating
time are corrected correspondingly. Due to the
missing sensor, individual rechargeable battery cells
will not be identified as accupacks.
y The monitoring of the accupack temperature during
charging in the L 2015 charger.
y The prevention of improper charging of inserted
primary cells (batteries). Due to the missing sensor,
individual rechargeable battery cells will also not be
charged in the L 2015 charger.
Connecting the microphone/line cable
The microphone/line input is designed for the connection of
both condenser microphones and instruments (e.g.
guitars). DC powering of the condenser microphones is via
the microphone/line input.
Connect the 3.5 mm jack plug from the microphone/
line cable to the 3.5 mm jack socket (MIC/LINE) .
Lock the 3.5 mm jack plug by screwing down the
coupling ring .
Via the operating menu, adjust the sensitivity of the
microphone/line input (MIC/LINE) (see “Adjusting the
sensitivity” on page 53).
Attaching the microphones
Use the microphone clips to attach the ME 2 or ME 4 clip-
on microphones to clothing (e.g. tie, lapel).
Adjust the ME 3 headmic so that a comfortable and
secure fit is ensured.
ew500_SK.book Seite 43 Dienstag, 4. November 2003 4:02 16

44
Positioning the microphones
The ME 3 and ME 4 microphones are directional
microphones, i.e. their sound inlet should always be
directed towards the sound source (e.g. mouth).
The ME 2 with omni-directional pick-up pattern picks up
sound equally from all directions. It is the best choice if
movements of the speaker’s head have to be compensated
for. However, it should be attached as close as possible to
the sound source.
Adjust the sensitivity correctly for all microphones/usages
(see “Adjusting the sensitivity” on page 53).
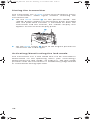
Attaching the transmitter to clothing
The transmitter is attached to clothing (e.g. belt,
waistband) with the supplied belt clip.
The clip is detachable so that you can also attach the
transmitter with the antenna pointing downwards. To do
so, withdraw the clip from its fixing points and attach it the
other way round.
The supplied BPP 1 bodypack pouch helps to protect the
transmitter against moisture.
ew500_SK.book Seite 44 Dienstag, 4. November 2003 4:02 16

45
Using the bodypack transmitter
Switching the transmitter on/off
The transmitter can only be switched off when the standard
display is shown on the display panel. When in the
operating menu, briefly pressing the ON/OFF button will
cancel your entry (ESC function) and return you to the
standard display with the last stored settings.
Note:
Remove the batteries or the accupack when the
transmitter will not be used for extended periods of
time.
Press the two unlocking buttons and open the
battery compartment cover .
Press the ON/OFF button to switch the transmitter
on. The red LED lights up.
To switch the transmitter off, press the ON/OFF
button until “OFF” appears on the display. The red
LED goes off.
Close the battery compartment. The battery
compartment cover locks into place with an audible
click.
ew500_SK.book Seite 45 Dienstag, 4. November 2003 4:02 16

46
Muting the transmitter
The transmitter has a MUTE switch that noiselessly mutes
the transmitter’s audio signal without switching the
transmitter off.
Set the MUTE switch to the position ’MUTE’. The
“MUTE” display appears on the display panel. Provided
that the pilot tone function is activated on both the
transmitter and the receiver, the “MUTE” display also
appears on the receiver display panel.
Set the MUTE switch back to the original position to
retransmit the audio signal.
Activating/deactivating the lock mode
The transmitter has a lock mode that can be activated or
deactivated via the operating menu (see “Activating/
deactivating the lock mode” on page 55). The lock mode
prevents that the transmitter is accidentally programmed
or switched off during operation.
ew500_SK.book Seite 46 Dienstag, 4. November 2003 4:02 16

47
The operating menu
A special feature of the Sennheiser ew 500 G2 series is the
similar, intuitive operation of transmitters and receivers. As
a result, adjustments to the settings can be made quickly
and “without looking” – even in stressful situations, for
example on stage or during a live show or presentation.
The buttons
Overview of menus
Buttons Mode To...
ON/OFF Standard display switch the transmitter on
and off
Operating menu cancel the entry and return
to the standard display
Setting mode cancel the entry and return
to the standard display
SET Standard display get into the operating menu
Operating menu get into the setting mode of
the selected menu
Setting mode store the settings and
return to the top menu level
/ Standard display without function
Operating menu change to the previous
menu () or change to the
next menu ()
Setting mode adjust the setting of the
selected menu:
option (/)
Display Function of the menu
BANK Switching between channel banks
CHAN
Switching between the channels in a
channel bank
TUNE
Setting a transmission frequency for
the channel bank “U” (user bank)
SENSIT Adjusting the sensitivity (AF)
DISPLY Selecting the standard display
NAME Entering a name
RESET
Loading the factory-preset default
settings
PILOT
Activating/deactivating the pilot tone
transmission
LOCK Activating/deactivating the lock mode
EXIT
Exiting the operating menu and
returning to the standard display
ew500_SK.book Seite 47 Dienstag, 4. November 2003 4:02 16

48
Working with the operating menu
By way of example of the “TUNE” menu, this section
describes how to use the operating menu.
After switching the transmitter on, the standard display is
shown on the display panel.
Getting into the operating menu
Press the SET button to get from the standard display
into the operating menu. The last selected menu flashes
on the display.
Selecting a menu
Press the / rocker button to select a menu.
Press the SET button to get into the setting mode of the
selected menu. The current setting that can be adjusted
flashes on the display.
Adjusting a setting
Press the / rocker button to adjust the setting.
By briefly pressing the / rocker button, the display
jumps either forwards or backwards to the next setting.
In the “CHAN”, “TUNE” and “NAME” menu, the /
rocker
button features a “fast search” function. If you
hold down a button, the display cycles continuously,
allowing you to get fast and easily to your desired
setting.
ew500_SK.book Seite 48 Dienstag, 4. November 2003 4:02 16

49
Storing a setting
Press the SET button to store the setting. “STORED”
appears on the display, indicating that the setting has
been stored. The display then returns to the top menu
level.
With most menus, new settings become effective
immediately without having to be stored. An exception
are the “BANK”, “CHAN”, “TUNE” and “RESET” menus.
With these menus, new settings only become effective
after they have been stored (“STORED” appears on the
display, indicating that the setting has been stored).
Exiting the operating menu
Select the “EXIT” menu to exit the operating menu and
to return to the standard display.
When in the operating menu, briefly pressing the
ON/OFF button will cancel your entry (ESC function) and
return you to the standard display with the last stored
settings.
ew500_SK.book Seite 49 Dienstag, 4. November 2003 4:02 16

50
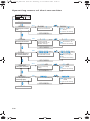
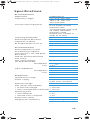
Operating menu of the transmitter
BANK
Changing the channel
bank
BANK 1 BANK U
SET
Current channel bank
/
:
1...8, U (User
Bank)
SET
:
Stores the setting
STORED
STORED
CHAN
1.03
B.CH
SET
Current channel
(display depends on
"DISPLY" setting)
Changing the channel
/
:
Channel 01...20
SET
:
Stores the setting
SENSIT
Setting the sensitivity
-10 dB
-30 dB
SET
Current sensitivity
setting
/
: 0...-30 dB
SET
:
Stores the setting
DISPLY
Switching between the
standard displays
SET
Current standard display
/
: FREQ, NAME,
CHAN
SET
:
Stores the setting
FREQ
FREQ
NAME
NAME
STORED
STORED
TUNE
Current frequency on
the selected channel
/
:
Transmission
frequency in steps of
25 kHz
SET
:
Stores the setting
790.025
790.025
791.125
791.125
SET
STORED
1.02
B.CH
MHz
MHz
NAME
Setting the frequency
for channel bank "U"
SET
EXIT
ew500_SK.book Seite 50 Dienstag, 4. November 2003 4:02 16

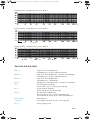
51
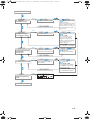
DISPLY
PILOT
Activating/deactivating
the pilot tone
transmission
SET
Pilot tone transmission
activated or deactivated
/
:
ON, OFF
SET
:
Stores the setting
PLT. ON
ON
PLT. OFF
OFF
LOCK
Activating the lock mode
SET
SET
Lock mode activated or
deactivated
LOC.OFF
OFF
LOC.ON
ON
EXIT
Exiting the operating
menu
STORED
STORED
BANK
RESET
Loading the factory-
preset default settings
SET
Security check
RST. NO
NO
RST. OK
OK
NAME
SET
Current transmitter name
Assigning the
transmitter a name
/
:
Transmitter name
(6 characters)
Letters w/o pronounciation
marks, numbers from 0...9,
special characters, spaces
SET: 5 x next character,
then store
VOCAL GUCAL
STORED
/
:
OK, NO
"reset" = OK:
SET:
Transmitter loads
factory-preset default
settings (only pilot tone
setting is kept), transmitter
is restarted, standard
display appears
"reset" = NO
SET
:
Reset is cancelled
/
:
ON, OFF
Lock mode = ON:
SET: Stores the setting
("STORED"), returns to
standard display
Lock mode = OFF:
SET: Stores the setting
ew500_SK.book Seite 51 Dienstag, 4. November 2003 4:02 16

52
Adjustment tips for the
operating menu
Switching between channel banks –
BANK
Via the “BANK” menu, you can switch between the
transmitter’s nine channel banks. Each of the channel
banks “1” to “8” has up to 20 switchable channels that are
factory-preset to a transmission frequency (see “The
channel bank system” on page 36). The channel bank “U”
(user bank) has up to 20 switchable channels to store your
selection out of 1440 transmission frequencies that are
freely selectable within the preset frequency range.
When switching from one channel bank to another, the
channel with the lowest channel number is automatically
displayed.
Switching between the channels –
CHAN
Via the “CHAN” menu, you can switch between the different
channels in a channel bank. When switching between the
channels, please observe the following:
Always set the transmitter and the receiver of a
transmission link to the same channel.
Multi-channel operation
Combined with ew 500 G2 receivers, the transmitter can
form transmission links that can be used in multi-channel
systems. For multi-channel operation, only use the free
channels in a channel bank.
Before putting the transmission links into operation, we
recommend performing an auto scan (see operating
manual of the receiver).
Selecting the frequencies to be stored
in the channel bank “U” –
TUNE
Via the “TUNE” menu, you can select the frequencies to be
stored in the channel bank “U” (user bank).
When you have selected one of the channel banks “1” to “8”
and then select the “TUNE” menu, the transmitter auto-
matically switches to channel 01 of the channel bank “U”.
In this case, “U.01” briefly appears on the display.
ew500_SK.book Seite 52 Dienstag, 4. November 2003 4:02 16
Page is loading ...
Page is loading ...
Page is loading ...
Page is loading ...
Page is loading ...
Page is loading ...
Page is loading ...
Page is loading ...
Page is loading ...
-
 1
1
-
 2
2
-
 3
3
-
 4
4
-
 5
5
-
 6
6
-
 7
7
-
 8
8
-
 9
9
-
 10
10
-
 11
11
-
 12
12
-
 13
13
-
 14
14
-
 15
15
-
 16
16
-
 17
17
-
 18
18
-
 19
19
-
 20
20
-
 21
21
-
 22
22
-
 23
23
-
 24
24
-
 25
25
-
 26
26
-
 27
27
-
 28
28
-
 29
29


Sennheiser SK 500 G2 User manual
- Category
- Microphones
- Type
- User manual
Ask a question and I''ll find the answer in the document
Finding information in a document is now easier with AI
Related papers
-
Sennheiser Wireless RS 45 User manual
-
-
Sennheiser LV307 User manual
-
-
-
-
Sennheiser SK 9000 User manual
-
Sennheiser SK 100 G3 User manual
-
-
Other documents
-
Mipro ACT 70T(6UA) Datasheet
-
the t.bone column PT Set 823 MHz User manual
-
Daktronics DD2945863 Operating instructions
-
Optimus EM-400 User manual
-
Braun 5691 User manual
-
Manhattan 164368 Specification
-
-
Medion Universal Remote Control MD 41666 User manual
-
Futek SENsit Quick start guide
-
Braun 8595, Activator User manual