
TWO CHANNEL LINE OUTPUT CONVERTER
WITH ACCUBASS
®
AND IMPEDENCE MATCHING
ACR-1 LEVEL CONTROL INCLUDED
FACTORY SYSTEM UPGRADE

TWO CHANNEL LINE OUTPUT CONVERTER
WITH ACCUBASS
®
AND IMPEDENCE MATCHING
Power
As awesome as it is that the LC2i PRO can be turned on
3 dierent ways, you still very much need to connect the
LC2i PRO to constant +12V power and ground.
Maybe one day science will invent a way to electrically
power devices via the sweet guitar solo of Jimi Hendrix,
but until then, we need +12V power and ground.
GTO Signal Sense
DC oset is a high falutin technical term that means
the LC2i PRO can sense when the head unit is on, not
necessarily when audio is being sent to the LC2i PRO. Use
GTO Signal Sense mode when your factory sound system
outputs a DC oset when it is on.
Audio Sense
When this mode is selected, the LC2i PRO will ONLY
turn on when you start playing a source from the head
unit. Whether it be the radio, CD player or streaming via
Bluetooth from a mobile device. If you turn the head unit
on, but DON’T play audio, the LC2i PRO will not turn on.
Remote Input
This is the traditional way to turn on the LC2i PRO and
gives you more control of exactly when the unit will turn
on. Most common places to connect the remote input
are from the ignition of the vehicle, fuse box, or some
other 12V source (such as a cigarette lighter).
Ground Isolation Switch
This handy switch allows the user to change how the
LC2i PRO is grounded. Sometimes when installing car
audio equipment, “ground buzz” or “alternator whine”
will creep into the audio path, wreaking havoc on your
listening experience. There are 3 positions. GND, ISO,
and 200 ohms. The unit ships from the factory in the ISO position.
GND - Power ground and audio ground are tied together.
ISO - Power ground and audio ground are separate.
200Ω - There is 200 ohms of resistance between power ground and
audio ground.
Quick Start
1. LC2i PRO is active and REQUIRES CONSTANT +12V POWER
2. Pick a suitable mounting location that will provide access to the
controls and connections. Protect the LC2i PRO from heat, moisture,
and dirt.
3. Use the integrated mounting brackets to mount the LC2i PRO.
4. Before drilling holes, take every precaution to prevent damage to
fuel lines, power and other electrical wiring, hydraulic brake lines,
and other systems that might comprimise vehicle safety.
5. When making conections, designate red RCA plugs as right, and
designate white, black, or gray plugs as left.
6. Connect the +12V input terminal of the unit to the +12V terminal on
the vehicle battery (or distribution block) using 16 to 14 AWG.
7. Connect the Ground terminal of the unit to the Ground/Negative
terminal of the battery (or distribution block) using the same gauge
wire as the +12V power wire.
8. For +12V remote turn on the Trigger Mode switch must be set to
“Rmt In”. Connect the Remote In (Rmt In) terminal of the unit to a
remote turn-on switch. Alternately, use GTO™ Signal Sense or Audio
Sense to trigger the unit on without a remote wire.
9. Connect the Speaker Level Inputs to the left and right output of
your factory head unit or amplier.
10. Run the ACR-1 remote wire to the front of your vehicle.
11. Adjust the input gain using the Main and Bass Output Level knobs.
12. Connect the Main and/or Bass Output RCAs to your aftermarket
amplier.
13. Adjust AccuBASS using the AccuBASS Threshold and Level knobs.
14. Enjoy the drive!

Load Selection Switch
The LC2i PRO is designed to present NO load to the
output of the factory amp, which can make some factory
amps upset and stop passing audio. The Load Selection
feature tricks the factory amp in to detecting a speaker
load so it will continue to pass audio.
20 Ω - Best suited for late model Dodge/Chrysler/Jeep/Ram/Fiat vehicles
equipped with OEM base sound system. (no separate factory amplier)
60 Ω - Best suited for late model Dodge/Chrysler/Jeep/Ram/Fiat vehicles
equipped with a separately amplied OEM “premium” sound system.
20 kΩ - Best suited for all other applications.
Setting Levels
Main Output - Fixed full range output suitable for
connecting to multi-channel ampliers for door speakers.
Use the Main Output Level knob to adjust level for this
output.
Bass Output - Variable low passed output (1000 Hz low
pass) and is suitable for connecting to a subwoofer amplier. Use the
Bass Output Level knob to adjust level for this output. Once the Bass
Output level is set for optimum signal, level can be adjusted on the y
using the included ACR-1 level control.
Maximized Light
The Maximized Light can be used to help achieve
optimal output level and will let you know if you are
getting close to clipping the output of the LC2i PRO.
With the factory system set to its maximum
undistorted volume, match the output level of the
LC2i PRO to the input maximum of your after market amplier. If the
Maximized Light turns on, the LC2i PRO output is distorting. Turn
the output level down until the Maximized Light turns o. IF THE
MAXIMIZED LIGHT NEVER TURNS ON, don’t panic. This just means the
output of the LC2i PRO is not clipping/distorting.
ACR-1 Level Control
The ACR-1 is a great way to control the Bass Output level being sent to
your subwoofer amplier. The ACR-1 ONLY controls the level of the Bass
Output and is strictly an attenuator knob. The ACR-1 will NEVER increase
the Bass Output level past where Bass Output Level knob is set.
Setting AccuBASS®
AccuBASS is a feature that restores bass
frequencies on factory systems that roll
o the bass as you increase volume.
If you can hear that the bass does not
increase as you continue to turn up the
volume on the head unit, then your
factory system is most likely rolling o bass.
There are two AccuBASS controls and a status LED used during initial
setup: AccuBASS Threshold determines when AccuBASS turns on, and
AccuBASS Level adjusts how much bass is restored. The status LED will
illuminate when AccuBASS is active.
1. Turn AccuBASS Threshold all the way down (counterclockwise)
2. Set AccuBASS Level at the 12 o’clock position
3. Play some bass-heavy music you are familiar with
4. Slowly turn up head unit volume until you start to hear bass
dropping out (roll o). Stop turning up the head unit volume.
5. Slowly turn AccuBASS Threshold to the right (clockwise) until the
status LED illuminates and you hear hear bass being restored. Stop
adjusting AccuBASS Threshold.
6. With AccuBASS Threshold set you can now adjust AccuBASS Level
to your liking.
If the sound system in your vehicle does not reduce bass output at
higher volumes, AccuBASS may be defeated, or used without the
threshold setting (on all of the time). To defeat (turn o) AccuBASS, turn
AccuBASS Threshold all the way down (counterclockwise), and turn
AccuBASS Level all the way down (counterclockwise).
To keep AccuBASS on all of the time so it does not turn on/o at a set
threshold, turn AccuBASS Threshold all the way up (clockwise). Now,
regardless of the head unit volume, AccuBASS will always be on. Adjust
AccuBASS Level to your liking.
Remote Output
Use the Remote Output (Rmt Out) to trigger on your aftermarket
amplier. When the LC2i PRO turns on (regardless of method) the
Remote Output will always be active. Do not connect more than two
ampliers to the LC2i PRO Remote Output. Connecting more than two
ampliers may damage the LC2i PRO.

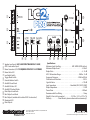
q
1%
e
t yr u i o 1) 1@1!
1#
w 1$
q
Speaker Level Inputs (40V / 400W INPUT MAXIMUM AT 20 KΩ)
w
ACR-1 level control input
e
Power Connector (LC2i PRO REQUIRES CONSTANT +12V POWER)
r
Power Status LED
t
Load Select Switch
y
Trigger Mode Switch
u
Ground Isolation Switch
i
AccuBASS Level Knob
o
AccuBASS Status LED
1)
AccuBASS Threshold Knob
1!
Main Output Level Knob
1@
Bass Output Level Knob
1#
Bass Outputs (variable with included ACR-1 level control)
1$
Maximized LED
1%
Main Outputs
Specications
Maximum Input Handling ...................40V / 400W (20 kΩ setting)
Maximum Output Level .......................................9.5 Vrms
Output Gain ..................................................+/- 12 dB
ACR-1 Attenuation Range ................................0 dB to -19 dB
Frequency Response ................................... 20 Hz to 50 kHz
Total Harmonic Distortion ........................................0.01%
Signal to Noise ................................................ >110 dB
Input Impedance ........................ Selectable (20 Ω, 60 Ω, 20 kΩ)
Output Impedance ...............................................150 Ω
Power Draw ....................................................200 mA
Recommended Fuse Rating .....................................1 Amp
Weight & Dims (with connectors) ........... 0.75 lbs. / 6.9”L x 3”W x 1”H
Warranty ...........5 Year Warranty (www.audiocontrol.com/warranty/)
©2020 AudioControl. All rights reserved. P/N 912-065-0
8 51523 00778 2
22410 70th Ave West, Mountlake Terrace, WA 98043 USA
Phone 425-775-8461
www.audiocontrol.com
-
 1
1
-
 2
2
-
 3
3
-
 4
4


Ask a question and I''ll find the answer in the document
Finding information in a document is now easier with AI
Related papers
-
AudioControl LC7iPRO User guide
-
AudioControl LC2I User manual
-
AudioControl LC7i User manual
-
-
AudioControl PNW-69 User guide
-
-
-
-
AudioControl PNW-35 User guide
-
Other documents
-
Audio Control Matrix Owner's manual
-
JBL GTO-804EZ Owner's manual
-
-
Axxess AX-BXLOC2 Installation guide
-
Alto Total recall User manual
-
Hifonics Brutus BRZ 1200.1D User manual
-
Soundstream SST-PXW-12T Datasheet
-
 Phoenix Gold Ti3 1200W 4 Channel Amplifier User manual
-
DLS Amplifier CAD1000 Owner's manual
-
Rockford Fosgate Punch P300-10 Installation & Operation Manual
