Roland JU-06A Owner's manual

Category
Digital pianos
Type
Owner's manual

This manual is also suitable for

Roland JU-06A Sound Module: Dive into the world of classic analog synthesis with this compact and versatile sound module, inspired by the iconic Roland JUNO-60 and JUNO-106 synthesizers. With its intuitive controls, 4-voice polyphony, and authentic recreations of the original JUNO sounds, the JU-06A lets you explore a wide range of classic and modern electronic music styles. From lush pads and shimmering leads to funky basslines and rhythmic arpeggios, the JU-06A delivers the unmistakable JUNO vibe, all in a portable and affordable package.

Roland JU-06A Sound Module: Dive into the world of classic analog synthesis with this compact and versatile sound module, inspired by the iconic Roland JUNO-60 and JUNO-106 synthesizers. With its intuitive controls, 4-voice polyphony, and authentic recreations of the original JUNO sounds, the JU-06A lets you explore a wide range of classic and modern electronic music styles. From lush pads and shimmering leads to funky basslines and rhythmic arpeggios, the JU-06A delivers the unmistakable JUNO vibe, all in a portable and affordable package.

Introduction
The JU-06A is a sound module that can be used in conjunction with the K-25m keyboard unit (sold
separately). The sound can be heard through the built-in speakers.
* The JU-06A can operate on batteries or on USB bus power. If you are using batteries, insert four AA
batteries, making sure that the batteries are oriented correctly.
* When turning the unit over, be careful so as to protect the buttons and knobs from damage. Also,
handle the unit carefully; do not drop it.
* When the batteries run low, the display indicates
bLo. Please install fresh batteries.
Using the JU-06A in conjunction with the DK-01 Boutique Dock
(sold separately)
&
For installation / removal / angle adjustment, refer to the DK-01’s Owner’s Manual.
Using the JU-06A with the K-25m keyboard unit
(sold separately)
&
For installation / removal / angle adjustment,, refer to the K-25m’s Owners
Manual.
Playing the JU-06A via MIDI or USB
You can also play the JU-06A via MIDI or USB. For details, refer to “Rear Panel (Connecting Your
Equipment).
Panel Descriptions
Top Panel
1 2 3 4 5 6 7 8
9 10
1
KEYBOARD
Controller Explanation
[HOLD] button
If you press this button to make it light, the sound of the key you played most
recently continues to be heard even after you release your hand. If you play a
dierent key while hold is applied, the sound also changes.
[CHORD] button Turns chord memory on.
[NOTE] button
If you press this button to make it light, the
10
step buttons can be used as a
keyboard. For details, refer to “Using the Buttons as a Keyboard (NOTE)”.
2 ARPEGGIO
Controller Explanation
[ON/OFF] button Turns the arpeggio on/o.
[MODE] switch
Selects the arpeggio mode.
UP (upward), U&D (upward and downward), DOWN (downward)
[RANGE] switch
Selects the range in which the arpeggio plays.
1–3 octaves
[RATE] knob
Species the note length for each step of the arpeggio.
4 (quarter note), 4t (quarter note triplet), 8 (8th note), 8t (8th note triplet),
16 (16th note), 16t (16th note triplet), 32 (32nd note), 32t (32nd note
triplet),
64 (64th note), 64t (64th note triplet)
3 LFO
Here you can create cyclic change (modulation) in the sound.
Controller Explanation
[RATE] slider Species the LFO’s modulation speed.
[DELAY TIME] slider
Species the time from when the tone sounds until the LFO reaches its
maximum amplitude.
4 DCO
Here you can select the waveform that determines the character of the sound, and specify its pitch.
Controller Explanation
RANGE [16] [8] [4]
‘buttons
Species the octave of the oscillator.
[LFO] slider
Allows the
3
LFO to modulate the pitch, producing a vibrato eect.
Controller Explanation
[PWM] slider
When the [LFO/MAN/ENV] switch is “MAN” (MANUAL)
Adjusts the value of the pulse width.
When the [LFO/MAN/ENV] switch is “LFO”
Adjusts the depth of modulation produced by the LFO.
When the [LFO/MAN/ENV] switch is “ENV”
Adjusts the depth of modulation produced by the ENV.
What is “Pulse Width”?
Pulse width is the amount of the upper portion of the pulse wave, expressed as
a percentage of the overall wavelength. If the upper and lower widths are not
the same, the waveform is called an asymmetric pulse wave.
[LFO/MAN/ENV]
switch
Selects whether the pulse width value is the xed value specied by the [PWM]
slider (MAN), is modulated by the
3
LFO (LFO), or is modulated by the
8
ENV
(envelope).
[
] button
[
] button
Selects the waveform that is the basis of the sound.
(Square wave/Asymmetrical pulse wave), (Sawtooth wave)
[SUB] button Turns the sub-oscillator on/o.
[SUB] slider Adjusts the volume of the sub oscillator.
[NOISE] slider Adjusts the volume of the noise.
5 HPF
This is a high-pass lter that passes the high frequencies and cuts the low frequencies.
Controller Explanation
[FREQ] slider
Species the cuto frequency of the high-pass lter. Frequency components
below the cuto frequency are cut.
6 VCF
This is a low-pass lter that passes the low frequencies and cuts the high frequencies.
Controller Explanation
[FREQ] slider
Species the cuto frequency of the low-pass lter. Frequency components
above the cuto frequency are cut, making the sound mellower.
[RES] slider
Resonance boosts the sound in the region of the lter's cuto frequency.
Higher settings produce stronger emphasis, creating a distinctively “synthesizer-
like” sound.
[
] switch
Selects the polarity (direction) of the envelope.
[ENV] slider
Adjusts the depth by which the
8
ENV (envelope) controls the cuto
frequency.
[LFO] slider
Uses the
3
LFO to vary the cuto frequency.
[KYBD] slider
Adjusts the way in which the pitch of the note aects the cuto frequency (key
follow) when using the keyboard to control cuto frequency. If this slider is
moved upward, the cuto frequency rises as you play higher notes.
7 VCA
Here you can adjust the amount of time-varying change (envelope) for the volume.
Controller Explanation
[
] switch
Selects whether the volume is controlled by
8
ENV (envelope) ( ) or by the
gate signal ( ).
[LEVEL] slider Adjusts the volume of the patch.
8 ENV
Here you can create time-varying change (envelope).
Controller Explanation
[A] slider Attack time
[D] slider Decay time
[S] slider Sustain level
[R] slider Release time
9 SEQUENCER
Controller Explanation
[START] button Makes the sequencer play (lit) or stop (unlit).
[EDIT] button Lets you edit the step sequencer.
[NOTE/GATE] switch Switches the target of editing (note number or gate time).
[VALUE] knob Use this to edit values.
10 Common section
Here you can switch the sound (patch/bank).
Controller Explanation
Display
Shows the bank number and patch number.
During patch editing, a decimal point
. is shown at the right of the patch
number.
If the SEQUENCER [EDIT] button is lit, this shows the tempo or the sequencer
value that you’re editing.
Controller Explanation
BANK [1 (5)]–[4 (8)]
buttons
PATCH [1]–[8]
buttons
What is “Patch/Bank”?
Here you can save or recall 64 sounds taken from the JUNO-60 (8 patches × 8
banks) and another 64 sounds taken from the JUNO-106.
To switch the bank/patch
1. Press the BANK [1 (5)]–[4 (8)] buttons to switch the bank.
Each time you press the same bank button, you alternate between banks
1–4 and 5–8.
To select banks 5–8, you can also hold down the bank (5–8) that you want
to select and then press another bank button to select it.
2. Press the PATCH [1]–[8] buttons to switch the patch.
To store the patch
* When you edit a patch, a dot appears in the display.
1-1.1-1.
1. Press the save-destination BANK [1 (5)]–[4 (8)] button.
Each time you press the same bank button, you alternate between banks
1–4 and 5–8.
To select banks 5–8, you can also hold down the bank (5–8) that you want
to select and then press another bank button to select it.
2. Long-press the save-destination PATCH [1]–[8] button.
[CHORUS
] button
[CHORUS
] button
Turns the chorus eect-
/ On/O.
[DELAY] button Turns the delay eect On/O.
[MANUAL] button Causes sound to be produced according to the current settings of the sliders.
[60/106] switch Switches between JUNO-60 sounds and JUNO-106 sounds.
EXT CLK IN jack
Inputs a clock signal from an external device.
You can make the sequencers steps advance in synchronization with the clock
(pulse) that is input.
Rear Panel
(Connecting Your Equipment)
* To prevent malfunction and equipment failure, always turn down the volume, and turn o all the
units before making any connections.
A B C D E F
G
A
Micro USB (
O
) port
Use a commercially available USB 2.0 cable (A-micro B) to connect
this port to your computer. It can be used to transfer USB MIDI and
USB audio data.
You must install the USB driver when connecting the JU-06A to your computer. Download the USB
driver from the Roland website. For details, refer to Readme.htm which is included in the download.
&
https://www.roland.com/support/
B [VOLUME] knob
Adjusts the tone.
C PHONES jack
Connect headphones (sold separately) here.
D OUTPUT jack
Connect this jack to your amp or monitor speakers.
E MIX IN jack
This is the audio input jack. Sound from the connected device is
output from the OUTPUT jack and PHONES jack.
F MIDI port
You can play the JU-06A by connecting a MIDI device via a
commercially available MIDI cable.
G [POWER] switch
This turns the power on/o.
Turning the JU-06A On
* Before turning the unit on/o, always be sure to turn the volume down. Even with the volume
turned down, you might hear some sound when switching the unit on/o. However, this is normal
and does not indicate a malfunction.
* When handling the sound module while adjusting its angle or during installation, please be careful
not to get your ngers pinched between the movable part and the unit. In places where small
children are present, make sure that an adult provides supervision and guidance.
* Do not use a micro USB cable that is designed only for charging a device. Charge-only cables cannot
transmit data.
Using the Buttons as a Keyboard (NOTE)
You can perform by using step buttons [1]–[16] as a one-octave keyboard.
1. Press the KEYBOARD [NOTE] button to make it light.
Step buttons [1]–[12] are lit.
2. Perform by pressing step buttons [1]–[12].
You can use step buttons [13] and [14] to shift the keyboard’s pitch range in one-octave units.
You can use step buttons [15] and [16] to switch between solo/unison/poly modes.
Mode Explanation
SOLO Plays monophonically.
UNISON Plays all sounds in unison.
POLY Plays polyphonically.
Using the Arpeggiator
1. Press the ARPEGGIO [ON/OFF] button to make it light.
2. Use the [MODE] switch to select the arpeggio mode.
UP (upward), U&D (upward & downward), DOWN (downward)
3. Use the [RANGE] switch to specify the range (1–3 octaves) in which the arpeggio plays
4. Use the [RATE] knob to specify the length of the notes.
5. Hold down multiple keys simultaneously.
You can perform while using this function together with chord memory and the [HOLD] button.
You can also use the step buttons to play the keyboard. For details, refer to “Using the Buttons as a
Keyboard (NOTE)”.
Chord Memory
Here’s how to play chords that are assigned to step buttons [1]–[16].
1. Press the [CHORD] button to make it light.
2. Play a key.
You can use the [HOLD] button to make the sound continue.
You can also use the step buttons as a keyboard. For details, refer to “Using the Buttons as a
Keyboard (NOTE)”.
Selecting a Chord Memory
1. Press the [NOTE] button to make it go dark.
2. Hold down the [CHORD] button and press a step button [1](c1)–[16](c16).
* You can also make a selection by holding down the [CHORD] button and turning the [VALUE] knob.
Editing a Chord Memory
1. Select the chord memory (c1c16) that you want to edit.
2. Press the [NOTE] button to make it light.
3. Hold down the [CHORD] button and press the [1]–[14] buttons as desired.
Use these buttons to edit the settings of the selected chord memory.
Button Explanation
[1]–[12] Specify the notes of the chord (C–B)
[13], [14] Change the octave
You can also edit the chord memory by holding down the [CHORD] button and pressing keys on the
K-25m.
Using Step Sequencer Mode
What is a step sequencer?
The step sequencer lets you input a note at each of up to 16 steps, and play back the notes as a loop.
change the number of steps between 1 and 16. Up to 16 patterns can be stored.
Step button [1]–[16]
In step sequencer mode, the [1]–[16] buttons are called step buttons.
1 2 3 4 5 6 7 8 9 10 11 12 13 14 15 16
Selecting/Playing Patterns
1. Hold down the [START] button and press a [1]–[16] button to select a pattern.
The display shows the pattern number.
* You can also select a pattern by holding down the [START] button and turning the [VALUE] knob.
2. Press the [ START] button to play the pattern.
Each time you press the button, the pattern plays or stops. You can also select the next pattern while
a pattern is playing. When the current pattern nishes playing, the next pattern starts playing.
Changing the Tempo
1. Press the SEQUENCER [EDIT] button to make it light.
The display indicates the tempo.
2. Use the [VALUE] knob to change the tempo.
JU-06A
MIDI keyboard
MIDI IN
MIDI OUT
English
Owner’s ManualSOUND MODULE
JU-06A
© 2019 Roland Corporation
Before using this unit, carefully read “USING THE UNIT SAFELY” and “IMPORTANT NOTES” (the leaet “USING THE UNIT SAFELY”). After reading, keep the document(s) where it will be available for
immediate reference.
Turning Steps On/O
Here’s how to specify whether each step will play.
1. Press the SEQUENCER [EDIT] button to make it light.
2. Press the step [1]–[16] buttons that you want to turn on/o.
Lit
(on): The note that is entered for the step will play.
Unlit
(o): The note that is entered for the step will not play.
You can choose whether turning a step o makes that step a rest or causes playback to skip that
step and proceed to the next step (refer to “Sequencer Settings”).
Entering a Pattern with Automatically Advancing Steps
(Step Entry Mode)
1. Hold down the SEQUENCER [EDIT] button and press the [START] button.
Step button [1] blinks, the display indicates
S 1, and the unit is in step entry mode.
2. Press the KEYBOARD [NOTE] button to make it blink.
3. Use step buttons [1]–[12] to enter the pitch.
The gate time value will be 50.
4. The step advances automatically each time you play a note.
When you have entered 16 steps, entry mode ends.
If using the K-25m
Enter notes using the keyboard of the K-25m instead of steps 2–3.
Entering/Editing Notes
(NOTE)
1. Press the SEQUENCER [EDIT] button to make it light.
2. Set the [NOTE/GATE] switch to the “NOTE” position.
3. Hold down the step button for which you want to enter a note, and use the [VALUE] knob to
select the note number.
The display shows the note number.
You can also select a note number by holding down a step number and playing a note on the
keyboard of the K-25m.
By holding down multiple step buttons and turning the [VALUE] knob, you can enter the same note
number for all of the buttons that you’re holding down.
A lit step button indicates note-on, and an unlit step button indicates note-o.
Entering/Editing the Gate Time
(GATE)
1. Press the SEQUENCER [EDIT] button to make it light.
2. Set the [NOTE/GATE] switch to the “GATE” position.
3. While holding down the step button at which you want to enter a gate, use the [VALUE] knob to
select the gate time.
The display indicates the value.
By holding down multiple step buttons and turning the [VALUE] knob, you can enter the same gate
time for all of the buttons that you’re holding down.
Entering a Tie
1. Press the SEQUENCER [EDIT] button to make it light.
2. Hold down the step button for which you want to enter a tie, and press the SEQUENCER [EDIT]
button.
You can enter a tie for the following step as well by pressing the SEQUENCER [EDIT] button again.
If you turn a step button o, that step’s tie is deleted.
Saving
If you modied the settings, the modied settings are lost if you turn o the power or select another
patch, chord memory, or pattern.
If you want to keep the changes that you made, perform the Write operation.
* KEYBOARD and ARPEGGIO settings are not saved.
Saving a Patch
* If you modify the patch settings, a decimal point appears in the display.
1-1.1-1.
1. Press the save-destination BANK [1 (5)]–[4 (8)] button.
Each time you press the same bank button, you alternate between banks 1–4 and 5–8.
To select banks 5–8, you can also hold down the bank (5–8) that you want to select and press a
dierent bank button.
2. Long-press the save-destination PATCH [1]–[8] button.
When the data is saved, the indicator blinks.
* KEYBOARD and ARPEGGIO settings are not saved in the patch.
Saving a Chord Memory
* If you modify the chord memory settings, a decimal point appears in the display.
c 1.c 1.
1. Press the [NOTE] button to make it go dark.
2. Hold down the [CHORD] button and long-press a step button [1]–[16].
When the data is saved, the indicator blinks.
Saving a Pattern
* If you modify the pattern settings, a decimal point appears in the display.
P 1.P 1.
1. Hold down the SEQUENCER [START] button and long-press a step button [1]–[16].
When the data is saved, the indicator blinks.
Editing
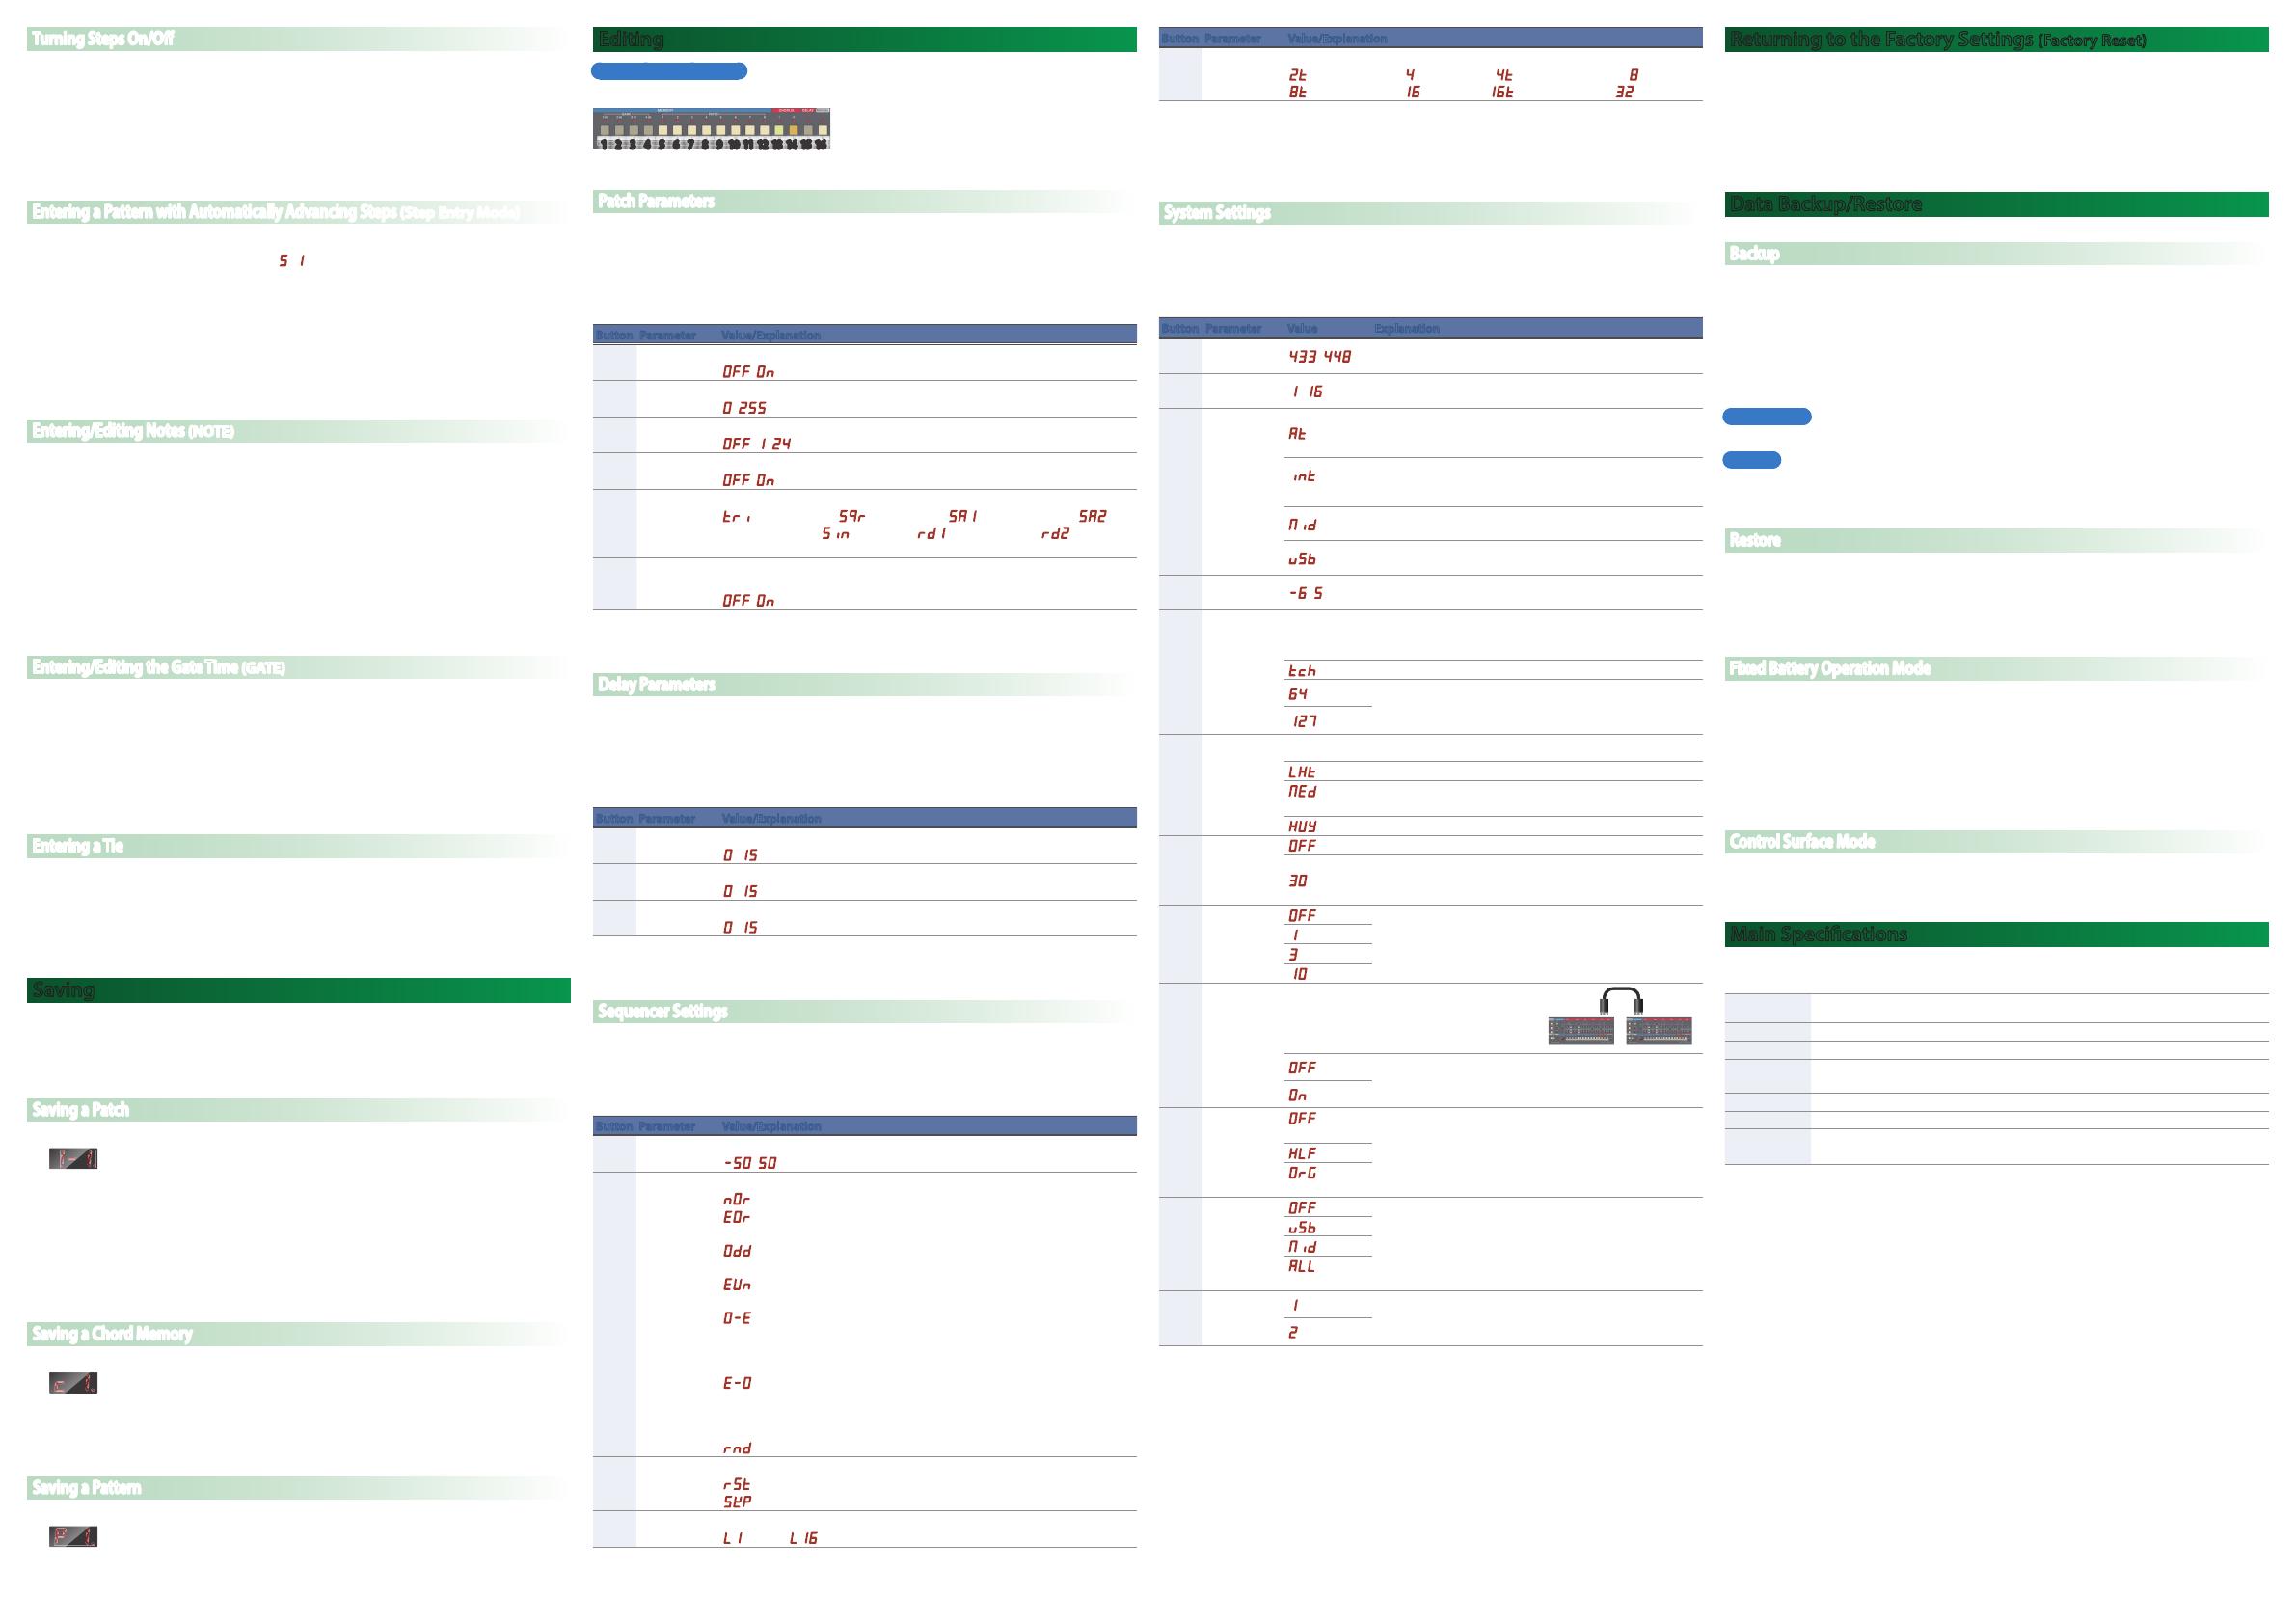
Numeric buttons [1]–[16]
In edit mode, the 16 numeric buttons shown in the illustration are called buttons [1]–[16].
1 2 3 4 5 6 7 8 9 10 11 12 13 14 15 16
Patch Parameters
1. Press the SEQUENCER [EDIT] button to make it go dark.
2. Hold down the [MANUAL (16)] button and select a parameter by pressing one of the numeric
buttons shown in the following table.
3. Use the [VALUE] knob to edit the value.
4. Press the [MANUAL (16)] button once again to exit patch parameter editing.
Button Parameter Value/Explanation
[1]
Portamento
Switch
Smoothly changes the pitch from the rst-played note to the next-played note.
OFF, On
[2]
Portamento
Time
Adjusts the time over which the portamento pitch change occurs.
0255
[3] Bend Range
Species the pitch bend range in semitone units.
OFF, 124
[4] Tempo Sync
Synchronizes the LFO’s RATE or the DELAY’s TIME to the tempo.
OFF, On
[5]
LFO
waveform
Switches the LFO waveform.
Tri (Triangle wave), Sqr (Square wave), SA1 (Sawtooth wave1), SA2
(Sawtooth wave2),
Sin (Sine wave), rd1 (Random wave1), rd2 (Random
wave2)
[6]
LFO Key
Trigger
Species whether the LFO cycle is aligned with the timing at which you play
the key (on) or is not aligned (o).
OFF, On
* Saved as a patch setting.
Delay Parameters
1. Press the SEQUENCER [EDIT] button to make it go dark.
2. Hold down the [DELAY (15)] button and select a parameter by pressing one of the numeric
buttons shown in the following table.
3. Use the [VALUE] knob to edit the value.
4. Press the [DELAY (15)] button once again to exit delay parameter editing.
Button Parameter Value/Explanation
[1] Delay Level
Adjusts the volume of the delay sound.
015
[2] Delay Time
Adjusts the time by which the sound is delayed.
015
[3]
Delay
Feedback
Adjusts the amount of feedback (delay repeats).
015
* Saved as a patch setting.
Sequencer Settings
1. Hold down the SEQUENCER [EDIT] button and select a parameter by pressing one of the numeric
buttons shown in the following table.
2. Use the [VALUE] knob to edit the value.
3. Press the SEQUENCER [EDIT] button once again to exit sequencer settings editing.
Button Parameter Value/Explanation
[1] Shue
Adjusts the timing of the notes for even-numbered steps.
-5050
[2]
Step Order
Type
Species how the step sequencer plays.
nOr (Normal): Play forward from the rst step.
EOr (Even/Odd reverse): Exchange even-numbered steps with odd-
numbered steps during playback.
Odd (Odd only): Play odd-numbered steps consecutively from the
beginning.
EVn (Even only): Play even-numbered steps consecutively from the
beginning.
O-E (Odd only
0
Even only): Play odd-numbered steps consecutively from the
beginning, and after reaching the last step play
even-numbered steps consecutively from the
beginning.
E-O (Even only
0
Odd only): Play even-numbered steps consecutively from
the beginning, and after reaching the last step
play odd-numbered steps consecutively from the
beginning.
rnd (Random): Play steps randomly.
[3] O Step Mode
Species how steps that are turned o will play.
rSt (Rest): Play a rest.
SKP (Skip): Advance to the next step without playing.
[5] Last Step
Species the length of steps that are played.
L1 (1step) –L16 (16step)
Button Parameter Value/Explanation
[6] Scale
Species the note length (scale) of each step.
2t (half-note triplet), 4 (quarter note), 4t (quarter note triplet), 8 (8th note),
8t (8th note triplet), 16 (16th note), 16t (16th note triplet), 32 (32nd note)
* Shue, Step Order Type, and O Step Mode settings return to their default values when the power
is turned o.
* Last Step and Scale settings are saved as pattern settings.
System Settings
1. Hold down the ARPEGGIO [ON/OFF] button and select a parameter by pressing one of the
numeric buttons shown in the following table.
2. Use the [VALUE] knob to select the value.
3. Press the ARPEGGIO [ON/OFF] button once again to conrm the value and exit system settings.
Button Parameter Value Explanation
[1] Master Tune
433448 Hz
Species the master tuning.
Default: 440 Hz
[2] MIDI Channel
116
Species the MIDI transmit/receive channel (1–16).
Default: 1 ch
[3]
MIDI
Clock Source
At (AUTO)
If MIDI clock is being input to the MIDI IN connector or the
USB port, the JU-06A’s tempo will automatically synchronize
to MIDI clock (default).
Int
(INTERNAL)
The JU-06A operates at the tempo specied on the unit
itself. Choose the “INTERNAL setting if you don’t want to
synchronize to an external device.
MId (MIDI)
Always synchronize to the MIDI clock received from the MIDI
IN connector.
USb (USB)
Always synchronize to the MIDI clock received from the USB
port.
[4]
Transpose
*2
-65
Transposes the keyboard range in semitones.
Default: 0
[5]
Key Velocity
*1
Species how the sound engine responds to velocity data (the force with
which you play a note).
* This setting also applies to the MIDI output when you play the K-25m.
tch (TOUCH)
The sound engine responds to velocity data.
64
Regardless of the velocity, the sound engine always operates
with a xed value (64 or 127).
Default: 127
127
[6]
Velocity
Curve
*1
Sets the keyboard’s touch.
LHt (Light)
Sets the keyboard to a light touch.
MEd
(Medium)
This is the standard keyboard touch setting (default).
HVY (Heavy)
Sets the keyboard to a heavy touch.
[7] Auto O
OFF (OFF)
The power does not turn o automatically.
30 (30 min)
The power turns oautomatically after 30 minutes (default
value).
Auto O does not occur while USB-connected.
[8] LED DEMO
Off (OFF)
Species the time until the LED DEMO is shown.
Default: 3 min
1 (1 min)
3 (3 min)
10 (10 min)
[9] Chain Mode
Although the JU-06A is four-note polyphonic,
you can increase the polyphony by using a MIDI
cable to connect two or more JU-06A units and
turning Chain mode on.
OFF (OFF)
If Chain mode is on, the fth voice and subsequent notes are
passed “thru” via MIDI OUT.
Default: OFF
On (ON)
[10] Chorus Noise
OFF (NOISE
OFF)
Species the amount of noise when chorus is on.
OrG (ORIGINAL) reproduces the noise of the original JUNO’s
chorus (default value).
HLF (HALF)
OrG
(ORIGINAL)
[11]
Control
Change
Output Mode
OFF (OFF)
Species the output destination of the MIDI messages that
are transmitted when you edit patch settings (operate the
panel).
Default: USB
USb (USB)
MId (MIDI)
ALL (USB &
MIDI)
[12]
Arpeggio
Style
1 (Type 1)
Species how the arpeggio plays.
1 (Type 1) reproduces the arpeggio of the original JUNO-60
(default value).
2 (Type 2)
*1 Only when using the K-25m keyboard unit (sold separately)
*2 This setting applies to keyboard performance using the step buttons and to performance using the
K-25m keyboard unit (sold separately).
Returning to the Factory Settings (Factory Reset)
Here's how to return the JU-06A to its factory-set state.
1. While holding down the BANK [1] button, turn on the power.
The ARPEGGIO [ON/OFF] button blinks.
If you decide to cancel the factory reset, turn o the power.
2. Press the ARPEGGIO [ON/OFF] button to execute the factory reset.
3. When all buttons blink, turn the JU-06As power o, then on again.
Data Backup/Restore
Backup
1. Connect your computer to the JU-06As USB port via USB cable.
2. While holding down the BANK [2] button, turn on the power.
It takes about 20 seconds to prepare the drive.
3. Open the JU-06A” drive on your computer.
The backup les are located in the “BACKUP” folder of the JU-06A drive.
4. Copy the backup les into your computer.
5. After copying is completed, eject the USB drive.
Windows 8/7
Right-click on the JU-06A” icon in “My Computer” and execute “Eject.
Mac OS
Drag the JU-06A” icon to the Trash icon in the Dock.
6. Turn the JU-06A power o.
Restore
1. As described in the procedure for “Backup” Step 1–3, open the JU-06A” drive on your computer.
2. Copy the JU-06A backup les into the “RESTORE” folder of the JU-06A” drive.
3. After copying is completed, eject the USB drive and then press the ARPEGGIO [ON/OFF] button.
4. After the LEDs have completely stopped blinking, turn o the power.
Fixed Battery Operation Mode
This mode makes the unit operate on batteries without switching to bus power supply even when the
USB port is connected.
This lets you use the unit even with a USB port that is not able to supply power.
1. While holding down the PATCH [1] button, turn on the power.
* If you handle batteries improperly, you risk explosion and fluid leakage. Make sure that you
carefully observe all of the items related to batteries that are listed in “USING THE UNIT SAFELY” and
“IMPORTANT NOTES” (leaet “USING THE UNIT SAFELY”).
Control Surface Mode
This makes the unit operate as a control surface. The JU-06A does not produce sound.
1. While holding down the PATCH [8] button, turn on the power.
Main Specications
Roland JU-06A: SOUND MODULE
Maximum
Polyphony
4 voices
Power Supply Ni-MH battery (AA, HR6) x 4, Alkaline battery (AA, LR6) x 4, USB bus power
Current Draw 500 mA (USB bus power)
Dimensions
300 (W) x 128 (D) x 49 (H) mm
11-13/16 (W) x 5-1/16 (D) x 1-15/16 (H) inches
Weight 995 g / 2 lbs 4 oz (including batteries)
Accessories Owner’s Manual, Leaet “USING THE UNIT SAFELY, Alkaline battery (AA, LR6) x 4
Options
Keyboard unit: K-25m
Boutique Dock: DK-01
* This document explains the specications of the product at the time that the document was issued.
For the latest information, refer to the Roland website.
MIDI INMIDI OUT
1 / 1

Roland JU-06A Owner's manual

Category
Digital pianos
Type
Owner's manual
This manual is also suitable for

Roland JU-06A Sound Module: Dive into the world of classic analog synthesis with this compact and versatile sound module, inspired by the iconic Roland JUNO-60 and JUNO-106 synthesizers. With its intuitive controls, 4-voice polyphony, and authentic recreations of the original JUNO sounds, the JU-06A lets you explore a wide range of classic and modern electronic music styles. From lush pads and shimmering leads to funky basslines and rhythmic arpeggios, the JU-06A delivers the unmistakable JUNO vibe, all in a portable and affordable package.

Ask a question and I''ll find the answer in the document

Finding information in a document is now easier with AI

Ask the document