Page is loading ...

""PROTECT YOURSELF AND YOUR INVESTMENT
COPYRIGHT: OMEGA RESEARCH & DEVELOPMENT, INC. 1997
MODEL: FREE-200 & FREE-300ATV
INSTALLATION MANUAL
L I M I T E D L I F E T I M E W A R R A N T Y
This device complies with FCC Rules part 15. Operation is subject to the following two
conditions, (1) This device may not cause harmful interference and, (2) This device must
accept any interference that may be received, including interference that may cause
undesired operation.
Products manufactured and sold by OMEGA RESEARCH & DEVELOPMENT, INC. (the
Company), are warranted to be free from defects in materials and workmanship under normal use.
If a product sold by the Company proves to be defective, the Company will repair or replace it free
of charge within the first year and thereafter all parts to be repaired will be free with only a
nominal charge for Omega Research and Development, Inc.'s labor and return shipping, to the
original owner during the lifetime of the car in which it was originally installed.
All products for warranty repair must be sent postage prepaid to Omega Research &
Development, Inc., P.O. Box 508, Douglasville, Georgia 30133, with bill of sale or other dated
proof of purchase. This warranty is nontransferable and does not apply to any product damaged
by accident, physical or electrical misuse or abuse, improper installation, alteration, any use
contrary to its intended function, unauthorized service, fire, flood, lightning, or other acts of God.
This warranty limits the Company's liability to the repair or replacement of the product. The
Company shall not be responsible for removal and/or reinstallation charges, damage to or theft
of the vehicle or its contents, or any incidental or consequential damages caused by any failure
or alleged failure of the product to function properly. Under No Circumstances Should This
Warranty, Or The Product Covered By It, Be Construed As A Guarantee Or Insurance Policy
Against Loss. The Company neither assumes nor authorizes any person or organization to make
any Warranties or assume any liability in connection with the sale, installation, or use of this
product.
MI_FREE-200/FREE-300ATV

Contents
WIRE CONNECTIONS
Wiring Diagram Overview ......................................................................................................................20-21
Black Wire (Negative Ground Input) ............................................................................................................ 3
Red Wire (12 Volt Positive Input) .................................................................................................................. 4
Yellow Wire (Ignition Power) ....................................................................................................................... 5
Orange Wire (Grounded Output For Starter Interrupt) ............................................................................. 5-7
Gray Wire (Optional Trunk Release Output) .............................................................................................7-8
Brown Wire (Connect To Siren Positive Wire) .............................................................................................. 9
White Wire (Positive Flashing Parking Light Output) .............................................................................9-11
Green Wire (Negative Door Trigger Wire).............................................................................................12-14
Violet Wire (Positive Door Trigger Wire) ..............................................................................................14-15
Blue Wire (Negative Instant Trigger Wire) ............................................................................................15-16
Pink Wire (Optional #3 Channel Output) ................................................................................................... 17
Black/White Wire (Optional Dome Light Supervision Output) .............................................................18-19
PREWIRED PLUG IN FEATURES
Red LED Status Light .............................................................................................................................22-24
Easy ValetTM Switch ................................................................................................................................25-26
Plug-In Auxiliary Sensor Port ..................................................................................................................26-27
Optional Plug-In Pager Port ......................................................................................................................... 27
Optional Plug-In power Doorlock Circuit ...............................................................................................27-33
PROGRAMMABLE FEATURES
Programming Features ............................................................................................................................34-38
Programming Transmitters ......................................................................................................................38-39
Transmitter Code Jumping (Model FREE-300ATV Only) ............................................................................. 39 Page - 39
3) To learn the first transmitter : Press the large transmitter button which will be used to
arm, disarm, and panic the alarm, until one siren burst and one short siren chirp is heard
to confirm that the code was learned. The small button will automatically be learned.
4) To program the second, third or fourth transmitter, repeat step #3. As each transmitter
is learned, the long confirmation chirp will be followed by two short chirps for transmitter
number two, three short chirps for transmitter number three, and four short chirps for
transmitter number four. An attempt to add any further transmitter codes will be ignored.
5) Turning off the ignition switch will automatically turn off the transmitter learning code
program, which is confirmed by two siren chirps.
The FREE-300ATV features Code JumpingTM transmitters and system control unit.
Each time a code is broadcast to the security system, the transmitter and security system
will advance to another code to use for the next transmission. This prevents "code grabber"
units from copying the transmitter to operate the security system. Please note that pressing
the arm / disarm button on the transmitter at any time while out of range of the security
system can advance the code beyond the range of recognition. If this occurs, simply press
the arm / disarm button a few times to synchronize the transmitter and the security system.
FREE-300ATV Only - Code JumpingTM

Installation
Mounting The Main Control Module: The Main Control Module contains the elec-
tronics necessary for the security system's operation. Always mount this module in the
vehicle's interior compartment, in a secure location that is not easily accessible. Ensure
that moisture, vibration and temperature extremes are minimized. Acceptable locations
may include mounting behind the dash, behind the glovebox or other interior panels.
Mounting The Siren: Find a location in the engine compartment away from the ex-
treme heat of the engine and manifold. A suitable location will offer a firm mounting
surface, will also allow sound dispersion out of the engine compartment, and not be acces-
sible to a thief. The siren must be pointed downward to avoid moisture collecting inside it
and to enhance sound dispersal.
Wiring Connections: The security system's wires should be securely connected to the
appropriate vehicle wires with the proper terminals, connectors, or by soldering and
insulating with quality vinyl electrical tape or heat shrink tubing. All wiring should be
carefully routed to avoid the possibility of chaffing or otherwise being damaged.
Black Wire - (Ground Input): The Black wire's function is to supply Negative
chassis ground for the security system's operation.
CONNECTION: Using the correct sized crimp-on ring terminal, connect the Black wire to
the metal frame of the vehicle, preferably using an existing machine-threaded fastener.
Wiring Connections - 5 Wire Connector
Page - 3Page - 38
pulse, which will make the confirmation horn honk louder.
9) Open Door Arming Alert: When this Feature is utilized, if one of the vehicle's doors
is open when the system is armed using the transmitter, the siren will chirp 3 times instead
of once upon arming the alarm.
This security system will respond to up to 4 different transmitters, and comes from the
factory with two transmitters already programmed into the system's memory. The alarm
control module, through a code-learning procedure, "learns" each transmitter's code. When
a transmitter code is programmed into the system, all previous codes will be deleted. If a
third or fourth transmitter is desired, all of the transmitters must be programmed into alarm's
memory. When adding transmitter codes to operate the alarm, follow this process:
1) Turn "on" the ignition switch.
2) Within 5 seconds of turning "on" the ignition, press the valet switch 5 times. The system
will respond with a long siren burst, confirming it is ready to learn a transmitter code.
When the ignition switch is turned "off", the learning process will automatically
terminate, which will be indicated by two long siren bursts. When the first transmitter is
learned, all prior codes will be erased.
Programming Transmitters

Make sure that the ring terminal attached to the Black wire has contact with bright, clean
metal. If necessary, scrape any paint, rust or grease away from the connection point until
the metal is bright and clean.
Note: If the control module has an insufficient ground connection, the security system can
find partial ground through the wires that are connected to other circuits, but the alarm will
not function correctly, giving the impression of a defective control module. The alarm can
partially work, so a bad ground wire connection would be suspected. In some cases the
alarm could arm and disarm properly -but not function correctly otherwise.
Note: When power or ground is first applied the alarm will trigger "on" instantly.
Note: The Black wire attached to the control module is the antenna wire. Do not
connect this wire to anything or the transmitter's range will be reduced or eliminated.
Stretch the Black antenna wire out and as high as possible for the best operating range.
Red Wire - (Positive 12 Volt Input): The Red wire's function is to supply
Constant Positive 12 Volts for security system's operation. When 12 Volts is first applied
to the Red wire, the system will activate, sounding the siren, flashing the lights and locking
the doors (if equipped with an optional doorlock interface). Note: In Valet Mode with the
ignition switch "on", this function will not work, allowing vehicle to be serviced without the
system being activated if the battery is disconnected and reconnected. The Red wire also
supplies 12 Volt Positive to the built-in relay for flashing the parking lights.
CONNECTION: Connect the Red wire to a Constant Positive 12 Volt source. This source
should have Positive 12 Volt at all times and in all ignition key positions. Connection
Page - 4 Page - 37
7) Steady Siren Or Pulsed Horn
Output: Instead of the included electronic
siren, if preferred the vehicles existing horn
may be used for the alarm's audible responses.
If the vehicle does not utilize an existing
horn relay, on must be added or this output's
1 Amp capacity may be exceeded, which will
damage the alarm.
86
85
87a
87
C O I L
Alarm
Brown (-)
Wire
30
To Constant (+) OR
(-)Ground
as needed
To Constant
(+) 12 Volts. To Vehicle's
Horn Wire
8) Horn Confirmation Honk Loud Or Soft: If the previous Feature is utilized, the
arming and disarming confirmation honks may adjusted with this Feature. When
programming this Feature, pressing the large transmitter button will select a longer output
automatically lock when the ignition switch is turned "on", nor automatically unlock when
the ignition switch is turned "off".
5) 30 or 60 Second Activation Duration: Feature #5 will select the length of time that
the siren sounds and the lights flash when the alarm is activated or triggered. This can be
used when local law requires shorter siren times for noise restrictions. Pressing the small
transmitter button when programming this Feature will select the 30 second timing cycle.
6) Double Pulse Door Unlock: If Feature #6 is "on" the alarm's unlock output will pulse
twice to unlock some of the newer doorlocking systems.

Page - 36
locations can be at the supply wire at the ignition switch, the supply wire behind the fuse
block or the fuse/junction block. Never just insert the Red wire or any other security system
wire behind a fuse. Also, please note that connecting directly to the battery's Positive
terminal will expose this connection to failure due to a corrosive environment. The
connection location must have at least a 15 Amp capacity.
Yellow Wire - (Ignition 12 Volt Positive Input):The Yellow wire is an igni-
tion "on" input to the security system. This connection is critical to the proper operation of
many of the security system's features.
CONNECTION: This wire supplies Positive 12 Volts to the control module whenever the
ignition switch is "on". This connection should be made at the ignition switch harness, to
the primary ignition circuit. Primary ignition has 0 Volts when the ignition key is in the
"Lock", "Off" and "Accessory" positions; and Positive 12 Volts in the "Run" and "Start"
positions. Locate the correct wire at the ignition switch harness and securely splice the
Yellow wire to it.
Orange Wire - (Ground Output While Armed): The Orange wire is for an
optional starter disable socket and relay. The function of this wire is to provide a Constant
500ma Ground Output whenever the security system is in an armed state. This output
supplies Negative Ground to one side of the relay's coil. The other side of the relay coil will
be supplied with Positive Voltage from the ignition switch, but only if the ignition switch
is turned to the "start" position. If this occurs, the coil will energize, activating the relay,
Page - 5
confirming that the alarm is fully armed. If a point of entry is reopened before the 30 seconds
expires, the countdown stops, and will reset to start again when the door is reclosed.
Upon disarming an armed system, a 90 second Automatic Rearming countdown will
start. During this countdown the LED will flash rapidly until any point of entry is opened,
which will temporarily suspend the Automatic Rearming process until reclosed.
At the end of the 90 second period the alarm will automatically arm itself (note that the doors
will also lock if Feature #2 is turned "on"). Automatic Rearming is cancelled by turning the
ignition switch "on" before the 90 second countdown ends. To temporarily suspend either
Last Door Arming or Automatic Rearming (for example, while refueling) the owner should
put the alarm in Valet Mode or leave the door open. It is not recommend to leave the ignition
switch turned "on" for this purpose.
2) Passive Locking and Automatic Relocking: If Feature #2 is turned "on", and the Last
Door Arming Feature is utilized, the doors will also lock when the alarm becomes armed
30 seconds after shutting the last door and also lock the doors when the alarm rearms from
Automatic Rearming.
3) Ignition On / Off to Lock / Unlock Doors: If Feature #3 is "on", the doors will lock
2 seconds after the ignition switch is turned "on", and unlock instantly when the ignition
switch is turned "off".
4) Open Door Bypass to Feature #3: If feature #4 is "on" it will check the vehicle's door
circuit. If it detects that any of the vehicle's doors are open at the time, the doors will not

Page - 35
which in turn will open the starter circuit. The starter interrupt prevents the vehicle from
starting only if the alarm is armed (including while the alarm is activated), and will draw
current from the vehicle's electrical system only if an attempt is made to start the vehicle.
Ignition
Switch
Cutting The Vehicle's
Starter Wire Will Leave
Two Sides- The Ignition
Switch Side And The
Starter Solenoid Side.
87a 30
87
85
86
C O I L
Starter Disable Socket
White Wire To The Starter
Solenoid Side Of The Cut.
Starter Disable Socket Red Wire
To The Ignition Switch Side Of
The Cut.
Security
System
Control
Unit
Configuring A Starter Disable Using The AU-SOCKET And One SPDT Relay.
Socket
Orange Wire
Control
Module
Orange Wire
Starter
Solenoid
Page - 6
Step #6 Repeat steps 4 and #5 to enter another Feature number and program the "on" or
"off" condition.
Step #7 Turning "on" the ignition, or 10 seconds of no programming activity, will cause
the system to automatically exit the Feature Programming Mode, which is
indicated by two long siren chirps.
List Of 9 Programmable Features:
Feature #1- Passive Arming and Automatic Rearming (Factory Setting Off).
Feature #2- Passive Locking and Automatic Relocking (Factory Setting Off).
Feature #3- Ignition On / Off to Lock / Unlock Doors (Factory Setting On).
Feature #4- Open Door Bypass to Feature #3 (Factory Setting On).
Feature #5- 30 or 60 Second Activation Duration (Factory Setting 60).
Feature #6- Double Pulse Door Unlock (Factory Setting Off).
Feature #7- Steady Siren Or Pulsed Horn Output (Factory Setting Steady Siren).
Feature #8 -Horn Confirmation Honk Loud Or Soft (Factory Setting Soft).
Feature #9 -Open Door Arming Alert (Factory Setting Off).
1) Passive Arming and Automatic Rearming: If Feature #1 is turned "on", the Last
Door Arming and Automatic Rearming Features will operate. Last Door Arming starts after
the ignition switch has been turned "off" and at the last open door is closed. The moment
the last door closes the alarm will chirp and begin a countdown (during this countdown the
LED Status Light will be flashing fast). Thirty seconds after the last door was closed, the
siren will chirp again, the parking lights flash once, and the LED will begin to flash slow,

CONNECTION: To interrupt the vehicle's starter circuit, the starter wire must be lo-
cated and cut. It is recommended that this connection be done as close to the ignition
switch as possible. Use a voltmeter, not a test light, to find the correct wire, which is the
wire from the ignition switch to the starter solenoid. CAUTION! Avoid the airbag circuit!
Improper use of a test light can cause deployment of the airbag, which may result in
bodily injury! Test lights can also damage on-board computers and associated sensors.
The starter wire will read Positive 12 Volts only when ignition key is in "start" position
(cranking the engine). Cut this wire at a suitable location. Confirm that this is the correct
wire by turning the ignition switch to the "start" position. The starter should not engage.
Connect the optional starter disable socket's Red wire to the ignition switch side, and its
White wire to the starter solenoid side. Be sure that good, solid electrical connections are
made as this generally is a high amperage circuit. Connect the security system's Orange
wire to the Orange wire of the starter disable socket. Note: If the Orange wire touches 12
volts positive directly or has more than a 500ma ground load, the circuit will be damaged.
Gray Wire - (Negative Trunk Release Output): The function of the Gray
wire is to provide an optional output, the primary use being trunk release. Press and hold
the small transmitter button for two seconds to activate this output. When activated the
siren will chirp twice and the Gray wire will provide a 250ma Negative Ground pulse for
1 second; or, stay grounded for as long as the small transmitter button is depressed, for up
to 15 seconds.
Also, the security system will automatically disarm, unlock the doors and illuminate the
Page - 7
Feature Programming Mode:
This Security System has 9 Features that can be turned on or off by accessing the Features
Programming Mode. To change a Feature, follow these steps:
Step #1: Turn "off" the ignition.
Step #2: Within 7 seconds of turning "off" the ignition, press the Valet Switch 5 times.
Step #3: The system is now in Features Programming Mode. To confirm, the siren will
sound a short burst. For the next 10 seconds the system is ready for the desired
Feature to be selected. The system will exit Features Programming Mode if a
selection is not made within 10 seconds.
Step #4: Within 10 seconds of entering Features Programming Mode, press the Valet
Switch the number of times that equal the Feature number that is desired. After
the series of Valet Switch presses, the siren will chirp an equal number of times
to confirm that the correct Feature has been accessed for programming. Example:
Press the Valet Switch 5 times, the siren will chirp 5 times.
Step #5: Press the large transmitter button if the Feature is to be turned on; or press the
small transmitter button if the Feature is to be turned off. The siren will chirp once
to confirm that the Feature was turned on; or, chirp twice to confirm the Feature
was turned off. Remember, 10 seconds without any programming activity will
result in the system exiting the Features Programming Mode automatically.
Programmable Features
Page - 34

exterior lights on for 30 seconds (unless a door is opened or the ignition switch is turned
"on"). Note: The trunk release feature can be operated anytime with the ignition switch
"off", or, it may also be operated while ignition key is "on" provided a door is open at the
same time. This prevents the trunk or rear hatch from being opened from the transmitter
while driving. Unless the vehicle's trunk release switch negatively triggers a release relay
which draws no more than 250ma, an optional relay must be used. Connect the Gray wire
to relay pin (85), and connect Constant Positive 12 Volts to relay pin (86). Connect pins
87, 87a & 30 as indicated in the following typical diagram:
Release
Switch
Release
Solenoid
Wiring An Optional Relay For Trunk Release.
Page - 8
Some vehicles have a type of power doorlock system in which mechanically locking and
unlocking the driver's door will operate an electrical switch in the door which supplies
voltage to actuators in the other doors. There is no actuator in the driver's door, only a switch.
An indication of this type
of power doorlock system
is when the driver door
key will operate the pass-
enger door, but the pass-
enger side will not oper-
ate the driver door.
Adding The Optional DS-2 Actuator And The DLS And 2 Relays
DLS
Relay Relay +
DLS Blue Wire To DS-2 Red Wire
DLS Green Wire To DS-2 Blue Wire
DLS Violet
Wire To
12 Volt
DLS Connector
Plugs Into Alarm
Note: Use this
diagram when
adding actuators
to a vehicle not
equipped with
factory power
door locks.
DLS Brown And
White Wires
Connect To
Chassis Ground
Page - 33
87
86 87a 85
Security
System
Control
Unit
To 12 Volt
Positive
Gray Wire
To Positive Or Negative As Needed.
In This Case, Negative Is Required.
In Others, Positive. In Some Appli-
cations The Wire Will Rest At
Ground. Cut The Wire, Switch Side
To Pin 87a, Solenoid Side To Pin 30
and 12 Volts To Pin 87.
To 12 Volt
Positive 30

Page - 9
Wiring Connections - 7 Wire Connector
Brown Wire - (Negative Siren Output): The Brown wire is a 12 volt Negative
output for the electronic siren. This circuit will have steady output to sound the siren if the
alarm is activated, and pulses for the confirmation chirps. If desired, this output may be
changed to pulse, allowing connection to the vehicle's existing horn. This Programmable
Option is explained on Page 37.
CONNECTION: The Brown wire is connected directly to the siren's Black wire, and the
siren's Red wire is connected to Positive 12 Volts.
White Wire - Positive Flashing Light Output: This is a Positive 12 Volt out-
put for exterior flashing light confirmation and to attract attention to the vehicle if the
security system is activated. Also, upon disarming, this circuit will stay on for 30 seconds
to confirm disarming and to illuminate the way to the vehicle. This feature gives added
security when approaching the vehicle at night.
CONNECTION: Connect this wire to the vehicle's Positive 12 Volt parking light circuit.
This wire can usually be found at the following locations: at the headlight switch, at the fuse/
junction block, or in the rear body harness in the driver kick panel. Note: Some vehicles,
notably Toyotas, have a parking light relay which is triggered by a Negative Ground circuit
from the headlight switch. These cars can still be connected directly to the White wire by
finding the parking light circuit after the relay, usually at the Fuse/Junction Block.
Lock
Unlock Unlock
DLS
Lock
Driver
Doorlock
Actuator
Passenger
Doorlock
Switch
Driver
Doorlock
Switch
DLS Violet
Wire To
12 Volt
Constant
DLS White Wire To
Lock Wire, "Switch" Side Wire, "Motor" Side
DLS Brown Wire To
Unlock Wire, "Switch" Side
DLS Green Wire To Lock
Wire, "Motor" Side
DLS Blue Wire To Unlock
Cut Both Lock And
Unlock Wires In Car
Relay Relay
DLS Connector
Plugs Into Alarm
5 Wire Reversal Rest At
Ground Doorlocks With
The Optional DLS And
2 SPDT Relays
Examine the wires on the back of the switch. Normally 5 wires will
be found. Of the wires, one will be constant 12 volts positive, regardless
of the switch's position. Two wires will be grounded regardless of the
switch's position. Of the two remaining wires, one will show 12 volts
positive when the switch is pushed to "lock", and the other will show 12
volts positive when the switch is pushed to "unlock". When the correct
wires are found, they must be cut. Notice in the diagram that the driver's
switch is the primary switch and referred to as the "switch" wires. The
wires that go to the secondary switch are referred to as the "motor" wires.
Even though the cut is made between the switches, the two sides are still
correctly called the "switch" and the "motor" sides.
++
Passenger
Doorlock
Actuator
Ground
12 Volt
Constant
Page - 32

The correct wire will show Positive 12 Volts when the headlight switch is in the "Parking
Light" and "Head Light" positions. When such a wire is located, be sure to also test that it
is non-rheostated: while metering the wire, operate the dash light dimmer control. The
correct wire will show no change in voltage when the dimmer is operated. Note: Do not
attempt to flash the parking lights by connecting the White wire to a rheostated (dimmer)
circuit! This will backfeed the parking lights through the rheostat or illumination control
module, and possibly cause damage to the vehicle or alarm control unit. Also, if the White
wire touches chassis ground, the Printed Circuit Board and on-board relay may be damaged.
Page - 10
+
+
Door Lock
Switch
Vehicle's Doorlock
Relay Control Unit
Doorlock
Actuators
DLP-P3 Blue Wire
To Unlock Wire.
DLP-P3 Green Wire
To Lock Wire.
DLP-P3
Connector
Plugs Into
Control Unit
Lock
Unlock
D/U +
D/L +
3 Wire Positive Doorlocks With The
Optional DLP-P3
To Constant
12 Volt
5 Wire Reversal Rest At Ground Systems: This power doorlock system differs
from the negative and positive pulse systems in the fact that there are no relays or doorlock
control unit. In this type of system, the switches themselves supply the positive voltage
directly to the doorlock actuators, and, more importantly, provide the return ground path.
The correct doorlock interface for this type of system is the optional DLS and 2 SPDT relays.
The important thing to remember is that the wires in this system rest at ground, which means
that the wires must be "opened", or cut, to make the connections.
Page - 31
Rear Body Harness
Head
Light
Switch
Junction
Block
Dash Lights
Dimmer
Caution:
Do not connect to
the dimmer circuit!
Damage to the con-
trol unit or vehicle
can occur!
Parking Lights
Parking
Lights
3 Suggested Parking Light Connections
Security
System
Control
Unit
White
Wire
10 Amp

Many European imports have separate left and right side parking lights. When left & right
parking lights are on separate circuits, a pair of 6 to 10 amp diodes must be used to connect
the White wire to each parking light circuit. Note: Flashing the headlights is not
recommended. The halogen headlights found in modern vehicles are not designed to be
rapidly turned on and off. If connected to the security system, a reduction of their useful life
may be noticed. If flashing the headlights is still desired, a relay must be used, since the
headlight's current draw exceeds the 7 amp rating of the built-in relay. If flashing headlights
and parking lights are desired, use two relays - one relay will supply the parking lights and
the other relay will supply the headlights.
Page - 11
Left Parking Lights
Head
Light
Switch
Right Parking Lights
White
Wire
10 Amp
Connecting Left And Right Parking Lights Using Two Diodes.
Note: Use Two
IN4006 Diodes.
The DLS is a dual relay socket with a harness and connector to plug into the alarm control
module and nonterminated wires to splice into the vehicle's wiring. The DLS and two relays
are the most universal doorlock interface available. The relays used with it are standard 30
amp single pole, double throw (SPDT) automotive relays. The DLP-P3 is a plug-in tran-
sistor network which converts the alarm's negative doorlock output pulses to 12 volt positive
pulses. The DLP-P3 is the quickest, easiest doorlock interface to use for 3 wire positive pulse
doorlock systems. The option model DLS with 2 relays can also be used to interface the
security system with 3 wire positive doorlock systems. Use this diagram:
-29
Relay
DLS DLS Connector
Plugs Into Alarm
Relay +
DLS Violet Wire To 12 Volt
Lock
Unlock
DLS Green Wire
To Door Lock Wire. DLS Blue Wire To
Door Unlock Wire.
+
Vehicle's Doorlock
Relay Control Unit
Door Lock
Switch DLS Brown & White Wires
Are Not Used In This System
3 Wire Positive Doorlocks With The Optional DLS
And 2 SPDT Relays
To Constant
12 Volt
Page - 30
Security
System
Control
Unit

Green Wire - (Negative Door Trigger): The Green wire's function is an open
door input to the control module for vehicles having Negative switching door pin switches.
This circuit has effects on many security system operations, the primary being the activation
of the system (sounding the siren and flashing the exterior and interior lights) if in an armed
state. If the Last Door Arming and Automatic Rearming features are utilized, after turning
"off" the ignition switch and closing the door, the Last Door Arming sequence will begin,
and be suspended if a door is reopened. Opening a door during Automatic Rearming will
also suspend that feature. Note: Last Door Arming and Automatic Rearming are related
automatic arming features. Utilizing the Last Door Arming feature automatically turns on
the Automatic Rearming feature.
Opening a door while the exterior lights are on after disarming the security system will
cause the exterior lights to turn off 10 seconds after the opening of the door. If the system
has been programmed to lock and unlock the doors with the ignition switch being turned
"on" and "off", an open door bypass of this feature may also be programmed. If a door is
opened while the ignition switch is "on", the trunk release via the transmitter will operate.
CONNECTION: Connect the Green wire to a wire in the vehicle which is common to all
the door pin switches. The correct wire in this type of dome light/door jamb pin switch system
will have no voltage present and will also show chassis ground when the doors are opened,
and up to 12 volts when the doors are closed. Note: The correct wire will show this change
when any of the doors are opened. If the vehicle has delay dome lights, remember to take
this into account when testing the wire. Note: If the car has a delay dome light the Circuit
Bypass feature will allow the system to be armed from the transmitter instantly and will start
Page - 12
Relay
DLS
Door Lock
Switch
Ground
DLS Connector
Plugs Into Alarm
Relay
Vehicle's Doorlock
Relay Control Unit
DLS Violet Wire To Ground
Lock
Unlock
DLS Green Wire
To Door Lock Wire. DLS Blue Wire To
Door Unlock Wire.
++
Doorlock
Actuators
3 Wire Negative Doorlocks With The Optional
DLS And 2 SPDT Relays
3 Wire Positive Pulse Systems: This power doorlock system is very similar to the
3 wire negative pulse system except the vehicle's doorlock switches use 12 volt positive
pulses to operate the doorlock relays/control unit. Examine the wires on the back of the
switch. Of the three wires, one will be constant 12 volt positive, regardless of the switch's
position. Of the two remaining wires, one will show 12 volt positive when the switch is
pushed to "lock", and the other will show 12 volt positive when the switch is pushed to
"unlock". Page - 29

protecting the Green wire circuit when the dome light turns off. In Last Door Arming mode,
the system arms 30 seconds after the delay dome light turns off. The diagram below
illustrates a basic negative courtesy light system.
If the pin switch is mounted in the metal structure of the vehicle, and the dome light goes
out when the switch is removed, suspect a grounding-type dome light system. If the switch
is mounted in plastic, a constant ground wire will also be present. While the traditional pin
switch is mounted in the front door jamb area, also be aware that many vehicles utilize other
types of switch devices to operate the interior
lights. Some imports have a sliding
type of switch and many
have the pin or sliding
To 12 Volt
Constant
This Is The Correct Trigger
Wire. Connection May Be
Made At Any Point.
Driver
Pin
Switch
Passenger
Pin
Switch
Note: The Driver Pin Switch Often Will Have An
Extra Wire That Goes To The Ignition Key Warn-
ing Chime. This Circuit Will Trigger The Secu-
rity System, But Only From The Driver's
Door, And Is The Incorrect Trigger Wire.
Typical Grounding-Type
Dome Light System.
Dome
Light
Page - 13
in the form of adding a model DS-2 to each of the doors. This will allow the alarm only to
operate the doorlocks. The vast majority of power doorlocks are found as three system types:
3 wire negative pulse, 3 wire positive pulse and 5 wire reversal, rest at ground. The best way
to identify a doorlock system is to examine the doorlock switch's wiring. The following
pages will show schematic diagrams of the various power doorlock systems, and discuss
them in more detail.
3 Wire Negative Pulse Systems: This power doorlock system is indicated by the
presence of three wires at the switch. Of these, one will show constant ground, regardless
of whether the switch is being operated or not (at rest). Of the remaining two wires, one will
show ground when the switch is pushed to the "lock" position, and the other wire will show
ground when the switch is pushed to the "unlock" position. With the switch at rest, these
two wires will read voltage, usually 12 volt positive, but in some cases less. The wires from
the switches operate doorlock relays or a doorlock control unit with built-in relays. The
correct connection point is between the switches and the relays.
Most vehicles that have this type of power doorlock system may be wired direct, because
all that's needed to operate the vehicle's relays is negative pulses. An optional harness is
available ( model DLP-N3), or the 3 pin connector and terminals that are included may be
used. Some doorlock systems, however, require more than the 500ma ground output that
the security system's control module can accommodate. In these cases the optional model
DLS and two relays must be used.
Page - 28

switches in the rear door jamb area. In addition, some vehicles utilize switches in the doors,
either connected to the exterior door handles or to the latching mechanism. A car that
features the dome lights illuminating when the exterior door handle is lifted is an example
of this type of switching system.
Also be aware of vehicles which diode-isolate each door. Typically, this is usually
encountered with dash displays that indicate individual doors being ajar. The proper wire
to connect to in this type of system is the common wire which is routed to the dome light itself.
Violet Wire - (Positive Door Trigger): The Violet wire's functions are identical
to the Green Door Trigger wire, with the sole exception that it is an open door input to the
control module for vehicles having Positive 12 volt door pin switches.
This Is
The Correct
Trigger Wire.
Driver
Pin
Switch
Typical Positive
Dome Light System.
To Chassis
Ground
Dome
Light
To Constant
12 Volt
Note: The Driver Pin Switch Often Will Have An Extra
Wire . This Circuit Will Trigger The Security System, But Only
From The Driver's Door, And Is The Incorrect Trigger Wire.
Passenger
Pin
Switch
Page - 14
The sensor may be installed by using screws to mount directly to a panel in the vehicle,
or a nylon tie-strap may be used to secure it to the steering column or other structural part
of the vehicle. Route the harness and connector from the sensor to the alarm control module.
Plug the sensor's connector into the alarm's White port marked "Aux. Plug". The FREE-
300 sensor may be adjusted using a small screwdriver in each of the adjustments (one for
Prewarning, the other for Instant Trigger). A LED indicator is present for each zone to assist
in the adjustment of the sensor. The FREE-200 single-zone sensor has one adjustment.
Plug-In Pager Port: The security system features a plug-in port for an optional
pager system. The 8-pin plug on the top corner of the system's Control Module will allow
quick and easy installation of an Omega Pager unit. The Omega Pager unit will come with
an adapter harness that plugs into this port. After all connections of the alarm are made
simply plug the pager into this optional port. A coaxial jumper cable included with the
Omega Pager will allow the vehicle's existing radio antenna to be used by the Pager.
Complete instructions are included with the Omega Pager.
Plug-In Power Doorlock Interface Port:
The security system features a plug-in port for an optional doorlock interface. The 3 pin
port on the alarm control module produces a negative pulse for lock, a constant 12 volt pin
for the optional relay coils only, and a negative pulse for unlocking the doors. The doorlock
interface needed will depend upon the type of power doorlocks the vehicle has. Note: If the
vehicle does not have existing power doorlocks. Power doorlocks may be added to the vehicle
Page - 27

CONNECTION: Connect the Violet wire to a wire in the vehicle which is common to
all the door pin switches. The correct wire for this type of dome light/door jamb pin switch
system will have 12 volts present when the doors are opened, and chassis ground when the
doors are closed. The correct wire will show this change when any of the doors are opened.
Note: If the car has a delay dome light the Circuit Bypass feature will allow the system to
be armed from the transmitter instantly and will start protecting the Violet wire circuit when
the dome light turns off. In Last Door Arming mode, the system arms 30 seconds after the
dome light turns off.
Blue Wire - Negative Instant Trigger: The Blue wire is a Negative instant trigger
used primarily to detect entry into the hood or trunk area of a vehicle. The primary function
of this circuit is to activate the security system (sounding the siren and flashing the exterior
and interior lights) if in an armed state. If the Last Door Arming and Automatic Rearming
features are utilized, after turning "off" the ignition switch and closing the door, the Last
Door Arming sequence will begin, provided the Blue wire is not grounded. If the Blue wire
is grounded during Automatic Rearming, the process will be interrupted. When the Last
Door Arming feature is utilized, if the Blue wire is grounded when the last door is closed,
the Last Door Arming process will not start until the Blue wire is ungrounded.
CONNECTION: The included pin switches may be installed to provide this trigger circuit
Or, if there are existing switches (example: a light in the luggage compartment or a "Trunk
Ajar" light in the dash), the Blue wire may be connected directly, provided this is a negative
ground switching circuit. An indication of such a circuit is the wire having no voltage present
Page - 15
To turn off the Easy ValetTM, Simply press the Easy Valet TM switch and instantly the
system will be out of Valet Mode. To confirm that the Valet Mode is turned off, the LED
Status Light will turn off. Note: The Easy ValetTM feature will only operate if the security
system is in any condition other than armed.
Disarming The System If The Transmitter Is Lost: In the event the
transmitter is lost, damaged, or its batteries become exhausted, the Easy ValetTM Switch and
the ignition key can be used to disarm the security system:
STEP 1. With the system in the armed condition, enter via the driver's door (be aware that
the security system will trigger the instant the door is opened).
STEP 2. Use the ignition key to turn "on" the ignition.
STEP 3. Within 10 seconds press the Easy ValetTM switch and the alarm will disarm.
NOTE: The Easy ValetTM switch is also part of the programming operations for programming
features and transmitters. These operations are explained in detail on Pages 34-39.
Plug-In Shock Sensor: The security system features a plug-in port for an included
Electronic Piezo Shock Sensor. This port supplies constant 12 volt, grounded output when
the system is armed, a negative instant trigger, and a negative prewarn trigger. When the
prewarn (optional on FREE-200, included on FREE-300) is triggered, the security system
will respond by chirping the siren for two seconds and relocking the doors. After this circuit
has been triggered 5 times it will automatically shut down until the alarm system is rearmed
again. This will prevent the alarm from being a nuisance to the general public. Most Omega
Research and Development, Inc. sensors will plug directly into the alarm control module.
Page - 26

when the hood or trunk is open, and up to 12 volts when the hood or trunk is closed. This
circuit cannot be used with mercury switch types of hood or trunk lights. If the vehicle is
equipped with a usable trunk or hood circuit, locate the proper wire and splice the Blue wire
directly to the vehicle's wire.
When wiring more than one of the vehicle's circuits and/or additional circuits to this
wire, diode-isolation may be required to maintain each circuit's proper operation. An
example would be wiring a hood pin switch and trunk light switch together. Without
isolating, the trunk light will illuminate whenever the hood is raised. Also, diode-isolation
is necessary when combining electronic sensors together, or, in the same circuit with pin
switches:
Optional
Electronic
Sensor
Blue (-) Instant Trigger Wire.
Note: Use IN4002 Diodes,
Which May Be Found At Most
Electronics Stores.
Trunk
Pin
Switch
Hood
Pin
Switch
Trunk
Light
Diode-Isolating multiple negative instant triggers
Security
System
Control
Unit
Page - 16
The Easy ValetTM Switch: Mount the Easy ValetTM switch in a hidden a location
that is accessible to the driver. The Easy ValetTM Switch uses a double-sided adhesive pad
for mounting. Be sure to clean the mounting area for good adhesion. A round adapter is
included, which may be screwed to the mounting area to ensure adhesion. Although it is
not absolutely necessary to mount the switch in a hidden location, because the ignition key
is needed to disarm the alarm, a hidden switch makes it more difficult for a thief who has
copied the ignition key. Route the wires to the system's control module, and insert the Blue
connector into the Blue plug on the control module. Note: The system's valet circuit is
designed so that a toggle type switch may also be used.
The function of the Easy ValetTM Switch is to keep the system from arming during
extended stopovers for service stations, maintenance, valet parking, car washing, etc.; and,
in conjunction with the ignition key, to disarm the system if the transmitter is lost or
inoperable.
To turn on the Easy ValetTM , simply press the Valet Switch for two seconds to activate
the Valet Mode. The system will confirm it is in the Valet Mode by responding with
two siren chirps, the LED Status Light coming on constant. The alarm will retain memory
of the valet condition while the ignition is "on" or "off". While in the Valet Mode, the
transmitters can still operate panic, doorlocks, trunk release; the doors will lock when the
ignition switch is turned "on" and unlock when it is turned "off"'. Note: While the security
system is in Valet Mode, every time the ignition switch is turned "off", the siren will chirp
once as a reminder. Note: The Automatic Transmitter Verification feature will also operate
when the ignition is turned "on" while the system in Valet Mode.
Page - 25

Pink Wire - 3rd Channel Output: The function of the Pink wire is to provide
an optional output similar to the Gray trunk release wire. Press both transmitter buttons for
two seconds to activate this output. Once activated, this output will last for one second, or,
for as long as the transmitter buttons are held down, until the transmitter battery-saver
feature turns the transmitter off. This feature can be used to activate other optional modules
(Example: car starting equipment or power window roll up units).
CONNECTION: For most applications an optional relay will be needed (Use the
following diagram). This output will not disarm the security system when activated.
Page - 17
Zone Violation: If the system is triggered the LED Status Light will start to flash and
pause the #9 through #12 sequences to indicate which protected circuit triggered the system.
This is seen while the system is armed, and after disarming, until the ignition switch is
turned "on", which will clear the security system's memory. The unit's memory can store
four different codes, and if multiple violations involving different zones occurred, the
different zones will be shown in the order of the violation.
9) Flash-2x & Pause = System was triggered from the hood or trunk circuit wire.
10) Flash-3x & Pause = System was triggered from the door circuit wire.
11) Flash-4x & Pause = System was triggered from the auxiliary sensor input.
12) Flash-5x & Pause = System was triggered from the auxiliary prewarn input.
Zone Testing: Every time the ignition key is turned off , the LED Status Light will flash
and pause the #13 through #16 code to indicate what protected circuit is in a triggered state.
Example: Open a door and the LED Status Light will start flashing 3 times and pause until
the door is closed, or, if another protected entry point is triggered while the door is still open,
then the LED Status Light will indicate the most recent zone triggered.
13) Flash-2x & Pause = System is detecting a trigger from the Blue wire.
14) Flash-3x & Pause = System is detecting a trigger from the door circuit wire.
15) Flash-4x & Pause = System is detecting a trigger from the auxiliary sensor input.
16) Flash-5x & pause = System is detecting a trigger from the auxiliary prewarn input.
Page - 24
30
Security
System
Control
Unit
Optional Relay Wiring Diagram To Positive Or
Negative As Needed
Output To
Optional Device
To Positive
12 Volts
Pink Wire 87
85 87a 86

Page - 18 Page - 23
Security System Status: The LED Status Light is a visual indicator of what state the
security system is in at any given time. It is normally positioned in a location that is easily
observed by the driver. There are 16 possible conditions that the system can be in, and are
reflected by the LED Status Light:
1) Off = The system is disarmed and not performing any automatic functions.
2) On Constant = The system is in the Valet Mode.
3) Flashing Slow = The system is Fully Armed.
4) Flashing Fast = 30 second Last Door Arming or 90 second Automatic Rearming is
in progress.
Automatic Transmitter VerificationTM (Patent Pending): After the ignition is turned
"on", the LED Status Light will flash to indicate the number of transmitters programmed
to operate the security system. For example: two flashes and a pause indicates that only two
transmitters are coded to operate the system. This feature works for a 10 second period every
time the ignition switch is turned "on". Also, for eight hours after any transmitters have been
coded to the system the siren will chirp for two seconds and the LED flashes 90 seconds.
5) Flash one time and pause = 1 transmitter code is stored in the system's memory.
6) Flash two times and pause = 2 transmitter codes are stored in the system's memory.
7) Flash three times and pause = 3 transmitter codes are stored in the system's memory.
8) Flash four times and pause = 4 transmitter codes are stored in the system's memory.
Black/White Wire - Domelight Supervision Output:
The Black/White wire is intended, by configuring an optional SPDT relay, for domelight
supervision. This feature will illuminate the interior lights of the vehicle upon disarm
(and also duplicate the confirmation flashes). This output's operation is very similar to
the White Parking Light Output wire. If required, this output may be used instead, in
conjunction with the White wire, to operate European-style split parking lamp circuits.
Wiring An Optional Relay For A Negative Domelight.
To Negative
Ground
87
30
86 87a 85
Factory Domelight Wire
To 12 Volt
Positive
Dome
Light
To Positive
12 Volt Black/White
Wire
Security
System
Control
Unit

Page - 19
Red LED Status Light: Mount the Red LED Status Light in a location where it
can easily be seen by the driver, and where it can be seen from outside, as the LED Status
Light provides a level of visual deterrence. Good locations differ from vehicle to vehicle,
but generally a spot on the driver side or optimally on the center of the dash will suffice.
Prewired Plug-In Features
When mounting, we suggest checking for a blank, or "dummy" plate, such as used to fill
an opening where optional switches, accessories, etc. would normally be located. Drilling
into a large, expensive to replace piece of the dash should be avoided. The correct size
mounting hole is 5/16". Use a stepped drill bit, such as a Unibit, to drill the hole. This is
the most accurate, safest way, to drill in steps until the hole is the proper size. If using a
single-sized bit, use a 1/8", then a 1/4", then a 5/16" bit. This prevents the drilled material
from cracking or splitting. CAUTION! Check behind the panel being drilled into for
obstructions before drilling! Taping the bit will prevent excess penetration. After mounting,
route the Red connector to security system control module and insert it into the Red plug
on the side of the control module.
Page - 22
Mounting The Red LED Status Light.
Red Wire
Black Wire LED
Status
Indicator
5/16"
Hole
Vehicle's
Dash, Into
Blank
Plate If
Available.
CONNECTION: Connect the Black/White wire to an optional SPDT relay's pin #85.
Relay pin #86 is connected to Positive 12 Volts, and pin #30 is connected to the vehicle's
domelight wire. This connection may be made at the same point that Green or Violet Door
Trigger wire is made. Relay pin #87 will be connected to 12 volts Positive (if the Violet Door
Trigger wire is used), or Negative Ground (if the Green Door Trigger is used). The diagrams
show both types.
To Negative
Ground
Wiring An Optional Relay
For A Positive Domelight.
87
30
86 87a 85
To Positive
12 Volts
To Positive
12 Volts
Dome
Light
Security
System
Control
Unit
Black/White
Wire

Page - 20
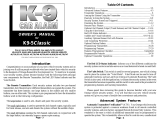
Ignition
Switch
✄
White:
To Starter Red: To
Ignition
Switch
Relay
OPTIONAL AU-SOCKET &
1 SPDT RELAY FOR
STARTER INTERRUPT
Orange: Armed (-) Output
Yellow: Ignition (+) 12 Volts
Black: (-) Ground
Battery+
Red: (+) 12 Volts
Green: (-) Door
Blue: (-) Instant
Violet: (+) Door
Brown: (-) Siren Output
White: (+) Parking Light Output
(-) Door
Pin Switch
Hood /
Trunk
Switch
Or
Pin
(+) Door
Pin Switch
OPTIONAL SPDT
RELAY FOR DOME
LIGHT SUPERVISION Page - 21
Pager Plug
Doorlock
Output
Red Port
Auxiliary
Sensor
White Port
15 Amp
Plug-In LED Status
Indicator
Gray: (-) Trunk
Release Output
Relay
OPTIONAL SPDT
RELAY FOR
TRUNK RELEASE
10 Amp
Black/White: Dome
Light Output - Connect
To Relay Coil
Relay
Plug-In
Valet
Switch
Red Plug
Red Port
Blue Plug
Blue Port
Siren
Siren
Black
Wire
Siren Red Wire
Starter
Relay
OPTIONAL SPDT
RELAY FOR 3rd
CHANNEL
Pink: (-) 3rd Channel
Output
/