
ENGLISH
Wake-up Light
Instruction manual ............................................................................ 2
ESPAÑOL
Luz para despertar
Instrucciones de uso ...................................................................... 12
FRANÇAIS
Lampe de réveil
Mode d’emploi ................................................................................. 22
WL 75
READ THIS MANUAL COMPLETELY AND CAREFULLY BEFORE USING THIS PRODUCT
Keep this manual in a safe location for future reference
LEA TODO ESTE MANUAL CON ATENCIÓN ANTES DE USAR ESTE PRODUCTO
Conserve este manual en un lugar seguro para consultarlo en el futuro
LISEZ CE MODE D’EMPLOI COMPLÈTEMENT ET ATTENTIVEMENT AVANT
D’UTILISER CE PRODUIT
Conservez ce manuel en lieu sûr pour y faire référence ultérieurement
Distributed by / Distribuido por / Distribué par :
Beurer North America LP
900 N Federal Highway, Suite 300
Hallandale Beach, FL 33009
www.beurer.com
Questions or comments?
Call toll free 1-800-536-0366 or contact info@beurer.com
¿Preguntas o comentarios? Llame gratis al
1-800-536-0366 o póngase en contacto info@beurer.com
Questions ou commentaires? Appeler gratuitement
1-800-536-0366 ou communiquez avec info@beurer.com

2
Content
SAVE THESE INSTRUCTIONS FOR FUTURE REFERENCE
If the instruction manual is damaged or if you no longer have the instruction manual
in your possession, please contact Beurer customer service. Please see warranty for
service contact.
Dear Customer,
Thank you for choosing this Beurer product. Our name stands for high-quality, thoroughly tested products
for applications in the areas of heat, weight, blood pressure, body temperature, pulse, gentle therapy, mas-
sage and air.
Please read these instructions completely and carefully before using this product and keep them for later
reference. Be sure to make them accessible to other users and observe the information they contain.
With best regards,
Your Beurer Team
1. Important Safety Notes
Signs and symbols
Whenever used, the following signs identify safety and property damage messages and designate a level
of hazard or seriousness.
READ AND UNDERSTAND THIS ENTIRE MANUAL INCLUDING THE SAFETY SECTION AND
ALL INSTRUCTIONS AND WARNINGS COMPLETELY AND CAREFULLY BEFORE USING THIS
PRODUCT. FOLLOW ALL SAFETY INSTRUCTIONS AND WARNINGS TO AVOID HAZARDOUS
SITUATIONS AND TO USE THIS PRODUCT CORRECTLY.
This is the safety alert symbol. It alerts you to potential personal injury haz-
ards. Obey all safety messages that follow this symbol to avoid possible injury
or death.
WARNING WARNING indicates a hazardous situation which, if not avoided, could result
in death or serious injury.
NOTICE NOTICE addresses practices not related to personal injury, such as product
and/or property damage.
2. IMPORTANT SAFEGUARDS
WARNING – To reduce the risk of fire, electric shock, or serious personal injury:
•
The device is intended only for domestic/private use, not for commercial use.
•
Children must not play with the device.
•
Keep packaging material away from children (risk of suffocation).
•
Only operate the device with the power adapter provided and at the voltage specified on the
power adapter.
•
Place the device on a firm, even surface.
ENGLISH
1. Important Safety Notes ....................................2
2. IMPORTANT SAFEGUARDS ............................2
3. Introduction ......................................................3
4. Features ............................................................3
5. Package Content .............................................. 4
6. Parts and Controls ............................................4
7. To Set Up ..........................................................5
8. Device Functions .............................................. 5
9. Cleaning, Storage and Disposal .......................9
10. Troubleshooting Guide ...................................9
11. Specifications ................................................. 9
12. FCC Compliance Statement .........................10
13. Warranty .......................................................10

3
•
The device must be placed near an easily accessible electrical outlet.
•
Before use, ensure all packaging materials are removed and inspect the device and accessories
for visible damage. If you have any doubts, do not use the device and contact your retailer or the
specified Customer Service address.
•
Keep the device, power adapter, and power cord away from water.
•
Never plug in or unplug the power adapter when you have wet hands.
•
Do not touch the unit with wet hands while it is plugged in; do not allow any water to be sprayed
onto the unit. Operate only when the unit is completely dry.
•
In the event of defects or operational faults, switch the device off immediately and disconnect
it from the electrical outlet.
•
Arrange the power cord so that no one will trip over it.
•
Do not immerse the unit into water and do not use it in wet rooms such as a bathroom, laundry
room, or pool area.
•
Do not cover or store the unit while it is warm.
•
Always unplug the power adapter and allow the unit to cool down before touching it.
•
Keep the power cord away from heated objects and flames.
•
Protect the unit from strong impacts.
•
Do not disconnect the power adapter from the electrical outlet by pulling on the cord.
NOTICE:
•P
rotect the device from impacts, moisture, dirt, marked temperature fluctuations, and direct sunlight.
•D
o not drop the device.
3. Introduction
The Beurer WL 75 Wake-up Light allows you to wake up and fall asleep gently and naturally. The LED
light gradually becomes brighter like a rising sun, allowing you to slowly become accustomed to the light
conditions and gently preparing your body for waking up. You can also set a wake-up melody that is played
following the simulated sunrise and provides an acoustic aid to help you wake up. Instead of an alarm
tone, you can select the radio or various sounds. The Beurer WL 75 Wake-up Light provides a rested and
pleasant start to your day and helps you drift comfortably off to sleep due to a simulated sunset with melodies.
4. Features
•
4-in-1: Wake-up light, mood light, reading lamp and music station
•
Convenient and easy to use via smartphone and free ‘beurer LightUp’ app
•
Colored sunrise and sunset simulation with slowly brightening or dimming light
•
Mood light with color change function
•
Multiple light settings with up to 256 levels of brightness or 10 preset mood light options
•
AUX dock with quality speaker to enjoy your own music
•
FM radio with 10 radio memory spaces
•
2 adjustable alarm times
•
6 different wake-up and 4 fall-asleep melodies
•
Snooze function (1-30 min.)
•
Time and date shown on blue LCD display
•
USB mobile phone charging
NOTE: The WL 75 Wake-up Light can only be used with its full functionality in conjunction with the
‘
beurer
LightUp’ app. Basic functions can also be set directly on the device.
The following functions can only be controlled via the app:
•
Choice of 10 defined mood light scenes
•
Direct choice of mood light color
•
Alarm can be switched On/Off for each day
•
Adjustment of special alarm settings
•B
utton tone can be switched On/Off

4
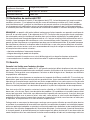
System Requirements for the ‘beurer LightUp’ App
•i
OS version ≤ 8.0 -or- Android™ version ≤ 4.4
•B
luetooth
®
version ≤ 4.0
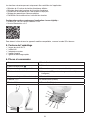
For a list of all compatible mobile devices, please scan the QR code above.
5. Package Content
•1
x Wake-up Light WL 75
•1
x AUX Cable
•1
x AC Power Adapter
•1
x Instructions for Use
•1
x Quick Start Guide
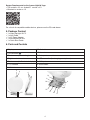
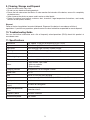
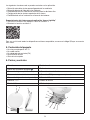
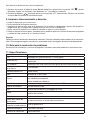
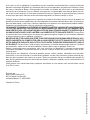
6. Parts and Controls
1 Display 8 Radio button
2 On/O button
9 Cable antenna
3 Touch sensor (for snoozing) 10 Mains part connection
4 Brightness buttons +/- 11 USB connection (for charging smartphones)
5 Touch sensor (for illuminated display) 12 AUX input
6 v/w buttons
13 Alarm button
7 AUX button 14 Set button
1
2
4
5
3
14
6
13
12
11
10
9
8
7
6

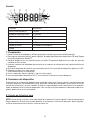
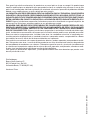
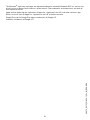
5
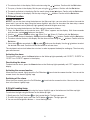
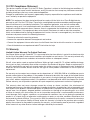
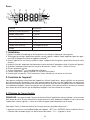
Display
1
2
3
4
5
6
7
8
9
10
12
13
14
15
11
1 Volume 9 Bluetooth
®
2 Year (Y)/Month (M)/Day (D) 10 Time
3 Radio alarm mode 11 Display
4 Time/Date/Radio frequency 12 Alarm memory space 1, 2
5 SET mode 13 ‘Sleep’ function
6 AUX mode 14 Beep
7 Alarm mode 15 Wake-up melody
8 Radio
7. To Set Up
1. Remove the packaging material and check that all parts listed are present.
2. Download the free ‘beurer LightUp’ app from Apple App Store (for iOS devices) or Google Play
(for Android
TM
devices).
3. Place the device on a firm, even surface. The device must be placed near an easily accessible socket.
4. Insert the power adapter connector into the power adapter jack on the rear of the device.
5. Insert the power adapter into an electrical outlet. The time ‘0:00’ appears in the device display.
6. Place the antenna at the back.
7. Activate Bluetooth
®
on your smartphone.
8. Open the ‘beurer LightUp’ app and follow the instructions.
9. Once the WL 75 is connected, the time on the Wake-up Light will update.
8. Device Functions
You can set device functions using the ‘beurer LightUp’ app or the buttons on the Wake-up Light. We
recommend using the app whenever possible since it provides better function control and convenience. When
the Wake-up Light is connected to a smartphone, all the buttons on the Wake-up Light are locked. Once
the smartphone and Wake-up Light are disconnected, you can use the buttons on the Wake-up Light again.
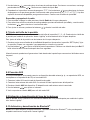
8.1 Setting the time/date
NOTE:
You can set the time and date using the
‘
beurer LightUp’ app or the buttons on the Wake-up light.
If
you connect the Wake-up light to your smartphone using the ‘beurer LightUp’ app, the time and date are
automatically set on the Wake-up light.
To set the time using the buttons on the Wake-up light, proceed as follows:
1. Press the Set button on the device three times. ‘SET Time’ appears on the display. Wait three seconds
until the hour format ‘12 hr’ flashes on the display.
2. Set the hour format using the / buttons. Confirm with the Set button.
3. The hour value flashes in the display. Set the hour using the / buttons. Confirm with the Set button.

6
4. The minutes flash in the display. Set the minutes using the / buttons. Confirm with the Set button.
5. The year (Y) flashes in the display. Set the year using the / buttons. Confirm with the Set button.
6. The month (M) flashes in the display. Set the month using the / buttons. Confirm with the Set button.
7. The day (D) flashes in the display. Set the day using the / buttons. Confirm with the Set button.
8.2 Alarm function
Setting the alarm
NOTE:
If you set the alarm using the buttons on the Wake-up Light, you can select the alarm time and the
alarm tone. If you set the alarm using the ‘beurer LightUp’ app, you can also select the alarm days, snooze
time, and simulated sunrise (Wake-up Light gradually becomes brighter over time).
To set the time using the buttons on the Wake-up light, proceed as follows:
1.
Press the Set button on the device once. ‘SET Alarm’ appears on the display. Wait three seconds
until the alarm symbol ‘ ’ flashes on the display.
2. Use the / buttons to select either ‘ ’ (Alarm 1) or ‘ ’ (Alarm 2). Confirm with the Set button.
3.
The alarm hour flashes in the display. Set the alarm hour using the / buttons. Confirm with the Set button.
4. The alarm minutes flashes in the display. Set the alarm minutes using the / buttons. Confirm with the
Set button.
5. Alarm tone wake-up melody 1–6 or radio flashes on the display. Use the / buttons to select
the desired alarm tone. Confirm with the Set button to activate alarm.
The simulated sunrise starts before the set alarm in order to prepare the body for waking up. The alarm only
goes o afterward.
Activating the alarm
To activate the alarm, press the Alarm button on the Wake-up light repeatedly until ‘ALARM1’, ‘ALARM2’ or
‘ALARM1 and ALARM2’ appears in the display.
Deactivating the alarm
To deactivate the alarm, press the Alarm button on the Wake-up light repeatedly until ‘OFF’ appears in the
display.
Activating the snooze function
When the alarm sounds, lightly touch the On/O button to activate the snooze function. You can set the
snooze time in the ‘beurer LightUp’ app.
Switching o the alarm
When the alarm sounds, press the On/O button to activate the snooze function. You can set the snooze
time in the ‘beurer LightUp’ app.
8.3 Light/reading lamp
NOTE:
You can switch on the light using the
‘
beurer LightUp’ app or the buttons on the Wake-up Light.
To switch on the light using the buttons on the Wake-up Light:
1. Briefly press the On/O button on the inserted device. The light comes on.
2. To switch the light o again, press the On/O button again. The light goes o.
3. You can use the brightness buttons + - to set the brightness.

7
8.4 Mood light
The Wake-up light can also be used as a mood light.
NOTE:
If you switch on the mood light via the Wake-up Light, you get a mood light with a standardized color
change. If you set the mood light via the
‘
beurer LightUp’ app, you also have the following setting options.
- Mood light color
- 10 preset sequences (e.g. rainbow)
- Timer
To activate the mood light:
1. Press and hold the On/O button for 2 seconds. The color changing mood light comes on.
2. To maintain one color on the mood light, press the On/O button again.
3. To switch the mood light o, press the On/O button again.
8.5 Sleep Function
The Sleep function is ideal for helping you fall asleep. Here you can set the sunset function. With this
function, the light gradually dims over time. You can also assign various relaxing sounds to the simulated
sunset and either use natural light or a mood light.
NOTE:
You can set the sunset function using the ‘beurer LightUp’ app or the buttons on the Wake-up Light.
To switch on the sunset function:
1. To use the sunset function with normal light, briefly press the On/O button. The light comes on.
To use the sunset function with the mood light, press and hold the On/O button for two seconds. The
mood light comes on.
2. Press and hold the On/O button for 5 seconds. 02 flashes on the display. Use the / buttons within
five seconds to set sunset duration.
3. Use the / buttons to set the volume.
4. Use the Set button to set the desired sound.
8.6 Radio
NOTE:
You can configure the radio settings using the
‘
beurer LightUp’ app or the buttons on the Wake-up Light.
Setting the radio station
To set the radio station using the buttons on the Wake-up light, proceed as follows:
1. Press the Set button on the device twice. ‘SET Radio’ appears on the display. Wait three seconds until
the current station frequency flashes on the display.
2. Use the / buttons to set the desired radio station. To start the station search, press and hold the
or button. Confirm with the Set button.
3. Program number P 01 flashes on the display. Use the / buttons to select the desired program
number (e.g. P 01 or P 02) under which the set radio station is to be saved. There are 10 radio memory spaces
available. Confirm with the Set button.
Switching the radio On/O
1. To switch the radio on or o, press the Radio button on the Wake-up light.
2. To select a station preset, press the Set button and then press the / buttons to select a radio
station preset.
3. To set the volume, press the / buttons during radio playback.

8
8.7 Setting the Display Brightness
NOTE:
The Wake-up Light has four display brightness levels (0, 1, 2, and 3). You can set the display brightness
in the settings of the
‘
beurer LightUp’ app or use the buttons on the Wake-up Light.
To set the display brightness using the buttons on the Wake-up Light:
1. Press the Set button on the device four times. ‘SET Display’ appears on the display. Wait three seconds
until a number flashes on the display.
2. Use the / buttons to set the desired display brightness. Confirm with the Set button. The selected
brightness is shown after five seconds.
Alternatively, you can also tap on the right-hand side of the display to temporarily increase brightness.
8.8 AUX Connection
You can connect an external audio source (e.g. MP3 player, smartphone or CD player) to the Wake-up light
via the AUX input.
1. Connect the included AUX cable to your audio source.
2. Insert the other end of the AUX cable into the AUX input on the rear of the device.
3. Press the AUX button on the device. The external audio source is now connected.
4. Use the / buttons to adjust the volume.
5. Press the AUX button to exit AUX mode again.
8.9 Switching the Button Tone On/O
You can only switch the button tone of the Wake-up Light on and o via the settings in the ‘beurer LightUp’
app.
8.10 Activating/Deactivating Bluetooth
®
NOTE:
The Wake-up Light comes with Bluetooth
®
already activated. If you deactivate
Bluetooth
®
, the
Wake-up Light cannot connect to the ‘beurer LightUp’ app.
To deactivate Bluetooth
®
on the Wake-up Light:
1. Press the Set button on the device five times. ‘SET ’ appears In the display. Wait three seconds until
‘on’ flashes on the display.
2. Press the or button until ‘OFF’ appears In the display. Confirm with the Set button. Bluetooth
®
is
now deactivated.

9
9. Cleaning, Storage and Disposal
•
Clean the device with a dry cloth.
•
Do not use any abrasive cleaning products.
•
Ensure that no water enters the device. If water reaches the internals of the device, ensure it is completely
dry before reuse.
•
Never immerse the device or power cord in water or other liquids.
•
Protect the device from impacts, moisture, dust, chemicals, large temperature fluctuations, and nearby
sources of heat (ovens, heaters).
Disposal
Observe the local regulations for material disposal. Dispose of the device in accordance with local
regulations. If you have any questions, please contact the local authorities responsible for waste disposal.
10. Troubleshooting Guide
You can find further information and a list of frequently asked questions (FAQs) about this product at
www.beurer.com.
11. Specifications
Illuminance Max. approx. 2,000 lux (at distance of 5.9 in /15 cm)
Light LED technology (LED service life: > 20,000 hours)
Light levels 10 on Wake-up Light; Infinitely variable via app
Mood light Automatic RGB color change, option of setting individual color
Snooze time 1–30 minutes
LCD backlighting 4 levels
Time 12-hour and 24-hour display formats
Alarm
2 alarm modes: Tone, radio
6Wake-up melodies
4 Sleep melodies
Charging function Smartphones can be charged via USB
Button tone O, On
AUX Line-in, 0.14 in (3.5 mm) jack plug
Radio Frequency range 88.1 to 107.9MHz (in 0.2MHz steps), 10 memory spaces
Loudspeaker 2 watts
Mains part voltage
supply
As shown on rating plate
Mains part protection
class
Protection class II
Frequency band
2402MHz-2480MHz
Transmission power
max. 4dBM

10
12. FCC Compliance Statement
This device complies with part 15 of the FCC Rules. Operation is subject to the following two conditions: (1)
This device may not cause harmful interference, and (2) this device must accept any interference received,
including interference that may cause undesired operation.
Changes or modifications not expressly approved by the party responsible for compliance could void the
user’s authority to operate the equipment.
NOTE: This equipment has been tested and found to comply with the limits for a Class B digital device,
pursuant to part 15 of the FCC Rules. These limits are designed to provide reasonable protection against
harmful interference in a residential installation. This equipment generates, uses and can radiate radio
frequency energy and, if not installed and used in accordance with the instructions, may cause harmful
interference to radio communications. However, there is no guarantee that interference will not occur in a
particular installation. If this equipment does cause harmful interference to radio or television reception,
which can be determined by turning the equipment off and on, the user is encouraged to try to correct the
interference by one or more of the following measures:
—Reorient or relocate the receiving antenna.
—Increase the separation between the equipment and receiver.
—Connect the equipment into an outlet on a circuit different from that to which the receiver is connected.
—Consult the dealer or an experienced radio/TV technician for help.
13. Warranty
Limited Lifetime Warranty For Original Purchaser
Your Beurer Wake-up Light, model WL 75, is warranted to be free from defects in materials and workmanship
for the life of the product under normal conditions of intended use and service. This warranty extends only
to the original retail purchaser and does not extend to retailers or subsequent owners.
We will, at our option, repair or replace the Beurer Wake-up Light, model WL 75, without additional charge,
for any part or parts covered by these written warranties. No refunds will be given. Repair or replacement is
our only responsibility and your only remedy under this written warranty. If replacement parts for defective
materials are not available, Beurer reserves the right to make product substitutions in lieu of repair or
replacement.
For warranty service contact our customer service department at 1-800-536-0366 or at info@beurer.com to
provide a description of the problem. If the problem is deemed to be within the scope of the limited lifetime
warranty, you will be asked to mail the product at your costs in its original package with proof of purchase,
your name, address and phone number. If the problem is not deemed to be within the scope of the limited
lifetime warranty, we will provide a quotation for repair respectively replacement and return shipping fee.
This warranty does not cover damage caused by misuse or abuse; accident; the attachment of
unauthorized accessory; alteration to the product; improper installation; misapplication; lack of reasonable care
with respect to the product; unauthorized repairs or modifications; improper use of electrical/power supply;
normal wear; loss of power; dropped product; malfunction or damage of an operating part as a result
of failure to comply with instructions for use or to provide manufacturer’s recommended maintenance;
transit damage; theft; neglect; vandalism; or environmental conditions; loss of use during the period the
product is at a repair facility or otherwise awaiting parts or repair; or any other conditions whatsoever that
are beyond the control of Beurer. This warranty is void if the product is ever used in a commercial or business
environment. The maximum liability of Beurer under this warranty is limited to the purchase price actually
paid by the customer for the product covered by the warranty, as confirmed by proof of purchase, regardless
of the amount of any other direct or indirect damage suffered by the customer.

11
This warranty is effective only if the product is purchased and operated in the country in which the product
is purchased. A product that requires modifications or adaptation to enable it to operate in any other country
than the country for which it was designed, manufactured, approved and/or authorized, or repair of products
damaged by these modifications is not covered under this warranty.
THE WARRANTY PROVIDED HEREIN SHALL BE THE SOLE AND EXCLUSIVE WARRANTY. ANY IMPLIED
WARRANTIES, OBLIGATIONS, OR LIABILITES, INCLUDING BUT NOT LIMITED TO THE IMPLIED
WARRANTY OF MERCHANTABILITY AND FITNESS FOR A PARTICULAR PURPOSE, ARE LIMITED IN
DURATION TO THE DURATION OF THIS APPLICABLE WRITTEN WARRANTY. Some states do not allow
limitations on how long an implied warranty lasts, so the above limitations may not apply to you.
IN NO EVENT SHALL BEURER BE LIABLE FOR ANY SPECIAL, INCIDENTAL, INDIRECT OR
CONSEQUENTIAL DAMAGES FOR BREACH OF THIS OR ANY OTHER WARRANTY, EXPRESS, IMPLIED
OR ANY OTHER THEORY OF LIABILITY, WHATSOEVER. Some states do not allow the exclusion or
limitation of special, incidental, or consequential damages, so the above limitation may not apply to you.
Beurer does not authorize anyone, including, but not limited to, retailers, the subsequent consumer
purchaser of the product from a retailer or remote purchaser, to obligate Beurer in any way beyond the terms
set forth herein.
This warranty does not extend to the purchase of opened, used, repaired, repackaged and/or resealed
products, including but not limited to sale of such products on Internet auction sites and/or products by
surplus or bulk resellers. Any and all warranties or guarantees shall immediately cease and terminate in
connection with any products or parts thereof which are repaired, replaced, altered, or modified, without the prior
explicitly written consent of Beurer.
This warranty gives you specific legal rights, and you may also have other rights which may vary from state
to state.
Distributed by:
Beurer North America LP,
900 N Federal Hwy Ste 300
Hallandale Beach, FL 33009 USA
Made in China
Subject to error and change

12
Contenido
CONSERVE ESTAS INSTRUCCIONES PARA REFERENCIA FUTURA
Si el manual de instrucciones está dañado o si ya no lo tiene, llame al servicio al cliente
de Beurer. Vea en la garantía la información de contacto de servicio.
Estimado cliente:
Gracias por elegir este producto Beurer. Nuestro nombre es sinónimo de productos de alta calidad, minucio-
samente probados, que se utilizan en las áreas de calor, peso, presión arterial, temperatura corporal, pulso,
terapia moderada, masajes y aire.
Lea estas instrucciones completamente y con atención antes de usar este producto y consérvelas para
referencia futura. Asegúrese de que estén disponibles para los demás usuarios y tenga en cuenta la infor-
mación que contienen.
Saludos cordiales,
Su equipo de Beurer
1. Notas importantes de seguridad
Signos ysímbolos
Siempre que se usan, estos signos identifican mensajes de seguridad y daños a la propiedad, indicando el
nivel de gravedad del peligro.
LEA CON ATENCIÓN Y ENTIENDA TODO ESTE MANUAL, INCLUYENDO LA SECCIÓN DE
SEGURIDAD Y TODAS LAS INSTRUCCIONES Y ADVERTENCIAS ANTES DE USAR ESTE
PRODUCTO. SIGA TODAS LAS INSTRUCCIONES Y ADVERTENCIAS DE SEGURIDAD PARA
EVITAR SITUACIONES PELIGROSAS Y PARA USAR CORRECTAMENTE ESTE PRODUCTO.
Este es el símbolo de advertencia de seguridad. Le pone alerta sobre
posibles peligros que pueden ocasionar lesiones personales. Tenga en
cuenta en todo momento todos los mensajes de seguridad después de
este símbolo para evitar posibles daños o incluso la muerte.
ADVERTENCIA ADVERTENCIA indica una situación peligrosa que, si no se evita, podría
causar muerte o una lesión grave.
AVISO
AVISO se refiere a prácticas que no están relacionadas con lesiones, como
es el caso de daños al producto o daños materiales.
2. SALVAGUARDAS IMPORTANTES
ADVERTENCIA – Para reducir el riesgo de incendio, descarga eléctrica o lesio-
nes personales graves:
•
El dispositivo no está diseñado para uso comercial, sino únicamente para uso doméstico o pri-
vado.
•
Los niños no deben jugar con el dispositivo.
•
Mantenga el material de empaque fuera del alcance de los niños (peligro de asfixia).
ESPAÑOL
1. Notas importantes de seguridad .................... 12
2. SALVAGUARDAS IMPORTANTES ..................12
3. Introducción ...................................................13
4. Características ................................................13
5. Contenido del paquete ................................... 14
6. Partes y controles ...........................................14
7. Preparación ....................................................15
8. Funciones del dispositivo ............................... 15
9. Limpieza, almacenamiento y desecho ...........19
10. Guía para la resolución de problemas ..........19
11. Especificaciones...........................................19
12. Declaración de conformidad de la FCC .......20
13. Garantía ........................................................20

13
•
No use el dispositivo con un adaptador de corriente distinto al que se incluye ni con un voltaje
de red diferente al indicado en el adaptador.
•
Ponga el dispositivo en una superficie plana y estable.
•
El dispositivo debe estar cerca de una toma de corriente de fácil acceso.
•
Antes de usar el dispositivo, asegúrese de haber quitado todos los materiales de empaque e
inspeccione el dispositivo y sus accesorios para comprobar que no presenten daños visibles.
Si tiene alguna duda, no utilice el dispositivo y póngase en contacto con el distribuidor o con el
servicio al cliente a través de la dirección especificada.
•
Mantenga el dispositivo, el adaptador de corriente y el cable de corriente lejos del agua.
•
No enchufe ni desenchufe el adaptador de corriente con las manos húmedas.
•
No toque la unidad con las manos húmedas mientras esté enchufada; no permita que se rocíe
agua sobre la unidad. Haga funcionar la unidad solo si está completamente seca.
•
En caso de defectos o mal funcionamiento, apague inmediatamente el dispositivo y desconéc-
telo de la toma de corriente.
•
Coloque el cable de corriente de tal forma que nadie se tropiece con él.
•
No sumerja la unidad en agua ni la utilice en ambientes húmedos como un baño, lavadero o
área de piscina.
•
No cubra ni almacene el dispositivo mientras esté caliente.
•
Desenchufe siempre el adaptador de corriente y deje que el dispositivo se enfríe antes de tocarlo.
•
Mantenga el cordón eléctrico alejado de objetos calientes y de llamas.
•
Proteja el dispositivo contra impactos fuertes.
•
No jale el cordón eléctrico para desconectar el adaptador de corriente de la toma eléctrica.
AVISO:
•P
roteja el dispositivo de los golpes, la humedad, la suciedad, los cambios drásticos de temperatura y la
luz solar directa.
•E
vite que el dispositivo se caiga.
3. Introducción
La luz para despertar Beurer WL75 le permite despertarse y dormirse de forma placentera y natural. Con
una luz LED que ilumina la habitación lentamente, se simula el amanecer. De esta forma, usted puede acos-
tumbrarse poco a poco a la luz y su cuerpo se prepara para un plácido despertar. También puede configu-
rar una melodía que suena tras la simulación del amanecer y le ayuda a despertarse. En lugar de un tono
de alarma, puede seleccionar la radio o distintos sonidos. La luz para despertar Beurer WL75 le ayuda a
comenzar el día relajado y contento y a conciliar el sueño cómodamente gracias a una puesta de sol simu-
lada acompañada de melodías.
4. Características
•
Cuatro en uno: luz para despertar, luz ambiente, lámpara de lectura y emisora de música
•
Cómoda y fácil de usar a través del smartphone y aplicación “beurer LightUp” gratuita
•
Simulación en color del amanecer y la puesta del sol mediante una intensidad creciente o una atenuación
gradual de la luz
•
Luz ambiente con cambio de color
•
Múltiples configuraciones de luz con hasta 256matices o diez ajustes preconfigurados de luz ambiente
•
Base auxiliar con un altavoz de calidad para disfrutar de su propia música
•
Radio FM con diez espacios de memoria para almacenar emisoras
•
Dos alarmas ajustables
•
Seis melodías para despertarse y cuatro melodías para dormirse
•
Función de repetición de la alarma (1-30 minutos)
•
Visualización de la fecha y la hora en una pantalla LCD azul
•
Carga de teléfono celular mediante puerto USB
NOTA:
Para aprovechar todas las funciones de la luz para despertar WL75, es necesario usarla con la apli-
cación
“
beurer LightUp”. Las funciones básicas también se pueden ajustar directamente en el dispositivo.

14
Las siguientes funciones solo se pueden controlar con la aplicación:
•
Selección entre diez ajustes preconfigurados de luz ambiente
•
Selección directa del color de la luz ambiente
•
Posibilidad de activar o desactivar la alarma para los distintos días
•
Configuración de los ajustes especiales de la alarma
•P
osibilidad de activar o desactivar el tono de los botones
Requerimientos del sistema para la aplicación “beurer LightUp”
•i
OS hasta la versión 8.0 o Android™ hasta la versión 4.4
•B
luetooth
®
hasta la versión 4.0
Para ver una lista de todos los dispositivos celulares compatibles, escanee el código QR que se muestra
más arriba.
5. Contenido del paquete
•U
na luz para despertar WL75
•U
n cable auxiliar
•U
n adaptador de corriente (CA)
•I
nstrucciones de uso
•G
uía de inicio rápido
6. Partes y controles
1 Pantalla 8 Botón de radio
2 Botón de encendido/apagado
9 Cable de antena
3 Sensor táctil (para repetir la alarma) 10 Conexión a la red eléctrica
4 Botones de luminosidad +/- 11 Conexión USB (para cargar smartphones)
5 Sensor táctil (para iluminar la pantalla) 12 Entrada AUX
6 Botones v/w
13 Botón de alarma
7 Botón AUX 14 Botón de ajuste
1
2
4
5
3
14
6
13
12
11
10
9
8
7
6

15
Pantalla
1
2
3
4
5
6
7
8
9
10
12
13
14
15
11
1 Volumen 9 Bluetooth
®
2 Año (Y)/mes (M)/día (D) 10 Hora
3 Modo de alarma por radio 11 Pantalla
4 Hora/Fecha/Radiofrecuencia 12 Posiciones de memoria de alarma 1 y 2
5 Modo de ajuste 13 Función de buenas noches
6 Modo AUX 14 Bip
7 Modo de alarma 15 Melodía para despertar
8 Radio
7. Preparación
1. Retire el material de empaque y verifique que todas las piezas enumeradas estén presentes.
2.
Descargue la aplicación gratuita “beurer LightUp” de Apple App Store (para dispositivos iOS) o de Google
Play (para dispositivos Android
TM
).
3. Ponga el dispositivo en una superficie plana y estable. El dispositivo debe estar cerca de una toma de
corriente de fácil acceso.
4.
Inserte el conector del adaptador de corriente en el conector de alimentación de la parte posterior del
dispositivo.
5.
Enchufe el adaptador de corriente a una toma de corriente. En la pantalla del dispositivo aparecerá “0:00”.
6. Coloque la antena en la parte trasera.
7. Active Bluetooth
®
en su smartphone.
8. Inicie la aplicación “beurer LightUp” y siga las instrucciones.
9. Una vez conectado el dispositivo WL75, se actualizará la hora de la luz para despertar.
8. Funciones del dispositivo
Puede ajustar las funciones del dispositivo por medio de la aplicación “beurer LightUp” o de los botones de
la luz para despertar. Recomendamos usar la aplicación siempre que sea posible, ya que ofrece un mayor
control de las funciones y es más cómoda. Cuando la luz para despertar esté conectada a un smartphone,
todos los botones de la luz estarán bloqueados. Una vez que la luz para despertar se desconecte del smar-
tphone, podrá volver a usar sus botones.
8.1 Ajuste de la fecha y hora
NOTA:
Puede ajustar la fecha y la hora por medio de la aplicación
“
beurer LightUp” o de los botones de la
luz para despertar.
Si conecta la luz para despertar al smartphone a través de la aplicación “beurer LightUp”,
se fijarán automáticamente la fecha y la hora en dicha luz.

16
Para fijar la hora por medio de los botones de la luz para despertar, haga lo siguiente:
1. Presione tres veces el botón de ajuste Set del dispositivo. Aparecerá en la pantalla “SET Time” (ajustar
hora). Espere tres segundos a que el formato de hora “12 hr” parpadee en la pantalla.
2. Ajuste el formato de la hora por medio de los botones / . Confirme con el botón de ajuste Set.
3. El valor de la hora parpadeará en la pantalla. Ajuste la hora con los botones / . Confirme con el botón
de ajuste Set.
4. Los minutos parpadearán en la pantalla. Ajuste los minutos con los botones / . Confirme con el botón
de ajuste Set.
5.
El año (Y) parpadeará en la pantalla. Ajuste el año con los botones / . Confirme con el botón de ajuste Set.
6. El mes (M) parpadeará en la pantalla. Ajuste el mes con los botones / . Confirme con el botón de ajus-
te Set.
7.
El día
(D)
parpadeará en la pantalla. Ajuste el día con los botones / . Confirme con el botón de ajuste Set.
8.2 Función de alarma
Ajustes de alarma
NOTA:
Si ajusta la alarma con los botones de la luz para despertar, podrá seleccionar la hora y el tono de la
alarma. Si la ajusta por medio de la aplicación “beurer LightUp”, también podrá seleccionar los días en que
suene la alarma, el momento de repetición de la alarma y la simulación del amanecer (la luz para despertar
iluminará la habitación gradualmente).
Para fijar la hora por medio de los botones de la luz para despertar, haga lo siguiente:
1.
Presione una vez el botón de ajuste Set del dispositivo. Aparecerá en la pantalla “SET Alarm” (ajustar alar-
ma). Espere tres segundos a que el símbolo de alarma parpadee en la pantalla.
2.
Use los botones / para seleccionar (alarma1) o (alarma2). Confirme con el botón de ajuste Set.
3. La hora de la alarma parpadeará en la pantalla. Ajuste la hora de la alarma con los botones / . Confir-
me con el botón de ajuste Set.
4.
El minuto de la alarma parpadeará en la pantalla. Ajuste el minuto de la alarma con los botones / .
Confirme con el botón de ajuste Set.
5. Parpadearán en la pantalla el tono de alarma , la melodía para despertar 1 a 6 o la radio . Use
los botones / para seleccionar el tono de alarma que desee. Confirme con el botón de ajuste Set para
activar la alarma.
A fin de preparar el cuerpo para despertarse, la simulación del amanecer comienza antes de que suene la
alarma fijada. La alarma suena después de este proceso.
Activación de la alarma
Para activar la alarma, presione varias veces el botón de alarma Alarm de la luz para despertar hasta que apa-
rezcan en la pantalla “ALARM1” (alarma1), “ALARM2” (alarma2) o “ALARM1 y ALARM2” (alarma1 y alarma2).
Desactivación de la alarma
Para desactivar la alarma, presione varias veces el botón de alarma Alarm de la luz para despertar hasta
que aparezca en la pantalla “OFF” (desactivada).
Activación de la función de repetición de la alarma
Cuando suene la alarma, toque ligeramente el botón de encendido/apagado para activar la función de re-
petición de la alarma. Puede ajustar el momento de repetición de la alarma con la aplicación “beurer LightUp”.
Apagado de la alarma
Cuando suene la alarma, presione el botón de encendido/apagado para activar la función de repeti-
ción de la alarma. Puede ajustar el momento de repetición de la alarma con la aplicación “beurer LightUp”.

17
8.3 Luz/lámpara de lectura
NOTA:
Puede encender la luz por medio de la aplicación
“
beurer LightUp” o los botones de la luz para des-
pertar.
Para encender la luz por medio de la aplicación “beurer LightUp”:
1. Presione brevemente el botón de encendido/apagado del dispositivo insertado. Se encenderá la luz.
2. Para apagar la luz, vuelva a presionar el botón de encendido/apagado . La luz se apagará.
3. Puede usar los botones de luminosidad +/- para ajustar el nivel de luminosidad.
8.4. Luz ambiente
La luz para despertar también se puede usar como luz ambiente.
NOTA:
Si activa la luz ambiente en la luz para despertar, consigue una luz ambiente con un cambio de color
estandarizado. Si ajusta la luz ambiente por medio de la aplicación
“
beurer LightUp”, también tendrá las si-
guientes opciones de configuración.
- Color de la luz ambiente
- Diez secuencias preestablecidas (p.ej., arco iris)
- Temporizador
Para activar la luz ambiente:
1. Mantenga presionado el botón de encendido/apagado durante dos segundos. Se encenderá la luz am-
biente con cambio de color.
2. Para conservar un color en la luz ambiente, vuelva a presionar el botón de encendido/apagado.
3. Para apagar la luz ambiente, vuelva a presionar el botón de encendido/apagado.
8.5 Función de buenas noches
La función de buenas noches es ideal para ayudarle a conciliar el sueño. En ella puede ajustar la función de
puesta de sol. Con esta función, la luz va atenuándose gradualmente. También puede asignar distintos so-
nidos relajantes a la puesta de sol simulada y usar la luz natural o una luz ambiente.
NOTA:
Puede ajustar la función de puesta de sol por medio de la aplicación “beurer LightUp” o con los bo-
tones de la luz para despertar. Para activar la función de puesta de sol:
1. Si desea usar la función de puesta de sol con luz natural, presione brevemente el botón de encendido/
apagado. Se encenderá la luz.
2. Si desea usar la función de puesta de sol con la luz ambiente, mantenga presionado dos segundos el bo-
tón de encendido/apagado. Se encenderá la luz ambiente.
3. Mantenga presionado el botón de encendido/apagado durante cinco segundos. Parpadeará en la panta-
lla “02”. Use los botones / dentro de los cinco segundos siguientes para seleccionar la duración de
la puesta de sol.
4. Use los botones / para ajustar el volumen.
5. Use el botón de ajuste Set para seleccionar el sonido que desee.
8.6 Radio
NOTA:
Puede ajustar los parámetros de la radio por medio de la aplicación
“
beurer LightUp” o de los boto-
nes de la luz para despertar.
Selección de la emisora de radio
Para seleccionar la emisora de radio por medio de los botones de la luz para despertar, haga lo siguiente:
1. Presione dos veces el botón de ajuste Set del dispositivo. Aparecerá en la pantalla “SET Radio” (ajustar
radio). Espere tres segundos a que la frecuencia de la emisora actual parpadee en la pantalla.

18
2.
Use los botones / para seleccionar la emisora de radio que desee. Para buscar una emisora, mantenga
presionados los botones o . Confirme con el botón de ajuste Set.
3.
Parpadeará en la pantalla el número de programa “P 01”. Use los botones / para seleccionar el número
de programa en el que desee guardar la emisora de radio seleccionada (p.ej., “P 01” o “P 02”). Hay diez
espacios de memoria disponibles para guardar emisoras. Confirme con el botón de ajuste Set.
Encendido y apagado de la radio
1. Para encender o apagar la radio, presione el botón Radio de la luz para despertar.
2.
Para seleccionar entre las emisoras de radio guardadas, presione el botón de ajuste Set y, a continuación,
los botones / para seleccionar la emisora de radio.
3. Para ajustar el volumen, presione los botones / durante la emisión de radio.
8.7 Ajuste del brillo de la pantalla
NOTA:
La luz para despertar tiene cuatro niveles de brillo de la pantalla (0, 1, 2 y 3). Puede ajustar el brillo de
la pantalla por medio de la aplicación
“
beurer LightUp” o de los botones de la luz para despertar.
Para ajustar el brillo de la pantalla con los botones de la luz para despertar:
1. Presione cuatro veces el botón de ajuste Set del dispositivo. Aparecerá en la pantalla “SET Display” (ajus-
tar pantalla). Espere tres segundos a que parpadee un número en la pantalla.
2. Use los botones / para ajustar el brillo de pantalla que desee. Confirme con el botón de ajuste Set. El
brillo seleccionado se muestra después de cinco segundos.
Alternativamente, puede tocar ligeramente el lado derecho de la pantalla para aumentar el brillo de manera
temporal.
8.8 Conexión AUX
A la luz para despertar se le puede conectar un dispositivo de audio externo (p.ej., un reproductor MP3, un
smartphone o un reproductor de CD) en la entrada AUX.
1. Conecte el cable AUX suministrado al dispositivo de audio.
2. Conecte el otro extremo del cable AUX a la entrada AUX de la parte trasera del dispositivo.
3. Presione el botón AUX del dispositivo. El dispositivo de audio externo estará conectado.
4. Use los botones / para ajustar el volumen.
5. Vuelva a presionar el botón AUX para salir del modo AUX.
8.9 Activación y desactivación del tono de los botones
Solo es posible activar y desactivar el tono de los botones de la luz para despertar por medio de la aplica-
ción “beurer LightUp”.
8.10 Activación y desactivación de Bluetooth
®
NOTA:
La luz para despertar incorpora Bluetooth
®
activado. Si desactiva
Bluetooth
®
, la luz para despertar
no podrá conectarse a la aplicación “beurer LightUp”.

19
Para desactivar Bluetooth
®
en la luz para despertar:
1. Presione cinco veces el botón de ajuste Set del dispositivo. Aparecerá en la pantalla “SET ” (ajustar
Bluetooth). Espere tres segundos a que parpadee “
on
” (activado) en la pantalla.
2. Presione los botones o hasta que aparezca en la pantalla “OFF” (desactivado). Confirme con el botón
de ajuste Set. Bluetooth
®
se habrá desactivado.
9. Limpieza, almacenamiento y desecho
•
Limpie el dispositivo con una tela seca.
•
No use productos de limpieza abrasivos.
•
Asegúrese de que no entre agua en el dispositivo. Si se mojan los componentes internos del dispositivo,
asegúrese de que se sequen por completo antes de volver a usar el dispositivo.
•
Nunca sumerja el dispositivo ni el cable de corriente en agua ni en otros líquidos.
•
Proteja el dispositivo contra golpes, humedad, polvo, productos químicos, cambios de temperatura grandes
y fuentes de calor cercanas (p.ej., hornos o estufas).
Desecho
Aplique las normas locales para desecho de materiales. Deseche el dispositivo de acuerdo con las normas lo-
cales. Si tiene alguna pregunta, consulte a las autoridades locales encargadas del desecho de desperdicios.
10. Guía para la resolución de problemas
Encontrará más información y una lista de preguntas frecuentes sobre este producto en www.beurer.com.
11. Especificaciones
Iluminancia Aprox. 2,000 lux como máximo (a 5.9pulgadas/15cm de distancia)
Luz Tecnología LED (vida útil del LED: > 20,000horas)
Niveles de luz
Diez a través de la luz para despertar; posibilidades ilimitadas de ajuste con
la aplicación
Luz ambiente Cambio de color RGB automático con opción de ajuste individual del color
Momento de repetición
de la alarma
1 a 30 minutos
Retroiluminación LCD Cuatro niveles
Hora Formatos de 12 o 24 horas
Alarma
Dos modos de alarma: tono y radio
Seis melodías para despertar
Cuatro melodías para dormirse
Función de carga Los smartphones pueden cargarse a través de USB
Tono de los botones Activado o desactivado
AUX Conector de entrada de 0.14pulgadas (3.5mm)
Radio
Rango de frecuencia de 88.1 a 107.9MHz (a intervalos de 0.2MHz); diez
espacios de memoria
Bocina 2 vatios
Voltaje de la fuente de
alimentación
Tal como se muestra en la placa de características
Clase de protección de la
conexión a la red eléctrica
Clase de protecciónII
Banda de frecuencia
2,402MHz-2,480MHz
Potencia de transmisión
4dBm como máx.

20
12. Declaración de conformidad de la FCC
Este dispositivo cumple con la parte15 de las Reglas de la FCC. Su funcionamiento está sujeto a las dos
condiciones siguientes: (1) este dispositivo no podrá causar interferencias dañinas, y (2) este dispositivo
debe aceptar cualquier interferencia recibida, incluyendo interferencias que podrían causar un funciona-
miento no deseado.
Los cambios o modificaciones que la parte responsable del cumplimiento no apruebe expresamente
podrían anular la autoridad del usuario para operar el equipo.
NOTA: Este equipo ha sido probado y se determinó que cumple con los límites para los dispositivos digi-
tales claseB, de acuerdo con la parte15 de las reglas de la FCC. Estos límites sirven para proporcionar
protección razonable contra la interferencia dañina en instalaciones residenciales. Este equipo genera, usa
y puede emitir energía de radiofrecuencia y, si no se instala de acuerdo con las instrucciones, puede causar
interferencias dañinas a las comunicaciones de radio. Sin embargo, no hay garantía de que no se produci-
rán interferencias en una instalación en particular. Si este equipo efectivamente causa interferencias dañinas
a la recepción de radio o televisión, lo cual puede determinarse al apagar y encender el equipo, se reco-
mienda al usuario que intente corregir las interferencias mediante una o más de las siguientes medidas:
—Reorientar o cambiar de lugar la antena receptora.
—Aumentar la distancia entre el equipo y el receptor.
—Conectar el equipo en una toma o circuito diferente a aquel donde está conectado el receptor.
—Consultar al distribuidor o a un técnico con experiencia en radio y televisión.
13. Garantía
Garantía limitada de por vida de la compra original
Se garantiza que su luz para despertar Beurer, modelo WL75, está libre de defectos de materiales y mano de
obra durante la vida útil del producto en las condiciones normales del uso y servicio indicados. Esta garantía
se aplica solamente al comprador original y no se extiende a vendedores minoristas o futuros propietarios.
A nuestra discreción, repararemos o reemplazaremos la luz para despertar Beurer, modelo WL75, sin cargo
adicional, por cualquier parte o partes cubiertas por esta garantía escrita. No se harán reembolsos. La repa-
ración o reemplazo es nuestra única responsabilidad y el único recurso con que usted cuenta según esta
garantía escrita. Si no hay piezas de reemplazo disponibles para los materiales defectuosos, Beurer se reserva
el derecho de hacer sustituciones del producto en lugar de la reparación o reemplazo.
Para obtener servicio de garantía, llame a nuestro departamento de servicio al cliente al teléfono
1-800-536-0366 o escriba a info@beurer.com para proporcionar una descripción del problema. Si se con-
sidera que el problema está dentro del alcance de la garantía limitada de por vida, se le pedirá que envíe
el producto, a su cargo, en su empaque original con el comprobante de compra, y su nombre, domicilio y
número telefónico. Si se considera que el problema no está cubierto por la garantía limitada de por vida, le
enviaremos una cotización para la reparación o remplazo así como del costo del transporte.
Esta garantía no cubre los daños causados por mal uso o abuso; accidente; conexión de accesorios no
autorizados; alteración del producto; instalación incorrecta; aplicación errónea; falta de cuidado razonable
con respecto al producto; reparaciones o modificaciones no autorizadas; uso indebido de alimentación o
energía eléctrica; desgaste normal; falta de potencia; caída del producto; mal funcionamiento o daño de una
parte operativa por incumplimiento de las instrucciones de uso o falta del mantenimiento recomendado por
el fabricante; daño en el transporte; robo; negligencia; vandalismo; condiciones ambientales; pérdida del uso
durante el periodo en que el producto esté en una instalación de reparación o en espera de partes o repara-
ción por otra causa; o cualquier condición de otro tipo que esté fuera del control de Beurer. Esta garantía no
es válida si el producto se usa alguna vez en un ambiente comercial o de negocio. La máxima responsabi-
lidad de Beurer según esta garantía se limita al precio de compra que el cliente haya pagado realmente por
el producto cubierto por la garantía, según se confirme mediante prueba de compra, independientemente
del monto de cualquier otro daño directo o indirecto que sufra el cliente.
Page is loading ...
Page is loading ...
Page is loading ...
Page is loading ...
Page is loading ...
Page is loading ...
Page is loading ...
Page is loading ...
Page is loading ...
Page is loading ...
Page is loading ...
Page is loading ...
-
 1
1
-
 2
2
-
 3
3
-
 4
4
-
 5
5
-
 6
6
-
 7
7
-
 8
8
-
 9
9
-
 10
10
-
 11
11
-
 12
12
-
 13
13
-
 14
14
-
 15
15
-
 16
16
-
 17
17
-
 18
18
-
 19
19
-
 20
20
-
 21
21
-
 22
22
-
 23
23
-
 24
24
-
 25
25
-
 26
26
-
 27
27
-
 28
28
-
 29
29
-
 30
30
-
 31
31
-
 32
32


Ask a question and I''ll find the answer in the document
Finding information in a document is now easier with AI
in other languages
- français: Beurer WL 75 Le manuel du propriétaire
- español: Beurer WL 75 El manual del propietario
Related papers
-
Ewig Industries Macao Commercial Offshore N9ZWL90 User manual
-
-
Beurer WL 50 Wake Up Light Operating instructions
-
Ewig Industries Macao Commercial Offshore N9ZTL100 User manual
-
Beurer WL 32 Owner's manual
-
Beurer BS 49 Owner's manual
-
-
-
-
Beurer IL 50 Owner's manual
Other documents
-
iLuv SmartShaker Quick start guide
-
Lenoxx BCR663 Instructions Manual
-
Denver CRL-340 User manual
-
THESOURCE Sunrise Alarm Clock Owner's manual
-
GPX CR1807 User manual
-
-
RCA RP5605 User manual
-
Philips TAPR702/12 User manual
-
SCOTT CMX 118 Lyte User manual
-