De Dietrich DHD7261B Owner's manual

Category
Cooker hoods
Type
Owner's manual

This manual is also suitable for

FR GUIDE D’UTILISATION
ES MANUAL DE UTILIZACION
EN GUIDE TO INSTALLATION
DE BETRIEBSANLEITUNG
PT GUIA DE UTILIZAÇAO
NL GEBRUIKSAANWIJZINGEN
IT GUIDA D’INSTALLAZIONE
LOREM IPSUM
HOTTE DÉCORATIVE
CAMPANA EXTRACTORA DECORATIVA
DECORATIVE HOOD
DEKOR-DUNSTABZUGSHAUBE
EXAUSTOR DECORATIVO
DESIGNAFZUIGKAP
CAPPA DECORATIVA
Typo : Arial
Couleur : blanc
Corps : 12 pts
Typo : Times New Roman italique
Couleur : noir 70 %
Corps : 36 pts
Typo : Arial
Couleur : noir 70 %
Corps : 12 pts
Couleur de fond : noir 70 %
C = 0 / M = 0 / J = 0 / N = 70
FR GUIDE D’UTILISATION
ES MANUAL DE UTILIZACION
EN GUIDE TO INSTALLATION
DE INSTALLATIONSANLEITUNG
PT GUIA DE INSTALAÇÃO
NL INSTALLATIEHANDLEIDING
IT GUIDA D’INSTALLAZIONE
PL PRZEWODNIK INSTALACYJNY
SK INŠTALAČNÝ NÁVOD
RU РУКОВОДСТВО ПО ЭКСПЛУАТАЦИИ
DK INSTALLATIONSVEJLEDNING
SV INSTALLATIONSGUIDE
EL ΟΔΗΓΙΕΣ ΕΓΚΑΤΑΣΤΑΣΗΣ
CS NÁVOD K POUŽITĺ
DHD7261B DHD7961B
HOTTE DÉCORATIVE
CAMPANA EXTRACTORA DECORATIVA
DECORATIVE HOOD
DEKOR-DUNSTABZUGSHAUBE
EXAUSTOR DECORATIVO
HOOD DECORATIEVE
CAPPA DECORATIVA
DEKORACYJNY OKAP KUCHENNY
DEKORAČNÝ ODSÁVAČ PAR
ДЕКОРАТИВНАЯ ВЫТЯЖКА
DEKORATIV HÆTTE
DEKORATIV FLÄKTKÅPA
ΔΙΑΚΟΣΜΗΤΙΚΟΣ ΑΠΟΡΡΟΦΗΤΗΡΑΣ
ODSAV
4
2
4
5
1
3
6
5
7
8
9
10
INDEX
ATTENTION
• Précautions importantes ____________________________
• Risques électriques _______________________________
• Risques d’asphyxie ________________________________
• Risques d’ incendie ________________________________
• Montage de votre hotte _____________________________
• Description de votre appareil _________________________
1 / COMMENT INSTALLER VOTRE HOTTE
• Utilisation ________________________________________
• Blocage du clapet anti-retour _________________________
• Version recyclage _________________________________
• Seulement en version moteur à bord ___________________
• Montage et démontage des ltres anti-graisse
Montage et démontage des ltres charbon _______________
• Raccordement de votre hotte _________________________
• Raccordement électrique ____________________________
2 / COMMENT FONCTIONNE VOTRE HOTTE ________________
3 / COMMENT NETTOYER VOTRE HOTTE ________________
4 / ANOMALIES DE FONCTIONNEMENT __________________
5 / SERVICE D’ASSISTANCE APRÈS-VENTE _________________
6 / ENVIRONNEMENT _________________________________
7
8
8
9
9
10
11
12
12
12
12
12
13
14
16
17
18
19
6
FR
10
DESCRIPTION DE VOTRE APPAREIL
ÍNDICE
ADVERTENCIAS
• Precauciones importantes ___________________________
• Riesgos eléctricos ________________________________
• Riesgos de asxia ________________________________
• Riesgos de incendio _______________________________
• Montaje de la campana _____________________________
• Descripción del aparato _____________________________
1 / COMO INSTALAR LA CAMPANA
• Uso ____________________________________________
• Bloqueo de la válvula de retención ____________________
• Versión con reciclado _______________________________
• Montaje del motor separado _________________________
• Montaje de ltros cartucho - montaje de ltro carbón _______
• Conexión elèctrica de la campana _____________________
• Conexión eléctrica _________________________________
2 / COMO FUNCIONA LA CAMPANA ______________________
3 / COMO LIMPIAR LA CAMPANA ________________________
4 / DEFECTOS DE FUNZIONAMIENTO ____________________
5 / SERVICIO DE ASSISTENCIA POS VENTA _______________
6 / MEDIO AMBIENTE __________________________________
21
22
22
22
23
24
25
25
26
26
26
26
26
27
29
30
30
31
20
ES
24
DESCRIPCIÓN DEL APARATO
TABLE OF CONTENTS
WARNINGS
• Important precautions ______________________________
• Electrical risk ____________________________________
Asphyxia risk ____________________________________
• Fire risk _________________________________________
• Installing the hood _________________________________
• Description of the appliance _________________________
1 / INSTALLING THE HOOD
• Use ____________________________________________
• Non-return valve locking ____________________________
• Filtering version ___________________________________
• External motor installation ___________________________
• Grease lter removal - charcoal lter installation __________
• Connecting the hood to power supply __________________
• Electrical connection _______________________________
2 / HOW THE HOOD WORKS ___________________________
3 / CLEANING THE HOOD ______________________________
4 / OPERATIONAL ANOMALIES __________________________
5 / AFTER-SALE SERVICE ______________________________
6 / ENVIRONNEMENT _________________________________
33
34
34
34
35
36
37
37
38
38
38
38
38
39
41
42
42
43
32
EN
These warnings are also available at the De Dietrich brand
website
Please follow all the instructions given below , before installing
and using your appliance.
They have been written down for ensuring your personal sa-
fety and the safety of other people, as well. Keep these instruc-
tions for use with the appliance. Should the appliance be sold
or passed on to others, please make sure these warnings are
passed on with it.
- Constantly seeking to improve our products, we hereby hold
the right to modify their technical, operational and aesthetic
features in line with any new technical innovation available .
- We suggest you to take note of the appliance technical de-
tails/ references in the “Consumers’ Service page, so that you
can easily nd then when necessary.
The manufacturer declines any liability for possible pro-
blems, damages or re caused by not abiding to the in-
structions specied in this manual.
- IMPORTANT PRECAUTIONS
- This appliance has been designed for personal use in the
household environment . Never use the appliance for commer-
cial or industrial use or for purposes other than its intended
use.
- Take the appliance immediately out of its packaging on de-
livery, or ask the courier to do it for you. Check the appliance
overall conditions. Write down any claims on the delivery note,
and take a copy of it.
- The appliance can be operated by children over the age of
8 and by people with impaired physical , sensorial and mental
faculties or without the necessary experience and competence
only if properly supervised and if they had been duly provided
with the necessary instructions concerning the safe use of the
appliance and informed of the potential associated risks.
Children shall not be allowed to play with the appliance.
Cleaning and maintenance operations on the appliance shall
not be performed by children without adults’ supervision.
33
WARNINGS
-Accessible parts of the hood may become hot when used
with cooking appliance.
- Use only the screws provided with the appliance during in-
stallation. The use of other screws may cause electrical or me-
chanical problems. Caution: Failure to use screws and xing
devices in compliance with the instructions specied in this
manual, may result in electrical risk . The use of accessories
which are not provided with the appliance is not recommended.
- ELECTRICAL RISK
- Disconnect any power supply circuits before reaching the
connecting terminals. In case the power cord is damaged, it
shall be replaced by either the manufacturer , the technical
assistance service or qualied personnel in order to avoid any
kind of risks.
- Electrical disconnection can be done by using an accessible
socket or by providing xed pipes with a breaker, in accordan-
ce with the installation instructions.
- Do not alter or try to alter the technical features of the applian-
ce, as it might be very dangerous.
- Repairs on the appliance shall be performed by authorized
technicians only.
- Always disconnect the appliance from power supply before
carrying out any cleaning and maintenance operation.
- Never use steam/ or high pressure devices to clean the ap-
pliance (precautions connected to electrical safety).
- ASPHYXIA RISK
- Standards concerning air- exhaust methods should be com-
plied with. The ducting system for this appliance must not be
connected to any existing ventilation system which is being
used for any other purpose such as discharging exhaust fumes
from appliances burning gas or other fuels (this does not apply
to appliances conveying only air into the room).
- The room where the appliance is installed must be properly
ventilated, when the kitchen hood is used together with other
gas combustion devices or powered by other fuels (this does
not apply to appliances conveying only air into the room).
- FIRE RISK
- It is not allowed to cook food over open ames (ambè coo-
king) and operate gas hobs without pots or pans on them (the
ames sucked into the hood might damage the appliance).
34
35
- Frying under the appliance shall be done under constant su-
pervision as overheated oils and fats may ignite.
- Respect the guidelines for the cleaning and replacement of
grease lters. Accumulated grease deposits represent a re
risk.
- The use of the appliance over ames produced by fuels (wood
or coal) is not allowed.
WARNING:
Place the metal box containing the electrical components at
minimum distance of 65 cm from the gas hob, in any case at
65 cm from the hood suction area.
WARNING:
We recommend to place the metal box containing the electrical
components at a distance of at least 10 cm from the ground
and at a safe and proper distance from any heat source (e.g.
oven or hob side).
INSTALLING THE HOOD
Installation shall be performed in compliance with any applicable standards on the
ventilation of enclosed spaces. In France, these requirements are specied in DTU
61.1 issued by CSTB.
In particular, the air collected shall not be conveyed into any existing ventilation sy-
stem which is being used for any other purpose such as discharging exhaust fumes
from appliances burning gas or other fuels . The use of disused ducts is not allowed,
except upon approval by a qualied technician.
36
DESCRIPTION OF THE APPLIANCE
1 HOW TO INSTALL THE HOOD
37
In order to ensure the Downdraft pro-
per operation, installation instruc-
tions shall be carefully followed.
1) Drill a rectangular hole in the rear
side of the kitchen worktop of the fol-
lowing dimensions:
Downdraft 90 Cm: 794X106mm
Downdraft 120 Cm: 1094x106mm (g. 1).
2) In case of gas hobs, the minimum di-
stance from the downdraft edge to the
hob rear edge shall be of a least 60 mm
3) Before making the hole, check that
there are no structural or other parts in-
side the cabinet, where the appliance is
to be placed, which could hinder a pro-
per installation. Check that the overall
dimensions of the Downdraft and its
motor are compatible with the cabinet
so that the installation can be carried
out properly.
4) In the version with internal motor, it
comes with the motor xed to the ap-
pliance in order to avoid any damage
during transport: you need to disas-
semble it before starting any installation
operation.
5) Apply the glue on the lower side of
the frame (g. 2).
6) Fit the Downdraft inside the cabinet
by inserting it from above , without re-
moving the glass and panel protections.
7) The appliance frame shall perfectly
adhere to the kitchen upper work top .
8) Secure the hood inside the cabinet by
using the two brackets provided (g. 3).
9) Mount the motor on the hood body
and direct the air outlet to the desired
position , either upwards or downwards
(g. 4).
10) The motor can be installed either on
the front or the rear side of the down-
draft .If you choose to install the motor
on the rear , please follow the procedu-
re below:
remove the plate found on the rear side
of the hood. Fit and fasten the motor
where the plate was placed ,; properly
connect the motor cord; Fix the plate on
the front side of the appliance to close
the opening.
Fit the air exhaust duct (not provided
with the appliance) . Connect the other
end of the duct towards the outside of
the cabinet if you choose to have your
hood working in the ltering mode (g.
5) or towards the outside of the building
if you choose to have your hood working
in suctioning mode. Caution: do not
drill any other hole on the appliance,
in order prevent any damage on the
sliding internal components and on
the electric ones, as well.
11) Connect the appliance to the power
supply.
12) Start to open the extractable unit
(see ‘How the hood works’ chapter)
and remove all the protections (g. 6-7).
Then open the small door (g.8) and re-
move all the protections.
Remove the PVC protection from the
grease lters and place them as shown
in g. 9.
USAGE
This appliance is intended to suck coo-
king fumes, greases and steam. It has
been designed to work in both suctioning
mode, with outside evacuation, and lte-
ring mode. Exhausting piping is not sup-
plied with the appliance.
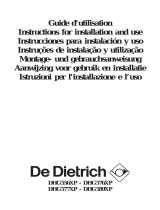
NON-RETURN VALVE LOCKING
Caution; before connecting the air
exhaust duct , make sure the non-return
valves can rotate freely.
The non-return valve prevents wind and
back air from entering.
FILTERING VERSION
In case fumes and vapour cannot be
discharged to the outside, the applian-
ce can be used in the ltering mode,
Activated charcoal lters are required in
this operation mode (g. 10). The air re-
cycled through the charcoal lters is then
re-circulated into the kitchen, thanks to
a duct conveying the air on one side of
the cabinet.
MOUNTING THE MOTOR
Only in the case of appliances equip-
ped with internal motor, it is possible to
mount the motor separately from the
hood; in this case, you will need to order
the dhk900 – 989580001 kit.
REMOVING THE GREASE FILTER,
FITTING THE ACTIVATED CHARCO-
AL FILTER
Grease lters and charcoal lters remo-
ving and tting operations shall be carri-
ed out with the downdraft open. To open
the downdraft, push the key .
.
Then remove the front panel by simulta-
neously pulling on the top of each side
(g. 8). The panel will rotate forwards,
thus allowing to reach the grease lters.
Remove the grease lters to reach the
charcoal lters . Charcoal lters shall be
replaced (g. 11) accordingly to actual
use of the Downdraft, in any case at le-
ast once every 6 months.
Caution: the lters protection panel shall
be re-t properly, otherwise the hood
might stop operation.
CONNECTING THE HOOD TO PO-
WER SUPPLY
Thisapplianceisequip-
pedwithaH05VVFwith3x
0,75mm2conductors(neu-
tral,phaseandground)po-
wercord.
It shall be connected to a
220V–240Velectrical mo-
no-phasenetworkthrougha
CEI 60083 approved power
socket, which shall be ac-
cessibleafterinstallation,in
38
compliance with installa-
tionregulations.Wehereby
declineanyliabilityincase
of accidents due to failure
toconnectthe hood tothe
groundorincorrectground
connection.Thefuse to be
usedshallbe10or16A.In
caseofdamagestothepo-
wercord,pleasecalltheaf-
ter-sale service in order to
avoidanykindofrisk.
ELECTRICAL CONNECTION
This appliance complies with Europe-
an Directives 2006/95/CE (Low Voltage
Directive) and 2004/108/CE (Electroma-
gnetic Compatibility ) .
The hood shall be disconnected from po-
wer supply during installation and main-
tenance operations, while fuses shall be
disconnected or removed. Electric con-
nection shall be completed before tting
the appliance into the cabinet.
Check that:
- Power is adequate
- Power lines are in good conditions.
- Cables diameter is compliant with in-
stallation regulations.
Caution
In case the hood shows any
anomalies, please disconnect
it or remove the fuse corre-
sponding to the appliance po-
wer disconnecting line.
2 HOW THE HOOD WORKS
IMPORTANT: All of the hood features/
functions are enabled only if the suc-
tion panel/extractable unit is open.
39
The light turns on and off only
when the suctioning panel is completely
OPEN .
By pressing this key when the panel is
closed , rst the panel will open up com-
pletely and then the light will turn on. By
pressing this key you will turn the light
off.
This key lifts the suctioning panel
until it is completely open, and automati-
cally sets operation at 2°speed.
When the suctioning panel is open, this
key disables all of the functions and pulls
the suctioning panel back.
This key decreases the mo-
tor speeds, from 4th speed to motor
switching off, without closing the suctio-
ning panel.
This key displays the speed set
by lighting the Leds.
It also signals the grease lters satura-
tion by the simultaneous ashing of all
the Leds.
This key increases the motor
speed when the panel is open.
After10 min from setting, this key
allows to stop the motor, close the panel
and switch off the lights.
The function set is signaled by the
ashing of the led corresponding to the
speed set.
To disable the timer function, press the
key again.
40
TIMING
As a result of the EU65 “Energy label”
and EU66 Ecodesign regulations is-
sued by the European Commission,
which came into force as from Janua-
ry 1st, 2015 , our products have been
adapted to comply with these new re-
quirements.
All of the models complying with the
energy label requirements, are equip-
ped with new electronics including a
timer device for suction speeds control,
when the air capacity exceeds 650m³/h.
Internal motor models, Internal motor
models, whose air capacity exceeds
650m³/h, have the IV speed temporized
after 5 minutes of operation.
When abovementioned timing elapses,
the motor switches to IIIa speed auto-
matically.
The energy consumption of the applian-
ce in stand by mode is lower than
0.5W.
OTHER FUNCTIONS
Automatic turn-off
After 4 hours of continuous operation
from the last setting, the appliance turns
off and closes automatically.
Grease lters saturation
After 30 hours of operation, the speed
indicators will all ash simultaneously,
signaling the grease lters saturation.
To reset this function, press the “TI-
MER” key for at least 3 seconds, while
the extractable unit is open.
ADJUSTMENT
The hood self-adjust every 3 comple-
te cycles performed by the extractable
unit. By pressing the “Timer” key 6 times
in a raw (MAX 3 sec. between one push
and the other ) all the leds will ash in
and the hood adjustment will be reset.
The downdraft performs self-adjustment
after the next 3 cycles.
CRUSHPROOF SAFETY DEVICE
If an obstacle obstructs the closure of
the suctioning panel, the closure is
stopped and the panel lifts up.
41
Careful maintenance ensures proper
operation and good performances over
time.
3 CLEANING THE HOOD
MAINTENANCE
HOW TO PROCEED?
PRODUCTS /ACCESSORIES
TO USE
External surface
and accessories
Do not use metallic scrub-
bers, abrasive products, or
hard brushes.
To clean the external surfa-
ce of the hood and the light
housing screen use only
commercially available hou-
sehold detergents diluted in
water. Then rinse with cle-
an water and dry with a soft
cloth.
Grease lter with
extractable unit
open
Activated charcoal
lter
After 30 hours of operation,
the downdraft will signal the
grease lter saturation.
The saturation is signaled by
the ashing of the 4 central
leds. To reset, press the ti-
mer key .
In the ltering version, the acti-
vated charcoal lter shall be re-
placed regularly. To remove the
charcoal lter panel, rst of all it
is necessary to remove the gre-
ase lter grid and then pull the
plastic key of the panel itself,
in order to disengage it from its
seating. Follow these steps in
reverse order to t the activated
charcoal lter. Replace the used
charcoal lter on an average of
every six months.
Grease lters can be washed
by hand or in the dishwasher.
These lters need to be cle-
aned on a regular basis,
otherwise they may repre-
sent a re risk.
Ret the grease lters and
the front panel, making sure
that the panel is properly t
on both sides so that it does
not cause the downdraft to
stop operation.
The hood shall be disconnected
from the electrical network ,by both
unplugging the appliance from the
socket and activating the magnetic
circuit breaker (safety cut-out), befo-
re removing the metal grease lters.
After cleaning operations, ret the
metal grease lters as detailed in the
installation instructions.
42
4 OPERATIONAL ANOMALIES
PROBLEM SOLUTION
The cooker hood
does not work...
Check that:
• There is not a power outage.
A specic speed has actually been selected.
The red reset key, found over the electrical system box,
has been pushed.
Make sure that the wires of the 9 pole connection are in-
serted properly in the connector itself (excessive pressure
during connection could bend the contacts).
The cooker hood
has low perfor-
mances...
The cooker hood
stops during ope-
ration.
Check that:
The motor speed selected is adequate for the quantity of
fumes and vapors present in the room.
The kitchen is ventilated well enough to allow for air intake.
• The charcoal lter is not worn out ( ltering version hood).
The air outlet channel is free and compliant with paragraph
no. 2.
Check that:
• There is not a power outage.
• The omnipolar device has not tripped.
5 AFTER - SALE SERVICE
Any maintenance operation on your ap-
pliance should be carried out by:
- Your retailer,
- A qualied professional technician, au-
thorized by the brand.
When calling, please mention the ap-
pliance details (model, type, serial num-
ber ). This information can be found on
the rating label stuck on the downdraft.
43
6 ENVIRONNEMENT
CARE FOR THE ENVIRONMENT
This appliance’s packaging can be re-
cycled. Recycle and contribute towards
protecting the environment by disposing
of packaging in local waste containers
designed for this purpose.
Your appliance also con-
tains a lot of recyclable ma-
terial. This logo indicates
that used appliances must
not be mixed with other wa-
ste.
Appliance recycling organized by your
manufacturer is carried out under op-
timum conditions, in accordance with
European Directive 2012/19/EC on the
disposal of waste electrical and electro-
nic equipment.
Contact your local authority or retailer
for information on used appliance col-
lection points close to your home.
Thank you for helping to protect the en-
vironment.
  • Page 1 1
  • Page 2 2
  • Page 3 3
  • Page 4 4
  • Page 5 5
  • Page 6 6
  • Page 7 7
  • Page 8 8
  • Page 9 9
  • Page 10 10
  • Page 11 11
  • Page 12 12
  • Page 13 13
  • Page 14 14
  • Page 15 15
  • Page 16 16
  • Page 17 17
  • Page 18 18
  • Page 19 19
  • Page 20 20
  • Page 21 21
  • Page 22 22
  • Page 23 23
  • Page 24 24
  • Page 25 25
  • Page 26 26
  • Page 27 27
  • Page 28 28
  • Page 29 29
  • Page 30 30
  • Page 31 31
  • Page 32 32
  • Page 33 33
  • Page 34 34
  • Page 35 35
  • Page 36 36
  • Page 37 37
  • Page 38 38
  • Page 39 39
  • Page 40 40
  • Page 41 41
  • Page 42 42
  • Page 43 43
  • Page 44 44
  • Page 45 45
  • Page 46 46
  • Page 47 47
  • Page 48 48
  • Page 49 49
  • Page 50 50
  • Page 51 51
  • Page 52 52
  • Page 53 53
  • Page 54 54
  • Page 55 55
  • Page 56 56
  • Page 57 57
  • Page 58 58
  • Page 59 59
  • Page 60 60
  • Page 61 61
  • Page 62 62
  • Page 63 63
  • Page 64 64
  • Page 65 65
  • Page 66 66
  • Page 67 67
  • Page 68 68
  • Page 69 69
  • Page 70 70
  • Page 71 71
  • Page 72 72
  • Page 73 73
  • Page 74 74
  • Page 75 75
  • Page 76 76
  • Page 77 77
  • Page 78 78
  • Page 79 79
  • Page 80 80
  • Page 81 81
  • Page 82 82
  • Page 83 83
  • Page 84 84
  • Page 85 85
  • Page 86 86
  • Page 87 87
  • Page 88 88
  • Page 89 89
  • Page 90 90
  • Page 91 91
  • Page 92 92
  • Page 93 93
  • Page 94 94
  • Page 95 95
  • Page 96 96
  • Page 97 97
  • Page 98 98
  • Page 99 99
  • Page 100 100
  • Page 101 101
  • Page 102 102
  • Page 103 103
  • Page 104 104
  • Page 105 105
  • Page 106 106
  • Page 107 107
  • Page 108 108
  • Page 109 109
  • Page 110 110
  • Page 111 111
  • Page 112 112
  • Page 113 113
  • Page 114 114
  • Page 115 115
  • Page 116 116
  • Page 117 117
  • Page 118 118
  • Page 119 119
  • Page 120 120
  • Page 121 121
  • Page 122 122
  • Page 123 123
  • Page 124 124
  • Page 125 125
  • Page 126 126
  • Page 127 127
  • Page 128 128
  • Page 129 129
  • Page 130 130
  • Page 131 131
  • Page 132 132
  • Page 133 133
  • Page 134 134
  • Page 135 135
  • Page 136 136
  • Page 137 137
  • Page 138 138
  • Page 139 139
  • Page 140 140
  • Page 141 141
  • Page 142 142
  • Page 143 143
  • Page 144 144
  • Page 145 145
  • Page 146 146
  • Page 147 147
  • Page 148 148
  • Page 149 149
  • Page 150 150
  • Page 151 151
  • Page 152 152
  • Page 153 153
  • Page 154 154
  • Page 155 155
  • Page 156 156
  • Page 157 157
  • Page 158 158
  • Page 159 159
  • Page 160 160
  • Page 161 161
  • Page 162 162
  • Page 163 163
  • Page 164 164
  • Page 165 165
  • Page 166 166
  • Page 167 167
  • Page 168 168
  • Page 169 169
  • Page 170 170
  • Page 171 171
  • Page 172 172
  • Page 173 173
  • Page 174 174
  • Page 175 175
  • Page 176 176
  • Page 177 177

De Dietrich DHD7261B Owner's manual

Category
Cooker hoods
Type
Owner's manual
This manual is also suitable for

Ask a question and I''ll find the answer in the document

Finding information in a document is now easier with AI