Page is loading ...

Assembly Instructions: 6068-1W (Marco)
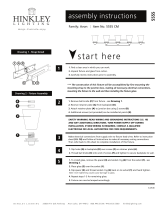
PREPARING FOR INSTALLATION
Remove all of the contents from the carton. See the important notes
above. Shut off the power at the circuit breaker and completely
remove the old xture from the wall, including the old mounting
strap.
Mounting strap (B) contains several pairs of threaded holes. Find
the pair of holes that matches the spacing of the holes on the
junction box and your xture’s back plate. Two of mounting screws
(A) should be attached to mounting strap (B). You may need to
tighten the nuts that hold these screws in place. Pull the house
wires through the center of mounting strap (B). Place mounting
strap (B) over the junction box so that mounting screws (A) are
horizontal, and in alignment with the hole locations on the xture’s
backplate (G). Secure mounting strap (B) to the junction box
with mounting screws (D) and a screwdriver. Tighten the screws
securely.
CONNECTING THE WIRES
Attach the xture’s wires to the power supply wires from the
junction box. Connect black to black (or smooth); white to white (or
ribbed); ground to ground (green or copper). Twist the ends of the
wire pairs together, then twist on a wire connector. Make sure all
twists are in the same direction. If there is no ground wire (green or
copper) from the junction box, locate ground screw (E) on mounting
strap (B) and wrap the xture’s ground wire around the green
ground screw (E). Use a screwdriver to secure ground screw (E)
onto mounting strap (B). Tuck all wires neatly into the junction box.
FINISHING THE INSTALLATION
Place the xture’s backplate (G) over mounting screws (A) so that
mounting screws (A) protrude through the holes in the front of the
backplate. Thread deco nuts (F) onto mounting screws (A). Twist
until backplate (G) is snug against the wall.
Note: Complete the remaining steps after the xture has been
hung.
Carefully slide the candle sleeve over the socket (I) before covering
the socket with glass shade (H).
Install light bulb (not provided) in accordance with the xture’s
specications. Do not exceed the maximum recommended
wattage.
Your installation is now complete. Turn on the power and test the
xture.
CLEANING TIPS
Treat the xture gently! Regular cleaning will reduce the need for deep cleaning. For regular cleaning, turn off the light and wipe down the
xture with a clean lint-free cotton or microber cloth. Never spray cleaner directly onto the xture.
BLACK
(Hot)
WHITE
(Neutral)
GREEN
(Ground)
HOUSE WIRES
SMOOTH
(Or Black)
FIXTURE WIRES
RIBBED
(Or White)
BARE COPPER
(Or Green)
IMPORTANT:
• ALL INSTALLATION WORK SHOULD BE DONE BY ACCREDITED PROFESSIONAL.
• SHUT OFF POWER SUPPLY AT FUSE OR CIRCUIT BREAKER!
• USE ONLY THE SPECIFIED BULBS. DO NOT EXCEED THE MAXIMUM WATTAGE!
For Customer Service, contact
the place of purchase to arrange
for replacement parts.
C
A
B
F
G
D
E
I
H
/