Page is loading ...

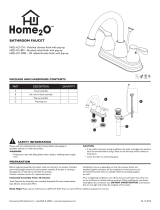
TWO HANDLE WIDE SPREAD
LAVATORY FAUCET WITH POP-UP
4-8-16
Design House is a registered brand
of DHI Corp.Mequon,WI 53092
1-800-558-8700
PREPARATION
SAFETY INFORMATION
Before beginning assembly of product, make sure all parts are present.
Compare parts with package contents list and hardware contents. If any
part is missing or damaged, do not attempt to assemble the product.
Contact customer service for replacement parts.
Estimated Assembly Time: 30 minutes
Tools Required for Assembly (not included): Adjustable Wrench, Groove
Joint Pliers, Pipe Wrench, Phillips Head Screwdriver, and Supply Lines.
Installations may vary depending on how the previous faucet was
installed. Supplies necessary for the installation of the faucet are not
all included; however, they are available wherever plumbing supplies
are sold.
Prior to beginning installation, turn off the hot and cold water lines, then
turn on the old faucet to release built-up pressure. When installing the
new faucet, hand tighten the connector nuts. DO NOT OVERTIGHTEN.
Connections that are too tight will reduce the integrity of the system.
Please read and understand this entire manual before attempting to
assemble, operate or install the product.
WARNING
• Protect your eyes with safety glasses when cutting or soldering water
supply lines.
CAUTION
• If you solder the joints during installation of the faucet, the seats,
or the warranty will be voided on these parts.
• Cover the sink drain to avoid losing parts.
www.todaysdesignhouse.com
PRODUCT SPECIFICATIONS
SPECIFICATIONS SPECIFICATIONS
1/4-turn ceramic cartridges
ASME A112.18.1/CSA B125
Manufactured to include no more than 0.25% weighted average lead
content on wetted surfaces
NSF 61-9
3-hole installation 6"-12" center distance
Chrome or satined nickel finish
NSF/ANSI 372
Notes: The picture in this installation instructions is for reference only, pls refer to
actual product in installation process.
MODELS
547653-Satined Nickel
547646-Polished Chrome
548289-Satined Nickel
548271-Polished Chrome

running,
.If it is

3
www.todaysdesignhouse.com
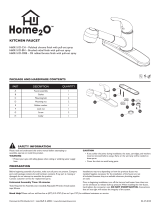
CARE AND MAINTENANCE
TROUBLESHOOTING
PROBLEM POSSIBLE CAUSE CORRECTIVE ACTION
Clean peridodically with a soft cloth.Avoid abraisive cleaners,steel wool, and harsh chemicals as these will dull
the finish and void your warranty
3
www.todaysdesignhouse.com
CARE AND MAINTENANCE
TROUBLESHOOTING
PROBLEM POSSIBLE CAUSE CORRECTIVE ACTION
Clean peridodically with a soft cloth.Avoid abraisive cleaners,steel wool, and harsh chemicals as these will dull
1. Move the handle to the OFF position. Unscrew the handle screw
and remove the handle.
2. Tighten the bonnet by turning it clockwise. Move the cartridge
stem to the on position. The leak should stop draining out from
around the cartridge stem.
3.Shut off the water supply. Remove the bonnet by turning it
counterclockwise. Lift out cartridge valve. Inspect the larger O-ring
on the cartridge bonnet and the smaller O-ring on the cartridge
stem.Remove any debris from the O-rings. If either O-ring is
twisted, straighten it out. If either O-ring is damaged, replace the
cartridge by calling customer service.
4.Position the cartridge back into the faucet body. Make sure the
ridges on the two sides of the cartridge bonnet fit into the grooves
on the two sides of the faucet body. Tightly screw the bonnet onto
the faucet body.
5.Re-install the handle.
Leaks
underneath
handle.
Bonnet has come loose
or O-ring on cartridge is
dirty or twisted.
Water does not
completely shut
off.
Rubber valve seat is
dirty,stuck, or broken.
1. Shut off the water supply to the faucet that leaks.
2. Remove the handle on the problem side. Loosen the bonnet by
turning it counterclockwise.Lift out the cartridge assembly.
3.Inspect the rubber valve seat in the faucet body. If there is debris
or brass scrap on the surface of the seat, remove it. If the rubber
seat is stuck tightly in the water inlet hole, push it gently with a
fingertip so that it moves up and down smoothly. The spring
(smaller end up) must be replaced underneath the valve seat. If
the rubber valve seat is worn out or broken, replace the cartridge
by calling customer service.
4.Replace the cartridge in the faucet body. Make sure that the
ridges on the two sides of the cartridge bonnet fit into the grooves
on the two sides of the faucet body. Tightly screw the bonnet onto
the faucet body.
5. Re-install the handle.

4
www.todaysdesignhouse.com
LIMITED LIFETIME WARRANTY
The distributor warrants to the original consumer purchaser this product to be free from defects in material and
workmanship under normal use in residential applications.At its option, the Company will provide repair parts or
replace defective product when the product is used in accordance with the manufacturer's specifications.
The distributor provides a limited warranty on the finish of this product to the original purchaser.At its option, the
distributor will provide repair parts or replace defective product when the product is used in accordance with the
manufacturer's specifications.Use of mild abrasive,abrasive or chemical cleaners may damage the finish of the
faucet.We recommend cleaning your faucet with a soft cloth, moistened with water.Damage resulting from the
use of abrasive or chemical cleaners SHALL VOID THIS WARRANTY.
This warranty is not applicable to any products or parts of products where damage is caused by use of non-
genuine parts; is due to installation error, product misuse, negligence or faulty maintenance; or where the
product is not installed according to local building codes.
This warranty excludes labor charges or damage incurred during installation, repair or replacement, and any
indirect, incidental or consequential damages, losses, injury or costs of any nature. This warranty is in lieu of
and excludes all other warranties, conditions and guarantees, whether expressed or implied, including without
restriction those of merchantability or fitness of use.Liability under this warranty will not exceed the purchase
price for the product claimed to be defective by the original consumer purchaser. Some states or provinces do
not allow the exclusion or limitation of consequential damages so the above limitations or exclusions may not
apply. This warranty gives you specific legal rights and you may also have other rights which vary from state to
state, or province to province.
Inquiries regarding warranty claims can be directed to 1-800-558-8700,8 a.m. - 5 p.m., CST, Monday - Friday.
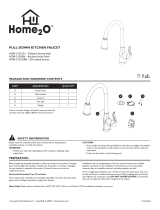
PROBLEM POSSIBLE CAUSE CORRECTIVE ACTION
PROBLEM POSSIBLE CAUSE CORRECTIVE ACTION
Faucet leaks
around the
aerator.
Aerator incorrectly
fitted.
1. Unscrew the aerator by turning it clockwise. Inspect the black
rubber packing inside the aerator.The rubber packing should be flat.
2.Screw the aerator onto the spout end and tighten.
Improper water
pattern.
Aerator dirty or small
parts inside aerator
improperly installed.
1. Remove the aerator from the spout end by turning it clockwise.
2.Gently flush the small parts inside the aerator to clear away any
debris.
3.Re-install the small parts as shown in the exploded diagram.
Metal screens must be flat and plastic supporter must be straight.
4.Screw the aerator onto the spout end and tighten.
/