Page is loading ...

710-0191-100
Introduction
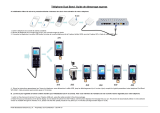
Setting up your Ooma Oce Base Station is quick and easy.
Your Base Station includes one phone jack for connecting an
analog phone/fax machine. The Base Station also includes a
wireless radio that can link with up to four Ooma DP1 desk phones
or Linx devices (for connecting additional analog phone/fax
machines). If you wish to use more than four DP1 or Linx devices,
you will need additional Base Stations.
Ooma Office Base Station
Quick Installation Guide
Step 3 Power Up Your Base Station
Troubleshooting
Quick Reference Guide
Plug the provided AC adapter into the POWER port. It is normal
for the status light on the front of the Base Station to blink amber
for several minutes while the device is booting up. The status light
will turn solid blue once the system is fully functional.
NOTE Ooma is constantly working to improve Ooma Oce and
we frequently upgrade the Oce software. If your device requires
a software upgrade it may take 10-30 minutes to boot up the rst
time you plug it in. This is normal. Do not unplug the Base Station
while it is upgrading. It will automatically reboot after the upgrade
is complete.
Base Station status indicator is blinking amber
A blinking amber status indicator means your Base Station is not
operational. Below are a few troubleshooting steps to take:
• Your Base Station may not be connected to the Internet. Check
that your network cables are plugged in securely. Verify that the
TO INTERNET port is connect to your modem, router, or switch
and that the green LED at the top of the port is illuminated.
• Try rebooting your Base Station, modem, router, and or switch
by power cycling the devices.
• Verify that you can access the Internet via the network port
to which the Base Station is connected. To test this, you can
connect a computer to the LOCAL NETWORK port of the Base
Station and navigate to http://oce.ooma.com. You should see
the login screen for Ooma Oce Manager. If not, troubleshoot
your network connection.
• Your Base Station may be unable to register with the Ooma
network. Verify that you have activated your device by logging in
to the Ooma Oce Manager portal: http://oce.ooma.com
The phone connected to the Base Station has no dial tone
If the system status indicator on the Base Station is blue, but you
don’t hear a dial tone, check your phone or fax machine is correctly
plugged into the PHONE port on the Base Station.
I hear an “extension has not been set up” error message when
I pick up the handset
Log into Ooma Oce Manager, navigate to the Devices section to
conrm the Base Station phone port has been assigned to a user.
If it has not been, assign the Base Station to the desired user.
Use your Ethernet cable to connect the TO INTERNET port of the
Base Station to an open Ethernet port of your router or switch.
Step 2 Connect your Base Station to the Internet
Package Contents
Ooma Oce
Base Station
Ethernet Cable
(7 ft)
AC Adapter
TO INTERNET
Plug in your modem or router to connect
your Base Station to the Internet.
PHONE
Connect your analog telephone or fax machine
with a standard telephone cable.
PAGE
Press and hold to pair a new device.
USB
Connect optional accessories such as the Ooma Wireless Adapter.
POWER
Connect the included AC adapter to power the Base Station.
LOCAL NETWORK
Connect a computer or router to the Base Station for additional
setup options.
Front view
Back view
System status indicator
• Lights up blue when system is operational.
• Blinks amber when device is booting up.
• Blinks amber when Ooma service is not working.
• Blinks blue rapidly when device is in pairing mode.
• Alternately blinks blue and amber during a software upgrade.
Alternative Setup Option
For optimal voice quality, your Base Station should be installed
between your modem and router.
This allows the Base Station to prioritize voice packets (your
phone calls) over other Internet trac and prevents audio glitches,
dropped calls, and other annoying issues.
Connect the Base Station between the Modem and Router
1 Locate the Ethernet cable that connects your modem to your
router. Unplug the modem end of the cable and plug it into
the LOCAL NETWORK port of your Base Station.
2
Use the included Ethernet cable and connect the
TO INTERNET port of the Base Station to your modem.
3 Reboot both your modem and router to ensure the new
network conguration takes eect.
Router
Modem
LOCAL
NETWORK
TO
INTERNET
Otherwise, you will need to add your Base Station to your
Ooma Oce account.
• If you are a new Ooma Oce customer, please visit
http://oce.ooma.com/activate
• If you are an existing Ooma Oce customer, please visit
http://oce.ooma.com/add_device
Once complete, you may continue to Step 2.
Step 1 Get Started
Step 4 Connect Phones or Fax Machines
You may connect an analog phone
or fax directly to your Base Station
via the PHONE port.
If you’d like to connect
DP1 or Linx devices,
please follow the
instructions included
with those devices.
Once completed, you
are ready to start calling!
NOTE If your Base Station is not listed as an available device,
please contact Ooma Oce Support at 866-939-6662 (US),
or 877-948-6662 (Canada).
If your device is labeled Ready to Call,
you may skip this step and continue to Step 2.
READY
TO CALL
Ooma-Insert-Base Station-Bilingual Jan 2019-R13.indd 1-2 1/11/19 3:54 PM

L’indicateur de statut de la station de base clignote orange.
Un indicateur de statut orange clignotant indique que votre station
de base n’est pas opérationnelle. Vous trouverez ci-dessous
quelques étapes à suivre :
• Votre station de base n’est peut-être pas connectée à Internet.
Vériez que vos câbles réseau sont branchés correctement.
Vériez que votre port VERS INTERNET est connecté à votre
modem, routeur ou prise et que la LED verte au-dessus du port
est illuminée.
• Essayez de réinitialiser votre station de base, modem, routeur ou
prise en mettant votre appareil hors tension.
• Vériez que vous pouvez accéder à Internet via le port réseau
auquel la station de base est connectée. Pour eectuer le test,
connectez un ordinateur au port RESEAU LOCAL de la station de
base et rendez-vous sur http://oce.ooma.com. Vous devriez
voir l’écran Ooma Oce Manager. Dans le cas contraire, vous
devrez vérier votre connexion réseau.
• Votre station de base n’est peut-être pas en mesure de se
connecter au réseau Ooma. Assurez-vous d’avoir activé votre
appareil en vous connectant au portail Ooma Oce :
http://oce.ooma.com
Le téléphone connecté à la station de base n’a pas de tonalité
Si l’indicateur sur la station de base est bleu, mais vous n’entendez
aucune tonalité, veries que votre telephone ou fax est branché au
port TELEPHONE sur la station de base.
J’entends le message d’erreur “une extension n’a pas été
programmée” quand je décroche le combiné
Connectez-vous à Ooma Oce Manager, rendez-vous dans la section
Appareils pour conrmer que le port téléphonique de la station de
base a été assigné à un utilisateur. Si ce n’est pas le cas, associez la
station de base à l’utilisateur souhaité.
710-0191-100
Introduction
Congurer votre station de base Ooma Oce, c’est simple
et facile.
Celle-ci inclut une prise téléphonique connectant un téléphone
analogue ou un fax. La station comprend aussi une radio sans
l pouvant relier jusqu’à quatre téléphones xes Ooma DP1 ou
appareils Linx (pour connecter des téléphones analogues ou fax).
Si vous souhaitez utiliser plus de quatre DP1 ou appareils Linx,
il vous faudra des stations de base supplémentaires.
Station de base Ooma Office
Guide d’installation rapide
Étape 3 Allumer votre station de base
Dépannage
Guide de référence rapide
Branchez l’adapateur AC fourni au port ALIMENTATION. Il est
normal que la lumière d’état à l’avant de la station de base
clignote pendant plusieurs minutes lors de l’allumage. La lumière
d’état deviendra bleue une fois que le système est complètement
fonctionnel.
REMARQUE Ooma travaille en tout temps à l’amélioration
d’Ooma Oce et met fréquemment à jour le logiciel Oce. Si
votre appareil requiert une mise à jour logicielle, le démarrage
peut prendre 10 à 30 minutes la première fois que vous
le branchez. C’est normal. Ne débranchez pas la station
de base pendant qu’elle se met à jour. Elle se réinitialisera
automatiquement une fois la mise à jour terminée.
Utilisez votre câble Ethernet pour connecter le port INTERNET
de la station de base à un port Ethernet ouvert sur votre routeur
ou votre mur.
Étape 2 Connecter la station de base à internet
Contenu
Station de base
Ooma Oce
Câble Ethernet
(7 ft)
Adaptateur AC
VERS INTERNET
Branchez votre modem ou votre routeur pour
connecter votre station de base à Internet.
TELEPHONE
Connectez votre téléphone analogue ou votre fax
via un câble téléphonique standard.
PAGE
Appuyez et maintenez pour associer un nouvel
appareil.
USB
Connect optional accessories such as the Ooma Wireless Adapter.
POWER
Connect the included AC adapter to power the Base Station.
LOCAL NETWORK
Connect a computer or router to the Base Station for additional
setup options.
Front view
Back view
Indicateur de statut système
• Lumière bleue quand le système est opérationnel.
• Clignotement orange quand l’appareil s’initialise.
• Clignotement orange quand le service Ooma ne fonctionne pas.
• Clignotement bleu rapide quand l’appareil est en mode appairage.
• Clignotements alternatifs bleu et orange lors d’une mise
à jour logicielle.
Autres options de démarrage
Pour une qualité sonore optimale, il est recommandé d’installer
la station de base entre le modem et le routeur.
Cela permet à la station de base de prioriser les paquets vocaux
(vos appels) par-rapport à d’autres entrées Internet et éviter ainsi
les interferences audio, appels manqués et autres contretemps.
Installez la station de base entre le modem et le routeur
1 Localisez le câble Ethernet reliant votre modem à votre routeur.
Débranchez l’extrémité du câble correspondant au modem et
branchez-la au port RESEAU LOCAL de votre station de base.
2
Utilisez le câble Ethernet fourni et connectez le port VERS
INTERNET de la station de base à votre modem
.
3 Réinitialisez votre modem et votre routeur pour vous assurer
que la nouvelle conguration réseau prend eet.
Routeur
Modem
RESEAU
LOCAL
VERS
INTERNET
Dans le cas contraire, vous devrez connecter votre station de base
à votre compte Ooma Oce.
• Si vous êtes un nouveau client Ooma Oce, veuillez visiter
http://oce.ooma.com/activate
• Si vous êtes un client Ooma Oce déjà existant, veuillez visiter
http://oce.ooma.com/add_device
Une fois ces étapes passées, vous pouvez continuer vers l’étape 2.
Étape 1 Démarrage
Étape 4 Connecter les téléphones ou fax
Vous pouvez connecter un téléphone
analogue ou fax directement à votre
station de base via le port TELEPHONE.
Si vous souhaitez connecter des appareils
DP1 ou Linx, veuillez suivre les instructions
accompagnant ces appareils.
Une fois que c’est fait,
vous pouvez passer
des appels !
Besoin d’aide ? Si le station de base ne fonctionne toujours
pas, veuillez contacter le support Ooma Oce au 877-948-6662
(Canada) ou 866-939-6662 (US).
Si votre appareil ache Prêt à appeler,
vous pouvez passez cette étape et
continuer vers l’étape 2
.
READY
TO CALL
Ooma-Insert-Base Station-Bilingual Jan 2019-R13.indd 3-4 1/11/19 3:54 PM
/