Page is loading ...

The Coleman Company, Inc. • 3600 N. Hydraulic • Wichita, Kansas 67219
1-800-835-3278 • www.coleman.com
MADE IN CHINA • PRINTED IN CHINA
© 2007 The Coleman Company, Inc.
Coleman
®
, , and exponent
®
are registered trademarks
and NorthStar
TM
is a trademarkof The Coleman Company, Inc.
Set-up Instructions for the
NorthStar
TM
X4 Tent
Rev 01/08
Before you begin
Read all instructions before set up.
• Select a level campsite clear of rocks, branches, and other hard or sharp objects, to install your tent.
WARNING: Keep clear of overhead power lines.
• Do not set up your tent under trees.
• For best results in windy conditions, position end of tent into the wind.
• Enlist the help of at least one other person to assist you when it is time to assemble the tent.
Warranty
Coleman
®
Exponent
®
Limited Lifetime Warranty
The Coleman Company, Inc. warrants to the original retail purchaser that this Coleman
®
Exponent
®
product will be free from defects in material and workmanship
for the lifetime of the product. Coleman will repair or replace this product or any component of the product found to be defective, at our discretion. Replacement will
be made with a new or remanufactured product or component. If the product is no longer available, replacement may be made with a similar product of equal or
greater value. This is your exclusive warranty.
The warranty is valid for the original retail purchaser and is not transferable. Keep the original sales receipt. Proof of purchase is required to obtain warranty
performance. Coleman dealers, service centers or retail stores selling Coleman
®
Exponent
®
products do not have the right to alter, modify or in any way change the
terms and conditions of this warranty.
What This Warranty Does Not Cover
This warranty does not cover normal wear and tear of parts, parts that are not genuine Coleman
®
part, or damage caused by negligent use or misuse of the
product; commercial use of the product; use contrary to the operating instructions; disassembly, repair or alteration by anyone other than Coleman or an authorized
service center; or the natural breakdown of materials and colors over extended time and use. Further, the warranty does not cover Act of God, such as fire, flood,
hurricanes or tornadoes.
COLEMAN SHALL NOT BE LIABLE FOR DEFECTS THAT ARE CAUSED BY THE USE OF UNAUTHORIZED PARTS OR SERVICE. COLEMAN SHALL NOT BE
LIABLE FOR ANY INCIDENTAL OR CONSEQUENTIAL DAMAGES CAUSED BY THE BREACH OF ANY EXPRESS OR IMPLIED WARRANTY OR CONDITIONS.
EXCEPT TO THE EXTENT PROHIBITED BY APPLICABLE LAW, ANY IMPLIED WARRANTY OF MERCHANTABILITY OR FITNESS FOR A PARTICULAR
PURPOSE IS LIMITED IN DURATION TO THE DURATION OF THE ABOVE WARRANTY OR CONDITIONS. SOME STATES, PROVINCES, OR JURISDICTIONS
DO NOT ALLOW THE EXCLUSION OR LIMITATION OF INCIDENTAL OR CONSEQUENTIAL DAMAGES OR LIMITATIONS ON HOW LONG AN IMPLIED
WARRANTY LASTS, SO THE ABOVE LIMITATIONS OR EXCLUSION MAY NOT APPLY TO YOU. THIS WARRANTY GIVES YOU SPECIFIC LEGAL RIGHTS,
AND YOU MAY ALSO HAVE OTHER RIGHTS THAT VARY FROM STATE TO STATE OR PROVINCE TO PROVINCE.
How to Obtain Warranty Service
Take the product to an authorized Coleman service center. You can find the nearest authorized Coleman service center by visiting www.coleman.com or calling
1-800-835-3278 or TDD 316-832-8707 in the United States or 1 800 387-6161 in Canada. If a service center is not conveniently located, attach to the product a tag
that includes your name, address, daytime telephone number and description of the problem. Include a copy of the original sales receipt. Carefully package the
product and send either by courier or insured mail with shipping and insurance prepaid to:
For products purchased in the United States:
The Coleman Company, Inc.
3600 North Hydraulic
Wichita, KS 67219
For products purchased in Canada:
Sunbeam Corporation (Canada) Limited
DBA Jarden Consumer Solutions
20B Hereford Street
Brampton, ON L6Y 0M1
The costs of transporting the product to Coleman or an authorized service center for warranty service is the responsibility of the purchaser.
DO NOT RETURN THIS PRODUCT TO THE PLACE OF PURCHASE.
If you have any questions regarding this warranty please call 1-800-835-3278 or TDD 316-832-8707 in the United States or 1 800 387-6161 in Canada.
8

Awning Poles (2)
Rainfly Poles Tent
Parts and Components
Description Part Number
Center Support Pole (1) 5010000256
Gold Leg Poles (4) 5010000255
Chrome Leg Poles (4) 5010000257
Awning Poles (2) 5010000258
Rainfly (1) 5010000259
Tent Body (1) 5010000247
Stakes (30) 5010000248
Carry Case 5010000249
Center Support Pole (1)
Chrome Leg
Poles (4)
Gold Leg
Poles (4)
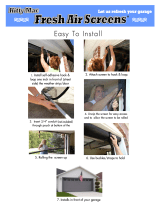
Remove items from compartments of the carry
case and check to make sure all components
are present before assembling your tent.
FIG. 1
FIG. 2
Left Side of Tent
Window
Front Door
To Set Up Tent
1. Assemble Center Support Pole, four Chrome Leg Poles, four Gold Leg Poles, and the two Awning Poles. (Fig. 1)
2. Unfold tent and spread out on a clean, level surface with the Front Living Area Door facing the desired direction
(Fig. 2). NOTE: Back Bedroom has a window on the left side of tent.
2 7
Things You Should Know:
• Under certain conditions (cold weather, high humidity, etc.) condensation will form on the inside of your tent.
Condensation is caused by water vapor from your breath, perspiration, or any wet clothing inside the tent. It is NOT
LEAKAGE through the tent fabric. It can be minimized by removing wet clothing from your tent and by providing good
ventilation through the tent.
• Never store tent, even for a short period of time, without drying it thoroughly and brushing off caked dirt. Do not pack
stakes or poles inside your tent. Use a separate storage bag.
• STAKES SHOULD BE REMOVED BY PULLING ON THE STAKE ITSELF. NEVER PULL ON THE TENT TO REMOVE STAKE.
• TENT POLES SHOULD NOT BE LEFT TELESCOPED TOGETHER DURING STORAGE.
• Do not leave your tent set-up for weeks at a time. Be aware that exposure to ultraviolet rays from the sun can seriously
damage material and/or cause it to become discolored.
WARNING: Keep all flame and heat sources away from this tent fabric.
This tent meets the flammability requirements of CPAI-84. The fabric may burn if left in continuous
contact with any flame source. The application of any foreign substance to the tent fabric may render the
flame-resistant properties ineffective.
To Store
1. All metal poles and stakes must be placed in the center compartment of carry case to prevent damage to the fabric
items. Neatly fold and store the Tent and Rainfly in the side compartments of the carry case.
2. Make sure Tent and Rainfly are clean and dry before placing in carry case.
3. Unzip doors before taking tent down for storage.
4. Store in a clean, dry area.
Back Bedroom Area
Front Living Area
Right Side of Tent

Detail A
Detail B
FIG. 3
Gold Leg
Poles
Chrome
Leg
Poles
Gold Leg
Poles
Center
Support Pole
3. Insert curved end of Gold Leg Poles into gold-colored fittings on Center Support Pole; then insert curved end of
Chrome Center Poles into chrome-colored fittings on Center Support Pole. (Fig. 3)
4. Insert bottom end of the four Gold Leg Poles into grommets on corner web straps (Detail A); then insert bottom
end of the four Chrome Center Poles into grommets on center front & back web straps (Detail B).
5. Snap both center hooks on top of tent onto middle section of the Center Support Pole. (Fig. 4 & 5)
NOTE: Unzipping Bedroom Door Panel and Living Area Door Panel will allow easier access to attaching the
center hooks of the tent to the Center Support Post.
FIG. 4
FIG. 5
6 3
Bedroom
Door
Panel
Living Area
Door Panel
The following chart is designed to show the variety of options available for access or ventilation with the X4 Tent. By
zipping or rolling up the flaps on the Rainfly, Inner Tent, or a combination of both, you can provide access, privacy or
maximum cross ventilation to enhance the camping experience.
To Assemble Right or Left Side Awning
1. Unzip the right or left side Awning Flap on Rainfly. Select which awning you prefer to use, then insert the two
furnished Awning Poles into grommets on web straps. (Detail A)
2. Tie guylines onto loops on the web straps, extend out, and secure with stakes. (Fig. 10)
FIG. 10
Guyline
Web Strap
Tent Configuration Section
Rainfly Options
Awning 1 Zipped Rolled Awning*
Awning 2 Zipped Rolled Awning*
Front Door Zipped Rolled
Back Door Zipped Rolled
*
See following Awning Assembly instructions below.
Inner Tent Options
Side Door 1 Zipped Rolled
Side Door 2 Zipped Rolled
Front Door Zipped Rolled
Back Door Zipped Rolled
Inner Door Zipped Rolled
2 Ceiling Vents Zipped Rolled
Detail A

6. Attach the two remaining hooks on the top of the tent to the Center Support Post. (Fig. 6)
7. Attach hooks on the corners of the tent to the Gold End Poles; then the hooks on the front & back of the tent to the
Chrome Center Poles. (Fig. 6)
8. Stretch corners and front & back of tent until floor is taut; then hammer stakes through loops on web straps to
secure. (Fig. 6)
FIG. 6
9. Unfold Rainfly and pull it over the tent frame. (Fig. 7)
NOTE: The windows need to be placed over the Bedroom Area and the right and left side awning flaps need to be
positioned over the Screen Living Area.
FIG. 7
Stake through loop in six web straps on tent
Plastic Window
Awning Flap
12. Insert plastic locking tabs, located on corners and front & back of Rainfly, into plastic sleeves on web straps
of tent. (Detail C)
13. Extend out guylines on front, back, and sides of tent and stake to secure Rainfly and tent (Fig. 9)
NOTE: Make sure guylines, located on left and right side of the Rainfly Awning Flap, do not interfere with access
to the doors of tent.
10. Unzip all Awning Flaps and Doors on the Rainfly.
11. Locate all 34 hook and loop fasteners, on under side of Rainfly, and wrap around all Gold and Chrome Leg Poles
to secure. (Fig. 8)
IMPORTANT: All hook and loop fasteners must be secured to provide more stability in windy conditions.
FIG. 8
Hook & Loop
Fastener
Detail C
FIG. 9
Plastic
Sleeve
Awning Flap
Guyline
Plastic
Locking
Tab
4 5
Bedroom
Area
Screened Living
Area
The X4 tent assembly is complete.
Proceed to the Tent Configuration
Section, on page 6, for the variety of ventilation options available with
your tent for its enjoyment in any weather condition.
/