Page is loading ...

INSTALLATION INSTRUCTIONS
IMPORTANT
ATTENTION INSTALLERS:
It is your responsibility to know this product better than your customer. This includes being
able to install the product according to strict safety guidelines and instructing the customer on
how to operate and maintain the equipment for the life of the product. Safety should always be
the deciding factor when installing this product and using common sense plays an important
role as well. Pay attention to all safety warnings and any other special notes highlighted in the
manual. Improper installation of this system or failure to follow safety warnings could result in
serious injury, death, or property damage.
These instructions are primarily intended to assist qualified individuals experienced in the proper
installation of this appliance. Some local codes require licensed installation/service personnel
for this type of equipment. Please read all instructions carefully before starting the installation.
Return these instructions to the customer’s package for future reference.
DO NOT DESTROY. PLEASE READ CAREFULLY & KEEP IN A SAFE PLACE FOR FUTURE REFERENCE.
EARTH LOOP INSTALLATION GUIDE
IMPORTANT SAFETY INFORMATION .........................2
REQUIREMENTS & CODES .........................................2
REQUIRED EQUIPMENT & MATERIALS .....................2
GENERAL INFORMATION ............................................3
Earth Loop Design Length ......................................... 3
Vertical Elevation Differential Design ........................3
DRILLING, LOOP INSTALLATION, & GROUTING ......3
Drilling Guidelines ......................................................3
Earth Loop Installation ............................................... 3
Attaching the tremie tube to the earth loop .............. 4
High water table and off-setting liquid line
insulation buoyancy .................................................4
Insulating the vapor line ........................................... 4
Line set integrity testing ...........................................4
Short Borehole Resolution ....................................... 4
What to do if the tremie tube detaches
during installation ..................................................... 5
What to do if copper tubing is kinked or crimped
during installation ..................................................... 5
Grouting ..................................................................... 5
Precautions .............................................................. 5
Product Description .................................................5
Properties ................................................................5
Procuring .................................................................5
Grout Volume Requirements ...................................5
Voids and Caverns ..................................................5
Receiving & Storage of Grout 111 ...........................6
Standard Packaging of Grout 111 ...........................6
Mixing the Pre-mix ...................................................6
Mixing Grout 111 .....................................................6
Placing Grout 111 ....................................................7
Earth Loop Insulation .................................................7
TRENCHING ..................................................................7
Trenching Requirements ...........................................7
Final Backfilling ..........................................................8
INSULATION REQUIREMENTS & ENCASEMENT
PRECAUTIONS FOR UNDERGROUND
REFRIGERANT TUBING ............................................... 8
Copper tubing protection in corrosive
sub-surface environments. ........................................8
Potential Freezing Concerns .....................................9
Installing Line Sets between Boreholes &
Compressor Unit ........................................................9

22
IMPORTANT SAFETY INFORMATION
Please read all instructions before servicing this equipment.
Pay attention to all safety warnings and any other special notes
highlighted in the manual. Safety markings are used frequently
throughout this manual to designate a degree or level of
seriousness and should not be ignored.
WARNING indicates a potentially hazardous situation that if not
avoided, could result in personal injury or death.
CAUTION indicates a potentially hazardous situation that if
not avoided, may result in minor or moderate injury or property
damage.
NOTE TO INSTALLER
READ THIS BEFORE YOU DIG!
Before you begin digging, you need to have possible
underground electric, gas, water, or other utilities located.
Many areas have a “One Call” number that may assist
in (but should not necessarily be relied upon) locating
underground utilities. Some laws require that a locate
request be placed at least three (3) working days prior
to any digging projects. The utilities should respond to
your request by marking the approximate location of their
utilities or notifying you that they have no utilities in your
dig site area. After confirming utility response, you can
then proceed with your excavation avoiding damages.
Failure to check for, and to avoid underground utilities
may result in physical injury or death.
WARNING:
The information listed below and on the next page
must be followed during the installation, service,
and operation of this unit. Unqualified individuals
should not attempt to interpret these instructions
or install this equipment. Failure to follow safety
recommendations could result in possible damage
to the equipment, serious personal injury or death.
REQUIREMENTS & CODES
• The installer must comply with all local codes and
regulations which govern the installation of this type of
equipment. Local codes and regulations take precedence
over any recommendations contained in these instructions.
Consult local building codes for special installation
requirements.
• The use of Grout 111 is only authorized with the
installation of the lineset associated with the Nortek
GlobalHVACGeothermalSystem.UseofGrout111
for any other applications is prohibited.
• Obtain all required permits (Federal, State, and/or Local)
prior to commencing work. This may include mechanical,
electrical, drilling/excavation, erosion control, and grouting
permits. Additionally, some subdivision developments or
some homeowner associations have certain landscaping,
etc., requirements where approvals must be obtained prior to
excavation or equipment positioning.
• Locate all underground utilities and objects prior to any
drilling and/or excavation.Manyareashavea“OneCall”
numberthatmayassistin(butshouldnotnecessarilybe
reliedupon)locatingundergroundutilities.Failuretocomply
with local laws may subject the homeowner or excavator to
expensive fines, legal fees or prosecution. Failure to check
for, and to avoid, underground utilities may also result in
physical injury or death.
• Itistheinstalling/servicingdealer’s/authorizedcontractor’ssole
responsibility to obtain and possess, or to insure the appropriate
possession of, all necessary licenses prior to installing or
servicing.
• Checkforfullandcompletecompliancewithallapplicablelocal
mechanical, drilling, excavation, grouting, erosion control, and
building codes, and check for full and complete compliance
withallapplicablenationalcodes/regulations(suchasOSHA
andtheNationalElectricalCodes,forexample).
• IMPORTANT: DO NOT UNDERSIZE THIS SYSTEM - The heat
transfer ability of the ground surrounding the geothermal
heat exchange tubing will be overstressed.
REQUIRED EQUIPMENT & MATERIALS
• Copper line sets, sub-surface copper liquid and vapor
lines - Sufficient soft refrigerant grade copper to connect all
boreholes to the compressor unit and the interior air handler.
• Refrigerant piping insulation - All insulation must be non-
corrosivetocopperandhaveaminimum3/4inch(19mm)wall
thickness.Thecommonpracticeofusinga“onesizelarger”
I.D. insulation tubing can permit unwanted water infiltration
during system installation.
a.) All insulation must meet the temperature requirements as
indicated in Table2(page6).
b.) All sub-surface insulation must be capable of withstanding
the compressive forces of any fill material.
c.) Insulate all refrigerant tubing that will be extending through
Grout111(oranyotherrigidmaterial)foradistanceof
at least 1 foot (300 mm) into and 1 foot (300 mm) out
of the rigid material. This allows for the expansion and
contraction of the tubing without rubbing directly against
the rigid material.
d.) Use un-split insulation tubing for all but 3 inches (75
mm)to1ft(300mm)oneachendofthecoppertubing
segments(leaveadequateroomforcoupling/brazingwhen
necessary).Slidethenewinsulationovertheun-insulated
and newly brazed segments after completion of brazing
and adequate cooling, or use pre-split insulation with glue
strip insulation segments to cover all coupled segments
after brazing and adequate cooling. Spiral tape all glue strip
insulation segments as a safety precaution, as glue strips
tend to separate over time if not reinforced. Do not place
insulation over newly brazed segments or the insulation
may melt.
IMPORTANT NOTE:
While the insulation material may meet the minimum
high temperature requirements, the glue used on split
insulation may not. When split insulation is used, high
temperature electrical tape must be wrapped around
the glued segments to prevent opening under high
temperature conditions.
• Nitrogen tank- A gentle flow of nitrogen must be used to purge
the refrigerant system of oxygen while joints are being brazed.
• Plastic pipe -PVC(orsimilar)ofsufcientdiametertofully
encase insulated refrigerant lines (both liquid and vapor)
extending through building walls or below foundations. Any
exteriorrefrigerantlinesinstalledlessthan4ft(1.2m).deep
should also be encased to help prevent accidental damage
from shallow digging, gardening, etc. Place insulated liquid
and vapor lines into separate pipes (liquid lines in one
pipe and vapor lines in another pipe). Holes through walls
should be placed above-ground to prevent water infiltration.

3
• Excavation equipment - A means to excavate a trench,
thegreaterof2ft(600mm)deepor2ft(600mm)belowthe
maximum frost line, for burying the fully insulated refrigerant
tubing extending from the structure to the borehole. While the
trench may be dug by hand, the use of a mechanical trencher
orbackhoeisrecommended.Theinsulatedliquidline(s)must
always be placed on the opposite side of the trench from the
vaporline(s).Iffutureexcavationintheareaisaconcern,the
insulatedliquidandvaporline(s)mustbeplacedintoseparate
protectivepipes(PVCpipingformoderateprotection,andsteel
pipingforbetterprotection).Theexcavationmustalwaysequal
any minimum depth required by applicable codes.
• Warning tape - Prior to final trench backfilling, an underground
warning tape is recommended to be placed 12” (300 mm)
above all trenched line-sets, so as to provide ease in location
and future excavation warning.
GENERAL INFORMATION
Geothermal heating/cooling systems operate via sub-surface
conductive heat transfer, using the naturally renewable
temperatureoftheearth’scrustasaheatsourceinthewinter,
and as a heat sink in the summer. However; within any climate
zone, the weather and underground conditions vary from place
to place. The system must be sized and installed to meet the
climate conditions in your area. To determine your climate zone,
see Figure1(page10).
Earth Loop Design Length
The sub-surface refrigerant lines used for geothermal heat
exchange purposes must be sized to accommodate the maximum
of the greater of the heating or cooling capacity design loads.
Typically, in mostly non-porous rock or in permanently water
saturatedsoil,anearthlooplengthbetween65ftand100feet
perton(5.6-10.8m/kW)ofcapacityisrequired.
Within the United States, see Figure 1 (page 10) to help
determine the appropriate earth loop length.
For installations outside of the United States, the following rules
will dictate the sizing of the earth loop. These rules assume that
the earth loop will be installed within bedrock or permanently
water saturated ground.
For the building to be conditioned, calculate the annual heating
and the annual cooling loads. Use ACCA Manual J or other
locally recognized load calculation program.
Divide the annual cooling load by the annual heating load. If this
result is less than or equal to one, then the system will require 65
ftofearthlooppertonofsystemsize(5.6m/kW).Iftheresultis
greater than one but less than 1.75, then the system will require
80ftofearthlooppertonofsystemsize(8.7m/kW).Iftheresult
isgreaterthan1.75,thenthesystemwillrequire100ftofearth
looppertonofsystemsize(10.8m/kW).
Vertical Elevation Differential Design
The vertical elevation differential between the bottom of the earth
loop and the top of the air handler must be no greater than 125
ftperton(10.8m/kw),withamaximumboreholedepthof400
ft(122m).Iftherequiredverticalelevationexceedsthisdesign
criteria, the maximum depth can be shortened by the addition
of a second borehole.
DRILLING, LOOP INSTALLATION, &
GROUTING
Drilling Guidelines
Use a fully licensed, qualified, and experienced driller to supply
therequisiteborehole(s).Mostlocaldrillerswillhaveareasonable
estimate of the sub-surface elements/geology that will be
encountered in your particular area. This information can be helpful
in obtaining drilling cost estimates for a particular job. Request
that the drilling company provide cost estimates in advance for
potential casing costs if loose soil is encountered. Make sure all
necessary permits are obtained prior to commencement of work.
Borehole Diameters - Boreholesaregenerally5inches(125
mm)to6inches(150mm)indiameter.Casedboreholesmay
be4inches(100mm)indiameter.Maximumdepthperborehole
is400ft(122m).
Multiple Boreholes / Minimum Spacing - In installations where
there are mulitple boreholes, there are minimum distances that
must be maintained:
• Ifthereareonlytwoboreholes,theymustbespacedatleast
15feet(4.5m)fromeachother.
• Iftherearethreeormoreboreholesarrangedinaline,they
mustbespacedatleast20ft(6m)fromeachother.
• Iftherearethreeormoreboreholesarrangedinamatrix,they
mustbespacedatleast30ft(9m)fromeachother.
Boreholes of Equal Depths - Multiple boreholes for one
compressor unit must always be of equal depths.
Recordallborehole(s)andallbrazedjointlocations- The
location of all boreholes, and the location of all sub-surface brazed
joints(typicallyintrenchesbetweentheboreholeandthestructure)
shouldbemeasured(triangulated)fromtwoseparatepointsof
an existing permanent structure, recorded, and maintained in
theinstallingcontractor’sle.Acopyshouldalsobeprovidedto
the property owner.
Drilling Log - A drilling log should be maintained by the driller.
The log should identify differing sub-surface geologies, water
tables, underground streams, and voids. Consult the log before you
install earth loops, to determine if any pea gravel is necessary for
undergroundvoids/aquifers,orifanyweightswillbenecessaryto
offset buoyancy in water-filled boreholes. Pea gravel is preferable
for filling any void areas or for filling any water zone areas that
might wash away Grout 111.
IMPORTANT NOTE
Never permit the driller to use bentonite clay during the
drilling process (such as to provide a mud wall to keep the
borehole open). Bentonite clay has a poor heat transfer rate
and prohibits necessary geothermal heat exchange.
Earth Loop Installation
Check all model numbers and earth loop spool length designations
upon receipt. Check the nitrogen charge of each spool. If the
designated shipping nitrogen charge is not found, there is likely
damage or a leak.
Earth loops are fully assembled and ready to place into the ground.
The loop includes the vapor line, an insulated liquid line, and a
bottom torpedo unit, shown in Figure 2 (page 11). The loop/
spoolstypicallycomewithanapproximate30psig(200kPa)dry
nitrogencharge.Thischargeisappliedaftera250micronvacuum
has been pulled at the factory to ensure that there are no leaks.
The best and preferred method of lowering earth loops into
boreholes is using the hoist on the drilling rig, immediately after
the hole is completed. NOTE: This is the preferred method
because, if there is a blockage in the borehole, the copper tubing
can be manually pulled out of the borehole, and the rig will be in
an exact position to re-drill and clear the hole.

4
1. Place a heavy wall steel pipe through the center of the earth
loop spool.
2.Usingthedrillingrig’shoist,raisethespool15ft(4.6m)or20
ft(6m)abovetheground.
3. Attach the tremie tube as described in the “Attaching the Tremie
TubetotheEarthLoop”section(page 4).
4. Slowly lower the tubing into the borehole.
Othermeansbesidesthedrillingrigcanbeusedtosupportthe
spool during earth loop installation. Regardless of method, the
following cautions should be observed:
• Thestructureshouldbecapableofsecurelyholdingtherotating
spool during insertion of the earth loop.
• Anadequatebrakingmechanismshouldalsobeavailable.This
may be as simple as an appropriate piece of lumber that can
be wedged against the perimeter of the spool. NOTE:
Braking
is necessary to slow the descent of the copper tubing into the
borehole,particularlywhentheearthloopisover50%installed
and the weight of the copper becomes a pulling factor within
adryhole.Theweightofthecopperlinesisbetween0.5lbs
and1 lb perft (0.74-1.49 kg/m).The weight ofthe torpedo
segmentisabout8lbs(3.5kg).Theweightofthetremietube
is extra and will vary depending on type and size.
Attaching the tremie tube to the earth loop
The earth loop systems are shipped from the factory pre-
assembled and leak tested. The spool contains 2 large un-insulated
vapor lines, one small insulated liquid line and a bottom segment
called the torpedo. See Figure2(page11).
• The torpedo is approximately 16” (400 mm) long and is
comprised of PVC tubing and a cap. It contains a lower copper
line u-bend, two copper vapor lines, and a copper liquid line
sealed within a heavy gauge polyethylene tube. The lower end
of the torpedo is filled with grout.
• Asmallholehasbeendrilledintothesidewallofthetorpedo
(aboutaninchfromthetop)atthefactory.An18gaugecopper
wire will need to be inserted through the hole, wrapped around
the exterior of the tremie tube twice, and secured with 3 twists
by the installing contractor. NOTE: This will keep the tremie
tube lightly attached to the earth loop as they are all lowered
into the borehole but also permit the tremie tube to be pulled
loose during the actual grouting procedure.
• Theunitneedstobecarefullyloweredintotheborehole,together
with the tremie tube used for the insertion of the Grout 111.
The lower end of the tremie tube should be placed above the
existing cured grout within the torpedo.
High water table and off-setting liquid line
insulation buoyancy
If a borehole has sufficient water, buoyancy may occur when the
loop is lowered into the borehole. When water is encountered,
drop the copper tubing into the borehole as far as possible using
its own weight.
• If resistance occurs and the loop stops its own downward
progression, gently raise and lower the loop again to ensure
the torpedo is not snagged on a ledge.
NOTE: Do not push or force the lines down into the borehole,
as this may crimp or damage the line. Also the risk of the loop
“oating”outoftheboreholeduringorafterthegroutingprocess
mayoccur.Shouldtheloopoatoutoftheborehole(morethan
3%ofthedesigndepth)aftergrouthasbeenadded,theloop
should be immediately pulled out of the borehole, washed off,
and re-installed into a newly drilled borehole.
• Supplementalweightmaybeaddedtotheearthlooptooffset
the buoyancy. Approximately one-half lb of weight per linear ft
(0.74kg/m)willberequiredtooffsetthebuoyancyoftheearth
loop.
NOTE:2inch(50mm)diameterrebarweighs10.68lbsper
ft(15.89kg/m)1.75inch(44.4mm)diameterweighs8.18lbs
perft(12.17kg/m)1.5inch(38.1mm)diameterweighs6.01
lbsperft(8.94kg/m).
• If3/4inch
(19mm)diameterorsmallerrebarisused,segments
shouldbenomorethan10ft(3m)inlength.Ifthesegments
are longer, they are more prone to jamming in a borehole that
is not perfectly straight and vertical.
• Priortoattachment,thetopandbottomendsoftherebarmust
bewrappedintape(ductorelectrical)toprotectthecopperfrom
the top and bottom edges of the steel. Steel is a sacrificial anode
to copper, and will not adversely affect any adjacent copper
tubing.Securelytapeon5ft(1.5m)(orshorter)segmentsof
2inch(50mm)diameter(maximum)rebartothelinesetto
continue the installation to its full borehole design depth.
• Addasmanysegmentsofrebarasnecessary,consistingof
atleastone-halflbperft(.74kg/m),inaverticalmanner,so
thatitdoesn’trestricttheavailablediameteroftheborehole.
Multiple segments of rebar may be bundled into one segment
so long as the diameter of the borehole will not be restricted.
• Ifajamintheinsertionresults,theremaybeabendinthe
borehole. Bends in the borehole can jam the installation
processwhenusingrebar(coppertubingissoftandwillbend
asnecessary,butrebarismorerigidandwillnotbend).Ifa
bend in the borehole is encountered, the entire assembly must
be carefully withdrawn from the borehole, the rebar must be cut
into shorter lengths, and then the assembly must be carefully
re-inserted.
Insulating the vapor line
Insulate the vapor line in the borehole from the surface to a
depth greater of 2 ft (600 mm) deep, or 2 ft (600 mm) below
the frost line.
• Ifthefrostlineisdeeperthan1foot(300mm)(sothatthe
total insulated vapor line distance from the surface exceeds
3ft(900mm)),thedepthoftheboreholesmustbeextended
to accommodate any additional depths, to a maximum of an
additional5ft(1.5m)
• If any such requisite borehole depth extension exceeds an
originalboreholedesigndepthof5ft(1.5m),youareindanger
of losing the earth loop in the borehole, as there is only an
extraapproximate10ft(3m)lengthofcoppertubinginstalled
onanyindividualearthloop(toaccommodateslighterrorsin
tubinglengthsanddrillingdepths).
Line set integrity testing
Once installed, a sub-surface earth loop should be free from
any leaks or restrictions. A kink may be caused by falling debris
within the borehole or improper handling during installation. If a
kink has occurred in a line during installation, such a restriction
could impair system operation.
• Theonlysolutionforasignicantkinkimpairmentfoundafter
the system has been fully installed would be to re-drill a new
borehole and replace the earth loop.
• Ifthereisanydoubtaboutthepresenceofakinkthatoccured
during the insertion of the earth loop into the borehole, it is best
to remove, repair, and reinsert before grouting.
Short Borehole Resolution
Obstructions or other borehole depth problems can create
situations where full design depths may not be reached by the
earth loop. If the full design earth loop depth is compromised by
morethan3%,theboreholemustbere-drilled.

5
What to do if the tremie tube detaches during
installation
CAUTION:
Manually feed the tremie tube into the borehole as the
earth loop is lowered into place. The retaining wire
will not be sufficient to pull down the entire weight
of the tremie tube. Never pull up on the tremie tube
until grouting commences. This may pull the tremie
tube loose from the torpedo.
If the tremie tube breaks loose during the earth loop installation
process and you are unable to manually push the tremie tube
into the bottom of the borehole, pull out the earth loop, re-attach
the tremie tube to the torpedo, and re-insert the entire assembly.
If the tremie tube pulls loose less than halfway down, roll the
earth loop back up onto the spool. If the earth loop is past the
halfway point of the borehole and is too heavy to pull out by hand,
carefully pull the loop up and out of the hole using mechanical
means, such as a mechanical winch or the trailer hitch of a truck.
Be careful when pulling the earth loop out of the borehole.
If mechanical means are not used to pull the tubing straight
upand out of the hole (and the ends of the copper lines are
attachedtoatruck),becarefulandprovideasmooth,rounded
borehole exit means for the copper lines as they are pulled out
acrossthetopedgeoftheboreholesothatthetubingdoesn’t
get distorted or kinked.
What to do if copper tubing is kinked or crimped
during installation
When installing the earth loops, or other copper tubing, repair or
replace any crimped or kinked segments of the insulated liquid line
or vapor line impaired during installation before the line segment
continues to be lowered into the borehole. Ream out all rough
edges on the interior of any cut line segments and make sure
no copper shavings or debris fall into the lines.
Grouting
IMPORTANT NOTES:
UseGrout111only.Thegroutmustbeinstalledfromthe
bottomoftheboreholeuptothetop.Grout111weighsabout
18.2lbs per gallon (2,181 kg/m
3
) and must be thoroughly
mixed with a contra-flow ribbon mixer.
Do not use a paddle mixer. Otherwise sand will settle to the
bottom and a bad mix will occur.
Precautions
• Keepoutofreachofchildren.
• Grout111containsportlandcementwhichcancauseirritation
or burning of skin.
• Avoiddirectcontactwithskinandtakenecessaryprecautions
to protect skin.
• Useofadustrespirator,safetygoggles,andrubberglovesis
required.
• Avoidprolongedcontactwithclothing.
• Incaseofcontactwitheyes,immediatelyushwithwaterfor
at least 15 minutes. Get prompt medical attention.
• DONOTwearcontactlenseswhenworkingwiththisproduct.
• DONOTtakeinternally.Readallwarningsprovidedbythe
product manufacturer.
Product Description
• Grout 111 is a non-shrinking grout designed for use with
geothermal heat pump systems.
• Itcanbeobtainedpre-blendedandpackaged,typicallyrequiring
only the addition of water.
• Itsprincipalconstituentsareanelygradedquartzsilicasand,
Portland cement, and an additive mixture to control pumpability
and set time.
• Thishighthermalconductivity,ultra-lowpermeability,groutlls
the remaining empty annular space in the borehole, coupling the
earth loop to the subterranean formation, insuring efficient heat
transfer, while protecting the copper line-sets and preventing
aquifer mixing ground water contamination from surface spills.
• Grout111isnon-toxicandisconsideredsafeforcontactwith
potable ground water.
Properties
Typical properties are as follows:
• Grout111ismixedwith16percentwater(byweight)toproduce
a highly plastic and pumpable slurry. The grout is specially
designed to sweep residual mud and water out of the borehole,
assuring a strong bond between the formation and the earth
loop.
• Grout111settimecanvaryfromlessthan1hourtomore
than 4 hours depending on temperature of the grout. It is
recommended that equipment clean-up happen as soon as
possible.
• Wetdensityisapproximately18.2lbspergallon(2,181kg/m
3
).
• 28-daycompressivestrengthexceeds4,000psig,andmeasured
permeabilityis4.5x10
11
cm/sec.Thethermalconductivityof
Grout 111, when cured in wet subterranean conditions is equal
to1.40BTU/hr-ft.-°F(2.42Watt/(m-°K)).
Procuring
• Grout111canbepurchasedpre-mixedormixedonsite.
• Ifblendingyourowngroutonsite,proceedtotheMixingGrout
111section(page 6).
Grout Volume Requirements
NOTE: Each borehole may require more than the calculated
volume of grout due to oversized holes, voids, mud seams, and
fracturedformations.Itisrecommendedtohaveatleast10%
more grout than calculated on hand to ensure that the annular
space is completely filled. See Table 1.
To maintain a grout head level above the lower bottom end
of the grout line, make sure the grout line is extracted at a
slower pace than the grout is supplied. This helps to eliminate
air gaps in the fill material. Slowly withdraw the grout line as
grout is pumped into the hole through the bottom of the grout
line. Make sure the bottom of the grout line always stays below
the grout level to prevent air pockets and to ensure a complete
grout fill for maximum heat transfer.
Voids and Caverns
When voids or caverns are encountered, an extra amount of
material may be required, depending on actual sub-surface
conditions encountered. The following procedures should be
used to minimize the loss of material into the formation:
1. Carefully review the drill log prior to commencement of
the grouting operation. If any excessively large voids are
encountered, the borehole operation should be abandoned
and a new borehole drilled. NOTE: Make note of the footage
range of all voids, fractures, and lost circulation zones. If your
driller does not typically keep these records, insist that this
information be given to you.
2. Calculate the volume of grout needed to fill the annular space
from the bottom of the hole to the void space or cavern. Pump
the calculated volume of grout while slowly retrieving the tremie

6
line to a depth just above the void or cavern. When designated
depth is achieved, pump any unused grout left in the hopper
into the void.
3. Slowly add pea gravel or #9 stone, or the like, into the borehole
until the void space is filled.
• Add the gravel with a shovel.
• Addnomorethana5gallons(19L)atatime.Addinggravel
orstoneatafasterrateismorelikelytocreate“bridging”
and blockages before reaching the area to be filled. This can
result in void areas with poor heat transfer, and can place
undueweight/stressonthecopperlineswithintheborehole
(potentiallyresultingindamagetotheearthlooplines).
• Grout should then be pumped above the stone plug until the
annular space is completely filled and sealed.
Receiving & Storage of Grout 111
All bagged products should be checked for dryness prior to signing
shipping papers. Grout 111 should be stored in a cool and dry
interior space, or adequately covered with waterproof tarping and
separated from the ground by palleting. Materials should never
be exposed to high moisture, rain, or snow.
Standard Packaging of Grout 111
• 50lb(23kg)bags
– Triple-lined
–60bags/pallet,15palletspertruckload
–Approximateyield:0.60ft
3
or4.5gallons(17L)
• SuperSack
– 2,500lbs(1134kg).
– Reusable
– 18 Super Sacks per truck
– Approximate yield: 30.0ft
3
(.84m
3
)or224.4gallons(849L)
Mixing the Pre-mix
1.Mixonegallonofclean(sulfur,chlorine,andotherchemical
free)coolwater(withapHlevelbetween6and10)withevery
50lbs(22.6kg)ofGrout111.Thewatershouldbemetered
and placed in the mixer with blades rotating before adding the
pre-blended dry grout mix.
2. Mix the grout for a minimum of 5 minutes until a smooth, lump
free consistency is achieved.
Mixing Grout 111
Grout 111 is a cement-sand grout for use with vertical ground
loops for geothermal heat pumps. The grout is designed to have
improved thermal conductivity and sealing capability compared
with other grouts. Grout 111 consists of cement, water, silica sand
(ofaparticulargradation)andasmallamountofsuperplasticizer.
The superplasticizer is an additive that improves the pumpability
ofthegroutwhileenablingthewater/cementratiotobekeptlow.
The material proportions and sand gradation are critical to
achieving pumpability and critical properties of the final product
(thermal conductivity, coefcient of permeability, shrinkage
resistanceanddurability).
Required Materials:
• Cement-ThecementusedshallconformtoASTMC150-Type
I. If the site conditions require that sulfate resistant cement
is necessary, then Type II or Type V cement can be used.
Cement that already contains a waterproofing additive should
not be used as this has been found to cause slight foaming of
the grout and reduce the thermal conductivity.
• Water - The water shall be potable. Water with excessive
impurities may affect the final properties of the grout.
• Silica Sand - The silica sand shall conform to ASTM C33 in
terms of soundness and absence of deleterious substances
only.Thesandshallhaveasilicacontentofgreaterthan98%.
The particle size gradation shall conform to that in Table 2
below(notthatgiveninASTMC33).
The sand has been selected on the basis of grout pumpability,
thermal conductivity of hardened grout and other grout
properties.Othersandsthatdonotmeetthespecicationsmay
cause pumpability problems or reduce thermal conductivity.
The bags of sand should be kept dry at all times. Sand that
contains moisture should not be used as this will increase the
water/cementratioofthegrout.
• Superplasticizer-Thesuperplasticizershallbe~42%sodium
naphthalene sulfonate conforming to ASTM C494 Type F.
Equipment:
Thegroutshouldbemixedinahighshear(colloidal)groutmixer.
Improved sand carrying capacity, decreased water requirement,
reduced bleeding and greater flowability of grout is achieved
when mixed this way.
It is preferable to use a grout mixer in conjunction with a larger
capacity agitator in which the grout is stored and agitated until
use. This is necessary to keep the particles in suspension, and, in
the case of thixotropic grouts, keep the grout mobile and fluid. As
discussed previously, the grout can be pumped continuously from
the agitator tank while the next batch is mixed. Thus, pumping is
not interrupted and the risk of plugging the tremie tube is reduced.
It is critical that a proper grout mixer suited to cement-sand grouts
be used. Mixing of the grout by hand, pumps or concrete ready
mix trucks is not acceptable.
Piston pumps are recommended for pumping Grout 111.
Excessive wear may be encountered when using a helical rotor
(progressingcavity)pump.
Basedontheeldtrialsaminimum1.25-inch(32mm)diameter
tremie tube with an open end and several side discharge outlets
is recommended.
SIEVE NO (SIZE, MM) PERCENTAGE PASSING (%)
8(2360) 100
16(1180) 95-100
30(595) 55-80
50(297) 30-55
100(149) 10-30
200(75) 0-10
Table 2. SpecicationforParticleSizeGradationof
Silica Sand
Cement (x1)94lb(43kg)bag
Water 6.19gallons(23.5L)
Sand
(conformingtogradationspec)
(x2)100lb(45kg)bags
Superplasticizer
21.oz(639ml)
nottoexceed28.7oz(851ml)
Table 3. MixProportionsandYieldforBatchofMix111
Based on One Bag of Cement
HOLE
DIAMETER
(INCHES)
GALLONS OF GROUT REQUIRED
(PER FT OF DEPTH)
51/2(140mm) 1.12(13.9L/m)
6(150mm) 1.35(16.8L/m)
63/8(160mm) 1.54(19.1L/m)
7(175mm) 1.88(23.3L/m)
8(200mm) 2.49(30.9L/m)
Table1.Grout Requirements

7
Grout Mix Proportions:
The basic mix is given in Table 3.Thismix,withone94lb(43
kg)bagofcement,willyield19.1gallons(72L).
The amount of grout that can be mixed at once will depend on
the capacity of the grout mixer. It is preferable to mix as much
as possible per batch.
Depending on the mixing equipment and actual particle size
gradation of sand used, the rheology of the grout may vary. Use
of excessive water will be detrimental to the hardened grout
properties (e.g., shrinkage, permeability, durability, thermal
conductivity)andprobablyinducesegregationofthesand.
SincethepropertiesofGrout111areverysensitivetothewater/
cement ratio and superplasticizer dosage, it is critical that the
amounts of water and superplasticizer required for a batch are
measured accurately. Superplasticizer should be limited to a
maximum of 20 ml/kg cement. This is equivalent to 29 oz
(851ml)per94lb(43kg)bagofcement.
Quality Control:
Every batch of freshly mixed grout should be measured for specific
gravitypriortopumping.Thespecicgravityissensitivetowater/
cementratio,sand/cementratioanduniformityofmixing.Grout
111 with the proportions given above has a specific gravity of
2.18+/-0.02(Density:18.2+/-0.2lb./gal).
Placing Grout 111
Place grout continuously and quickly with appropriate mixing and
pumpingequipment.DONOTVIBRATE.DONOTmixorplace
groutwithwatertemperaturesbelow40°F.(4°C).NOTE: Grout
canstillbemixedandplacedwithairtemperaturesbelow32°F
(0°C),aslongasthemixwaterisatleast40°F(4°C).
• Asthegroutisbeinginstalledunderground,antifreezewithin
the grout mixture itself is not required. Water that is exposed
toexcessivesunortemperaturesabove80°F(26°C)will
decrease working time and accelerate the curing schedule.
• Itmaybenecessarytoaddicetoyourmixwatertomaintain
atemperaturebelow80°F(26°C)onhotsummerdays.DO
NOToverwaterthegroutmix.Thiscancausebleedingor
separation.
• DO NOT add additional sand, cement, aggregate, or
admixtures.
• Inbetweenbatchesofgrout,itmaybenecessarytopump
small amounts of water through your pump to keep the tremie
line lubricated and prevent packing off or premature curing.
Simply place your water hose into your pump hopper and
slowlypumpafewgallons(liters)ofwateruntilyouresume
pumping grout. The addition of such water into the borehole
will not adversely affect Grout 111, as it weighs about 18.2
lbspergallon(2,181kg/m
3
),whilewateronlyweighsabout
8.34lbspergallon(1,000kg/m
3
).Thewaterusedtokeep
the tremie line clear will simply be displaced by the much
heavier Grout 111 as it is pumped into the borehole.
Earth Loop Insulation
CAUTION:
Before pulling a vacuum on the polyethylene tube, the
surrounding grout must be in place and fully cured.
Failure have the polyethylene tube fully encased in
cured grout may cause the the tube and inner liquid
line to collapse.
The liquid line of the earth loop is encased within a polyethylene
tube. For optimal insulating properties, a vacuum should be pulled
on this tube. There is a schrader valve located on the top end of
the polyethylene tube for this purpose.
TRENCHING
NOTE TO INSTALLER
READ THIS BEFORE YOU DIG!
Before you begin digging, clearly mark the location of all
trenches to prevent accidents and personal injury. Fully
comply with all trench excavation regulations required by
the U.S. Department of Labor and the Occupational safety
& Health Administration (OSHA).
Trench excavations are subject to rules and regulations
of the U.S. Department of Labor and the Occupational
Safety & Health Admninistration. Should any NORDYNE
trench excavation instructions differ from OSHA or other
applicable regulations, follow the rules and regulations
enforced by OSHA and the U.S. Department of Labor
WARNING:
When a trench is being excavated, advise the
excavator that full and complete compliance with
OSHA and any other applicable state and local
regulations are mandatory, without exception. Failure
to comply to all applicable safety guidelines and
reasonable due care under all circumstances, can
result in personal injury or death.
WARNING:
If a person must go into a trench, the trench must
be fully excavated and shored in full compliance
with OSHA regulations and all other applicable rules
and regulations. Failure to comply to all applicable
safety guidelines, and reasonable due care under all
circumstances, can result in personal injury or death.
CAUTION:
Never install inadequately insulated refrigerant
tubing in a trench in close proximity to a slab,
foundation wall, water line or septic tank. Failure to
comply may cause damage from potential ground
water freezing around the exposed sub-surface
vapor refrigerant line. Consult a professional or
licensed Engineer to determine appropriate set back
distances.
• OSHA rules and regulations govern safety precautions
which must be fully observed and complied with, in addition
to any and all other applicable state and local regulations.
Trenching requirements are available, generally free of
charge from most OSHA offices.
Trenching Requirements
Trenching will always be required to connect the refrigerant
lines in a borehole to the interior refrigerant lines leading to the
compressor unit.
• Atminimum,a4inch(100mm)widetrenchmustbeexcavated
from the borehole to the wall of the structure. The trench must
beofadequatedepth,typicallyabout2ft(600mm).belowthe
frost line in any particular geographic area.

8
LIQUID LINE VAPOR LINE
ABOVE
SURFACE
BELOW
SURFACE
ABOVE
SURFACE
BELOW
SURFACE
3/4"(19mm)Min.WallThickness 3/4”(19mm)Min.WallThickness
Closed Cell Foam Closed Cell Foam
Non-Corrosive to Copper Non-Corrosive to Copper
Min.Hi-TempRating180°F(82°C) Min.Hi-TempRating220°F(104°C)
Min.Lo-TempRating-20°F(-28°C) Min.Lo-TempRating-20°F(-28°C)
Armaflex SS Armaflex SS Armaflex SS Armaflex SS
Expanded
Polyethylene
Expanded
Polyethylene
Expanded
Polyethylene
Expanded
Polyethylene
Neoprene Neoprene Neoprene Neoprene
Rubatex — Rubatex —
Tubolit Tubolit — —
Table 4. Insulation Requirements
• Boththeliquidandthevaporlinemustbedoublyinsulated
(insulation providing at least a 1.5 inch (38 mm) thickwall)
in all areas proximate to structural walls, water lines, sewer
lines, septic systems, and the like, with any such vapor line
insulated lengths excluded from any and all sub-surface heat
transfer tubing length calculations. Always check with the design
engineertomakesurethata1.5inch(38mm)thickinsulation
wall will be sufficient and to determine the distances where
such double thick insulation must be applied in the proximity
of all such items.
• Insulate all refrigerant tubing that will be extending through
Grout 111 (or any other rigid material) for a distance of at
least1foot(300mm)intoand1foot(300mm)outoftherigid
material. This allows for the expansion and contraction of the
tubing without rubbing directly against the rigid material.
Copper tubing protection in corrosive sub-
surface environments.
• Avoid any installation in corrosive environments where the
copper tubing is to be installed within soils, waters, materials
that are corrosive to copper (typically with pH levels below
5.5 or above 11, or in sub-surface sulfur or other chemically
concentratedwater(chlorine,etc.).
• Stray electrical currents can also be corrosive to copper.
Electricalshortsinwater-wellpumps(particularlyDCcurrent
pumps),etc.,canresultinsub-surfacestrayelectricalcurrents.
Checking for any stray electrical currents in the sub-surface
area of an installation is necessary prior to any earth loop or
sub-surface line set installation. Special precaution should be
taken if water-pumps, or other sub-surface pumps, are nearby.
• Equipmentoperatingonnearbydirectcurrent(DC)powerwill
present a significant potential stray current hazard, that must
be periodically monitored for early stray current detection. All
stray currents affecting copper tubing must be eliminated prior
to copper tubing installation, and immediately upon subsequent
discovery. Any such stray electrical currents can corrode copper
tubing.
• Neverplace,orpermitawelldrillertoplace,chlorinetabletsinto
a borehole intended for earth loop use. Chlorine is corrosive
to copper.
CAUTION:
Water well drillers commonly insert chlorination
tablets in the bottom of a borehole to purify the water.
NEVER DO THIS in a system borehole, as chlorine
is highly corrosive to copper.
• Astheinsulatedtubingistypicallyinstalledwithintheborehole
prior to trenching, it is usually safer to dig out the final segments
of the trench adjacent to the borehole and adjacent to the wall
by hand than with a trenching machine, to be sure neither the
tubing nor the structural wall is damaged.
• Arefrigerantlineset,comprisedoffullyinsulatedliquidand
vapor refrigerant lines, are placed at the bottom of the trench,
preferably with the liquid line on one side of the trench and the
vapor line on the other side.
• Theliquidandvaporrefrigerantlinesmustbethesamesize
as the fittings on the compressor unit.
• The line sets (when more than one) should be tied into an
appropriate distributor in an inside accessible location whenever
possible. The refrigerant distributor must always be vertically
oriented,withoutexception.Otherwise,theremaybeunequal
refrigerant flow to the boreholes.
• Ifsurfacerockisencountered,eitherllmaterialcanbesupplied
to build up an area over the fully insulated refrigerant lines, or
a more expensive rock trencher can be rented that is designed
to trench through rock.
Final Backfilling
• Priorto nal backlling,it is recommendedthat geothermal
marking tape be placed 12” (300 mm) above all trenched
line-sets, to provide ease in location and to provide a future
excavation warning.
• The trench should be backlled with a self-compacting ll
material, such as sand, pea gravel, or similar, with a final
and top several inches of dirt to promote grass or other cover
growth. Avoid the use of large rock for backfilling.
• Stonepowderresultingfromdrillingdebrismayalsobeused.
• Ifonlydirtisusedtobackllthetrench,“bridging”andairgaps
will result, which will require additional fill material and work
after initial settling.
INSULATION REQUIREMENTS &
ENCASEMENT PRECAUTIONS FOR
UNDERGROUND REFRIGERANT TUBING
IMPORTANT NOTE:
In all applications, in all areas within potential heat transfer
distances of, or proximity to, structural walls, water lines,
sewer lines, septic systems, and the like:
a. The liquid line must be fully insulated with either a
Tubolit or neoprene insulation, with wall thickness of at
least3/4inch(19mm),closedcell,andnon-corrosive
to copper; and
b. The vapor line must be insulated with at least a 3/4
inch(19mm)Armaexorneopreneinsulation,with
atleasta3/4inch(19mm)thickwall,mustbeclosed
cell, and non-corrosive to copper.
• Insulate the liquid and vaporlinewith closed-cell insulation
material in all underground areas. See Table 4.
• Inallsub-surfacelocations,andinallareasproximatetowater/
sewer/septic lines and structural walls, etc., the liquid line
must be insulated with either a closed-cell neoprene insulation
(typicallywithanadhesivebackthatisrolledaroundthetubing
totherequisiteminimumwallthickness),orwithaclosedcell
Tubolit(expandedpolyethylenefoam)insulation.
NOTE:NeopreneandTubolit(expandedpolyethylenefoam)
both have relatively rigid walls that resist crushing/thinning
(unlikethesofterwalledRubatex)whenllmaterialisadded.
Tubolithasameltingpointof180°F(82°C);however,the
liquid line should never exceed this temperature. Both neoprene
and Tubolit have enough structural integrity to remain effective
within only a few feet of fill by the pressure of the Grout 111
or other common fill materials.

9
PotentialFreezingConcerns
IMPORTANT NOTE:
DO NOT install any uninsulated refrigerant line (in a trench
system, pit system, or in any other geothermal heat transfer
application) within close proximity of a slab, bearing wall,
water line, sewer line, septice system, etc., This may
potentially cause a freezing problem. Consult a qualied
or licensed engineer to determine appropriate set-back
distances necessary to prevent any potential damage caused
byfreezingtemperaturespriortoinstallation.
All refrigerant lines within close proximity of a slab, bearing wall,
water line, sewer line, septic system, etc., must be fully insulated
withatleasta1.5inch(38mm)wallofclosed-cell,water-proof
insulation for a safe distance so as not to result in any damage
caused by the freezing ground. Refer to the insulation requirements
listed above for additional information.
Safedistancesaretypically15ft(4.5m);however,thisdistance
is a general estimate only and may vary depending on surface
conditions, water table elevations, and other factors. Consult a
qualified or licensed engineer.
Installing Line Sets between Boreholes &
Compressor Unit
• Linesetsbetweentheboreholeandthestructure,andbetween
the structural wall and the compressor unit, must be comprised
of refrigerant grade copper tubing. All line sets between the
borehole and the structure, and between the structural wall and
the compressor unit, must be comprised of the designated line
set size as used in each individual borehole.
• Withmultipleboreholesonasinglecompressorunit,individual
liquid lines and vapor lines from each earth loop must be
joined to their distributors, adjacent to the compressor unit, or
otherwise located in an accessible location. The distributors
must be vertically oriented, without exception. See Table 5 for
distributor kit info.
• Ifanelbowisincorporatedwithin12inches(304mm)ofthe
inlet side of the distributor, it must be oriented perpendicular
to the plane of the two outlet lines as shown in Figure3(page
11).
• Theliquidandvaporlinemustbefullyinsulatedaccordingto
the requirements listed in Table4(page8).
• Makesuretoinsulatethevaporlineextendingintotheborehole
from the ground surface for the greater of a distance equal to
atleast2ft(600mm).deepbelowthesurface,and2ft(600
mm).belowthefrostlineintheparticulargeographicareaof
installation.
• UseGrout111,powderedstone,peagravel,orsandtototally
surround and fully support the bend from the top of the borehole
to the refrigerant lines in the trench. The bend must not be
greater than 90°. If using a 90° angle, use a store-bought,
machined,90°angle.Ifthebendisnotfullysurroundedand
supported as required, by loose ground settling, the copper
linescouldbecomedamaged.Onlyhardcopperstore-bought
anglesof90°maybeused.
• Itisrecommendedthatboththeliquidlineandthevaporline
protruding from the borehole be surrounded by a protective 6
inch(150mm)diameterPVC,orsimilarpipesegment.Atthis
point it is very susceptible to damage and this will help prevent
anyaccidentalbending/crimpingoftherefrigeranttubing.
IMPORTANT NOTE:
Replace any damaged refrigerant line segment prior to
grouting and backfilling by cutting away the damaged
segment and coupling the remaining good segments.
De-burr all cut lines, with open ends facing down so no
debris falls into the lines.
• The insulated line set, extending from the borehole to the
structure, must be installed within a trench or within protective
piping. When installed within a trench, the separately insulated
vapor and liquid lines must be on opposite sides of the trench.
Wheninstalledwithinapipe,otherthanashortaccess/entrance
pipethroughthestructuralwall(wherethewalldoesnotexceed
athicknessof2ft(600mm))eachlinemustbeindividually
insulated and installed in its own pipe.
IMPORTANT NOTE:
Even though the lines are insulated, too much heat transfer
loss (short-circuiting) may occur if both the liquid and
the vapor lines are installed within a single longer pipe
segment. Protective piping is recommended for shallow
trenches and for installations that will be located under
pavement or traffic. If location is in a high traffic area, use
steel pipes. PVC piping only provides light protection from
gardening, etc.
• Ifthetrenchisbacklledwithaowablellmaterial(suchas
Grout111),theinsulated,horizontallineswithinthetrenches
willtendto“oat”outoftheheavyllmaterial.Ifowablell
materialisusedtobackll(alloraportionofthetrench),the
insulated refrigerant lines must be secured to the bottom of the
trenchwithaddedweightorwith1ft(300mm)longcrossed
nailspikes,typicallyplacedat4ft(1.2m).intervals.
• Ifmorethanonesetofrefrigerantlinessharethesametrench,
the individually insulated liquid lines must be placed on one
side of the trench, and the individually insulated vapor lines
must be placed on the opposite side of the trench.
IMPORTANT NOTES:
Always keep the liquid lines separated, to the greatest
extent possible, from the vapor lines. This also applies
to all interior line sets. Do not tape the insulated vapor
line and the insulated liquid line tightly together, as is a
common trade practice for aesthetics. Leave an air gap
in between the liquid lines and the vapor lines to prevent
a short-circuiting of heat transfer.
When two or more line sets are placed in the same vicinity,
keep all the individually insulated liquid lines together,
and all the individually insulated vapor lines together,
to the greatest extent possible. Multiple insulated liquid
refrigerant lines may be taped together, and multiple
insulated vapor refrigerant lines may be taped together,
but liquid and vapor lines may not be taped together.
• Whenrunninglinesetsthroughawall,a4inch(100mm)PVC
pipe is recommended for one insulated line set, and a 6 inch
(150mm)PVCpipeisrecommendedfortwoinsulatedlinesets.
If more than two insulated line sets are to use a common wall
entry point, it is recommended that all insulated vapor lines go
through one PVC pipe of sufficient size, and that all insulated
liquid lines go through another separate PVC pipe of sufficient
size.This assists in avoiding “short-circuiting” heat transfer
between the lines.
P/N DESCRIPTION
1003462 Distributor,geothermal,3/4”to3/4”
1003463 Distributor,geothermal,7/8”to3/4”
Table 5. Distributor Kits

1010
7
7
6
6
6
6
5
5
5
7
5
4
4
4
4
4
4
4
4
5
5
5
5
6
6
6
6
6
6
6
6
5
5
3
3
3
3
3
3
3
3
3
7
7
7
5
4
5
2
1
2
2
3
4
7
5
6
6
2
2
3
3
3
3
3
3
2
3
3
4
4
Moist (A)
Marine (C)
Dry (B)
Warm-Humid
Below White Line
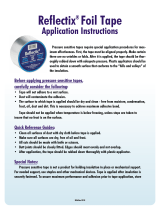
NOTE: Zone 7 includes all of Alaska except for the following
burroughs in Zone 8: Bethel, Northwest Arctic, Dellingham,
Southeast Fairbanks, N. Star, Wade Hampton, Nome,
Yukon-Koyukuk, North Slope.
NOTE: Zone 1 includes
Hawaii, Guam, Puerto Rico,
and the Virgin Islands
Figure1.Climate Map
IECC ZONES EARTH LOOP SIZE (FT/TON)
1, 2, 3A, 3B 100
3C, 4A, 4B 80
4C, 5, 6, 7, 8 65
There are exceptions to the earth loop sizes shown in this table. Within a
climate zone, the weather, and underground conditions vary from place
to place. The earth loop length may need to be adjusted accordingly.
Earth loop size indicated in the table assumes installation within bedrock
or permanently water saturated ground.

11
Insulated
Liquid line
400 FT
(122 M)
Max Depth
Grout
Torpedo
Suction line
Borehole filled
with Grout 111
Frost Line
Figure 2. Vertical Borehole with Earth Loop
Elbow perpendicular
to outlet tubes
Elbow
Outlet
Tubes
Elbow parallel
to outlet tubes
NOT RECOMMENDED!
Elbow
Outlet
Tubes
Figure 3. Outlet Tubes

709761A(Replaces7097610)
Specications&illustrationssubjecttochangewithoutnoticeorincurringobligations(05/15).
O’Fallon,MO,©NortekGlobalHVACLLC2015.AllRightsReserved.
/