
ASSEMBLY AND INSTALLATION
BEDSLIDE.COM | 888.807.0099

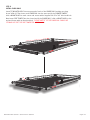
GET TO IT.
Supplied Hardware: (14) 1/4-20 Allen head bolts,
(18) UHMW mount blocks, (4) D-ring tie downs,
(2) Corner towers, (2) Side towers, (1) Head rail,
(2) Side rails
Tools Needed: Allen head wrench
ASSEMBLY
INSTRUCTIONS
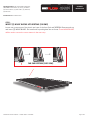
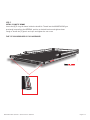
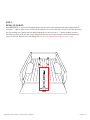
STEP 1.
INSERT (2) MOUNT BLOCKS INTO BEDTRAX (CAB END)
Loosen set screw on one of the plastic end caps of the front (cab end) BEDTRAX. Remove end cap
and insert (2) MOUNT BLOCKS. Re-install end cap and tighten the set screw. These MOUNT BLOCKS
will be used to secure the corner towers in the next step.
Page 1 of 7
BEDSLIDE.COM | 888.807.0099
CAB END BEDTRAX (SIDE VIEW)

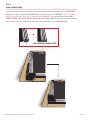
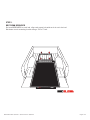
STEP 2.
MOUNT CORNER TOWER
Loosen set screw on both of the plastic end caps located at the rear (tailgate end) of the BEDTRAX.
Remove end caps and insert (4) MOUNT BLOCKS down each side of the BEDTRAX.
Set end caps aside. Next invert
CORNER TOWER, slide MOUNT BLOCKS underneath the CORNER TOWER so they line up with the mount
holes. Secure using the supplied 1/4-20 x 3/4” allen head bolts in to the MOUNT BLOCKS.
*CORNER TOWERS are positioned upside down and rest on the BEDTRAX for shipping purposes.
*Insert (6) MOUNT
BLOCKS per side if your BEDSLIDE is equipped with GUARDRAILS.
Page 2 of 7
BEDSLIDE.COM | 888.807.0099
REAR BEDTRAX (HANDLE END)

Page 3 of 7
BEDSLIDE.COM | 888.807.0099
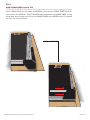
STEP 3.
MOUNT HEAD RAIL TO CORNER TOWER
Slide one end of the HEAD RAIL with slot facing forward into the mounted corner tower.
Insert a MOUNT BLOCK into the HEAD RAIL and slide over to the CORNER TOWER so that
the threaded hole is center with the mounting hole on the CORNER TOWER.
Fasten together with a 1/4-20 x 3/4” allen head bolt.
HEAD RAIL
MOUNT BLOCK

STEP 4.
MOUNT CORNER TOWER (opposite side)
Insert a MOUNT BLOCK into the aluminum HEAD RAIL then invert the CORNER TOWER and slide
open end into the HEAD RAIL. Slide (2) MOUNT BLOCKS underneath the CORNER TOWER so they
line up with the mounting holes. Secure the CORNER TOWER to the BEDTRAX with (2) supplied
1/4-20 x 3/4” allen head bolts.
*CORNER TOWERS are positioned upside down and rest on the unit for shipping purposes.
Page 4 of 7
BEDSLIDE.COM | 888.807.0099
CARDBOARD P
ACKAGING

Page 5 of 7
BEDSLIDE.COM | 888.807.0099
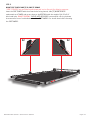
STEP 5.
MOUNT SIDE TOWERS AND (2) D-RING TIE DOWNS
Invert the SIDE TOWERS with the mount holes facing inward, slide (2) MOUNT BLOCKS
underneath each TOWER and secure them to the BEDTRAX with the supplied 1/4-20 x 3/4”
allen head bolts. *PLEASE NOTE:BEDSLIDE® recommends a D-ring tie down
be mounted in front of and behind each of the SIDE TOWERS. Pre-install them before fastening
the SIDE TOWERS.
*SIDE TOWERS are positioned upside down and rest on the unit for shipping purposes.
DO NOT TIGHTEN!!
X2
X2

Page 6 of 7
BEDSLIDE.COM | 888.807.0099
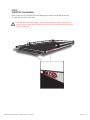
STEP 6.
INSTALL GUARD RAILS
Insert (2) MOUNT BLOCKS into an open end of each of the GUARD RAILS making sure they
do not slide off. Then insert each GUARD RAIL into the open end of the CORNER TOWERS,
slide a MOUNT BLOCK to each corner and secure with a supplied 1/4-20 x 3/4” allen head bolt.
Next insert SIDE TOWERS into the closed end of the GUARD RAILS, slide a MOUNT BLOCK to the
end and fasten with an allen head bolt. *PLEASE NOTE:6” OF THE GUARD RAIL SHOULD BE
STICKING OUT PAST THE SIDE TOWER FOR A CLEAN LOOK.
6”
6”

STEP 7.
INSTALL D-RING TIE DOWNS
Locate the (4) D-ring tie downs inside the install kit. Thread into the MOUNT BLOCKS you
previously inserted into the BEDTRAX, position at desired location and tighten down.
Lastly re-install the (2) plastic end caps and tighten the set screw.
THAT’S IT! YOUR BEDSLIDE® IS FULLY ASSEMBLED!
Page 7 of 7
BEDSLIDE.COM | 888.807.0099

BEDSLIDE.COM | 888.807.0099
Page 1 of 5
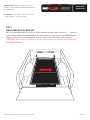
STEP 1.
CENTER BEDSLIDE® IN TRUCK BED
Place assembled BEDSLIDE® in truck bed. Center between the wheel wells and leave 1 ½” clearance
space between bulkhead and BEDSLIDE® frame. Next make sure tailgate clears the BEDSLIDE when
tailgate is closed and that the BEDSLIDE® does not make contact with tailgate when slid open.
If BEDSLIDE® does not clear the tailgate or has the step in the gate you will need our LIFT BLOCK KIT
PART #BSA-SPACEBLKIT
GET TO IT.
Supplied Hardware: (4) 5/16 riv nuts, (1) riv nut tool,
(4) 5/16 x 2” hex head bolts, (4) 5/16 split lock washers,
(4) 3/8 flat washers
Tools Needed: Drill, 1/2” drill bit, sharpie, tape measure,
½”socket, ratchet, ½” open end wrench
INSTALLATION
INSTRUCTIONS
Center BEDSLIDE between wheel wells
LEAVE 1 ½” SPACE

BEDSLIDE.COM | 888.807.0099
Page 2 of 5
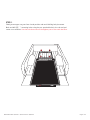
STEP 2.
Slowly move upper tray out from closed position and avoid shifting hole placement.
Mark and drill (4) ½” mounting holes using the pre-punched holes in the cab end and
center cross member.
Use the hole that rests on the highest part of the truck bed floor.

Truck bed
Riv nut tool
5/16 x 2” bolt
Riv nut anchor
X4
STEP 4.
INSTALL (4) RIV NUTS
Move BEDSLIDE® to access the (4) marked holes for the center cross member and drill through the bed
using the ½”drill bit. Next, insert a 5/16 bolt through the riv nut tool and into a riv nut. Insert the assembly
into a mounting hole. Tighten the bolt while holding the riv nut tool with a ½”wrench making sure the
assembly sits flush with the bed. As you tighten the bolt the riv nut will compress from underneath and
secure to the bed. Repeat to the remaining hole.
Do not over tighten! Do not use air impact tools!
BEDSLIDE.COM | 888.807.0099
Page 3 of 5

STEP 5.
BOLT DOWN BEDSLIDE®
Re-install BEDSLIDE® in truck bed, align each mount hole with each riv nut in the bed.
Bolt down at each mounting location using a 5/16 x 2” bolt.
BEDSLIDE.COM | 888.807.0099
Page 4 of 5

STEP 6.
PROTECTIVE FILM REMOVAL
Pull a corner of the protective film and slowly pull it away from the die cut decals
on each side of the tie down rails.
If the film comes up with a letter attached, position back in place and rub with
a card such as a bank card or even your hand so the decal adheres to the surface
of the tie down rail.
PEEL
BEDSLIDE.COM | 888.807.0099
Page 5 of 5

-
 1
1
-
 2
2
-
 3
3
-
 4
4
-
 5
5
-
 6
6
-
 7
7
-
 8
8
-
 9
9
-
 10
10
-
 11
11
-
 12
12
-
 13
13
-
 14
14


Ask a question and I''ll find the answer in the document
Finding information in a document is now easier with AI
Related papers


Other documents
-
Carlisle TTS15003 Operating instructions
-
 TMI Products 1973-75 K5 Chevy Bed Rail Installation guide
-
Eaton LMS Installation guide
-
aspenhome I240-400-RIV Assembly Instructions
-
 Stellar Industries SI-75 User manual
-
Volkswagen Phaeton 2003 Workshop Manual
-
Gorilla Playsets 01-0055-TS Operating instructions
-
 StopTech Automobile Accessories 98-139-1470 User manual
-
-


