Page is loading ...

1
Foreword
Foreword
Thanks for your choosing Haima passenger vehicle,
which will become your regretless choice. The product
model checked below is your purchased model:
Model User purchased mode
l
HMA7150DA4W
HMA7150DB4W
HMA7150DC4W
This manual describes in details the structural
characteristics, operation methods, and maintenance
specifications for this series passenger vehicle.
Carefully reading this manual can enable you to
appropriately use and maintain your vehicle, ensure
your safety, and better feel the driving pleasure.
This series passenger vehicle conforms to Chinese
Stage-IV/Beijing Stage-V emission regulations. Due
to different designs and configurations of the vehicle
models, some devices, equipment, or functions
described herein may not be incorporated on certain
vehicle model. All items other than the standard
configuration are marked with “Optional”.
Haima Car Co., Ltd. reserves the right without
prior notice to cease the use of or change the technical
specification due to continual optimization and upgrade
of the product.
The personnel of the sales and service shops of
Haima Car Co., Ltd. passed professional trainings to
provide you with best consultations, repairs, and
services.
The copyright of this manual is reserved by
Haima Car Co., Ltd.
Haima Car Co., Ltd.
January, 2013

2
Foreword
Graphic symbols
Some common symbols listed in the table below are used on your vehicle to indicate warning information
and instruction information:
Symbol
Definition of
symbol
Symbol for master
lighting switch
and signal device
Symbol for high
beam control and
signal device
Signal for low beam
control and signal
device
Symbol for position
(side) lamp control
and signal device
Signal for front fog
lamp control and
signal device
Signal for rear fog
lamp control and
signal device
Symbol for
headlamp levelness
manual adjustment
mechanism control
Symbol
Definition of
symbol
Symbol for turn
indicator control
and signal device
Symbol for hazard
warning lamp
control and signal
device
Symbol for front
windscreen wiper
and washer
combination control
Lower fixing points
for child seat
Symbol for rear
windscreen defroster
and demister control
and signal device
Symbol for engine
exhaust system
malfunction warning
signal device
Symbol for
cigarette lighter
control
Symbol
A/C
Definition of
symbol
Symbol for A/C
system control and
signal device
Brake system
malfunction signal
device
Symbol for fuel
level indicator and
warning signal
device
Symbol for battery
charging indicator
and warning signal
device
Symbol for engine
coolant temperature
indicator and warning
signal device
Symbol for horn
control
Symbol for engine
hood control

3
Foreword
Symbol
Definition of
symbol
Symbol for trunk
lid control and
signal device
Symbol for
driver/front
passenger seat belt
warning signal
device
Symbol for engine
oil pressure
indicator and
warning signal
device
Symbol for anti-lock
brake system
malfunction signal
device
Symbol for electronic
injection engine
malfunction signal
device
Symbol for door open
control and signal
device
Symbol for internal
recirculation
control and signal
device
Symbol
Definition of
symbol
Symbol for
external
recirculation
control and signal
device
Symbol for
instrument panel
airflow control and
signal device
Symbol for
instrument
panel/floor airflow
control and signal
device
Symbol for floor
airflow control and
signal device
Symbol for
floor/defroster airflow
control and signal
device
Symbol for window
lifter control
Symbol for
anti-theft warning
signal device
Symbol
Definition of
symbol
Symbol for airbag
malfunction signal
device

4
Foreword
The following symbols are used only on some of the M3 series passenger vehicles:
Applicable models
HMA7150DB4W HMA7150DB4W HMA7150DB4W HMA7150DB4W HMA7150DB4W HMA7150DB4W
Symbol
Definition of
symbol
Symbol for parking
gear (PARK) control
and signal device of
automatic
transmission
Symbol for reverse
gear (Reverse)
control and signal
device of automatic
transmission
Symbol for neutral
gear (Neutral)
control and signal
device of automatic
transmission
Symbol for drive
gear (Drive) control
and signal device of
automatic
transmission
Symbol for manual
mode (Manual)
control and signal
device of AMT
transmission.
Symbol for
transmission
(CVT) control and
signal device
Symbol for
electronic stability
program (ESP)
control and signal
device
Applicable models
Symbol
Definition of
symbol
Symbol for
electronic stability
program (ESP) OFF
control and signal
device
Applicable models
Symbol
Definition of
symbol

5
Table of Contents
Table of Contents
I. Safety System of Vehicle ···························· 12
1.1 Unlocking and locking system ················ 12
1.1.1 Keys and remote control ·················· 12
1.1.2 Use of keys·································· 12
1.1.3 Rear door child lock ······················· 13
1.1.4 Use of remote control······················ 14
1.1.5 Automatic control ·························· 17
1.2 Anti-theft system ································ 19
1.2.1 Engine anti-theft system ·················· 19
1.2.2 Anti-theft system warning lamp·········· 19
1.2.3 Possible problems during use ············ 19
1.2.4 Mechanical anti-theft system ············· 20
1.3 Seats and seat belt system ······················ 21
1.3.1 Adjustment of driver seat ················· 21
1.3.2 Use of seat belt ····························· 24
1.3.3 Fixing method of child seat··············· 29
1.4 Frontal airbag system ··························· 29
1.4.1 Composition of airbag system············ 30
1.4.2 Working principle of airbag ·············· 30
1.4.3 Airbag warning lamp ······················ 31
1.4.4 Passenger detection
system (optional) ····························· 32
1.4.5 Deployment conditions
of airbag ······································· 32
1.4.6 Deployment of airbag······················ 32
1.4.7 Conditions for non-deployment
of airbag ······································· 33
1.4.8 Side airbag and air
curtain (optional) ····························· 35
1.4.9 Composition of side airbag
and air curtain system························ 35
1.4.10 Working principle of
side airbag and air curtain ··················· 36
1.4.11 Deployment conditions
for airbag and air curtain ···················· 36
II. Configuration and Functions······················· 38
2.1 Types of equipment ····························· 40
2.1.1 Standard equipment························ 40
2.1.2 Optional equipment ························ 40
2.2 Combination instrument························ 40
2.2.1 Engine tachometer ························· 41
2.2.2
High beam indicator ······················· 41

6
Table of Contents
2.2.3 Engine malfunction lamp ················· 41
2.2.4 Left turn indicator·························· 41
2.2.5 Transmission malfunction
lamp (for CVT model)······················· 41
2.2.6 Engine exhaust malfunction
lamp ············································ 41
2.2.7 Engine oil pressure warning
lamp ············································ 41
2.2.8 Seat belt warning lamp ···················· 42
2.2.9 Door open indicator························ 42
2.2.10 Fuel gauge ································· 42
2.2.11 Fuel warning lamp························ 42
2.2.12 Water temperature warning
lamp ············································ 42
2.2.13 Battery charging warning
lamp ············································ 43
2.2.14 Water temperature gauge ················ 43
2.2.15 Position lamp signal······················ 43
2.2.16 ESP status
indicator (optional)··························· 43
2.2.17 ESP OFF indicator (optional)········· 43
2.2.18 Right turn indicator······················· 44
2.2.19 Front fog lamp
indicator (optional)··························· 44
2.2.20 Speedometer······························· 44
2.2.21 LCD display screen······················· 44
2.2.22 Airbag warning lamp ····················· 44
2.2.23 Rear fog lamp indicator·················· 44
2.2.24 Anti-theft system
warning lamp·································· 44
2.2.25 ABS warning lamp ······················· 45
2.2.26 Instrument adjustment lever············· 45
2.2.27 Brake system warning lamp············· 45
2.2.28 LCD display screen (optional) ············ 45
2.3 Warning and alert signals······················· 45
2.3.1 Hazard warning lamp······················ 45
2.3.2 Keyhole lamp ······························· 46
2.3.3 Warning tone································ 46
2.4 Combination switch ····························· 46
2.4.1 Left operating lever ························ 46
2.4.2 Right operating lever ······················ 48
2.5 Parking Assist System (Optional) ············· 49
2.6 Audio system····································· 49
2.6.1 Type of audio system ······················ 49

7
Table of Contents
2.6.2 USB/CD function: ························· 52
2.7 A/C System······································· 57
2.7.1 Functions and operations
of A/C system ································· 57
2.7.2 Type of A/C system ··························· 60
2.8 Interior and exterior accessories··············· 71
2.8.1 Door outer handle ·························· 71
2.8.2 Exterior rearview mirror ·················· 72
2.8.3 Power windows····························· 73
2.8.4 Left switch group ·························· 74
2.8.5 Front fog lamp
switch (optional)······························ 75
2.8.6 Rear fog lamp switch ······················ 75
2.8.7 ESP switch (optional)······················ 75
2.8.8 Headlamp adjustment switch ············· 76
2.8.9 Trunk switch (Optional)··················· 76
2.8.10 Trunk lamp ································ 76
2.8.11 Engine hood opening lever ·············· 76
2.8.12 Filler cap and trunk
opening lever·································· 77
2.8.13 Auxiliary handle ·························· 77
2.8.14 Sun visor ··································· 78
2.8.15 Skylight (Optional) ······················· 79
2.8.16 Skylight sun visor (Optional) ··········· 80
2.8.17 Interior lamp······························· 80
2.8.18 Reading lamp······························ 81
2.8.19 Interior rearview mirror·················· 81
2.8.20 Rear defroster ····························· 81
2.8.21 Glovebox··································· 82
2.8.22 Left storage ································ 82
2.8.23 Central storage ···························· 83
2.8.25 Front ashtray ······························ 83
2.8.26 Rear ashtray (Optional) ·················· 84
2.8.27 Central storage
(optional) and armrest ······················· 84
2.8.28 Front cup holder ·························· 84
2.8.29 Driver’s tool/jack ························· 85
2.8.30 Triangular warning sign ················· 85
2.8.31 Spare tire··································· 85
2.8.32 Fuel tank cap ···························· 86
2.8.33 Front/rear towing hooks ················· 86
III. Driving and Operations···························· 88
3.1 Before driving···································· 88
3.2 Use of ignition switch··························· 88

8
Table of Contents
3.2.1 LOCK········································ 88
3.2.2 ACC (Accessory)··························· 89
3.2.3 ON············································ 89
3.2.4 START······································· 89
3.3 Start of engine···································· 89
3.3.1 Checking before start ······················ 89
3.3.2 Start operations ····························· 89
3.4 Operations of manual
transmission (MT)······························· 90
3.5 Operations of automatic
transmission (CVT) ····························· 91
3.5.1 Parking gear (P) ···························· 91
3.5.2 Reverse gear (R)···························· 91
3.5.3 Neutral gear (N) ···························· 91
3.5.4 Drive gear (D) ······························ 92
3.5.5 Manual mode ······························· 92
3.5.6 Forced downshift··························· 92
3.5.7 Precautions within run-in
period ·········································· 92
3.6 Operations of service brake system··········· 93
3.6.1 General information ······················· 93
3.6.2 Influencing factors of braking············ 94
3.6.3 Function of vacuum booster ·············· 94
3.6.4 Anti-Lock Brake System (ABS) ········· 94
3.6.5 Electronic stability
program (ESP) (Optional)··················· 95
3.7 Operations of parking brake system ·········· 96
3.7.1 Parking brake ······························· 96
3.7.2 Release of parking brake ·················· 97
3.8 Operations of steering system ················· 97
3.8.1 Steering system····························· 97
3.8.2 Hydraulically assisted system ············ 98
3.8.3 Collapsible steering column ·············· 98
3.8.4 Angle adjustable
steering wheel································· 98
3.8.5 Multifunctional buttons of
steering wheel································· 98
3.9 Checking and maintenance of
vehicle in winter ································· 99
3.10 Driving on snowy and icy roads ············· 99
IV. Maintenance ········································· 101
4.1 Periodical maintenance ························· 101
4.1.1 Descriptions of maintenance
periods ········································· 101

9
Table of Contents
4.1.2 Periodical maintenance
schedule········································ 102
4.2 Checking of fluid levels ························ 111
4.2.1 Check the engine oil level ················ 111
4.2.2 Check the radiator coolant ················ 112
4.2.3 Check the brake fluid ······················ 112
4.2.4 Check the washing fluid··················· 113
4.3 Maintenance and replacement
of parts ············································ 114
4.3.1 Maintenance and charging
of battery······································· 114
4.3.2 Maintenance of air cleaner················ 115
4.3.3 Maintenance of engine oil filter·········· 116
4.3.4 Replacement of fuel filter················· 116
4.3.5 Maintenance of spark plugs··············· 116
4.3.6 Maintenance of A/C air
cleaner (Optional) ···························· 116
4.3.7 Maintenance of wiper blades ············· 117
4.3.8 Replacement of headlamp bulb ·········· 118
4.3.9 Replacement of front
turn lamp bulb ································ 119
4.3.10 Replacement of rear lamp bulb ········· 119
4.3.11 Maintenance of seat belt ················· 120
4.3.12 Maintenance of
interior trims ·································· 121
4.4 Cleaning and maintenance
of vehicle ········································· 122
4.4.1 Cleaning of vehicle ························ 122
4.4.2 Waxing of body····························· 124
4.4.3 Maintenance of paint ······················ 124
4.4.4 Rust protection of vehicle················· 125
4.4.5 Tire rotation ································· 126
4.5 Parking of vehicle ······························· 126
V. Malfunctions and Troubleshooting················ 128
5.1 Use of triangle warning sign ··················· 128
5.2 Use of hazard warning lamp ··················· 128
5.3 Engine overheating ··························· 129
5.4 Engine start failure ······························ 130
5.5 Jumper start of engine ·························· 132
5.6 Light-up of
engine malfunction
indicator··········································· 133
5.7 Light-up of exhaust malfunction
warning lamp····································· 133
5.8 Light-up of engine oil

10
Table of Contents
pressure indicator································ 134
5.9 Light-up of charging indicator················· 135
5.10 Checking and replacement of fuse ·········· 135
5.10.1 Cab fuse case······························ 136
5.10.2 Engine compartment fuse case ········· 138
5.11 Light-up of brake system
warning lamp····································· 142
5.11.1 Parking brake warning ··················· 142
5.11.2 Brake fluid level warning················ 142
5.11.3 ABS warning ······························ 142
5.12 Replacement of wheels························ 143
5.13 Driving accidents ······························ 144
5.13.1 Emergency treatment····················· 144
5.13.2 Rescue of wounded······················· 144
5.14 Towing by trailer ······························· 145
VI. Technical Specifications··························· 147
6.1 Geometrical parameters of complete vehicle
(HMA7150DA4W, HMA7150DB4W, and
HMA7150DC4W)······························· 147
6.2 Quality masses and other parameters of complete
vehicle············································· 148
6.3 Engine specification····························· 149
6.4 Transmission specification ····················· 150
6.5 Trademark of lubricating oil ··················· 151
6.6 Starter specification ····························· 152
6.7 Battery specification (L2 350)················· 152
6.8 Alternator specification ························· 153
6.9 Specification of wheel assembly ·············· 153
6.10 Capacities for equipment
(approximate values)···························· 154
6.11 Electric system ································· 155
6.12 Wheel alignment ······························· 155
6.13 Location of engine number ··················· 156
6.14 Locations of vehicle
identification number a
nd nameplate ····································· 157

11
Haima M3
M3
This series passenger vehicle can only use unleaded
gasoline with octane number at 93# (by research method) or
above. The use of leaded gasoline is prohibited.

12
Safety System
I. Safety System of Vehicle
1.1 Unlocking and locking
system
1.1.1 Keys and remote control
Every passenger vehicle is
attached with one set of keys, namely
convention key and remove control
key, as shown in the figure.
The keys are applicable for all
locks on the vehicle, including:
Ignition lock
Door lock
Trunk lid lock
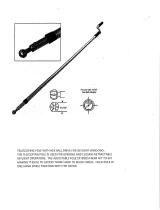
Upon receipt of the vehicle
keys, a key number plate will be
provided, which is the DNA of the
keys. When it’s necessary to match
new keys, the number of the key
shall be provided. At ordinary
times, preserve the number plate at
a safe place. In addition, write
down the number of the number
plate and properly preserve in an
easily accessible place. However,
do not preserve within the vehicle.
When it’s necessary to match
keys, please contact the sales and
service shop of Haima Car Co., Ltd.
with the presence of the key number
plate.
To unlock, lock, or start the
vehicle with key, it’s necessary to
unfold the key. Press the button 1
(for remote control key) to unfold
the key and press this button to
manual fold the key.
The remote control can unlock
and lock the all doors and trunk lid.
Tip
Please properly preserve
your keys and key number plate.
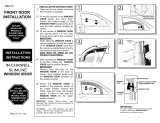
1.1.2 Use of keys
The left front door and trunk lid
can be unlocked and locked by keys
from the outside of the vehicle.
Rotate the key clockwise to
Key number plate

13
Safety System
unlock the left front door and, when
all doors are completely closed,
turn counterclockwise to lock.
There is a lock button on the top
of the inner handle for each door,
which is functioned for control of
door lock. When four doors are
completely locked, press the front
end of lock button on the driver side
to lock all doors and rotate the front
end of lock button on the driver side
to unlock all doors.
The lock button on the other
doors can only lock and unlock
corresponding door.
Unlocked status
Locked status
Press the front end of lock
button, pull the door outer handle,
and then close the door to lock the
front doors from the outside.
Press the front end of lock
button and close the door (without
pulling the door outer handle) to
lock the rear doors from the outside
of the vehicle.
The driver door can be locked
with key from outside of the vehicle.
When locking the driver door with
key with four doors completely
closed, the system will
automatically lock all doors.
When unlocking the driver
door with key, all doors will be
unlocked automatically.
1.1.3 Rear door child lock
The rear door child lock is
functioned to prevent the accidental
open of door by child sitting in the
rear seat.
Unlock
Loc
k

14
Safety System
When the child lock is shifted
to position “OFF”, the door can’t be
opened from the inside, no matter
the door lock button is placed at
any position. The door can be
opened only by the outer handle
from the outside of the vehicle.
Caution
Opening the door during the
traveling of the vehicle is extremely
dangerous. If there is child
passenger sitting in the rear seat,
please make sure to use child lock.
1.1.4 Use of remote control
While using the remote control,
please press the keys slowly and
accurately.
1. Locking by remote control
When the
key on the
remote control is pressed, the turn
lamps will flash once and all doors
will be locked.
2. Unlocking by remote control
When the
key on the
remote control is pressed, the turn
lamps will flash twice and all doors
will be unlocked.
3. Locking failure by remote control
When the
key of the
remote control is pressed, but there
is any door incompletely closed, all
doors will be locked and then
immediately unlocked. At the same
time, the electric horn of the vehicle
will sound for a short sound and the
turn lamps will flash for three
times.
4. Secondary locking
When the
key of the
remote control is pressed after all
doors and trunk lid are closed, if no
door is opened or the ignition
switch is not turned on within 30s,
all doors will be automatically
locked and at the same time the turn
lamps will flash once.
After the
key of remote
control is pressed, if no door is ever
opened within 30s, the automatic
locking of the door locks will fail.
Tip
The remote control can
LED indicator

15
Safety System
control the unlocking and
locking of the doors within the
vehicle. However, when the key
is inserted into the ignition lock,
the remote control function will
be disabled.
5. Car find function
When the key is withdrawn
from ignition switch and four doors
are locked, within 10m radius of the
vehicle, if the locking key of
remote control is pressed twice
continually within 1.3s, the turn
lamps will flash for 10 times and
the horn will sound twice.
6. Opening of truck lid by remote
control (optional)
When it’s only necessary to
open the trunk lid without opening
the doors, the following method
may be taken.
Press and hold the
key of
remote control for more than 2s to
open the trunk lid. At the same time,
the remaining door locks will
remain at original status.
7. Locking by remote control with
trunk opened
When all doors are completely
closed and the trunk is opened, if
the “Locking” key of the remote
control is pressed, the remote
locking will be completed
successfully and the turn lamps will
not flash. If four doors are not
unlocked, the turn lamps will flash
once after the trunk is closed.
Caution
Before the vehicle is
completely stopped, do not press
the unlocking key of the remote
control, in order to prevent the
unlocking of doors from causing
accidents.
8. Appropriate use of remote control
Pay attention to the following
issues during the use of remote
control:
The remote control can
function effectively only
within 10m radius of the
vehicle. However, the remote
control capability will change
along with the external
environment of the vehicle and
operation angle.
The frequent pressing of
locking key and unlocking key
(such as the keys are operated
repeatedly for 10 times within
30s) will be considered as
malicious operations. In the
next 1min, such operations
will be prohibited and the
locking and unlocking
functions will be disabled. The
central control function of the
remote control will restore
normal after 1min.

16
Safety System
When the keys of remote
control are pressed, the LED
indicator will light up. When
the LED indicator becomes
dark or the range of remote
control is shortened gradually,
it indicates that the battery is
insufficient in power and shall
be replaced with new one. This
is not the damage of remote
control.
Tip
The appropriate use of
remote control can not only ease
the operations, but also prolong
the service life of remote control.
Ensure the appropriate use and
proper preservation.
Caution
The radio frequency used by
the remote control is probably
subject to the interference just like
did for other short-range radio
emitters (such as amateur radio
players, medical devices, radio
interphones, other remote controls,
and alarm systems), which will
cause the failure of locking and
unlocking by remote control or the
failure of alarm setup. However,
the vehicle can still be
locked/unlocked by the key.
9. Replacement of battery (for
remote control key)
The battery of remote control
can be replaced by the sales and
service shop of Haima Car Co., Ltd.
or by user own.
At the time of replacement,
please prepare a new lithium-based
battery (Specification: Panasonic
CR1632).
Separate the upper and lower
halves of the remote control
with force.
Disassemble the lower half and
remove the used battery.
Install the prepared new battery
Pry open
b
atter
y
cove
r
Unfold folding key

17
Safety System
into the lower cap, with the
positive pole facing
downward.
Properly buckle the lower half
of the remote control.
Buckle the upper and lower
halves of the remote control to
complete the replacement.
1.1.5 Automatic control
1. Locking at specific traveling
speed
Provided that all doors are
completely closed, all doors will be
locked automatically when the
traveling speed of the vehicle
exceeds 20km/h.
While the traveling speed
exceeds 20km/h during the
traveling of the vehicle, if the
linkage lever of the driver door lock
is rotated up to be under unlocked
status:
If no door is ever opened, all
doors will be locked
automatically after 7s.
If the traveling speed drops to
below 20km/h within 7s, there
is no action in the door lock.
If the traveling speed drops to
below 20km/h and then rises to
above 20km/h with 7s, the doors
will be locked automatically
(This includes the condition that
the traveling speed is above and
below 20km/h for multiple times.
The doors will be locked
immediately the first time when
the traveling speed drops to
below 20km/h and then rises to
above 20km/h and afterwards no
action will be taken for the
repeated change of traveling
speed.)
2. Control of ignition switch
When the doors are under
locked status, if the ignition switch
is turned from “ON” position to
“OFF” position, all doors will be
unlocked automatically.
3. Control of interior lamp
While the interior lamp switch
is at position DOOR, if the vehicle
Buckle battery
cove
r

18
Safety System
is unlocked by remote control or the
key is withdrawn from ignition lock,
the interior lamp will light up
immediately and then go out in a
gradual manner (which will take
3s~5s) after 15s time delay. If the
vehicle is locked by remote control
within above-mentioned 20s, the
interior lamp will go out gradually.
With the above-mentioned 20s, the
opening/closing of the doors has no
influence on the interior lamp.
Within the above-mentioned 20s, if
the key is rotated to position ON,
the interior lamp will go out
gradually. After the interior lamp
goes out, if a door or trunk is
opened, the interior lamp will light
up immediately. The interior lamp
will go out after all doors and trunk
are closed.
When the interior lamp toggle
switch is at position ON, no matter
which position the interior lamp
switch is at, the interior lamp will
light up constantly. When the
interior lamp toggle switch is at
position OFF, the left/right interior
lamp can light up or go out
separately when the left/right
interior lamp switch is pressed.
4. Delay OFF of headlamp
Rotate the ignition switch from
position ON to position LOCK.
When the headlamp switch is at
position OFF, operate the
overtaking switch for two or more
times, close all doors, and lock with
remote control. In such case, the
delay OFF function of the low
beam is activated and the low beam
will go out after 30s time delay. If
the vehicle is unlocked by remote
control within 30s or any door is
opened and reclosed, the low beam
will light up for 30s once again. If
the ignition switch is at position ON
within above-mentioned 30s, the
low beam will go out.
5. Automatic headlamp (optional)
Rotate the combination switch
to position AUTO. When the
environment light becomes dark, the
position lamp and low beam will
light up in turn. When the
environment light becomes light, the
low beam and position lamp will go
out in turn, in order to improve the
traveling safety and economy.

19
Safety System
Tip
To ensure the effective
functioning of the headlamp
delay OFF function, do not cover
the light sensor with any article.
1.2 Anti-theft system
1.2.1 Engine anti-theft system
The anti-theft system can
ensure that the engine can be started
only by the system authorized key.
If any unauthorized key is
attempted, the engine can’t be
started, which can prevent the car
from being stolen.
Warning
The change or modification
of the anti-theft system without
the authorization of Haima Auto
Co., Ltd. will probably lead to
user’s loss of control authority on
the equipment.
1.2.2 Anti-theft system warning
lamp
If the system functions
normally, when the ignition switch
is turned to position “ON”, the
anti-theft warning lamp will go out.
If the warning lamp flashes
rapidly, goes out or lights up
continuously, it indicates the
presence of system malfunction. In
event of above condition, please
contact sales and service shop of
Haima Car Co., Ltd. for treatment as
soon as possible.
1.2.3 Possible problems during use
The engine anti-theft system
will probably encounter following
problems during the use:
The signal from the radio
station, television station, radio
transceiver, or mobile
telephone will probably
interfere with the anti-theft
system. If the key in use is
correct but the engine can’t be
Sunlight sensor

20
Safety System
started, please check the
anti-theft warning lamp. If the
warning lamp flashes rapidly,
withdraw the key, wait for at
least 2s, re-insert the key, and
restart the engine. If the engine
fails to start after three
attempts, please contact the
sales and service shop of
Haima Car Co., Ltd.
If the anti-theft system
warning lamp flashes
continually during the
traveling of the vehicle,
directly drive to the sales and
service shop of Haima Car Co.,
Ltd. and have the vehicle
checked and treated by
professionals, instead of
stopping the engine. If the
warning lamp is flashing,
stopping the engine will
probably lead to failure of
engine at the time of restart.
The password attached in the
key is an unique password.
Therefore, it will take some
time to match a new key. The
keys are available only at the
sales and service shop of
Haima Car Co., Ltd.
Please properly preserve your
keys. Meanwhile, frequently
preserve a backup key, just in
case.
In event of loss of key, the
sales and service shop of
Haima Car Co., Ltd. will reset
the password for the anti-theft
system and remaining keys.
The key not reset can’t start
the engine further.
Tip
The engine anti-theft system is
an effective anti-theft device and
any inconvenience thereof shall be
understood.
1.2.4 Mechanical anti-theft system
The mechanical anti-theft
system is a traditionally effective
anti-theft device and the following
issues shall be cautioned during the
use:
After the vehicle is parked
steadily, rotate the ignition
switch to position “LOCK”
(For automatic transmission
model, the gearshift lever shall
be at parking gear) and
withdraw the key. Then rotate
the steering wheel leftward and
rightward, till the steering
/