Page is loading ...

USER GUIDE
Network Storage System
with 2 Bays
Model: NAS200

About This Guide
i
Network Storage System with 2 Bays
About This Guide
Icon Descriptions
While reading through the User Guide you may see
various icons that call attention to specific items. Below is
a description of these icons:
NOTE: This check mark indicates that there is
a note of interest and is something that you
should pay special attention to while using the
product.
WARNING: This exclamation point indicates
that there is a caution or warning and it is
something that could damage your property or
product.
WEB: This globe icon indicates a noteworthy
website address or e-mail address.
Online Resources
Website addresses in this document are listed without
http:// in front of the address because most current web
browsers do not require it. If you use an older web browser,
you may have to add http:// in front of the web address.
Resource Website
Linksys www.linksys.com
Linksys International www.linksys.com/international
Glossary www.linksys.com/glossary
Network Security www.linksys.com/security
Copyright and Trademarks
Linksys, Cisco and the Cisco Logo are
registered trademarks or trademarks of
Cisco Systems, Inc. and/or its affiliates
in the U.S. and certain other countries.
Copyright © 2008 Cisco Systems, Inc. All
rights reserved. Other brands and product
names are trademarks or registered
trademarks of their respective holders.

Table of Contents
ii
Network Storage System with 2 Bays
Chapter 1: Product Overview 1
Front Panel. . . . . . . . . . . . . . . . . . . . . . . . . . . . . . . . . . . . . . . . . . . . . . . . . . 1
Back Panel . . . . . . . . . . . . . . . . . . . . . . . . . . . . . . . . . . . . . . . . . . . . . . . . . . 1
Drive Bay Doors. . . . . . . . . . . . . . . . . . . . . . . . . . . . . . . . . . . . . . . . . . . . . . . 2
Notication Sounds . . . . . . . . . . . . . . . . . . . . . . . . . . . . . . . . . . . . . . . . . . . . 2
Chapter 2: Conguration Using the Setup Wizard 3
How to Access the Setup Wizard . . . . . . . . . . . . . . . . . . . . . . . . . . . . . . . . . . . . 3
Set up Computer . . . . . . . . . . . . . . . . . . . . . . . . . . . . . . . . . . . . . . . . . . . . . . 3
Set up Second Drive. . . . . . . . . . . . . . . . . . . . . . . . . . . . . . . . . . . . . . . . . . . . 4
Backup Software . . . . . . . . . . . . . . . . . . . . . . . . . . . . . . . . . . . . . . . . . . . . . . 7
Advanced Setup . . . . . . . . . . . . . . . . . . . . . . . . . . . . . . . . . . . . . . . . . . . . . . 9
Install Utility . . . . . . . . . . . . . . . . . . . . . . . . . . . . . . . . . . . . . . . . . . . . . . . . . 9
Chapter 3: Advanced Conguration 11
How to Access the Web-Based Utility . . . . . . . . . . . . . . . . . . . . . . . . . . . . . . . . .11
Home . . . . . . . . . . . . . . . . . . . . . . . . . . . . . . . . . . . . . . . . . . . . . . . . . . . . .11
My Files > Files . . . . . . . . . . . . . . . . . . . . . . . . . . . . . . . . . . . . . . . . . . . . . . .11
My Files > My Downloads . . . . . . . . . . . . . . . . . . . . . . . . . . . . . . . . . . . . . . . .12
My Files > Personal Info. . . . . . . . . . . . . . . . . . . . . . . . . . . . . . . . . . . . . . . . . .13
Administration > Status . . . . . . . . . . . . . . . . . . . . . . . . . . . . . . . . . . . . . . . . .13
Administration > Users . . . . . . . . . . . . . . . . . . . . . . . . . . . . . . . . . . . . . . . . . .14
Administration > Shared Folders . . . . . . . . . . . . . . . . . . . . . . . . . . . . . . . . . . . .16
Administration > System Options . . . . . . . . . . . . . . . . . . . . . . . . . . . . . . . . . . .17
E-Mail Alert . . . . . . . . . . . . . . . . . . . . . . . . . . . . . . . . . . . . . . . . . . . . . . . . .19
Firmware Upgrade . . . . . . . . . . . . . . . . . . . . . . . . . . . . . . . . . . . . . . . . . . . . .20
Media Server . . . . . . . . . . . . . . . . . . . . . . . . . . . . . . . . . . . . . . . . . . . . . . . .21
Disk Utility . . . . . . . . . . . . . . . . . . . . . . . . . . . . . . . . . . . . . . . . . . . . . . . . . .22
Disk Conguration. . . . . . . . . . . . . . . . . . . . . . . . . . . . . . . . . . . . . . . . . . . . .24
Chapter 4: Use 26
Access to the Network Storage System . . . . . . . . . . . . . . . . . . . . . . . . . . . . . . . .26
How to Access the Network Storage System . . . . . . . . . . . . . . . . . . . . . . . . . . . .26
USB Storage Devices . . . . . . . . . . . . . . . . . . . . . . . . . . . . . . . . . . . . . . . . . . .28
How to Use the Network Drive Mapping Utility . . . . . . . . . . . . . . . . . . . . . . . . . .29
Appendix A: Troubleshooting 31
Appendix B: Specications 33
Appendix C: Warranty Information 34
Limited Warranty. . . . . . . . . . . . . . . . . . . . . . . . . . . . . . . . . . . . . . . . . . . . . .34
Appendix D: Regulatory Information 36
FCC Statement . . . . . . . . . . . . . . . . . . . . . . . . . . . . . . . . . . . . . . . . . . . . . . .36
Safety Notices. . . . . . . . . . . . . . . . . . . . . . . . . . . . . . . . . . . . . . . . . . . . . . . .36

Table of Contents
iii
Network Storage System with 2 Bays
Industry Canada Statement . . . . . . . . . . . . . . . . . . . . . . . . . . . . . . . . . . . . . . .36
User Information for Consumer Products Covered by EU Directive 2002/96/EC on Waste
Electric and Electronic Equipment (WEEE) . . . . . . . . . . . . . . . . . . . . . . . . . . . . . .37
Appendix E: Software License Agreement 41
Software in Linksys Products . . . . . . . . . . . . . . . . . . . . . . . . . . . . . . . . . . . . . .41
Software Licenses . . . . . . . . . . . . . . . . . . . . . . . . . . . . . . . . . . . . . . . . . . . . .41

Chapter 1
Product Overview
1
Network Storage System with 2 Bays
Chapter 1:
Product Overview
Thank you for choosing the Linksys Network Storage
System with 2 Bays. It features two SATA hard drive bays
so you can add storage space to your network. There are
also two USB ports that let you add USB hard drives for
additional storage space, or you can connect a USB flash
disk to access your portable files. (USB hard drives may
require external power supplies.)
WARNING: Do not block the air vents, and do
not stack devices on top of the Network Storage
System; otherwise, overheating can occur.
(Air vents are located on the sides of the
Network Storage System. Keep the area around
the Network Storage System clear.)
Front Panel
POWER (Green/Orange) The POWER LED
serves multiple purposes. It flashes green
when the Network Storage System boots up,
shuts down, prepares a disk, or scans a disk.
The LED flashes green and orange when the
Network Storage System upgrades its firmware.
It is continuously lit green when the Network
Storage System is ready for use. The LED is
continuously lit orange when there is an error.
(See “Appendix A: Troubleshooting” for more
information.)
ETHERNET (Green) The ETHERNET LED serves
two purposes. The LED is continuously lit when
a device is connected through the Ethernet
port. It flashes to indicate network activity.
DISK ACT (Green) The DISK ACT LED flashes
when the Network Storage System is accessing
data on the disk.
DISK FULL (Green) The DISK FULL LED flashes
when available disk capacity is less than 2% of
total capacity or lower than the number you set
through the web-based utility.
DISK 1 (Green) The DISK 1 LED serves two
purposes. The LED is continuously lit when
the hard drive in the top bay is ready for use. It
flashes when the hard drive is reformatting or
rebuilding with Disk 2 (RAID 1 mode).
DISK 2 (Green) The DISK 2 LED serves two
purposes. The LED is continuously lit when the
hard drive in the bottom bay is ready for use. It
flashes when the hard drive is reformatting or
rebuilding with Disk 1 (RAID 1 mode).
USB 1-2 (Green) The USB LED serves multiple
purposes. The LED is continuously lit when
the USB device is connected through the
corresponding port. It flashes when the
Network Storage System is accessing the USB
device. After the LED powers off, the USB device
can be removed.
Back Up Button Press the Back Up button to
initiate backup jobs specified by the backup
software on your computer. (Your computer
must be powered on for the jobs to run.)
Back Panel
POWER Button Push the POWER button to
power on or off the Network Storage System.
POWER The POWER port connects to the
included power adapter.
ETHERNET The ETHERNET port connects to
an Ethernet network device, such as a router or
switch.
USB 1 The USB 1 port connects to your USB
storage device. Press the USB 1 button to
eject the device from the USB 1 port. After
the Network Storage System beeps once and
the USB 1 LED powers off, you can remove the
device.

Chapter 1
Product Overview
2
Network Storage System with 2 Bays
USB 2 The USB 2 port connects to your second
USB storage device. Press the USB 2 button
to eject the device from the USB 2 port. After
the Network Storage System beeps once and
the USB 2 LED powers off, you can remove the
device.
RESET The RESET button has two functions:
To reset the network settings, such as •
the IP address, of the Network Storage
System, press and hold this button for
two seconds. The Network Storage
System resets to DHCP and tries to
get an IP address from the DHCP
server on your network. If there is no
DHCP server on your network, the
Network Storage System will be set to
its default IP address, 169.254.xx.xx
(the x’s represent randomly generated
numbers). The Network Storage System
beeps once to indicate that the reset
has occurred.
To reset the password of the Network •
Storage System to its default value
of admin, press and hold this button
for 10 seconds. The Network Storage
System beeps twice to indicate that the
reset has occurred.
Drive Bay Doors
The drive bay door covers the opening of the drive bay,
which holds the hard drive. Push together the clips to
remove the drive bay door. Disk 1 is inserted into the
upper bay, and Disk 2 is inserted into the lower bay.
Notification Sounds
The Network Storage System emits sounds to indicate
different activities or status information.
Notification Sounds
Sound Meaning
1 beep
Power or Reset button pushed
USB device ready to be removed
2 beeps
Reset button pushed and held for over
10 seconds
3 beeps every
15 seconds for 3
minutes
Available disk capacity is less than 2%
of total capacity or the number you set
through the web-based utility (2 or 5 GB)

Chapter 2
Configuration Using the Setup Wizard
3
Network Storage System with 2 Bays
Chapter 2:
Configuration Using the
Setup Wizard
After first-time installation of the Network Storage
System with the Setup Wizard (located on the CD-ROM),
the Network Storage System is ready for use. However,
additional configuration is available with the Setup Wizard
and web-based utility.
Use the Setup Wizard for the following tasks:
Configure another computer to use the Network •
Storage System
Add a second hard drive to the already configured •
Network Storage System
Install backup software on your computer •
Access the web-based utility •
Install the Linksys Network Drive Mapping Utility •
Access the User Guide on the CD •
Use the web-based utility for advanced configuration
(refer to “Chapter 3: Advanced Configuration” for details).
How to Access the Setup Wizard
Insert the Setup Wizard CD-ROM into your PC’s CD-ROM 1.
drive. The Setup Wizard should run automatically,
and the Welcome screen should appear. If it does not,
click Start and then Run. In the field provided, enter
D:\SetupUtility.exe (if “D” is the letter of your CD-ROM
drive).
Click the 2. Click Here to Start button.
Welcome Screen
You have multiple options on this screen:3.
Welcome Screen with Options
Set up NAS200 – Install the Network Storage
System for the first time. (The instructions are
covered in the Quick Installation.)
Set up Computer – Configure another computer to
use the Network Storage System.
Set up Second Drive – Add a second hard drive to
the already configured Network Storage System.
Exit – Use this option to close the Setup Wizard.
Backup Software – Install a third-party program to
run backup jobs.
Advanced Setup – Use this option to access the
web-based utility.
Install Utility – Use this option to install the Network
Drive Mapping Utility.
User Guide – Use this option to open the pdf of this
User Guide.
Set up Computer
Follow these instructions to configure another computer
to use the Network Storage System.
Click 1. Set up Computer.

Chapter 2
Configuration Using the Setup Wizard
4
Network Storage System with 2 Bays
For the public folder, keep the default drive letter, or 2.
select a different letter from the drop-down menu.
Click Next.
Map Network Drive
To install the Linksys Network Drive Mapping Utility on 3.
your computer, click Yes.
Install Drive Mapping Utility
T4. he Setup Wizard automatically installs the utility.
Click OK.
Drive Mapping Utility Installed
The network drive(s) are mapped to your computer. 5.
Click Exit to exit the Setup Wizard, or click Next to
return to the Welcome screen.
Network Drive Mapped
The computer has been configured.
Set up Second Drive
NOTE: Make sure your second hard drive
is a 3.5-inch, Serial-ATA (SATA) hard drive.
If you plan to stripe (RAID 0) or mirror
(RAID 1) your drives, then match the drive sizes
for maximum drive use.
WARNING: Low-profile or half-height hard
drives can be used at your own risk; however,
Linksys does not support the use of these drives
as they are not securely held in place inside the
Network Storage System.
Follow the instructions to add a second hard drive to
your previously configured Network Storage System. If
you physically install a second drive without running the
Setup Wizard, then the second drive will not be formatted.
It will have to be manually formatted using the web-based
utility (refer to “Chapter 3: Advanced Configuration”).

Chapter 2
Configuration Using the Setup Wizard
5
Network Storage System with 2 Bays
Click 1. Set up Second Drive.
Set up Second Drive
The Setup Wizard explains that these instructions 2.
cover the physical installation and drive configuration.
Click Next.
Overview
To install the second hard drive:3.
Power off the Network Storage System.a.
Push together the clips, and remove the lower b.
drive bay door.
Lift up the ribbon.c.
Make sure the connector side of the drive faces the d.
bay, and the label side faces up.
Make sure the drive is inserted under the ribbon. e.
Push the drive in until it snugly fits in the bay.
Replace the drive bay door.f.
Wait until you hear the Network Storage System g.
beep twice. Then click Next.
Physical Installation of the Second Hard Drive
The Setup Wizard automatically searches for any 4.
Network Storage System on your network. If it is not
detected, check its cable connections, and make sure
it is powered on. Click Search Again to locate the
Network Storage System.
Select the appropriate Network Storage System. Click
Next.
Network Storage System Detected

Chapter 2
Configuration Using the Setup Wizard
6
Network Storage System with 2 Bays
Select the appropriate configuration for your drive 5.
usage:
NOTE: If you change the drive configuration
setting (for example, from Separate Disks to
RAID 1), both drives will be reformatted and all
current data will be erased. Back up any pre-
existing data before reconguring your drives.
Maximum Storage - Separate Disks – Drives seen
separately.
Maximum Storage - Multiple Disks –
(JBOD/LVM) Drives seen as a single virtual drive.
Maximum Security - Mirroring (RAID 1) – Requires
two hard drives.
Maximum Speed - Striping (RAID 0) – Requires
two hard drives.
Click Next.
Select Drive Configuration
Review the new settings. If they are correct, click 6. Save.
If you would like to change them, click Back to return
to the previous screen.
Confirm New Settings
To confirm that you want to format your drives and 7.
erase all data on them, click Next.
WARNING: Before you format drive(s), back
up pre-existing data because all data on
your drive(s) will be erased when they are
formatted.
If the drives have been previously formatted by the
Network Storage System, click Skip to continue
without reformatting.
Confirm Formatting

Chapter 2
Configuration Using the Setup Wizard
7
Network Storage System with 2 Bays
Click 8. Set up Computer.
Set up Computer
For the public folder of the second hard drive, keep the 9.
default drive letter, or select a different letter from the
drop-down menu. Click Next.
Map Network Drive
To install the Linksys Network Drive Mapping Utility on 10.
your computer, click Yes.
Install Drive Mapping Utility
T11. he Setup Wizard automatically installs the utility.
Click OK.
Drive Mapping Utility Installed
The network drive(s) are mapped to your computer. 12.
Click Exit to exit the Setup Wizard, or click Next to
return to the Welcome screen.
Network Drive Mapped
NOTE: If the utility is already installed on your
computer (you can see it in your list of programs),
the Setup Wizard will skip the installation.
Program Folder
The second hard drive has been installed.
Backup Software
Follow these instructions to install a third-party program
to run backup jobs.
Click 1. Backup Software.
Backup Software

Chapter 2
Configuration Using the Setup Wizard
8
Network Storage System with 2 Bays
Click 2. Install.
Install Backup Software
The InstallShield Wizard appears. Click 3. Next.
Begin Installation of Backup Software
To accept the license agreement, click 4. Yes.
License Agreement
Enter your information in the 5. User Name and Company
Name fields. Then select the users of the backup
software:
Anyone who uses this computer (all users) •
Only for me •
Click Next.
User Information
Keep the default installation folder, or click 6. Browse to
select a different folder. Click Next.
Choose Destination Location
The backup software is installed. Click 7. Finish.
Backup Software Installed

Chapter 2
Configuration Using the Setup Wizard
9
Network Storage System with 2 Bays
Double-click the desktop icon to access the software.
Desktop Icon for Backup Software
For more information, click Help on the main menu of the
backup software.
Advanced Setup
Follow the instructions to access the web-based utility
through the Setup Wizard.
Click 1. Advanced Setup.
Advanced Setup
The Setup Wizard automatically searches for any 2.
Network Storage System on your network. If it is not
detected, check its cable connections, and make sure
it is powered on. Click Search Again to locate the
Network Storage System.
Select the appropriate Network Storage System. Click
Next.
Network Storage System Detected
The Setup Wizard notifies you that a user name and 3.
password are required for access. Click OK.
User Name and Password Required
Enter your information in the 4. User Name and Password
fields. Click OK.
Login Screen
Refer to “Chapter 3: Advanced Configuration” for details
about the web-based utility.
Install Utility
Follow these instructions to install the Network Drive
Mapping Utility.
Click 1. Install Utility.
Install Utility

Chapter 2
Configuration Using the Setup Wizard
10
Network Storage System with 2 Bays
Click 2. Yes.
Install Drive Mapping Utility
T3. he Setup Wizard automatically installs the utility.
Click OK.
Drive Mapping Utility Installed
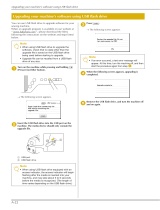
On the 4. Shared Folder Mapping screen, select the
appropriate Network Storage System.
Map Network Drive
Select the appropriate shared folder. If you do not see 5.
the folder you want, click Refresh.
Keep the default drive letter, or select a different letter 6.
from the drop-down menu. Then click Map.
Enter your information in the 7. User Name and Password
fields. Click OK.
Login Screen
You are notified when the shared folder has been 8.
mapped. Click OK.
Shared Folder Mapped
The shared folder automatically opens in a separate 9.
window.
Repeat steps 5-8 to map additional network drives.
To exit the utility, click 10. Close on the Shared Folder
Mapping screen.
For more information about the utility, refer to “Chapter 4:
Use”.
User Guide
Click this option to access the pdf of this User Guide.
User Guide
To install Adobe Reader, click Yes. To cancel, click No.
Adobe Reader

Chapter 3
Advanced Configuration
11
Network Storage System with 2 Bays
Chapter 3:
Advanced Configuration
NOTE: When first installing the Network Storage
System, you should use the Setup Wizard on
the Setup CD-ROM. If you want to configure
advanced settings, use this chapter.
After setting up the Network Storage System with the
Setup Wizard (located on the CD-ROM), it is ready for use.
If you want to change its advanced settings, use the web-
based utility. This chapter describes each web page of the
utility and each page’s key functions. You can access the
utility via a web browser on a computer connected to your
network router.
On the homepage of the web-based utility, you have
two options, Access My Files and Administration Login.
Additional tabs will be available after you click one of the
main options.
How to Access the Web-Based Utility
To access the Network Storage System from any computer
using a web browser, follow these instructions:
Open your web browser.1.
In the 2. Address field, enter http://<IP_address_of_
the_Network_Storage_System>. Press Enter.
If you do not know its IP address, then run the Setup
Wizard. Click the Click Here to Start button. Then click
Advanced Setup. Select the appropriate Network
Storage System, and its IP address will be displayed. (For
more information, refer to “Chapter 2: Configuration
Using the Setup Wizard”.)
A login screen appears. (Non-Windows XP users will 3.
see a similar screen.) The first time you open the
web-based utility, enter admin in the User name and
Password fields. (The default user name and password
is admin. You can set a new password for the admin
user on the Access My Files > Personal Info screen.) Click
OK to continue.
Login Screen
The web-based utility appears.
Home Screen
Home
On the homepage of the web-based utility, you have two
options:
Access My Files Click this option to access folders or
change your password.
Administration Login Click this option to manage the
Network Storage System through the web-based utility.
My Files > Files
To access folders or change your password:
Click 1. Access My Files.
Enter your information in the 2. User Name and Password
fields.
Click 3. OK.
The Files screen automatically appears. You have two
options available, Files and Personal Info, in the My Files
column. If the Download Manager feature has been
enabled through the Administration > System Options
screen and your login has Download Manager access,
then the My Downloads option will also be displayed.
NOTE: The Download Manager feature lets you
specify download tasks for the Network Storage
System. The advantage is that the Network
Storage System can run the download task
separately, without using your computer. For
example, if you order a movie online, then you
can have the Network Storage System—instead
of your computer—download the movie.

Chapter 3
Advanced Configuration
12
Network Storage System with 2 Bays
Login
The login you use to access your files is displayed.
My Files > Files
Shared Folders
The Files screen displays a list of shared folders that you
can access, according to your user account. Within a
shared folder, users with access to that shared folder can
create other folders and files.
Public Folders These are shared folders accessible to all
users. Disk 1 and Disk 2 are listed as PUBLIC DISK 1 (Public
Data) and PUBLIC DISK 2 (Public Data).
Private Folders These are your personal folder
and the shared folders associated with your login.
(The administrator controls folder access using the
Administration > Shared Folders screen.)
USB Storage Devices All users have access to the devices
connected to the Network Storage System.
Current Folder
The shared folder you are currently accessing is displayed.
The sub-folders available to you are listed with the
following information: Type, Name, Size, and Last Modified
date and time.
Click the folder you want to access. To view a file, click the
filename. To download a file, right-click the filename and
select Save Target as...
Click Refresh for the most up-to-date information.
My Files > My Downloads
If the Download Manager feature has been enabled
through the Administration > System Options screen and
your login has Download Manager access, then the My
Downloads screen will be available. Configure download
tasks on this screen.
My Files > My Downloads
Download Manager The status of the Download
Manager feature is displayed.
User Name Your login name is displayed.
Maximum Concurrent Tasks The maximum number of
tasks that can run at the same time is displayed.
For each download task, the screen lists the File Name, File
Size, Progress, Speed, and Status information.
Add Task Click this option to add a new download task. A
new screen appears.
Create New Download Task
Source
URL • Enter the URL of the FTP or HTTP URL.
Destination • Click Browse. The Folders Browser screen
appears.

Chapter 3
Advanced Configuration
13
Network Storage System with 2 Bays
Folders Browser
Current Folder – Select the location of the shared
folder that you want to specify as the current
folder.
New Folder – To create a new folder, enter its name,
and then click Create. Select the new folder from
the list, and its path appears in the Current Folder
field.
Click Apply to save the location. Click Close to exit this
screen.
The Remote Server Requires Authentication • If
authentication is required to access the URL, select this
option, and complete the following:
User Name – Enter the user name used to access
the URL.
Password – Enter the password used to access the
URL.
NOTE: For more information about
authentication for the remote server, contact
the administrator of the remote server.
Click Save to save the new download task, or click
Cancel to clear your changes.
Start/Stop Select the appropriate download task, and
then click Start/Stop to start or stop the selected task.
Cancel If you want to delete a download task, select it,
and then click Cancel.
Refresh Click Refresh to update the on-screen status
information.
My Files > Personal Info
Change your password on this screen.
My Files > Personal Info
User Name Your login name is displayed.
Current Password Enter your current password.
New Password Enter your new password.
Confirm New Password Enter your new password
again.
Click Save to save your new password, or click Cancel to
clear your change.
Administration > Status
To manage the Network Storage System:
Click 1. Administration Login.
Enter your information in the 2. User Name and Password
fields.
Click 3. OK.
The Status screen shows information about the Network
Storage System.
Administration > Status

Chapter 3
Advanced Configuration
14
Network Storage System with 2 Bays
Disk Status
Information about the hard drive(s) is displayed.
Internal Disks
Volume Mode The disk configuration is displayed.
Volume Status The format status of each hard drive is
displayed.
Disk 1-2, LVM, RAID 1, or RAID 0 The amount of free and
total space is displayed.
Information The Model number and Status of each hard
drive are displayed.
External Disks
USB Port
For each USB storage device, the Partition, File System,
Shared Folder, Total Size, and Free Size information is
displayed.
System Status
For the Network Storage System, the Server Name,
Firmware Version, Hardware Address, IP Address, Date,
Time, and Current Status information is displayed.
Disk and System Status
Click Refresh for the most up-to-date information. Click
View Log to view a list of system activities. The Log File
screen appears.
Log File
Click Refresh for the most up-to-date information.
Click Clear to remove all entries. Click Close to exit this
screen and return to the Status screen.
Administration > Users
The Users screen allows you to manage all Network Storage
System users. Linksys recommends that you create a user
account for each user, so each user has a unique login and
personal folder. (The user has automatic read/write access
to the personal folder, which uses the login name as the
folder name.)
Administration > Users
User List
The User List shows all existing users. (The admin and
guest users are pre-defined and cannot be deleted.)
New
Click this option to add a user account. The Create User
screen appears.
New User
Name • Create a unique login name for the user.
Punctuation and other special characters (for example,
* / | \ ) cannot be used in the name.

Chapter 3
Advanced Configuration
15
Network Storage System with 2 Bays
Password • Enter the password this user will use to
access the Network Storage System.
Verify Password • Enter the password again.
Allow Download Manager Access • If you want to
allow this user to use the Download Manager, then
select this option.
NOTE: The Download Manager feature lets you
specify download tasks for the Network Storage
System. The advantage is that the Network
Storage System can run the download task
separately, without using your computer. For
example, if you order a movie online, then you
can have the Network Storage System—instead
of your computer—download the movie.
Restrict Disk Quota to __ MB • Select this option if you
want to set a maximum amount of disk space for this
user. Then enter the number of MB you want to allow.
Create Personal Folder • Linksys recommends that you
keep this option enabled, so each user has a personal
folder. (The user has automatic read/write access to
the personal folder, which uses the login name as the
folder name.)
New User
Click Save to create a new user, or click Cancel to clear
your changes.
Edit
Click this option to change the settings of a user account.
The User Properties screen appears.
User Properties
Name • Change the login name of the user. Punctuation
and other special characters (for example, * / | \ ) cannot
be used in the name.
Password • Change the password this user will use to
access the Network Storage System.
Verify Password • Enter the password again.
Allow Download Manager Access • If you want to
allow this user to use the Download Manager, then
select this option.
Restrict Disk Quota to __ MB • Select this option if you
want to set a maximum amount of disk space for this
user. Then enter the number of MB you want to allow.
User Properties
Click Save to save your changes, or click Cancel to
clear your changes.
Delete
To delete a user, select the user on the User List. Then click
this option. A confirmation screen appears.
Confirm Deletion
Click OK to confirm the deletion, or click Cancel to
cancel the deletion.
Another screen appears, asking if you want to delete
the user’s corresponding personal folder.
Confirm Deletion of Personal Folder
Click OK to delete the personal folder, or click Cancel
to keep the personal folder and its contents.

Chapter 3
Advanced Configuration
16
Network Storage System with 2 Bays
Administration > Shared Folders
The Shared Folders screen allows you to create and manage
shared folders. Within a shared folder, users with access to
that shared folder can create other folders and files.
Administration > Shared Folders
Shared Folder List
The Shared Folder List shows all existing shared folders.
A user has access to the following:
Public folders accessible to all users •
Private folders: personal folder and shared folders •
specified by the administrator
USB storage devices accessible to all users •
Share
Only users with administrative rights can create shared
folders. Click this option to create a new shared folder.
New Shared Folder
Once the shared folder is created, the location cannot be
changed.
New Shared Folder
Location • Click Browse. The Folders Browser screen
appears.
Folders Browser
Current Folder – Select the location of the shared
folder that you want to specify as the current
folder.
New Folder – To create a new folder, enter its name,
and then click Create. Select the new folder from
the list, and its path appears in the Current Folder
field.
Click Apply to save the location. Click Close to exit this
screen.
Display Name • Enter the display name of the folder.
Punctuation and other special characters (for example,
* / | \ ) cannot be used in the name.
Description • Enter a description of the folder.
Click Save to create a new shared folder, or click Cancel to
clear your changes. The shared folder will appear on the
My Files > Files screen of users who have access to that
shared folder.
Edit
Only users with administrative rights can edit shared
folders. To change the properties of a shared folder, select
the folder on the Shared Folder List, and then click this
option. The Shared Folder Properties screen appears.
Shared Folder Properties
Change the display name or description on this screen.
Shared Folder Properties
/