Specification Revised 10/05
130716
ZTD910BF/SF/WF – GE Monogram 30" Warming Drawer
For answers to your Monogram,
®
GE Profile
™
or
GE appliance questions, visit our website at
GEAppliances.com or call
GE Answer Center
®
service, 800.626.2000.
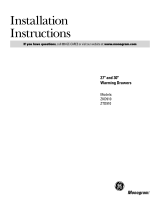
Electrical
Outlet 16" Max.
From Left Side
Installation Belo
w
a Dr
aw
er
23-1/2 Min.
Solid Barrier
1/4
Air Gap
25
1-1/2 Cabinet Top
36
Countertop
Height
1 Min.*
28-1/2
9-1/4
Electrical Outlet 42" Max.
From Right Side
Install a Solid Barrier
Below a Cooktop
See Note
Electrical Outlet
Flush With Side
of Cabinet 7" Max.
9
Install
2x4 or 2x2
Anti-Tip Block
Against Rear
Cabinet Wall
9" From Floor
to Bottom
of Block
7
Install a Solid Barrier
and a 1/4" Air Gap
Above Warming Drawer
Undercounter Installation (in inches)
Note: When installing warming drawer with a cooktop,
allow a 2" minimum from cooktop burner box bottom to
top of cut-out.
Important Installation Note:
Must provide anti-tip brace at the back of the cabinet and
at the top of the cutout.
Optional Accessories:
ZXD30B – 3/4" wood panel trim kit
• When installed, the front face of the drawer will be nearly flush
with adjacent cabinetry doors.
• Drawer overlaps will conceal cut edges on all sides of the opening.
The rough opening for the drawer must be:
–Depth 23-1/2" min. from inside back to front of cabinet frame.
–Width 25-1/2" for 27" wide models, 28-1/2" for 30" wide models.
–Height 9-1/4"
• 5" min. above floor or 1" above toekick. 23-1/4" from floor to bottom
of cutout is recommended for under countertop installation.
Installation below a cooktop:
Warming drawers are approved for installation below only certain
specified cooktop models. See the label attached to the top of the
warming drawer for approved models. A solid barrier and air gap
between cooktop and warming drawer is required. See Note above.
Installation below a cabinet drawer:
The warming drawer may be installed beneath a cabinet drawer. In
this installation, a solid barrier should be installed above the warming
drawer to block access. Use any solid material such as 1/4" thick
plywood. Allow at least 1/4" air gap between the barrier and the
top of the warming drawer. Observe the 5" min. above the floor or 1"
above the toekick minimum installation height.
Note: If you are installing in frameless cabinets, it may be necessary
to install 1/2" wide cleats to accept drawer mounting screws. See
drawer to find exact locations of mounting screws.
Side to Side Installation:
Install two warming drawers in separate cutouts. Allow 2" min.
between cutouts.
* Note: When installing the warming drawer below a
cooktop, a solid barrier must be installed at 1" from the
lowest point of the bottom of cooktop burner box to the
top of cutout. Use any solid material such as 1/4" thick
plywood. Allow at least 1/4" air gap between the barrier
and the top of the warming drawer. See label on top of
the warming drawer for approved cooktop models.
2
Min.
Side to Side Installation
Listed by
Underwriters
Laboratories