Page is loading ...

Owner’s Manual

12 14 16 18 20
123 6 79
13 15 17 19
10
11
45 8

1
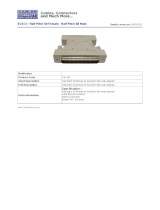
Front panel
1
D BEAM
p. 37
You can apply various e ects to the sound by waving your hand over this sensor.
2
VOLUME
p. 20
This knob adjusts the overall volume of the VP-550.
3
SOUND CHECK
p. 34
Here you can record and check the sound that’s sent from the OUTPUT jacks.
4
BASS & PERCUSSION
p. 31
These buttons select bass sounds or voice percussion.
5
OCTAVE
p. 36
These buttons raise or lower the keyboard range in one-octave steps.
6
VOCAL DESIGNER
p. 21
Here you can select the tonal character of the vocal designer, and adjust the mic level.
7
ENSEMBLE
p. 27
Here you can select the ensemble sound and adjust the volume.
8
REGISTRATION
p. 43
Here you can register combinations of vocal designer and ensemble settings.
9
AMBIENCE
p. 33
Here you can adjust the type and depth of ambience.
10
Pitch bend / modulation
lever
p. 38
Use this lever to vary the pitch or apply vibrato.
* The VP-550’s pitch bend range is xed at a whole note (two semitones).
11
Keyboard
Perform.
*The VP-550 does not respond to aftertouch.
Rear panel
12
POWER ON
Switch
p. 18
Press to turn the power on/o .
13
AC Inlet
p. 12
Connect the included power cord to this inlet.
14
MIDI
connectors
p. 54
Connect your MIDI equipment to these connectors.
15
TUNE
knob
p. 42
This knob adjusts the pitch of the VP-550 over a range of 415.3 Hz–466.2 Hz.
16
PEDAL
jacks
p. 16, p. 39
Connect an expression pedal and hold pedal to these jacks.
17
EXT IN
jack
p. 15, p. 50
Connect an external synthesizer or mic (phone plug) to this jack.
18
MIC
jack
p. 14, p. 22
Connect a mic (XLR plug) to this jack.
19
OUTPUT
jacks
p. 13
These jacks output the sound of the VP-550 in stereo (L/R).
20
PHONES
jack
p. 13
Connect your headphones to this jack.

2
Contents
T
he ancestr
y
of the VP
....................................................................................................................
5
F
eatures of the VP-55
0
...................................................................................................................
6
An overview of the VP-550
...........................................................................................................
7
About Vocal Designer
.....................................................................................................................
8
Sou
n
d
li
st
............................................................................................................................................
9
Ma
k
ing connections
1
1
M
aking connection
s
.......................................................................................................................
1
2
Connect the
p
ower cor
d
(
AC IN
)
.
...............................................................
.
1
2
Connecting your amp or speakers (OUTPUT/PHONES)
.....................
1
3
Connecting your mic (MIC)
..........................................................................
1
4
Connectin
g
a pe
d
a
l
(HOLD PEDAL/EXP PEDAL
)
...................................
1
6
P
er
f
ormin
g
1
7
T
urnin
g
on/o
the power (POWER ON)
...................................................................................
1
8
A
dj
usting t
h
e vo
l
ume (VOLUME
)
...............................................................................................
2
0
P
erformin
g
with Vocal Desi
g
ner (VOCAL DESIGNER
)
.........................................................
2
1
S
e
l
ecting a soun
d
............................................................................................
2
1
A
djusting the mic input level (MIC LEVEL)
.............................................
2
2
P
er
f
ormin
g
with Vocal Desi
g
ne
r
.................................................................
2
3
Add
ing your unprocesse
d
voice (DIRECT
)
..............................................
2
4
S
witchin
g
o the mic (MIC ON/OFF
)
.........................................................
2
5
R
aising Voca
l
Designer’s pitc
h
by
one octave (8va
)
............................
2
6
P
er
f
orming with Ensemble (ENSEMBLE
)
.................................................................................
2
7
S
electing a soun
d
............................................................................................
2
7
P
er
f
ormin
g
with Ensemble
...........................................................................
2
8
Adj
usting t
h
e Ensem
bl
e vo
l
ume (ENSEMBLE LEVEL
)
.........................
2
9
U
sing t
h
e mic to a
dd
expression to t
h
e Ensem
bl
e
(
VOICE EXPRESSION
)
.......................................................................................
3
0
A
bout the VP-550’s strings (STRINGS 1
)
...................................................
3
0
P
er
f
ormin
g
with Bass & Percussion (BASS & PERCUSSION
)
..............................................
3
1
S
e
l
ectin
g
a soun
d
............................................................................................
3
1
P
erforming with Bass & Percussio
n
...........................................................
3
2
A
djusting the Bass & Percussion volume
................................................
3
2
Ad
j
usting the ambience (AMBIENCE
)
.......................................................................................
3
3
C
heckin
g
the output sound (SOUND CHECK
)
.......................................................................
3
4

3
U
sing contro
ll
ers
3
5
S
hifting one octave up or down (OCTAVE)
.............................................................................
3
6
U
sing the D Beam (D BEAM
)
........................................................................................................
3
7
U
sin
g
the pitch bend / modulation lever (PITCH BEND
)
....................................................
3
8
U
sin
g
pe
d
a
l
s (HOLD PEDAL / EXP PEDAL
)
..............................................................................
3
9
U
sin
g
a mic to contro
l
expression (VOICE EXPRESSION
)
...................................................
4
0
C
han
g
in
g
the settin
g
s
4
1
T
uning (TUNE
)
...................................................................................................................................
4
2
R
e
g
isterin
g
sounds and settin
g
s
(
REGISTRATION
)
...............................................................
4
3
A
dj
usting t
h
e mic express
i
on
s
ens
i
t
i
v
i
t
y
.................................................................................
4
4
E
xam
pl
e a
ppl
ication
s
4
5
S
imulating a large classical choir ..............................................................................................
.
4
6
S
imulatin
g
a
g
ospel choru
s
..........................................................................................................
4
7
A
dd
ing a
b
ac
k
ing c
h
orus to your voice
...................................................................................
4
8
S
imu
l
ating a jazz scat so
l
o
............................................................................................................
4
9
U
sing the sound of an external s
y
nthesizer (EXT IN
)
..........................................................
5
0
“Per
f
orming” sound
f
rom drums or a portable music playe
r
..........................................
.
5
2
A
ppen
d
ix
5
3
C
onnectin
g
t
h
e VP-550 wit
h
MIDI equipment
......................................................................
5
4
M
IDI Im
pl
ementatio
n
.....................................................................................................................
5
6
M
IDI Im
p
lementation Char
t
.........................................................................................................
5
8
M
ain s
p
eci
cation
s
..........................................................................................................................
5
9
T
rou
bl
es
h
ootin
g
...............................................................................................................................
6
0
I
n
d
e
x
.....................................................................................................................................................
6
2
I
nformatio
n
........................................................................................................................................
6
4
Be
f
ore usin
g
the VP-550, please read the sections, “USING THE UNIT SAFELY” and
“
IMPORTANT NOTES” (separate s
h
eet)
.
T
hey provide important in
f
ormation concerning proper
o
perations of the VP-550. This Owner’s manual should be read in its entirety in order for you to
u
nderstand all features and operations. Keep the manual on hand for reference purposes.
All product names mentioned in this document are trademarks or registered trademarks o
f
their
r
es
p
ect
i
ve owners.
C
opyrig
h
t © 2006 ROLAND CORPORATIO
N
All rights reserved. No part of this publication may be reproduced in any form without the written
p
ermission of ROLAND CORPORATION
.

4
Play like you’re singing.

5
The ancestry of the VP
1939
marks the invention of the “vocoder,” a method of compressing a vocal signal. Subsequently
used during World War II as a way to scramble communications, the vocoder began to achieve
popularity as an electronic musical instrument in the 1970’s. Most vocoders of that time didn’t provide
a keyboard or carrier signal (analogous to the vocal cords of a human), so you had to separately
provide a synthesizer in order to produce sound.
1979
was the year in which Roland released the VP-330, a new idea that combined a vocoder with
a strings-type keyboard, making it simple to produce sound without needing to use other equipment.
The VP-330 enabled you to create distinctive vocal sounds without specialized knowledge of vocoder
parameters, and still continues to be loved by musicians around the world.
2006
marks the birth of the VP-550, going beyond the vocoder to utilize Roland’s “Vocal Designer”
human vocal modeling technology, and featuring a simple interface designed for musicians.
“Ultimate vocals for all musicians” – that’s the mission of the VP-550.

6
Features of the VP-550
The VP-550 is a keyboard featuring cutting-edge “Vocal Designer” human vocal modeling technol
-
og
y
. Just connect a mic, p
l
a
y
t
h
e
k
e
yb
oar
d
w
h
i
l
e
y
ou sing, an
d
l
et t
h
e VP-550 mo
d
e
l
incre
d
i
bly
r
ea
l
istic an
d
natura
l
voca
l
s.
Highest qualit
y
vocal
s
Unlike the choir sounds you’ve heard
f
rom samplers and synthesizers, the “Vocal Designer” model-
i
ng tec
h
no
l
og
y
b
ui
l
t into t
h
e VP-550
l
ets
y
ou actua
lly
“sing t
h
e
ly
rics” — an
d
it generates natura
l
an
d
rea
l
istic voca
l
s t
h
at are simp
ly
b
e
y
on
d
a
ll
comparison wit
h
conventiona
l
voco
d
ers.
In other words, the VP-550 lets
y
ou do it all;
f
rom beauti
f
ul choirs echoing in a cathedral, to
f
unk
y
g
ospel, to back
g
round choruses
f
or pop and rock bands
.
No longer will you need to call multiple vocalists to your live performances or recording sessions
.
Simpl
y
pla
y
the VP-550 and start enjo
y
ing the top qualit
y
vocal sounds
y
ou’ve dreamed of
.
Rich ensemble
s
In addition to “Vocal Designer,” the VP-550 also provides an “Ensemble” part with care
f
ully selected
h
ig
h
-qua
l
ity PCM soun
d
s (
d
igita
l
samp
l
e
d
soun
d
s)
.
B
y
using t
h
e “Ensem
bl
e” part to
l
a
y
er ric
hly
expressive strings an
d
super
b
c
h
oir soun
d
s wit
h
“Voca
l
Designer,”
y
ou can create unbelievabl
y
rich ensembles
.
In addition, you can use the “Bass & Percussion” part to play voice bass or voice percussion.
This means that all b
y
itself, the VP-550 lets
y
ou rival an orchestra or a cappella group
.
Eas
y
operat
i
on
The VP-550 doesn’t have the display screen you o
f
ten see on a synthesizer. Take a look at the panel.
The knobs and buttons you see are all that there is! The complex hierarchies and menus that ob
-
struct your creativity
h
ave
b
een comp
l
ete
l
y e
l
iminate
d
.
All
y
ou nee
d
to
d
o is connect a mic, use t
h
e
b
uttons to se
l
ect a soun
d
, an
d
t
h
en p
l
a
y
t
h
e
k
e
yb
oar
d
while
y
ou sing
.

7
An overview of the VP-550
T
he VP-550 has three parts, and each part occupies its own section o
f
the
f
ront panel
.
V
OC
AL DE
S
IGNE
R
ENSEMBLE
BA
SS
&
PER
CUSS
I
ON
VOCAL DESIGNER ENSEMBLE
BASS & PERCUSSION
If
y
ou turn on a sound button for a part,
y
ou’ll be able to pla
y
that part
.
If you turn on a sound button for two or more parts, you’ll be able to play those parts simultaneously.
By combining these parts, you can make the VP-550 produce an incredible range o
f
vocal sounds.
T
hese parts are mixed as
f
ollows.
•
•
•
Th
is part uses t
h
e
k
e
yb
oar
d
an
d
t
h
e mic input to mo
d
e
l
voca
l
soun
d
s.
U
se t
h
e
k
ey
b
oar
d
to contro
l
t
h
e pitc
h
, an
d
use t
h
e mic to contro
l
a
ll
o
ther aspects of the sound.
AMBIENC
E
This section a
pp
lies
t
h
e
a
m
b
i
e
n
ce
of
a
h
a
ll
o
r studio to the sound
from the three parts.
f
y
ou don’t want ambi
-
e
nce to
b
e a
dd
e
d
, turn
he knob all the wa
y
to
the left.
Ca
rri
e
r
T
h
is
h
as t
h
e same ro
l
e t
h
at t
h
e
“
voca
l
cor
d
s” p
l
ay in a
h
uman
voice. Accor
d
in
g
to t
h
e pitc
h
es
you p
l
ay on t
h
e
k
ey
b
oar
d
,
this
g
enerates the si
g
nal that
f
orms the basis o
f
the sound
(tone and
p
itch). Use the sound
buttons to switch between dif-
ferent vocal characters such as
cl
assic or pop
.
M
odu
l
ator
From t
h
e voice you input via
t
h
e mic input, t
h
is extracts t
h
e
r
esonances (
f
ormants) that
r
esult
f
rom the shape o
f
your
throat and lar
y
nx and the move
-
m
ent o
f
y
our mouth, and uses
these
f
ormants to modulate the
s
ignal produced b
y
the carrier.
T
h
is wi
ll
repro
d
uce not on
ly
t
h
e
l
oudness of your voice, but also
l
et t
h
e
l
yrics
b
e
h
ear
d
c
l
ear
l
y
and intelligibly
VOC
AL DE
S
IGNE
R
E
NSEMBLE
This part lets
y
ou pla
y
high-qualit
y
PCM sounds (dig
-
i
tall
y
sampled sounds) from the ke
y
board. Use the
s
oun
d
b
uttons to switc
h
b
etween samp
l
e
d
soun
d
s
s
uc
h
as strings or c
h
oir. By
l
ayering t
h
e Ensem
bl
e
part wit
h
t
h
e Voca
l
Designer you can create even
ri
che
r
sou
n
ds.
B
A
SS
&
PER
CUSS
I
O
N
I
f
y
ou turn on one of these sound buttons, the
s
eventeen left-most ke
y
s of the ke
y
board will pla
y
voice
b
ass or voice percussion soun
d
s. You can easi
l
y
d
o things such as using your left hand to play a bass
l
ine w
h
i
l
e using your rig
h
t
h
an
d
to p
l
ay t
h
e me
l
o
d
y
.

8
About Vocal Designer
“
Vocal Designer” human vocal modeling technolog
y
is a further evolution of the “vocoder.” Here’s a simple
ex
p
lanation of the vocoder
.
What’s a
v
ocoder
?
T
he “vocoder” was invented by the physicist H. Dudley in 1939 as a technology
f
or compressing a voice
communication signal. Subsequently, musical instruments based on this technology were developed,
a
llowing
y
ou to pla
y
melodies and harmonies using a human voice. O
f
course, the audio source can be
a
n
y
t
h
ing (not just a
h
uman voice)
b
ut
b
ecause t
h
e voco
d
er
h
as its
b
asis in t
h
e soun
d
-pro
d
ucing structure
of the human voice, we’ll be talking about it in terms of how a human voice is produced.
I
f
we ignore di
erences o
f
loudness, pitch, and variation between individuals, the wave
f
orm produced by
our vocal cords is essentially identical regardless o
f
what you’re saying (e.g., “ahh” or “eeh”). We can distin
-
guish spoken or sung words because o
f
the various resonances (
f
ormants) created by our vocal tract (the
shape o
f
our throat and the movement o
f
the lar
y
nx and mouth) and additional sounds called “
f
ricatives,”
“
plosives,” and “sibilants” that are added in var
y
ing wa
y
s over time. The e ect of the waveform created b
y
the vocal cords actuall
y
has a rather minimal e ect on what the listener hears
.
A vocoder analyzes these time-varying changes, electrically synthesizes the
shape o
f
the throat and movements o
f
the mouth (the
f
ormant movements),
a
nd uses these
f
ormants to modulate a musical si
g
nal (the carrier) rather than
the waveform produced b
y
the vocal cords. The vocoder “voice” produced in
this wa
y
was closer to that of a robot in a science ction movie rather than the
vo
i
ce
o
f
a
n
actua
l h
u
m
a
n
.
V
ocal Designer uses cutting-edge modeling technology to bring about a revo-
l
utionary leap in the accuracy o
f
this synthesis, succeeding in generating a
“
human voice” that is incomparably more realistic and natural than the sounds
produced b
y
vocoders of the past.
P
l
ay
l
i
k
e you’re singing
V
oca
l
Designer is constructe
d
so t
h
at e
l
ements ot
h
er t
h
an pitc
h
are expresse
d
b
y your voice via t
h
e mic.
Y
ou play the keyboard to control the pitch
.
V
ocal Designer won’t produce sound i
f
you are only vocalizing into the mic or only playing the keyboard.
T
his means that in order to take advantage o
f
Vocal Designer, the timing at which
y
ou pla
y
the ke
y
board
a
nd vocalize into the mic is extremel
y
important. When
y
ou’re performing a rapid passage,
y
ou will prob
-
a
bl
y
nd it best to hold down the ke
y
s (or press the hold pedal
➞
p
. 39) an
d
use
y
our voice to p
l
a
y
t
h
e
r
h
yt
h
m
.
Unlike on typical synthesizers, the volume is controlled by the mic. Use your voice to draw the curve. Using
your voice, you can produce a range o
f
expression that you might even
nd extreme.
T
he most important technique for taking advantage of Vocal Designer is t
o
“
P
l
a
y
l
i
k
e
y
ou’re singing”
Resonances (formants)
produced by the vocal
tract (shape of the
throat and larynx) and
movements of the mouth
Vocal cords (carrier)

9
Sound list
V
OC
AL DE
S
IGNER
Sou
n
d
D
escri
p
tion
C
LA
SS
I
C
A
large choir suitable for classical music. This is also a good choice for any choral sound — not
j
ust classical— and will match nearl
y
an
y
st
y
le of music. It has a clear sound, and is a good
c
hoice when
y
ou want the l
y
rics to be heard
.
M
ALE
&
FEMALE
A
mixed choir with inde
p
endent male and
f
emale
p
arts. With s
p
arser chords, it
p
roduces a
d
ee
p
er and more three-dimensional sound than “CLASSIC.” You’ll hear the
f
emale voices in the
h
i
gh
ran
g
e, an
d
t
h
e ma
l
e voices in t
h
e
l
ow ran
g
e. Fema
l
e voices wi
ll
b
e
h
ear
d
in t
h
e ri
gh
t si
d
e
o
f the stereo, and male voices in the left side.
G
OS
PEL This choir includes the distinctive phrasings and irregularities that are distinctive of gospel
music. It’s an ideal choice
f
or
j
azz or gospel.
PO
P
A
choir with a
f
ewer number o
f
members, broadl
y
use
f
ul
f
or popular music as well as songs that
c
ontain rapid passages. The sound is clear, making this a good choice when the lyrics need to
be
hea
r
d.
VOCO
DER
1
A
ta
lkb
ox soun
d
wit
h
a meta
ll
ic c
h
aracter. T
h
is is a more mo
d
ern soun
d
t
h
an “VOCODER 2,” an
d
i
s suitable for st
y
les with a groove, such as R&B
.
VOCO
DER 2
A
vintage vocoder sound, broadl
y
use
f
ul
f
or pop music o
f
the 1980’s as well as songs that con
-
tain rapid passages. It’s a good choice
f
or chordal playing
.
If
y
ou press the [VOCODER 1] and [VOCODER 2] sound buttons simultaneousl
y
, the sound be-
ing received
f
rom the rear panel EXT IN
j
ack will be used as the carrier
(
➞
p
. 50
).
*
EN
S
EMBLE
Sou
n
d
D
escri
p
tio
n
STRINGS 1
Th
is is an acoustic string soun
d
t
h
at emp
h
asizes t
h
e expressive p
l
aya
b
i
l
ity t
h
at is in
h
erent to
strings. Performance nuances such as
y
our ke
y
board touch or pedal operation will automati-
c
all
y
control the attack, release, legato, and tonal changes of the sound. This sound is suitable
f
or pla
y
ing phrases, but can be broadl
y
used
f
or chordal pla
y
ing and other purposes. (p. 30).
S
TRING
S
2
Th
is is a synt
h
esizer string soun
d
. It is a
b
rig
h
t string soun
d
t
h
at evo
k
es t
h
e Ro
l
an
d
JP-8000
synthesizer, and is a good choice for chordal playing.
J
AZZ
SC
AT
T
his sound provides samples of
j
azz scat singing. It’s great for songs that contain rapid passages
and
f
or scat soloing. Your ke
y
board d
y
namics will switch between long “Doo” sounds, short “Bap
”
sounds
,
and
f
alls “Fall.
”
M
IXE
D
C
H
O
R
US
T
his provides samples o
f
a lar
g
e choir that’s excellent
f
or classical music. You can
g
et an even
m
ore majestic e ect by layering this with one of the sounds of the Vocal Designer part
.
BO
Y
S
C
H
O
IR
T
his is a sampled bo
y
s choir. To take the fullest advantage of this sound, pla
y
notes in the upper
hal
f
o
f
the ke
y
board.
HU
MMIN
G
Th
is is a samp
l
e
d
h
ummin
g
soun
d
. You can use t
h
e expression pe
d
a
l
or t
h
e “Voice Expression
f
unction” (p. 40) to var
y
the sound through a range o
f
“mmh”
➞
“Ooh
”
➞
“Aah”
f
or a ver
y
expres
-
sive performance
.

1
0
BA
SS
&
PER
C
U
SS
I
O
N
Sou
n
d
D
escriptio
n
B
A
SS
1
T
his is a bass voice with short-duration notes, good for up-tempo songs across a wide range o
f
sty
l
es
.
B
A
SS
2
T
his is a bass voice with long-duration notes, good for slower-tempo songs across a wide range o
f
sty
l
es
.
B
A
SS
3
Th
is is a jazz scat
b
ass soun
d
. Your
k
e
yb
oar
d
dy
namics wi
ll
switc
h
b
etween
l
ong “Doo” soun
d
s, s
h
ort
“Ba
p
” sounds, and
f
alls “Fall.
”
P
ER
C
T
his provides a collection of voice percussion sounds.
P
ER
C
sou
n
ds
Note
S
oun
d
D
#
3
Vox C
y
m
m
C#3
C#3
VCbl
V
ox
Cy
m
b
a
l
A#2
A#2
V Hih 3
V
ox
Hih
at
3
G
#2 V
o
x Hi
hat
1
F#2
V
o
x Hih
at
2
D
#2 V
o
x
S
n
a
r
e
2
C
#
2
VoxKickSwee
p

11
Making connections
I
n this chapter you’ll connect the VP-550 to your external equipment and set it up.

12
Making connections
Connect the power cord
( AC IN)
C
onnect t
h
e inc
l
u
d
e
d
power cor
d
to t
h
e VP-550’s [AC In
l
et], an
d
p
l
ug
t
h
e
ot
h
e
r
e
n
d
in
to
a
n A
C
out
l
et.
to AC outlet
1
.

13
Connecting your amp or speakers
( OUTPUT/ PHONES)
T
he VP-550 doesn’t contain an amp or speakers. In order to hear sound, you’ll need to connect it to monitor
speakers (with a built-in amp), a stereo set or other audio system, or headphones
.
To prevent malfunction and/or damage to speakers or other devices, alwa
y
s turn down the volume,
and turn o
the power on all devices be
f
ore making any connections
.
M
a
k
e connections as s
h
own
.
Hea
d
p
h
one
s
INPU
T
Monitor spea
k
er (wit
h
b
ui
l
t-in amp
)
I
f
y
ou’re outputting in mono, connect
y
our equipment to the [L/MONO] jack
.
A
udio cables and headphones aren’t included with the VP-550. You’ll need to obtain them sepa-
r
ate
l
y
.
*
1
.
✍
✍

14
Connecting your mic
( MIC)
A mic is indispensable
f
or per
f
orming with the VP-550. The VP-550 models vocal sounds by using your voice
that’s input via the mic. This means that using a high-quality mic will correspondingly improve the quality
of the result. The connector of the VP-550
y
ou use will depend on the t
y
pe of plug
y
our mic provides. (In
order to use the full capabilit
y
of the VP-550, we recommend using a “balanced (XLR) t
y
pe” plug.
)
F
or more about mics recommended
f
or the VP-550, re
f
er to the separate lea
et “Mics recommended
f
or the VP-550.
”
H
eadset
o
r
ha
n
d
mi
c?
T
he VP-550 (Vocal Designer) controls the volume of the sound according to the loudness of
y
our voice in
t
h
e mic. T
h
is means t
h
at a
h
ea
d
set mic is t
h
e i
d
ea
l
c
h
oice, since t
h
e
d
istance
b
etween t
h
e mic an
d
your
mouth will remain the same even during the most intense moments o
f
your keyboard per
f
ormance! With a
h
eadset mic, you’ll be
f
ree to sing and dance on stage to your heart’s content.
I
f
y
ou’re using a
b
a
l
ance
d
(XLR) p
l
u
g
mic
(
MIC
)
C
onnect it to t
h
e [MIC]
j
ac
k
as s
h
own
.
T
he VP-550 is equipped with a balanced (XLR) t
y
pe jack. Wiring diagrams
f
or this
j
ack is shown at right. Make connections a
f
ter
rst checking the wiring diagrams o
f
o
t
h
er equipment
y
ou inten
d
to connect
.
T
he VP-550’s MIC jack does not provide phantom power. I
f
y
ou’re using a condenser mic,
y
ou’ll need to
ob
tain a separate p
h
antom power supp
l
y unit or switc
h
to using a
d
ynamic mic.
Howling could be produced depending on the location of microphones relative to speakers. This can
be remedied b
y:
1
. Chan
g
in
g
the direction o
f
the microphone(s)
.
2. Relocating microphone(s) at a greater distance
f
rom speakers.
3. Lowerin
g
vo
l
ume
l
eve
l
s
.
*
1
.
*
*
*

1
5
I
f
y
ou’re using a
p
hone plu
g
mic
(
E
XT IN
)
C
onnect it to the [EXT IN]
j
ack as shown
.
Turn t
h
e
[
EXT IN
]
k
no
b
to “MIC.
”
This knob ad
j
usts the level o
f
the sound
f
rom the [EXT IN]
j
ack. (Turn the knob toward “MIC” to
i
ncrease the level, or toward “LINE” to decrease it.) If
y
ou’ve connected a mic,
y
ou should turn this
t
o
“
MIC.
”
➞
Refer to “Ad
j
usting the mic input level” (p. 22) for more about this ad
j
ustment.
S
et t
h
e
[MIX
TO
MIC]
sw
i
tc
h
“ON
.
”
The [MIX TO MIC] switch setting determines whether the sound from the [EXT IN] jack will be used
as a mic input (modulator; the ON settin
g
) or as the carrier (the OFF settin
g
).
W
e’
ll
b
e using it as a mic input, so se
l
ect t
h
e “ON” position
h
ere.
1
.
2
.
✍
3
.
✍
Modu
l
ato
r
T
he tonal character (
f
ormants) o
f
the
voice
f
rom the mic in
p
ut is extracted,
a
n
d
t
h
ese
fo
rm
a
n
ts
a
r
e
used
to
modulate (trans
f
orm) the carrier
s
i
g
na
l.
I
f
y
ou want the sound from the
r
ear panel [EXT IN] jack to be the
m
odulator
,
set the [MIX TO MIC]
switch
“
ON
”
(
➞
p 52)
Carr
i
e
r
Th
is is t
h
e si
g
na
l
t
h
at is t
h
e
bas
i
s
o
f
t
h
e
sou
n
d
a
n
d
dete
r
-
m
ines its tim
b
re an
d
pitc
h
.
I
f
y
ou press the [VOCODER
1]
and
[
VOCODER 2
]
sound
b
uttons simultaneousl
y
, the
sound bein
g
received
f
rom
th
e rear pane
l
EXT IN jac
k
wi
ll
be
used
as
the
ca
rri
e
r
.
I
f
y
ou want the sound from the rear panel
[EXT IN]
j
ack to be the carrier, set the [MIX
TO MIC] switc
h
“OFF”
(
➞
p. 50
)
.

1
6
Connecting a pedal
( HOLD PEDAL/ EXP PEDAL)
Y
ou can connect a hold pedal (sold separately: DP series, BOSS FS-5U) and an expression pedal (sold sepa-
rately: EV-5) to the VP-550
.
Using a
h
o
ld
pe
d
a
l
l
ets
y
ou
h
o
ld
t
h
e notes
.
Using an expression pedal lets
y
ou add expression to
y
our performance
.
➞
R
e
f
er to “Using pedals” (p. 39)
f
or more in
f
ormation
.
Ma
k
e
co
nn
ect
i
o
n
s
as
s
h
o
wn
.
E
xpression pe
d
a
l
(so
ld
separate
ly
: EV-5
)
Ho
ld
pe
d
a
l
(so
ld
separate
ly
: DP series, BOSS FS-5U)
U
se only the speci
ed expression pedal (EV-5; sold separately). By connecting any other expres
-
s
ion pedals,
y
ou risk causing malfunction and/or damage to the unit
.
1
.
✍

17
Performing
I
n this chapter you’ll learn the basics of playing the VP-550. When you’ve nished it, you will
have mastered the basics of the VP-550!

1
8
Turning on/o the power
( POWER ON)
Here’s how to turn the VP-550’s
p
ower on or o .
Turning on t
h
e powe
r
Af
ter completing the connection explained in the previous chapter, make sure to turn on the power
b
y
following the steps below. B
y
turning on devices in the wrong order,
y
ou risk causing malfunction
and/or dama
g
e to speakers and other devices
.
B
e
f
ore
y
ou turn on the power, check the
f
ollowing
.
Is t
h
e VP-550 correct
ly
connecte
d
to
y
our perip
h
era
l
equipment
?
Have you turned down the volume of the VP-550 and the connected audio system to the minimum set
-
tin
g
s
?
O
n the VP-550’s rear
p
anel, turn the [POWER] switch “on.”
ON OFF
This unit is e
q
ui
pp
ed with a
p
rotection circuit. A brief interval (a few seconds) after
p
ower u
p
is re-
q
uired be
f
ore the unit will operate normally.
Use t
h
e [VOLUME]
k
no
b
to a
d
just t
h
e vo
l
ume appropriate
ly
.
While
y
ou pla
y
the ke
y
board to produce sound, adjust the volume of the VP-550 and of the audio equip
-
ment
y
ou’ve connecte
d.
I
f
y
ou don’t hear sound, check the
f
ollowing
.
I
s t
h
e VP-550 correct
ly
connecte
d
to
y
our amp, spea
k
er, or
h
ea
d
p
h
ones?
T
h
e Voca
l
Designer part won’t pro
d
uce soun
d
w
h
en
y
ou p
l
a
y
t
h
e
k
e
yb
oar
d
un
l
ess
y
ou are voca
l
izing
in
to
the
mi
c.
➞
For details, refer to “Performing with Vocal Designer” (
➞
p
. 23)
I
f there’s no mic connected, try selecting an Ensemble part sound and playing it from the keyboard
(
➞
p. 28
).
*
1
.
2
.
*
3
.
•
•
•
/