Motorola Talkabout T6212 User manual
- Category
- Two-way radios
- Type
- User manual
This manual is also suitable for

Contents
Safety and General Information 1
Exposure to Radio Frequency Energy 1
Portable Radio Operations and EME Exposure 1
Antenna Care 1
Two-Way Radio Operation 1
Body-Worn Operation 2
Approved Accessories 2
Electromagnetic Interference/Compatibility 2
Medical Devices 2
Safety and General Use While Driving 3
Operational Warnings 3
Operational Cautions 3
Save these Instructions 4
Let’s Talk About Your New Radio 5
Batteries 5
To Install NiMH Battery 5
To Charge NiMH Battery 5
Using The Charging Dock 5
To Install AA Batteries 6
To Turn Radio On and Off 6
Battery Meter 6
Battery Type Selection 6
Belt Clip 6
Before You Can Talk 7
Change The Channel 7
Change The Code 7
To Communicate 7
Other Features 8
Talk Confirmation Tone 8
Ring Mode 8
Short Menu 8
Lock 8
Light 8
Alert Tones 8
Microphone Gain Edit 9
Call Tones 9
Auto Power Off (APO) 9
Reset 9
Time-out Timer 9
Hands-Free Use 10
Internal VOX 10
Scan 11
Selecting the Scan List 12
VibraCall
®
12
Voice Scrambler 12
Radio Etiquette 12
Talk Range 13
Troubleshooting 14
Specifications 15
Warranty Information 15
Copyright Information 17
English

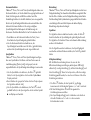
Safety and General Information
Important Information on Safe and Efficient Operation
Read This Information Before Using Your Radio
The information provided in this document supersedes the
general safety information contained in user guides published
prior to July 2000. For information regarding radio use in a
hazardous atmosphere please refer to the Factory Mutual (FM)
Approval Manual Supplement or Instruction Card, which is
included with radio models that offer this capability.
RF Operational Characteristics
Your radio contains a transmitter and a receiver. When it is
ON, it receives and transmits radio frequency (RF) energy.
The radio operates in the frequency range of 446.00625 MHz
to 446.09375 MHz.
Exposure To Radio Frequency Energy
Your Motorola radio is designed to comply with the following
national and international standards and guidelines regarding
exposure of human beings to radio frequency electromagnetic
energy:
• United States Federal Communications Commission,
Code of Federal Regulations; 47 CFR part 2 sub-part J
• American National Standards Institute (ANSI) / Institute of
Electrical and Electronic Engineers (IEEE) C95. 1-1992
• Institute of Electrical and Electronic Engineers (IEEE)
C95. 1-1999 Edition
• National Council on Radiation Protection and Measurements
(NCRP) of the United States, Report 86, 1986
• International Commission on Non-Ionizing Radiation
Protection (ICNIRP) 1998
• National Radiological Protection Board of the United Kingdom 1995
• Ministry of Health (Canada) Safety Code 6. Limits of Human
Exposure to Radio Frequency Electromagnetic Fields in the
Frequency Range form 3 kHz to 300 GHz, 1999.
To assure optimal radio performance and make sure human
exposure to radio frequency electromagnetic energy is within the
guidelines set forth in the above standards, always adhere to the
following procedures:
Portable Radio Operation and EME Exposure
Antenna Care
Use only the supplied or an approved replacement antenna.
Unauthorized antennas, modifications, or attachments could
damage the phone and may violate FCC regulations.
DO NOT hold the antenna when the radio is "IN USE". Holding
the antenna affects the effective range.
Two-Way Radio Operation
When using your radio as a traditional two-way radio, hold the
radio in a vertical position with the microphone two to three
inches (5.0 to 7.5 cm) away from the lips.
1 English

Body-Worn Operation
To maintain compliance with FCC RF exposure guidelines, if you
wear a radio on your body when transmitting, always place the
radio in a Motorola supplied or approved clip, holder, holster, case,
or body harness. Use of non-Motorola-approved accessories may
exceed FCC RF exposure guidelines. If you do not use a body-worn
accessory, ensure the antenna is at least one inch (2.5 cm) from
your body when transmitting.
Approved Accessories
For a list of approved Motorola accessories please refer to the
Motorola Original Accessories brochure for further details.
Electromagnetic Interference/Compatibility
Note: Nearly every electronic device is susceptible to electromagnetic
interference (EMI) if inadequately shielded, designed or
otherwise configured for electromagnetic compatibility.
Facilities
To avoid electromagnetic interference and/or compatibility
conflicts, turn off your radio in any facility where posted notices
instruct you to do so. Hospitals or health care facilities may be
using equipment that is sensitive to external RF energy.
Aircraft
When instructed to do so, turn off your radio when on board
an aircraft. Any use of a radio must be in accordance with
applicable regulations per airlines crew instructions.
Medical Devices
Pacemakers
The Health Industry Manufacturers Association recommends
that a minimum separation of 6 inches (15 centimeters) be
maintained between a handheld wireless radio and a pacemaker.
These recommendations are consistent with the independent
research by, and recommendations of, Wireless Technology Research.
Persons with pacemakers should:
• ALWAYS keep the radio more than six inches (15 centimeters)
from their pacemaker when the radio is turned ON.
• Not carry the radio in the breast pocket.
• Use the ear opposite the pacemaker to minimize the potential
for interference.
• Turn the radio OFF immediately if you have any reason to
suspect that interference is taking place.
Hearing Aids
Some digital wireless radios may interfere with some hearing
aids. In the event of such interference, you may want to consult
your hearing aid manufacturer to discuss alternatives.
Other Medical Devices
If you use any other personal medical device, consult the
manufacturer of your device to determine if it is adequately
shielded from RF energy. Your physician may be able to assist
you in obtaining this information.
2 English

3 English
Safety and General Use While Driving
Check the laws and regulations on the use of radios in the area
where you drive. Always obey them.
When using your radio while driving, please:
• Give full attention to driving and to the road.
• Hands-free operation must be used if the radio is to be
operated whilst driving.
• Pull off the road and park before making or answering a call
if driving conditions so require.
Operational Warnings
For Vehicles With and Air Bag
Do not place a portable radio in the area over an air bag or in the
air bag deployment area. Air bags inflate with great force. If a
portable radio is placed in the air bag deployment area and the
air bag inflates, the radio may be propelled with great force and
cause serious injury to occupants of the vehicle.
Potentially Explosive Atmospheres
Turn off your radio prior to entering any area with a potentially
explosive atmosphere, unless it is a radio type especially qualified
for use in such areas as "Intrinsically Safe" (for example, Factory
Mutual, CSA, or UL Approved). Do not remove, install, or charge
batteries in such areas. Sparks in a potentially explosive
atmosphere can cause an explosion or fire resulting in bodily
injury or even death.
Note: The areas with potentially explosive atmospheres referred
to above include fueling areas such as below decks on
boats, fuel or chemical transfer or storage facilities, areas
where the air contains chemicals or particles, such as
grain, dust or metal powders, and any other area where
you would normally be advised to turn off your vehicle
engine. Areas with potentially explosive atmospheres are
often but not always posted.
Blasting Caps and Areas
To avoid possible interference with blasting operations, turn
off your radio when you are near electrical blasting caps, in a
blasting area, or in areas posted: "Turn off two-way radio".
Obey all signs and instructions.
Operational Cautions
Antennas
Do not use any portable radio that has a damaged antenna. If
a damaged antenna comes into contact with your skin, a minor
burn can result.
Batteries
All batteries can cause property damage and/or bodily injury
such as burns if a conductive material such as jewelry, keys, or
beaded chains touch exposed terminals. The conductive material
may complete an electrical circuit (short circuit) and become
quite hot. Exercise care in handling any charged battery,
particularly when placing it inside a pocket, purse, or other
container with metal objects.

SAVE THESE INSTRUCTIONS
Before using the battery charger, read all instructions and
cautionary markings on, (1) the battery, (2) the battery charger,
and (3) the radio using the battery.
To reduce the risk of injury, only charge (E)NTN9395 rechargeable
batteries. Other types of batteries may burst, causing personal
injury and damage.
1. Do not expose the charger to rain or snow.
2. Do not operate the charger if it has received a sharp blow, or
has been dropped or damaged in any way.
3. Do not disassemble the charger. If it does not work properly
return it to the point of purchase if within 90 days of purchase.
Incorrect re-assembly may result in a risk of electric shock or fire.
4. Never alter the AC cord and plug provided with the unit. If
the plug will not fit the outlet, have proper outlet installed by
a qualified electrician. An improper condition can result in a
risk of electric shock.
5. To reduce the risk of damage to the cord or plug, pull by the
plug rather than the cord when disconnecting the charger from
the AC receptacle.
6. To reduce the risk of electric shock, unplug the charger from
the outlet before attempting any maintenance or cleaning.
7. Use of an attachment not recommended or sold by Motorola
TM
may result in a risk of fire, electric shock, or personal injury.
4 English

Let’s Talk About Your New Radio
Motorola
TM
Talkabout
TM
T6202, T6212 or T6222 two-way radios
allow you to stay in touch with your family and friends. They
operate on PMR446 frequencies. They can be used in any
country where PMR446 frequencies are authorized, subject to
applicable regulations.
Batteries
Talkabout
TM
T6202, T6212 and T6222 radios operate with either
three AA batteries or a Nickel-Metal Hydride (NiMH)
rechargeable battery.
The NiMH rechargeable battery, charger adapter cover, charger
and Charging Dock can be purchased separately.
To Install NiMH Battery:
1. Push clip upwards to remove battery cover.
2. Insert NiMH battery pack with charging contacts facing out.
3. Replace the battery cover by inserting the battery cover pegs
into the slots in the back of the radio, then press firmly until
battery cover clicks into place.
To Charge NiMH Battery:
The NiMH battery can be charged while in the radio or on its own
in the charger adapter cover. To get maximum use from the
battery, charge overnight (16 hours) before you use it for the first
time. Subsequent charges will only require four hours of
charging time.
1. Ensure the radio is off or place the NiMH battery in the
charger adapter cover.
2. Plug the charger into an AC wall socket.
3. Position the charger connector with the large hook over the
large slot to the right of the three battery contacts.
4. Push the large hook into the large slot, then snap the small
hook into the small slot.
5. The light on the charger will be red while the battery is charging
and will flash green when the battery is approximately 90%
charged. The green light will be on constantly when the battery
is fully charged.
6. To remove the charger pull gently out and up until the small
hook disengages and carefully remove the larger hook.
Note: If you notice the LED flashing red for more than a minute,
the battery is faulty and should be replaced.
Using The Charging Dock
The Charging Dock can be mounted or placed on any flat surface
(such as a wall or table). To mount the Charging Dock:
1. Wrap the power cord under the Charging Dock. Use the cutouts
to hold the cord in place.
2. Attach using two number 6 x
3
⁄4 screws appropriate for the
mounting surface.
To charge the NiMH battery using the Charging Dock:
1. Position the charger with the hook on the LED end over the left slot.
2. Snap the hook on the cord end into the right slot, clamping the
charger onto the Charging Dock contacts.
3. Plug the charger into an AC wall socket.
5 English
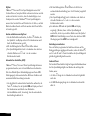
A
B
C
F
G
D
/
E

4. Place the radio, or the NiMH battery in the charger adapter
cover, into the Charging Dock until you hear a click.
5. When the LED turns green, the battery is fully charged.
To Install AA Batteries:
1. Push clip upwards to remove battery cover.
2. Insert 3 AA batteries into the AA battery tray so the + and –
markings match the ones in the compartment.
3. Replace the battery cover by inserting the battery cover pegs into
the slots in the back of the radio, then press firmly until battery
cover clicks into place.
To Turn Radio On and Off:
1. Press and hold down the P button until the radio is on. The
LED will be solid red, the display will turn on and an audible
alert will be heard (unless the Alert tones are disabled).
2. To turn the radio off, press and hold down the
P
button, the
radio will beep to confirm (when the Alert tones are enabled)
and the display will disappear.
Battery Meter:
The d icon, located on the LCD, is divided into three bars.
It shows d(full), b (two-thirds full), c(one-third full)
and a (almost empty). When it’s c, the radio beeps
every ten minutes.
Battery Type Selection:
To ensure that the Battery Meter icon is showing accurate battery
usage, the type of battery being used in your radio should be set,
in the Battery Type Selection Menu.
1. To enter the Battery Type Selection Menu, press the
\
button
until the d icon appears in the display. The channel number
will be replaced by a flashing A or n.
2. Use the up ] or down [ button to choose either A, if Alkaline
batteries are being used on or n, if NiMH or NiCd rechargeable
batteries are being used.
3. The radio will return to the normal operating mode after ten
seconds or when you quick-press M or R.
Note: Remove batteries before storing your radio for extended
periods. Batteries corrode over time and may cause
permanent damage to your radio.
Belt Clip:
Talkabout
TM
T6202, T6212 and T6222 radios come as standard
with a belt clip.
To Attach:
1. Holding the belt clip at the top and bottom, squeeze to retract
the hook.
2. Insert belt clip into slot on back of radio and release hold.
3. To remove, hold the belt clip at the top and bottom, squeeze
again to retract the hook and remove.
6 English
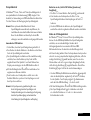
3
7
I
H
A
B
C
2
1
5/
6

Before You Can Talk
Read this manual carefully.
Talkabout
TM
T6202, T6212 and T6222 radios have 8 channels and
38 Interference Eliminator Codes. To talk to others, all radios in
your group must be set to the same channel and code.
Interference Eliminator Codes filter out static, noise and
unwanted messages on radio channels. You can only
communicate with radios using the same channel and code.
However, since radio channels can be monitored, conversations
are not private. To avoid congested channels, change the radio’s
channel/code setting. (Ensure all other radios in your group are
also changed to the same setting).
Select code 0 (carrier squelch) to monitor all activity on the channel.
Change The Channel:
1. Press the \ button once to enter the Channel Selection
Menu. The channel number will begin to flash.
2. Use the up ] or down [ buttons to select a new channel while
the channel number is flashing.
3. The radio will return to the normal operating mode after ten
seconds or when you quick-press M or R.
Change The Code:
1. Press the \ button twice to enter the Code Selection Menu.
2. The radio’s current code (small number) will begin to flash.
3. Use the up ] or down [ buttons to select a new code while
the number is flashing.
4. The radio will return to the normal operating mode after ten
seconds or when you quick-press M or R.
To Communicate
Adjust The Volume:
1. Press the up ] or down [ button to change the radio’s volume.
2. The V icon will appear and the display will show the current
volume level (from 1 to 20). The radio will beep to indicate
the volume level (when the Alert tones are enabled).
3.
The radio will return to normal operating mode after three seconds.
Caution:
Do not hold the radio too close to your ear when the volume
is at a high setting. This could cause hearing damage.
The Monitor/Signal Strength Indicator and Scan Button:
This button has three features, Monitor, Signal Strength Indicator
and Scan (Scan available on T6212 and T6222 radios only).
The Monitor feature is used to check activity on the current
channel before transmitting. When receiving, or if the channel is
busy, the radio LED will flash more frequently than normal.
The Signal Strength Indicator shows the level of any incoming
signal from 1 (weakest) to 6 (strongest).
Send Messages:
1. Check channel activity by a long press of the ) button. You’ll hear
static if the channel is clear to use. Don’t transmit if someone’s
talking on the channel.
2. The display will show the w icon and the channel number will
be replaced by a number showing the level of any incoming
signal from 1 (weakest) to 6 (strongest).
3. To maximize clarity, hold radio 5.0 to 7.5cms from your mouth.
4. Press the M button and speak into the radio. The LED glows
continuously when transmitting.
5. To receive message, release the
M
button.
8
7 English

Other Features
Talk Confirmation Tone:
Whenever you turn on the talk confirmation tone feature, your radio
transmits a unique tone when you finish transmitting, and sounds
the tone locally on your radio.
To enable or disable this feature press and hold the up ] button
as you turn on your radio.
Ring Mode:
Talkabout
TM
T6202 and T6212 radios allow you to select Ring alert
when receiving the first incoming transmission. Ring is then
suspended until 30 seconds after channel activity has finished.
To Select Ring:
1. Press the
\
button until the B icon appears
in the display.
2. The large channel number is replaced with a Y for enabled or
n for disabled.
3. Use the up ] or down [ button to select Y for enable.
4. The radio will return to the normal operating mode after ten
seconds or when you quick-press M or R.
Short Menu:
Talkabout
TM
T6202, T6212 and T6222 radios have a Short Menu
feature which allows you to limit the number of menus displayed
to Channel, Interference Eliminator Code and Call Tones. The
Channel Scan function is also disabled, to prevent accidentally
changing the radio’s mode of operation. When short menu is
enabled the only radio turn on sequence available is short menu
disable. The menu time-out time is increased to 60 seconds.
1. To activate the Short Menu, press and hold the \ button,
while turning the radio on.
2. To disable the Short Menu, turn the radio off, then press and
hold the \ button, while turning the radio on.
Lock:
Talkabout
TM
T6202, T6212 and T6222 radios have a Lock feature
which allows you to disable Menu, Scan and volume control (up
] and down [ buttons) so that the radio settings cannot be
changed accidentally.
1. To activate the Lock feature, press and hold the \ button, until
the lock enable alert sounds and the f icon appears on the display.
2. Disabled buttons will beep if pressed (when the Alert tones are enabled).
3. To disable the Lock feature, press and hold the \ button again
until the lock disable alert sounds and the f icon disappears.
Light:
Talkabout
TM
T6202, T6212 and T6222 radios have a backlit display for
use in low-light conditions. Press the R button briefly to illuminate the
display. The light will turn on for four seconds. Pressing any button will
start or extend the period of time for which the display is illuminated.
Alert Tones:
The Alert tones can be disabled by turning on the radio while
pressing the down [ button. Transmit Time-out Timer and low
battery alert tones are not disabled.
To re-activate the Alert tones, turn the radio off and then on again
while holding the down [ button.
8 English
6

Microphone Gain Edit:
Microphone Gain Edit allows you to select one of three
Microphone Gain settings (if VOX not enabled): low setting (1),
medium setting (2) and high setting (3). If you speak loudly, the
low setting should be selected, and if you speak softly, the high
setting should be selected.
1. Press the \ button until the g icon appears in the display
along with a flashing number 1,2 or 3.
2. Use the up ] and down [ buttons to switch between the levels.
3. The radios will return to the normal operating mode after ten
seconds or when you quick-press M or R.
Call Tones:
Talkabout
TM
T6202 and T6212 radios have five unique call tones
to identify each user and alert the others that you intend to
transmit. Talkabout
TM
T6222 radios has ten unique call tones.
Press the ^ button and all users on your channel and code will
be alerted with your Call Tone.
To Change and hear a Call Tone:
1. To enter the Call Tone Menu, press the \ button until the ^
icon appears in the display. The channel number will be
replaced by the call tone number.
2. Use the up ] or down [ buttons to change the Call Tone.
3. The radio will return to the normal operating mode after ten
seconds or when you quick-press M or R.
Auto Power Off (APO):
Talkabout
TM
T6202, T6212 and T6222 radios can be programmed to
turn themselves off after a certain period of inactivity (no button
presses or VOX transmissions). This feature is used to prevent
unwanted battery usage.
1. To enter the Auto Power Off Menu, press the \ button until
the APO icon appears in the display. The channel number will
be replaced by a flashing horizontal bar which means Auto
Power Off is disabled.
2. Use the up ] or down [ button to change the Auto Power Off
time setting (from 1 to 8 hours).
3. The radio will return to the normal operating mode after ten
seconds or when you quick-press M or R.
4. If APO is enabled the APO icon will be shown in the display. For
five minutes before the radio turns off, the radio will periodically
emit a tone warning and the APO icon will flash. Any button
press activity or VOX transmission will reset the APO timer.
Reset:
Holding down the \ and M button,or h and M button,
while turning the radio on will reset the user programmable
features back to the factory settings.
Time-out Timer:
The Time-out Timer feature helps extend battery life. The radio
will emit a warning tone and will stop transmitting if:
1. The M button is pressed for more than 60 continuous
seconds.
2. VOX transmission is active for more than 60 continuous seconds.
4
9 English

Hands-Free Use:
Talkabout
TM
T6202, T6212 and T6222 radios have built-in Voice
Activated Transmission (VOX) capability. This means the sound
of your voice activates transmission when the radio is used with
a VOX audio accessory.
Note: When using optional audio accessories with your radio, we
recommend that the volume level be kept at a comfortable
listening level. Before you place the accessory on your
head or in your ear, turn the volume down.
To Use VOX Feature:
1. Ensure radio is turned off.
2. Plug the audio accessory’s connector into the jack on the left
hand side of the radio.
3. Turn the radio on and lower volume before placing accessory
on head or in ear. The flashing g icon will appear on the
display to indicate that the VOX feature is active.
4. Use the up ] or down [ button to adjust volume to a
comfortable level.
5. To transmit, speak into the accessory microphone. To receive,
stop talking.
Note: There will be a brief delay between when you start talking
and the radio transmitting, and a longer delay between
when you stop talking and the radio going back to receive,
to allow for speech pauses.
Reset to Push-To-Talk Mode:
1. Press
M
button once. The g icon will disappear.
2. To transmit, press the M button on the radio. To receive,
release the M button.
3. To return to VOX mode, turn the radio off, then on again with
the accessory in place.
To Select VOX Sensitivity:
Talkabout
TM
T6202, T6212 and T6222 radios allow you to adjust
the VOX sensitivity of the radio to compensate for varying levels
of background noise and speech. The VOX edit mode allows you
to choose between high, medium and low settings. For example
if you speak loudly, or are in a noisy environment, the low setting
(1) should be selected and if you speak softly, or are in a quiet
environment, the high setting (3) should be selected. The
middle setting (2) is suitable for most applications.
1. To enter the VOX sensitivity menu, ensuring the audio
accessory is in place, press the \ button until the g icon
appears on the display. The channel number will be replaced
with VOX setting 1, 2, or 3.
2. Use the up ] or down [ button to change the VOX setting, if
required.
3. The radio will return to the normal operating mode after ten
seconds or when you quick-press M or R.
Internal VOX
Talkabout
TM
T6212 and T6222 radios also have built in Internal
Voice Operated Transmission capability. This is a similar
function to the VOX because the sound of your voice activates
transmission, but no external accessories are needed.
10 English

To Select The Internal VOX Feature:
Either
1. Press the \ button until the flashing g icon appears in the
display and the channel number is replaced with Y (enabled) or n
(disabled). Use the up ] or down [ button to select Y for enable.
2. The radio will return to the normal operating mode after ten
seconds or when you quick-press M or R. The g icon remains
in the display.
OR
1. Ensure radio is turned off.
2. Press and hold down the M button and switch on the radio
using the Power button. The g icon will be shown on the display.
To Use The Internal VOX Feature:
1. Quickly press and release the M button and the g icon will
begin to flash. Your radio will now transmit every time you talk.
2. Quick press M switches radio between muted and active
VOX modes.
3. To disable the Internal VOX feature, go into Internal VOX
Selection Menu and use the up ] or down [ button to select
n for disable. Or switch the radio off and then back on again.
To Select Internal VOX Sensitivity:
Talkabout
TM
T6212 and T6222 radios allow you to adjust the
Internal VOX sensitivity of the radio to compensate for varying
levels of background noise and speech. The Internal VOX edit
mode allows you to choose between high, and low settings. For
example if you speak loudly, or are in a noisy environment, the
low setting (1) should be selected and if you speak softly, or are
in a quiet environment, the high setting (3) should be selected.
The middle setting (2) is suitable for most applications.
1. To enter the Internal VOX sensitivity menu, ensuring the g icon
is showing on the display, press the \ button until the channel
number is replaced with an Internal VOX setting of 1, 2 or 3.
2. Use the up ] or down [ button to change the Internal VOX
setting, if required.
3. The radio will return to the normal operating mode after ten
seconds or when you quick-press M or R.
Scan:
Talkabout
TM
T6212 and T6222 radios have Scan feature which allows
you to monitor other transmitting radios. It allows you to listen and
talk back to the person(s) without having to switch channels.
Normal scan will only “land” on a channel if the Interference
Eliminator Code matches the one you set for that channel.
Carrier Squelch scan will “land” on a channel if any activity is
detected. The radio will do the Carrier Squelch scan if you set the
Interference Eliminator Code to 0 for the original channel (the
channel being used before going to Scan mode).
1. To begin scanning, quick-press the ) button. The h icon
will appear in the display and the channel numbers are
scrolled through.
2. When the radio detects channel activity, the display will indicate
the channel and code on which the activity is taking place (code
will show 0 if the radio is in Carrier Squelch Scan and “lands”
on a channel where the incoming signal does not contain an
Interference Eliminator Code).
3. Pressing the M or ) button while the radio is scanning will
result in transmit/monitor operation on the original channel.
4. To exit Scan, short press the ) button again, the display will
show the original Channel and Code number and the h icon
will disappear.
11 English

Selecting The Scan List:
Talkabout
TM
T6212 and T6222 radios allow you to select which
channels are to be scanned. The radio can be programmed to scan
specific channels by turning them on or off in the Scan List Menu.
1. To enter the Scan List Menu, press the \ button until the h
icon appears on the display. The current code number will be
replaced with a flashing Y for yes or n for no.
2. Press the ) button to select whether or not a channel will be
scanned. Select Y for yes and n for no.
3. Press the up ] or down [ button to change channels.
4. The radio will return to the normal operating mode after ten
seconds or when you quick-press M or R.
VibraCall
®
Mode:
Talkabout
TM
T6222 radios allow you to choose between Ring
and/or VibraCall
®
alert when receiving the first incoming
transmission. Ring and/or VibraCall
®
are then suspended until
30 seconds after channel activity has finished.
To Select Ring and/or VibraCall
®
Mode:
1. Press
\
button until the B and/or i icons appear in the
display (depending on the current setting).
2. The large channel number is replaced with a – or number 1, 2 or 3.
3. Use the up ] or down [ button to switch between the
following settings.
– = Neither Ring or VibraCall
®
Mode (both icons flashing)
1 = VibraCall Mode
®
2 = Ring Mode
3 = Both Ring and VibraCall
®
Mode
4. The radio will return to the normal operating mode after ten
seconds or when you quick-press M or R.
Voice Scrambler:
Talkabout
TM
T6222 radios have a Voice Scrambler feature. This
feature allows additional privacy for user’s transmission. To
receive a scrambled transmission, radios must have matching
channels, codes and scramble codes. We recommend that you
check and follow any applicable regulations in your country
before using this feature.
To Select Scrambler:
1. Press \ button until the e icon appears in the display and
the channel number is replaced by a horizontal bar.
2. To choose Scrambler, press the up ] or down [ button until
1 appears in the channel position.
3. To disable Scrambler, press the up ] or down [ button until
the horizontal bar appears.
4. The radio will return to the normal operating mode after ten
seconds or when you quick-press M or R.
Radio Etiquette
Your radio’s 8 channels are shared on a "take turn" basis. This
means other groups may be talking on the channels. For
uninterrupted communications, follow the steps below:
1. Use the ) button to check activity on the channel before talking.
2. Don’t talk over someone who is already using the channel - your
message may not be completely heard. Try changing the Channel
and Interference Eliminator Code to avoid channel congestion.
Note: Since the channels are shared, your conversations will not be
private and you may hear others talking.
12 English

Talk Range
Talkabout
TM
T6202, T6212 and T6222 radios have been designed
to maximize performance and improve transmission range in
the field. It is recommended that you do not use the radios
closer than 1.5 meters apart because of heavy interference.
Talk range depends on the terrain. These are line of sight
radios and talk range will be affected by concrete structures,
heavy foliage and operating radios indoors and in vehicles.
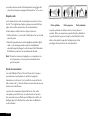
Optimal Range Medium Range Minimal Range
Optimal range occurs in flat, open areas with up to 3 kilometres of
coverage. Medium range occurs when buildings and trees are in
the way. Minimal range occurs when dense foliage and mountains
obstruct the communication path.
13 English

Troubleshooting
Problem Solution
No Power Reposition or replace AA batteries.
Recharge or replace NiMH battery pack.
Message Not Transmitted Make sure the Push-To-Talk button is completely pressed as you transmit. Reposition or replace batteries
Message Not Received Confirm radios have the same Channel and Interference Eliminator Code settings. Make sure Push-To-Talk
button is not inadvertently being pressed. Reposition or replace batteries. Obstructions, operating
indoors, or in vehicles may interfere with communication. Change your location. Check to make sure
volume is turned up.
Message scrambled Scramble code is on or setting doesn’t match other radios; all radios must use the same scramble code.
Hearing Other Conversation or Confirm Interference Eliminator Code is set, (active settings are 1-38).
Noise on a Channel Shared Channel or Interference Eliminator Code may be in use, try another.
Limited Talk Range Steel/concrete structures, heavy foliage, and use in buildings and in vehicles will decrease range, check for
clear line of sight to improve transmission. Wearing radio close to body such as in a pocket or on a belt
will decrease range, change location of radio.
Heavy Static or Interference Radios too close together. Radios must be at least 1.5 metres apart, increase your distance. Radios too far
apart. Obstacles interfere with transmission. Talk range is up to 3 kilometres in clear, unobstructed
conditions.
Cannot change channel/ Make sure radio is unlocked.
code settings
Cannot access all menus Verify whether short menu is activated. Disable short menu by pressing \ while turning on the radio
Low batteries Recharge NiMH battery pack or replace AA batteries. Extreme operating temperatures will affect the life of
the battery.
Charger LED double flashing Charger not properly positioned. Reposition charger and ensure it is firmly clamped to the radio, battery,
or charging dock. Battery power is very low; battery is charging up slowly before it starts to quick charge.
Motorola Product Services: If the radio still doesn’t work properly, contact your place of purchase.
14 English

Specifications:
Description Specs
Channels 8
Codes 38
Operating Frequency 446.00625-446.09375 MHz
Talk Range Up to 3 kilometres
Power Source 3 AA Batteries or NiMH Battery pack.
Battery Life*: AA** NiMH
Continuous Talk Time 8.2 Hours 2.4 Hour
Standby Time 130 Hours 39 Hours
* Typical
** With premium quality alkaline cells. Battery life with third party
AA NiMH/NiCd cells can vary.
Warranty Information
Motorola guarantees to you, the original purchaser, the Personal
Communicator and accessories which you have purchased from
an authorised Motorola dealer. Retailer or distributor (the
"Products"), to be in conformance with the applicable Motorola
specifications current at the time of manufacture for a term of [1]
year from date of purchase of the Product(s) (Warranty Term).
You must inform Motorola of the lack of conformity to the applicable
specifications of any of the Products within a period of two (2)
months from the date on which you detect a defect in material,
workmanship or lack of conformity and in any event within a term
not to exceed the Warranty Term, by submitting the Product for
service to Motorola or the distributor. Motorola shall not be bound
by Product related statements not directly made by Motorola.
A list of the Motorola Call Centre numbers is enclosed with this Product.
During the Warranty term, Motorola will, at its discretion and
without extra charge, as your exclusive remedy, repair or replace
your Product which does not comply with this warranty; or failing
this, to reimburse the price of the Product but reduced to take into
account the use you have had of the Product since it was delivered.
This warranty will expire at the end of the Warranty Term.
This is the complete and exclusive warranty for a Motorola
Personal Communicator and accessories and in lieu of all other
warranties, terms and conditions, whether express or implied.
Where you purchase the product other than as a consumer, Motorola
disclaims all other warranties, terms and conditions express or
implied, such as fitness for purpose and satisfactory quality.
In no event shall Motorola be liable for damages in excess of the
purchase price nor for any incidental special or consequential
damages* arising out of the use or inability to use the Product,
to the full extent such may be disclaimed by law.
This Warranty does not affect any statutory rights that you may
have if you are a consumer, such as a warranty of satisfactory
quality and fit for the purpose for which products of the same
type are normally used under normal use and service, nor any
rights against the seller of the Products arising from your
purchase and sales contract.
(*) including without limitation loss of use, loss of time,
inconvenience, commercial loss, lost profits or savings.
15 English

How to Get Warranty Service?
In most cases the authorised Motorola retailer which sold your
Motorola Personal Communicator and original accessories will
honour a warranty claim and/or provide warranty service.
Alternatively, for further information on how to get warranty
service please contact Motorola’s call centre at the telephone
numbers below for your country.
In order to claim the warranty service you must return the
Personal Communicator to Motorola or the distributor. The
Product should also be accompanied by a label with your name,
address, telephone number; and a description of the problem.
In order to be eligible to receive warranty service, you must
present your receipt of purchase or a comparable substitute
proof of purchase bearing the date of purchase. The Personal
Communicator should also clearly display the serial number.
Such information is contained with the Product.
Conditions
This warranty will not apply if the type or serial numbers on the
Product has been altered, deleted, removed, or made illegible.
Motorola reserves the right to refuse free-of-charge warranty
service if the requested documentation can not be presented or
if the information is incomplete, illegible or incompatible with
the factory records.
Repair, at Motorola's option, may include the replacement of parts
or boards with functionally equivalent, reconditioned or new parts
or boards. Replaced parts, accessories, batteries, or boards are
guaranteed for the balance of the original warranty time period.
The Warranty Term will not be extended. All original accessories,
batteries, parts, and Personal Communicator equipment that have
been replaced shall become the property of Motorola. Motorola
does not warrant the installation, maintenance or service of the
products, accessories, batteries or parts.
Motorola will not be responsible in any way for problems or
damage caused by any ancillary equipment not furnished by
Motorola, which is attached to or used in connection with the
Products, or for operation of Motorola equipment with any
ancillary equipment and all such equipment is expressly excluded
from this warranty.
When the Product is used in conjunction with ancillary or
peripheral equipment not supplied by Motorola, Motorola does
not warrant the operation of the Product/peripheral combination
and Motorola will not honor any warranty claim where the
Product is used in such a combination and it is determined by
Motorola that there is no fault with the Product. Motorola
specifically disclaims any responsibility for any damage, whether
or not to Motorola equipment, caused in any way by the use of
the Personal Communicator, accessories and peripherals
(specific examples include, but are not limited to: batteries,
chargers, adapters, and power supplies) when such accessories
and peripherals are not manufactured and supplied by Motorola.
What Is Not Covered By The Warranty
This warranty is not valid if the defects are due to damage,
misuse, tampering, neglect or lack of care and in case of
alterations or repair carried out by unauthorised persons.
1. Defects or damage resulting from use of the Product in
other than its normal and customary manner.
2. Defects or damage from misuse, accident or neglect.
16 English

3. Defects of damage from improper testing, operation,
maintenance, adjustment, or any alteration or modification
of any kind.
4. Breakage or damage to aerials unless caused directly by
defects in material or workmanship.
5. Products disassembled or repaired in such a manner as to
adversely affect performance or prevent adequate inspection
and testing to verify any warranty claim.
6. Defects or damage due to range.
7. Defects or damage due to moist, liquid or spills of food.
8. All plastic surfaces and all other externally exposed parts that
are scratched or damaged due to customer normal use.
9. Products rented on a temporary basis.
10.Periodic maintenance and repair or replacement of parts due
to normal wear and tear;
Note: The talk-time, stand-by time and total life cycle of
a Motorola rechargeable battery for your Personal
Communicator will depend on usage conditions. As a
consumable product, the specifications indicate that you
should be able to obtain optimum performance for your
Motorola Personal Communicator within the first six
months from date of purchase and up-to (200) charges.
The warranty for Motorola rechargeable batteries becomes
void if (i) the batteries are charged other than by Motorola
approved battery chargers specified for the charging of the
battery, (ii) any of the seals on the battery are broken or
show evidence of tampering, (iii) the battery is used in
equipment or service other than the equipment for which
it is specified.
Copyright Information
The Motorola products described in this manual may
include copyrighted Motorola programs, stored semiconductor
memories or other media. Laws in the United States and other
countries preserve for Motorola, certain exclusive rights for
copyrighted computer programs, including the exclusive right
to copy or reproduce in any form, the copyrighted Motorola
programs. Accordingly, any copyrighted Motorola computer
programs contained in the Motorola products described in this
manual may not be copied or reproduced in any manner without
express written permission of Motorola. Furthermore, the
purchase of Motorola products shall not be deemed to grant
either directly or by implication, estoppel, or otherwise, any
license under the copyrights, patents or patent applications of
Motorola, except for the normal non-exclusive royalty free license
to use that arises by operation of law in the sale of a product.
For more information call:
Within the UK: 01256 484100
Outside the UK: +44 1256 484100
, MOTOROLA are trademarks of Motorola Inc.
Talkabout is a trademark of Motorola Inc.
© 2001 Motorola Inc.
17 English
Page is loading ...
Page is loading ...
Page is loading ...
Page is loading ...
Page is loading ...
Page is loading ...
Page is loading ...
Page is loading ...
Page is loading ...
Page is loading ...
Page is loading ...
Page is loading ...
Page is loading ...
Page is loading ...
Page is loading ...
Page is loading ...
Page is loading ...
Page is loading ...
Page is loading ...
Page is loading ...
Page is loading ...
Page is loading ...
Page is loading ...
Page is loading ...
Page is loading ...
Page is loading ...
Page is loading ...
Page is loading ...
Page is loading ...
Page is loading ...
Page is loading ...
Page is loading ...
Page is loading ...
Page is loading ...
Page is loading ...
Page is loading ...
Page is loading ...
Page is loading ...
Page is loading ...
Page is loading ...
Page is loading ...
Page is loading ...
Page is loading ...
Page is loading ...
Page is loading ...
Page is loading ...
Page is loading ...
Page is loading ...
Page is loading ...
Page is loading ...
Page is loading ...
Page is loading ...
Page is loading ...
Page is loading ...
Page is loading ...
Page is loading ...
Page is loading ...
Page is loading ...
Page is loading ...
Page is loading ...
-
 1
1
-
 2
2
-
 3
3
-
 4
4
-
 5
5
-
 6
6
-
 7
7
-
 8
8
-
 9
9
-
 10
10
-
 11
11
-
 12
12
-
 13
13
-
 14
14
-
 15
15
-
 16
16
-
 17
17
-
 18
18
-
 19
19
-
 20
20
-
 21
21
-
 22
22
-
 23
23
-
 24
24
-
 25
25
-
 26
26
-
 27
27
-
 28
28
-
 29
29
-
 30
30
-
 31
31
-
 32
32
-
 33
33
-
 34
34
-
 35
35
-
 36
36
-
 37
37
-
 38
38
-
 39
39
-
 40
40
-
 41
41
-
 42
42
-
 43
43
-
 44
44
-
 45
45
-
 46
46
-
 47
47
-
 48
48
-
 49
49
-
 50
50
-
 51
51
-
 52
52
-
 53
53
-
 54
54
-
 55
55
-
 56
56
-
 57
57
-
 58
58
-
 59
59
-
 60
60
-
 61
61
-
 62
62
-
 63
63
-
 64
64
-
 65
65
-
 66
66
-
 67
67
-
 68
68
-
 69
69
-
 70
70
-
 71
71
-
 72
72
-
 73
73
-
 74
74
-
 75
75
-
 76
76
-
 77
77
-
 78
78


Motorola Talkabout T6212 User manual
- Category
- Two-way radios
- Type
- User manual
- This manual is also suitable for
Ask a question and I''ll find the answer in the document
Finding information in a document is now easier with AI
in other languages
Related papers
-
Motorola PMLN6393 Series User manual
-
-
-
Motorola M900 Reference guide
-
-
-
-
-
Motorola XV1100 - XTN Series VHF User manual
-
Other documents
-
Uniden GMR3050-2C Owner's manual
-
 Motorola Solutions RDU4100 User manual
-
Uniden SX-409-3CKEM Owner's manual
-
-
-
Uniden SX237 Owner's manual
-
Logicom FX 200 Owner's manual
-
Midland G9 Pro Funkgerät, Single, 16 PMR + 69 LPD Owner's manual
-
-
