Page is loading ...

◄ Seite 1 ►
CONSOLE TYPE
AIR CONDITIONING SYSTEMS
• USER’S MANUAL
• ΕΓΧΕΙΡΙΔΙΟ ΧΡΗΣΗΣ
• MANUAL UTILIZATORULUI
• BENUTZERHANDBUCH
ENGLISH | ΕΛΛΗΝΙΚΑ | ROMANA | DEUTSCH
MODELS:
LV6LI-12WiFiR
LV6LI-18WiFiR

◄ Page 2 ►
Table of Contents
Owner’s Manual
Safety Precautions .................................................. 04
Indoor Unit Parts and Major Functions ................ 06
Manual Operations ................................................. 09
1
2
3
SAFETY
FIRST

◄ Page 3 ►
Troubleshooting ............................. 13
a. Common Problems .................. 13
b. Troubleshooting Tips ............... 14
Care and Maintenance ....................................10
a.Unit Maintenance ...................................... 10
b.How to Clean the Air Filter ....................... 10
c.Repairing Refrigerant Leaks ..................... 12
d.Preparation for Periods of Non-use .........12
European Disposal Guidelines.. .................... 16
5
4
6
Caution: Risk of re/
ammable materials
WARNING: Servicing shall only be performed as recommended by the equipment manufacturer. Maintenance
and repair requiring the assistance of other skilled personnel shall be carried out under the supervision of the
person competent in the use of ammable refrigerants. For more details, please refer to the Information on
servicing on INSTALLATION MANUAL. (This is only required for the unit adopts R32/F290 Refrigerant.)

◄ Page 4 ►
1
Safety Precautions
WARNING
CAUTION
Thank you for purchasing this air conditioner. This manual will provide you with information on
how to operate, maintain, and troubleshoot your air conditioner. Following the instructions will
ensure the proper function and extended lifespan of your unit.
Please pay attention to the following signs:
Failure to observe a warning may result in death. The appliance must
be installed in accordance with national regulations
Failure to observe a caution may result in injury or equipment damage.
WARNING
• Ask an authorized dealer to install this air con-
ditioner. Inappropriate installation may cause
water leakage, electric shock, or re.
• The warranty will be voided if the unit is not
installed by professionals.
• If abnormal situation arises (like burning smell),
turn o the power supply and call your dealer
for instructions to avoid electric shock, re or
injury.
• DO NOT let the indoor unit or the remote con-
trol get wet. It may cause electric shock or re.
• DO NOT insert ngers, rods or other objects
into the air inlet or outlet. This may cause injury,
since the fan may be rotating at high speeds.
• DO NOT use a ammable spray such as hair
spray, lacquer or paint near the unit. This may
cause re or combustion.
• Do not use means to accelerate the defrosting
process or to clean, other than those recom-
mended by the manufacturer.
• The appliance shall be stored in a room without
continuously operating ignition sources (for ex-
ample: open ames, an operating gas appliance
or an operating electric heater).
• The appliance shall be stored so as to prevent
mechanical damage from occurring.
• Be aware that the refrigerants may not contain
an odour.
• Compliance with national gas regulations shall
be observed.
• Keep ventilation openings clear of obstruction.
NOTE: The following informations are required
for the units adopt RB2/R290 Refrigerant.
• DO NOT pierce or burn.
• A warning that the appliance shall be stored
in a well-ventilated area where the room size
corresponds to the room area as specied for
operation.
• Any person who is involved with working on
or breaking into a refrigerant circuit should
hold a current valid certicate from an indus-
try-accredited assessment authority, which
authorises their competence to handle refrig-
erants safely in accordance with an industry
recognised assessment specication.
• Servicing shall only be performed as recom-
mended by the equipment manufacturer.
Maintenance and repair requiring the assis-
tance of other skilled personnel shall be carried
out under the supervision of the person com-
petent in the use of ammable refrigerants.
• If the supply cord is damaged, it must be re-
placed by the manufacturer, its service agent or
similarly qualied persons in order to avoid a
hazard.

◄ Page 5 ►
CAUTION
• DO NOT touch the air outlet while the swing
ap is in motion. Fingers might get caught or the
unit may break down.
• DO NOT inspect the unit by yourself. Ask an
authorized dealer to perform the inspection.
• To prevent product deterioration, do not use
the air conditioner for preservation purposes
(storage of food, plants, animals, works of art,
etc.).
• DO NOT touch the evaporator coils inside the
indoor unit. The evaporator coils are sharp and
may cause injury.
• DO NOT operate the air conditioner with wet
hands. It may cause electric shock.
• DO NOT place items that might be aected
by moisture damage under the indoor unit.
Condensation can occur at a relative humidity of
80%.
• DO NOT expose heat-producing appliances to
cold air or place them under the indoor unit.
This may cause incomplete combustion or
deformation of the unit due to the heat.
• After long periods of usage, check the indoor
unit to see if anything is damaged. If the indoor
unit is damaged, it may fall and cause injury.
• If the air conditioner is used together with other
heating devices, thoroughly ventilate the room
to avoid oxygen deciency.
• DO NOT climb onto or place objects on top of
the outdoor unit.
• DO NOT operate the air conditioner when
using fumigant insecticides. The chemicals may
become layered with the unit and endanger
those who are hypersensitive to chemicals.
• DO NOT let children play with the air
conditioner.
• DO NOT operate the air conditioner in a wet
room (e.g. bathroom or laundry room). This can
cause electrical shock and cause the product to
deteriorate.
• This appliance can be used by children aged
from 8 years and above and persons with
reduced physical, sensory or mental capabilities
or lack of experience and knowledge if they
have been given supervision or instruction
concerning use of the appliance in a safe way
and understand the hazards involved. Children
shall not play with the appliance. Cleaning
and user maintenance shall not be made by
children without supervision.
• The appliance shall be installed in accordance
with national wiring regulations.
• The indoor unit must be installed 2,5m above
oor.
• An all-pole disconnection device which has at
least 3mm separation distance in all pole and a
residual current device (RCD) with the rating of
above 10mA shall be incorporated in the xed
wiring according to the national rule.

◄ Page 6 ►
2
Indoor Unit Parts And Major Functions
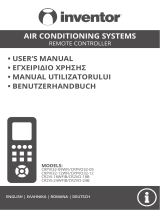
Unit Parts
• when Wireless Control feature is activated
(some units)
Unit Specications and Features
Indoor unit display
NOTE:
This display panel on the indoor unit can be used to operate the unit in case the remote contr
ol
has been misplaced or is out of batteries.
Drain hose
Refrigerant
connecting
pipe
Display panel
Air inlet (with air filter in it)
Air flow louver (at air outlet)
Air flow louver (at air outlet)
Display panel
• Displays temperature and Error codes:
“ ” when defrosting(for model B cooling &
heating units)
“ ” for 3 seconds when:
• TIMER ON is set
• SWING or SILENCE is turned on
“ ” for 3 seconds when:
• TIMER OFF is set
• SWING or SILENCE is turned off
“ ” when unit is self-cleaning
“ ” when 8 C heating feature is turned on
• When ECO function(some units) is activated.

◄ Page 7 ►
COOL Mode HEAT Mode DRY Mode
Indoor
Temperature
16-32°C
(62-90°F)
0-30°C
(32-86°F)
10-32°C
(50-90°F)
Outdoor
Temperature
0-50°C
(32-122°F)
-15-24°C
(5-75°F)
0-50°C
(32-122°F)
-15-50°C
(5-122°F)
(low temperature
cooling models)
Operating Conditions
Use the system under the following temperatures for safe and eective operation. If the air condi-
tioner is used under dierent conditions, it may malfunction or become less ecient.
Features
Default Setting
When the air conditioner restarts after a pow-
er failure, it will default to the factory settings
(AUTO mode, AUTO fan, 24°C (76°F)). This may
cause inconsistencies on the remote control
and unit panel. Use your remote control to
update the status.
Auto-Restart
In case of power failure, the system will immedi-
ately stop. When power returns, the Operation
light on the indoor unit will ash. To restart the
unit, press the ON/OFF button on the remote
control. If the system has an auto restart func-
tion, the unit will restart using the same settings.
Louver Angle Memory Function
Some models are designed with a louver angle
memory function. When the unit restarts after a
power failure, the angle of the horizontal louvers
will automatically return to the previous position.
The angle of the horizontal louver should not be
set too small as condensation may form and drip
into the machine. To reset the louver, press the
manual button, which will reset the horizontal
louver settings.
Refrigerant Leak Detection System
In the event of a refrigerant leak, the LCD screen will
display “EC” or ‘’ELoC’’ and the LED indicator light will
ash.

◄ Page 8 ►
Energy Saving Tips
• DO NOT set the unit to excessive temperature levels.
• While cooling, close the curtains to avoid direct sunlight.
• Doors and windows should be kept closed to keep cool or warm air in the room.
• DO NOT place objects near the air inlet and outlet of the unit. This will reduce the eciency of the unit.
• Set a timer and use the built-in SLEEP/ECONOMY mode if applicable.
• If you don’t plan to use the unit for a long time, remove the batteries from the remote control.
• Clean the air lter every two weeks. A dirty lter can reduce cooling or heating eciency.
• Adjust louvers properly and avoid direct airow.
Closing curtains during heating also
helps keep the heat in
Doors and windows should be kept
dosed

◄ Page 9 ►
3
Manual Operations
Lower air louver switch setting
Under the condition of meeting the ambient
temperature, the lower air louver can be opened
when the unit is turned on.
To select whether the lower air louver is on or
off, use the button on the electric control box.
Within 10 minutes of power-on, press it for
5 seconds to enter the mode in standby state.
Press it to open or close the lower air louver.
NOTE: During the setting process, the display
panel displays the switch status of the lower air
louver.
on - open
of - closed
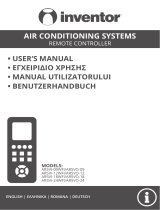
Adjusting Air Flow Direction
CAUTION
Do not try to adjust the horizontal louver by
hand. This may cause damage the
mechanism and result in condensation
forming on the air outlets.
Manual Swing: Press Air Direction to x the
louver at a desired angle.The louver swings
(upward or downward) at a different angle
with each press of the button.
The air direction can be changed by
manually adjusting air louver.
When cooling
Adjust the louver downwards (horizontally).
When heating
Adjust the louver vertically.
•
•
•
•
Electric control box
Air louver button

◄ Page 10 ►
4
Care And Maintenance
Safety Precautions
How To Clean The Air Filter
Unit Maintenance
• Contact an authorized service technician for repair
or maintenance. Improper repair and mainte-
nance may cause water leakage, electrical shock,
or re, and may void your warranty.
• DO NOT substitute a blown fuse with a higher
or lower amperage rated fuse, as this may cause
circuit damage or an electrical re.
• Make sure the drain hose is set up according to
the instructions. Failure to do so could cause leak-
age and result in personal property damage, re,
and electric shock.
• Make sure that all wires are connected properly.
Failure to connect wires according to instructions
can result in electrical shock or re.
NOTE: In households with animals, you will have
to periodically wipe down the grille to prevent
animal hair blocking airow.
The lter prevents dust and other particles from en-
tering the indoor unit. Dust buildup can reduce the ef-
ciency of the air conditioner. For optimum eciency,
clean the air lter every two weeks or more frequently
if you live in a dusty area. Replace the lter with a new
one if it’s heavily clogged and unable to be cleaned.
BEFORE CLEANING OR
MAINTENANCE
• Always turn o your air conditioning system and
disconnect the power supply before cleaning or
maintenance.
• DO NOT use chemicals or chemically treated
cloths to clean the unit.
• DO NOT use benzene, paint thinner, polishing
powder or other solvents to clean the unit. They
can cause the plastic surface to crack or deform.
• DO NOT wash the unit under running water. Do-
ing so creates an electrical hazard.
• DO NOT use water hotter than 40°C (104°F) to
clean the front panel. This can cause the panel to
become deformed or discolored.
• Clean the unit using a damp, lint-free cloth and
neutral detergent. Dry the unit with a dry, lint-free
cloth.
WARNING: DO NOT REMOVE
OR CLEAN THE FILTER BY
YOURSHELF
Removing and cleaning the lter can be danger-
ous. Removal and maintenance must be per-
formed by a certied technician.
1. Pull the left and right handles of the front panel ,
pull the panel outward, and open the panel.
2. Remove the air lter. Press the claws on the right
and left sides of the air lter down slightly, then
pull upward.
3. Hold the tabs of the frame,and remove the 4
claws. (The special function lter can be washed
with water once every 6 months. It is recom-
mended that you replace it once every 3 years.)
Air freshening lter

◄ Page 11 ►
4. Remove the air lter.
5. Clean the air lter by vacuuming the surface or
washing it in warm water with mild detergent.
A. If using a vacuum cleaner, the inlet side should
face the vacuum.
6. Rinse the lter with clean water and allow it to air-
dry. DO NOT let the lter dry in direct sunlight.
7. Reinstall the lter.
B. If using water, the inlet side should face down
and away from the water stream.
Fig. 4.4
Fig. 4.5
Replace internal parts
CAUTION
• Before changing the lter or cleaning, turn o
the unit and disconnect its power supply.
• When removing lter, do not touch metal parts
in the unit. The sharp metal edges can cut you.
Do not use water to clean the inside of the indoor
unit. This can destroy insulation and cause
electrical shock.
Do not expose lter to direct sunlight when
drying. This can shrink the lter.
• Any maintenance and cleaning of outdoor unit
should be performed by an authorized dealer
or a licensed service provider.
• Any unit repairs should be performed by an
authorized dealer or a licensed service provider.
1. Pull the left and right handles of the front panel ,
pull the panel outward, and open the panel.
2. Remove the 7 screws on the face frame.
3. Buckle up the snap indicated by the arrow and
remove the face frame.
4. Replace internal parts.
5. Install the face frame and panel parts.

◄ Page 12 ►
WARNING
• If the refrigerant leaks, turn o the air condi-
tioner and any combustible heating devices,
ventilate the room and call your dealer immedi-
ately. Refrigerant is both toxic and ammable.
DO NOT use the air conditioner until the leak is
repaired.
• When the air conditioner is installed in a small
room, measures must be taken to prevent the
refrigerant concentration from exceeding the
safety limit in the event of refrigerant leakage.
Concentrated refrigerant causes a severe health
and safety threat.
Refrigerant Leak Detection System
• In the event of a refrigerant leak, the LCD screen
will display “EC” or ‘’ELoC’’ and the LED indicator
light will ash.
Maintenance after Extended Non-Use
1. Remove any obstacles blocking the vents of both
the indoor and outdoor units.
2. Clean the air lter and the front grille of the
indoor unit. Reinstall the clean, dry air lter in its
original position.
3. Turn on the main power switch at least 12 hours
prior to operating the unit.
Storing the Unit While Not In Use
1. Run the appliance on FAN mode for 12 hours in a
warm room to dry it and prevent mold.
2. Turn o the appliance and unplug it.
3. Clean the air lter according to the instructions in
the previous section. Reinstall the clean, dry lter
before storing.
4. Remove the batteries from the remote control.
Repairing Refrigerant Leaks
Preparation For Periods Of Non-Use

◄ Page 13 ►
• The operation light continues to ash rapidly after the unit has been restarted.
• The remote control buttons do not work.
• The unit continually trips fuses or circuit breakers.
• A foreign object or water enters te air conditioner.
• Other abnormal sitations.
The following symptoms are not a malfunction and in most situations will not require repairs.
Common Problems
5
Troubleshooting
CAUTIONS
If one of the following conditions occurs, switch o the power supply immediately and contact your
dealer for further assistance.
Problem Possible Causes
Unit does not
turn on when
pressing ON/ OFF
button
The unit has a 3-minute protection feature that prevents the unit from overloading. The unit can-
not be restarted within three minutes of being turned o.
Cooling and Heating Models: If the Operation light and PRE-DEF (Pre-heating/ Defrost) indicators
are lit up, the outdoor temperature is too cold and the unit's anti-cold wind is activated in order
to defrost the unit.
In Cooling-only Models: If the "Fan Only" indicator is lit up, the outdoor temperature is too cold
and the unit's anti-freeze protection is activated in order to defrost the unit.
The unit changes
from COOL mode
to FAN mode
The unit changes its setting to prevent frost from forming on the unit. Once the temperature
increases, the unit will start operating again.
The set temperature has been reached, at which point the unit turns o the compressor. The unit
will resume operating when the temperature uctuates again.
The indoor unit
emitswhite mist
In humid regions, a large temperature dierence between the room's air and the conditioned air
can cause white mist.
Both the indoor
and outdoor
units emit white
mist
When the unit restarts in HEAT mode after defrosting, white mist may be emitted due to moisture
generated from the defrosting process.
The indoor unit
makes noises
A squeaking sound is heard when the system is OFF or in COOL mode. The noise is also heard
when the drain pump (optional) is in operation.
A squeaking sound may occur after running the unit in HEAT mode due to expansion and con-
traction of the unit's plastic parts.
Both the indoor
unit and outdoor
unit make noises
A low hissing sound may occur during operation. This is normal and is caused by refrigerant gas
owing through both the indoor and outdoor units.
A low hissing sound may be heard when the system starts, has just stopped running or is defrost-
ing. This noise is normal and is caused by the refrigerant gas stopping or changing direction.
The outdoor unit
makes noises The unit will make dierent sounds based on its current operating mode.

◄ Page 14 ►
Problem Possible Causes
Dust is emitted
from either the
indoor or out-
door unit
The unit may accumulate dust during extended periods of non-use, which will be emitted when
the unit is turned on. This can be mitigated by covering the unit during long periods of inactivity.
The unit emits a
bad odor
The unit may absorb odors from the environment (such as furniture, cooking, cigarettes, etc.)
which will be emitted during operations.
The unit's lters have become moldy and should be cleaned.
The fan of the
outdoor unit
does not operate
During operation, the fan speed is controlled to optimize product operation.
Problem Possible Causes Solution
The unit is not
working
Power failure Wait for the power to be restored
The power switch is o Turn on the power
The fuse is burned out Replace the fuse
Remote control batteries are dead Replace the remote control batteries
The unit's 3-minute protection has
been activated Wait three minutes after restarting the unit
Poor cooling
performance
Temperature setting may be higher
than the ambient room temperature Lower the temperature setting
The heat exchanger on the indoor or
outdoor unit is dirty Clean the aected heat exchanger
The air lter is dirty Remove the lter and clean it according to instructions
The air inlet or outlet of either unit is
blocked
Turn the unit o, remove the obstruction and turn
it back on
Doors and windows are open Make sure that all doors and windows are closed
while operating the unit
Excessive heat is generated by sunlight Close windows and curtains during periods of high
heat or bright sunshine
Low refrigerant due to leak or long-
term use
Check for leaks, re-seal if necessary and top o
refrigerant
The unit
starts and stops
frequently
There's too much or too little refriger-
ant in the system
Check for leaks and recharge the system with
refrigerant
There is air, incompressible gas or
foreign material in the refrigeration
system.
Evacuate and recharge the system with refrigerant
System circuit is blocked Determine which circuit is blocked and replace the
malfunctioning piece of equipment
The compressor is broken Replace the compressor
The voltage is too high or too low Install a manostat to regulate the voltage
Poor heating
performance
The outdoor temperature is extremely
low
Check for leaks and recharge the system with
refrigerant
Cold air is entering through doors and
windows
Make sure that all doors and windows are closed
during use
Low refrigerant due to leak or long-
term use
Check for leaks, re-seal if necessary and top o
refrigerant
When troubles occur, please check the following points before contacting a repair company.
Troubleshooting Tips

◄ Page 15 ►
NOTE: If your problem persists after performing the checks and diagnostics above, turn o
your unit immediately and contact an authorized service center.
Problem Possible Causes
Indicator lamps continue
ashing
The unit may stop operation or continue to run safely. If the indicator lamps
continue to ash or error codes appear, wait for about 10 minutes. The problem
may resolve itself.
If not, disconnect the power, then connect it again. Turn the unit on. If the problem
persists, disconnect the power and contact your nearest customer service center.
Error code appears and
begins with the letters as
the following in the window
display of indoor unit:
E(x), P(x), F(x)
EH(xx), EL(xx), EC(xx)
PH(xx), PL(xx), PC(xx)

◄ Page 16 ►
6
European Disposal Guidelines
Users in European Countries may be required to properly dispose of this unit. This appliance con-
tains refrigerant and other potentially hazardous materials. When disposing of this appliance, the
law requires special collection and treatment. DO NOT dispose of this product as household waste
or unsorted municipal waste.
When disposing of this appliance, you have the following options:
• Dispose of the appliance at designated municipal electronic waste collection facility.
• When buying a new appliance, the retailer will take back the old appliance free of charge.
• The manufacturer will also take back the old appliance free of charge.
• Sell the appliance to certied scrap metal dealers.
NOTE: Disposing of this appliance in the forest or other natural surroundings endangers your
health and is bad for the environment. Hazardous substances may leak into the ground water
and enter the food chain.
All the pictures in the manual are for explanatory purposes only. The actual shape of the unit
you purchased may be slightly dierent, but the operations and functions are the same.
The company may not be held responsible for any misprinted information. The design and
the specications of the product for reasons, such as product improvement, are subject to
change without any prior notice.
Please consult with the manufacturer at +30 211 300 3300 or with the Local Distributor for
further details.
Scan here to download the latest version of this manual.
www.inventorairconditioner.com/media-library
Activate your Warranty
l Visit our web site and activate your warranty via the below link or by
scanning the QR code
https://www.inventorairconditioner.com/warranty-inventor
l Fill all the elds as shown below
þ
once the warranty submission has been completed a conrmation message will be
sent to your email
Full Name*
Address*
Postal Code*
Phone Number*
E-mail*
Unit Type*
Serial Number of the unit*
Date of Purchase*
Invoice Number*
Additional Details
Subscribe to Inventor's Newsletter
Owner details Unit details
To activate the warranty card, please ll in the following elds
* Required eld
With the current warranty card you accept the terms and conditions.
SEND
Follow the next quick steps to activate your warranty:
STEP 1
Visit our website via the link:
https://www.inventorairconditioner.com/warranty-inventor
or by scanning the QR code, as follows:
STEP 2
Fill in the obligatory fields as requested in the “Owner’s details” and “Unit’s details”:
STEP 4
Wait for the confirmation email you will receive at the email address you have filled
in - please also check your spam folder.
STEP 5
Inventor warranty is now valid!
STEP 3
Click SEND button at the end of the submission form:
þ
once the warranty submission has been completed a conrmation
message will be sent to your email
Activate your Warranty
l Visit our web site and activate your warranty via the below link or by
scanning the QR code
https://www.inventorairconditioner.com/warranty-inventor
l Fill all the elds as shown below
þ
once the warranty submission has been completed a conrmation message will be
sent to your email
Full Name*
Address*
Postal Code*
Phone Number*
E-mail*
Unit Type*
Serial Number of the unit*
Date of Purchase*
Invoice Number*
Additional Details
Subscribe to Inventor's Newsletter
Owner details Unit details
To activate the warranty card, please ll in the following elds
* Required eld
With the current warranty card you accept
the terms and conditions.
SEND
Activate your Warranty
l Visit our web site and activate your warranty via the below link or by
scanning the QR code
https://www.inventorairconditioner.com/warranty-inventor
l
þ
essage will be
sent to your email
Full Name*
Address*
Postal Code*
Phone Number*
E-mail*
Unit Type*
Serial Number of the indoor unit*
Serial Number of the outdoor unit*
Date of Purchase*
Invoice Number*
Additional Details
Subscribe to Inventor's Newsletter
Owner details Unit details
s
With the current warranty card you accept the terms and conditions.
SEND
Activate your Warranty

◄ Σελίδα 2 ►
Πίνακας Περιεχομένων
Εγχειρίδιο Χρήσης
Προφυλάξεις Ασφαλείας ........................................04
Εξαρτήματα και Λειτουργίες
της εσωτερικής μονάδας ....................................... 06
Χειροκίνητες Λειτουργίες ...................................... 08
1
2
3
SAFETY
FIRST

◄ Σελίδα 3 ►
Επίλυση Προβλημάτων ................. 11
α. Συνήθη προβλήματα . ............. 11
β. Συμβουλές για την επίλυση
προβλημάτων .......................... 12
Φροντίδα και Συντήρηση ...............................09
α. Συντήρηση της μονάδας ......................... 09
β. Καθαρισμός του φίλτρου αέρα .............. 09
γ. Επισκευή διαρροών ψυκτικού μέσου ... 10
δ. Προετοιμασία για περιόδους μη χρήσης .. 10
Ευρωπαϊκές οδηγίες για την απόρριψη ...... 14
5
4
6
Προσοχή: Κίνδυνος πυρκαγιάς/
Εύφλεκτα υλικά
ΠΡΟΕΙΔΟΠΟΙΗΣΗ: Το σέρβις θα πρέπει να εκτελείται μόνο με τον τρόπο που συνιστάται από τον κατασκευαστή. Οι
εργασίες συντήρησης και επισκευής για τις οποίες απαιτείται η συνδρομή άλλου ειδικευμένου προσωπικού θα πρέπει να
εκτελούνται υπό την επίβλεψη του ατόμου που είναι αρμόδιο για τη χρήση εύφλεκτων ψυκτικών μέσων. Για περισσότερα
στοιχεία, ανατρέξτε στις πληροφορίες για το σέρβις στο ΕΓΧΕΙΡΙΔΙΟ ΕΓΚΑΤΑΣΤΑΣΗΣ. (Αυτό απαιτείται μόνο για τις μονάδες
στις οποίες χρησιμοποιείται ψυκτικό μέσο R32/R290)

◄ Σελίδα 4 ►
1
Προφυλάξεις Aσφαλείας
ΠΡΟΕΙΔΟΠΟΙΗΣΗ
ΠΡΟΣΟΧΗ
Σας ευχαριστούμε που αγοράσατε αυτό το κλιματιστικό. Αυτό το εγχειρίδιο παρέχει πληροφορίες σχετικά με
τη λειτουργία, τη συντήρηση και την επίλυση προβλημάτων του κλιματιστικού σας. Η τήρηση των οδηγιών
εξασφαλίζει τη σωστή λειτουργία και την παράταση της διάρκειας ζωής της μονάδας.
Πρέπει να δίνετε προσοχή στα ακόλουθα σύμβολα:
Η μη τήρηση των οδηγιών μπορεί να οδηγήσει σε θάνατο. Η συσκευή πρέπει
να εγκαθίσταται σε συμμόρφωση με τους εθνικούς κανονισμούς.
Η μη τήρηση των οδηγιών μπορεί να οδηγήσει σε τραυματισμό ή ζημιά
στον εξοπλισμό.
ΠΡΟΕΙΔΟΠΟΙΗΣΗ
• Ζητήστε από έναν εξουσιοδοτημένο αντιπρόσωπο να
εγκαταστήσει αυτό το κλιματιστικό. Αν η εγκατάσταση
δε γίνει σωστά, μπορεί να προκληθεί διαρροή νερού,
ηλεκτροπληξία ή πυρκαγιά.
• Η εγγύηση ακυρώνεται, αν η μονάδα δεν εγκατασταθεί
από επαγγελματίες.
• Αν προκύψει μη φυσιολογική κατάσταση (όπως οσμή
υλικού που καίγεται), διακόψτε την παροχή ρεύματος
και επικοινωνήστε με τον αντιπρόσωπο για οδηγίες
σχετικά με την αποφυγή ηλεκτροπληξίας, πυρκαγιάς ή
τραυματισμού.
• ΜΗΝ αφήνετε να βραχεί η εσωτερική μονάδα ή το
τηλεχειριστήριο. Μπορεί να προκληθεί ηλεκτροπληξία
ή πυρκαγιά.
• ΜΗ βάζετε τα δάχτυλά σας, ραβδιά ή άλλα αντικείμενα
στα ανοίγματα εισαγωγής ή εξαγωγής αέρα. Μπορεί
να προκληθεί τραυματισμός, καθώς ο ανεμιστήρας
μπορεί να περιστρέφεται με υψηλή ταχύτητα.
• ΜΗ χρησιμοποιείτε εύφλεκτα σπρέι όπως λακ,
λούστρο ή βαφή κοντά στη μονάδα. Μπορεί να
προκληθεί πυρκαγιά ή καύση των υλικών.
• Μη χρησιμοποιείτε μέσα επιτάχυνσης της διαδικασίας
ξεπαγώματος ή μέσα καθαρισμού διαφορετικά από
εκείνα που συνιστώνται από τον κατασκευαστή.
• Η συσκευή θα πρέπει να αποθηκεύεται σε χώρο
όπου δεν υπάρχουν ενεργές πηγές ανάφλεξης (για
παράδειγμα: ακάλυπτες φλόγες, ενεργές συσκευές
αερίου ή ηλεκτρικοί θερμαντήρες).
• Η συσκευή θα πρέπει να αποθηκεύεται με τρόπο που
δεν επιτρέπει την πρόκληση μηχανικής βλάβης.
• Πρέπει να γνωρίζετε ότι τα ψυκτικά μέσα δεν
αναδίδουν οσμή.
• Πρέπει να συμμορφώνεστε με τους εθνικούς
κανονισμούς για τα αέρια.
• Μη φράσσετε τα ανοίγματα εξαερισμού.
ΣΗΜΕΙΩΣΗ: Οι ακόλουθες πληροφορίες απαιτούνται
για τις μονάδες στις οποίες χρησιμοποιείται ψυκτικό
μέσο R32/R290.
• ΜΗΝ τρυπάτε και μην καίτε τη μονάδα.
• Η συσκευή πρέπει να αποθηκεύεται σε καλά
εξαεριζόμενο χώρο με μέγεθος που αντιστοιχεί στο
προβλεπόμενο εμβαδόν για τη λειτουργία της.
• Κάθε άτομο που εκτελεί εργασίες ή παρεμβαίνει
σε κυκλώματα ψυκτικών μέσων θα πρέπει να είναι
κάτοχος έγκυρου πιστοποιητικού από διαπιστευμένη
αρχή αξιολόγησης, το οποίο θα εγκρίνει την επάρκεια
του συγκεκριμένου ατόμου για τον ασφαλή χειρισμό
ψυκτικών μέσων. Το πιστοποιητικό θα πρέπει να έχει
εκδοθεί σε συμμόρφωση με κάποια προδιαγραφή
αξιολόγησης που είναι αναγνωρισμένη στον κλάδο.
• Το σέρβις θα πρέπει να εκτελείται μόνο με τον
τρόπο που συνιστάται από τον κατασκευαστή του
εξοπλισμού. Οι εργασίες συντήρησης και επισκευής
για τις οποίες απαιτείται η συνδρομή άλλου
ειδικευμένου προσωπικού θα πρέπει να εκτελούνται
υπό την επίβλεψη του ατόμου που είναι αρμόδιο για
τη χρήση εύφλεκτων ψυκτικών μέσων.
• Αν το καλώδιο παροχής ρεύματος υποστεί ζημιά,
πρέπει να αντικατασταθεί από τον κατασκευαστή,
τον αντιπρόσωπο σέρβις του κατασκευαστή ή από
άλλο άτομο με παρόμοιες πιστοποιήσεις, ώστε να
αποφεύγεται ο κίνδυνος.
/