Page is loading ...

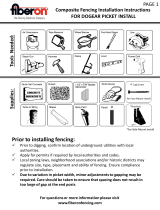
Check Box for These Contents
In the event of missing or defective parts please call our customer service department at
1 877 778 5733
(Mon. to Fri. 8:00 AM to 4:00 PM EST).
1.
Post Caps
(6)
2. Posts
(
4) - 7/8” x 1½“ x 43½”
3. Horizontal Rails - Top (2) - 1½“ x 1½” x 12“
4. Horizontal
Rails - Bottom
(2) - 1½” x 1½” x 12“
5. Picket 1
(4) - ¼” x 1½“ x 24 1/8”
6. Picket 2
(2) - ¼” x 1½“ x 22 7/8”
7. Picket 3
(2) - ¼” x 1½“ x 22 1/8”
8. Picket 4
(1) - ¼” x 1½“ x 21 7/8”
9. Gate Posts (2) - 7/8” x 1½“ x 26½”
10.
Gate Top Rail
(1) - 1½” x 1½” x 36 3/8“
11.
Gate Bottom Rail
(1) - 1½” x 1½” x 36 3/8“
12. Gate Hardware Kit with Fasteners (1)
13.
Corner Brackets
(4)
14.
3/4 in Self-Augering Stainless Steel Screws
(47)
15.
Zippity Connector Brackets (4)
16.
1/8” Drill Bit (1)
Tools You Will Need
• Cordless Drill
• Level
• Shovel
Madison Vinyl Gate Kit w/ Fence Wings
(Unassembled) 62” Wide x 30” Tall
Please read through before starting assembly.
ASSEMBLY INSTRUCTIONS
1
Not to Scale
IMPORTANT: CHECK THE INSIDE OF THE LARGER PIECES IN YOUR BOX FOR OTHER MATERIALS
PACKED INSIDE.
Ver 1.4/121617
12
This Gate is designed to be integrated with our 30” High Madison Picket Fence
13 14 15
36 7/8 in
39 3/8 in
2 in
40 7/8 in
6 5/8 in
16 1/2 in
12 1/8 in 12 1/8 in
21 1/2 in
14 in
14 in
8 1/2 in
30 in
2 1/2 in
1
10
2
9
11
5
3
4
6 8
7
16

2 Madison Vinyl Picket Gate Instructions
Madison Vinyl Picket Gate
GENERAL INFORMATION
1 - Read Over Fence Instructions First
Your gate and fence will work better together as an
integrated
fence instructions.
2 -
Pre-Assemble the Gate Frame
(without pickets)
This will ensure three things:
a) That you have everything necessary to complete the gate.
b) That you will have assembled the gate in the correct order.
It’s easier to trouble shoot when things are not screwed together.
3 -
Ideally, Install Your Gate Posts Before Your Fence Posts
Your fence panels will be more forgiving for a custom t than your gate. Ideally, position and install your
gate posts before you do anything else, or very early on in the process of setting up your fence run.
4 -
Ideally, Do Not Hang Your Gate System By Itself (With no
other fence panels)
Your gate will perform better and last longer if the fence assembly that supports the hinge side of the gate
is connected in-line with another fence assembly. See illustration below. The weight strain will be transferred
unto two posts versus just one. Installing fence panels on both sides of your gate is the ideal in all situations.
d) The gate height and width measure similar to drawing on Page 1.
Use Zippity clips to attach the gate to the fence panel posts.

Assemble the Gate Frame
Orientate the posts so the tab is facing up as illustrated.
Insert the post down through the top and bottom horizontal
rails as illustrated.
Note that the underside of the bottom rail only has two holes
as shown.
Align the pre-drilled holes in the horizontal rails with the
pre-drilled holes in the vertical posts and fasten together with
FOUR short screws for the bottom rail and THREE screw for
the top rail.
Starting with one inside corner, place the corner bracket
against the horizontal and vertical posts as shown.
Fasten corner bracket with two short screws into the horizontal
rail.
Fasten with two more screws into the vertical posts.
Repeat for all four inside corners.
1
2
STEP ONE
1
3
2
3
3
Madison Vinyl Picket Gate Instructions
Note: Underside of bottom rail.
4
5
6
Align
4 5
Note: There is no screw
hole here.
Tab

STEP TWO
Pickets and Caps Installation
Insert pickets (as numbered in illustration) down through the
top rail and into the bottom rail.
Pressure fit the two caps down over the posts. The post caps
will lock into place.
1
4
Madison Vinyl Picket Gate Instructions
2
1
Picket 1
Picket 2
Picket 3
Picket 4
Picket 3
Picket 2
Picket 1
2

5
Madison Vinyl Picket Gate Instructions
STEP THREE
Hinges and Latch Installation
W
Align the hinges on the top and bottom horizontal rails as
shown. Note the location of the top rail that has no holes - this
is where the latch will be installed in the future.
Pre-drill two holes on the face of the horizontal rails for each
hinge as shown. Holes should be approximately 1/4” from the
edge of the rail as shown.
Fasten each hinge with two screws.
1
2
3
2
3
1
Align the finger latch to the top horizontal rail and pre-drill
four holes into the rail as shown.
Fasten four screws to lock the finger latch in place.
4
5
54
No screw/pre-drilled hole
1/4 in

6
Madison Vinyl Picket Gate Instructions
1
2
1
3
4
Assemble the Gate Wings
Orientate the posts so the tab is facing up as illustrated.
Insert the post down through the top and bottom horizontal
rails as illustrated.
Note that the underside of the bottom rail only has two holes
as shown.
Align the pre-drilled holes in the horizontal rails with the
pre-drilled holes in the vertical posts and fasten together with
FOUR short screws for the bottom rail and FOUR screws for
the top rail.
Insert a picket (numbered 1) down through the rop rail
and into the bottom rail.
Repeat for second gate wing.
STEP FOUR
2 3
Note the direction
of the spears.
Tab

7
Madison Vinyl Picket Gate Instructions
40 7/8 in
39 3/8 in
x
x
x
x
STEP FIVE
Install Gate wings into Ground
1
2
4
3
1
Move the gate wings to their final location and identify the location
of posts. The distance between the posts should be 39 3/8” or
40 7/8“ center-to-center
.
Loosen the top 6” to 8” of the ground using a claw hammer
and screw driver (or something equivalent) as illustrated.
Add water to loosen soil if necessary.
Use a block of wood to the protect the top of post and
gently hammer each post into the ground equally until
bottom rails are about 2” above the ground.
2
3
4
x
x
x
x
x
x
x
x
Block of Wood
39 3/8 in

8
Madison Vinyl Picket Gate Instructions
STEP FIVE
Install Gate wings into ground - continued
Level the assembled unit and backfill and compact dirt around
the base of each post to strengthen the unit.
Finish the assembly by pushing the post caps down over the
top of posts as illustrated. The post caps will lock into place.
5
6
5
6
Level

STEP SIX
Gate Installation
Align the gate hinges against the horizontal rails of the gate
wing as illustrated.
Mark and pre-drill two holes for each hinge.
Fasten each hinge with two screws.
Align the catch as shown and pre-drill two more holes
into the gate wing horizontal rail.
Fasten two screws to lock the catch in
place.
1
2
3
2
3
9
Madison Vinyl Picket Gate Instructions
9
Madison Vinyl Picket Gate Instructions
5
4
4
5

701 Lawton Rd. , Charlotte NC USA 28216
Toll Free Phone: 1 877 778 5733 Fax: 704 631 4685
www.zippity-outdoor.com
STEP SEVEN
10
Fence Panels installation
Follow the instructions included in your Madison Picket
Fence kit.
Connect the top and bottom rails of the gate and fence
panels using the supplied zippity clips as shown.
1
2
/