Page is loading ...

SKYLANDS
4” Centerset Faucet
Installation Instructions
Thank you for purchasing our quality product.
We recommend installation by a licensed plumbing professional
Before starting installation please read the instructions in full.
ATTENTION: Shut off water supply before starting installation
Note: To replace your current faucet
Disconnect supplies to old faucet.
Remove lock-down nuts and lift faucet from sink.
1
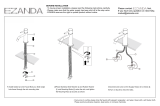
. INSTALL FAUCET
Place the faucet SHANKS through the holes of the BASE PLATE (1).
Apply a bead of plumber's putty along the bottom edge of the BASE PLATE (1) as desired.
Insert SHANKS through holes of sink
SHANK
SINK
2. SECURE FAUCET AND CONNECT WATER SUPPL
Y
Secure Faucet (2) to sink using lock-down nuts (3).
(HAND TIGHTEN ONLY).
2
)4( seilppus elbixelf SPI "2/1 htiw )2( tecuaf eht ot ylppus retaw tcennoC
or 3/8" O.D. Bull-nose risers or flat head risers with rubber cone washers (6)
Use adjustable wrench to tighten supply nuts (5).
To avoid leaking or restrictions do not allow copper risers to kink
Use adjustable wrench to tighten supply connections. Do not over tighten.
Note: Flexible supplies and Bull-nose risers are not included.
PUTTY
1
5
4
6
Plastic supply nut can be tightened by hand
Please keep for future reference.
1
3

3. INSTALLING THE POP-UP DRAIN ASSEMBL
Y
1. Remove drain flange (A) and black washer (B) from the pop-up assembly.
2. Note: When using Plumber's putty discard the black washer and place the plumbers putty under the drain flange (A).
3. Install flange nut ( C), flat washer (D) and gasket (E) on drain body (F). NOTE: Install gasket with the cone side up.
4. Insert the completed drain body through the bottom of the sink and thread onto the drain flange (A).
5. Line up the ball port (G) opening so it faces the rear of the sink. Tighten flange nut ( C). Be careful not to over-tighten.
6. Align the stopper assembly (O) with the eyelet facing the back of the sink and slide it into the drain hole.
7. Place ball rod washers (H) on either side of the ball rod (I) and place the ball rod (I) into the drain body (F).
The ball rod should go through the eyelet of stopper assembly so the stopper can be opened and closed when activated.
8. Thread ball nut (J) snugly onto the drain body (F). Manipulate the assembly and check for ease of movement.
9. Place lift rod (P) through hole in the faucet body.
Insert the lift rod (P) through the lift rod strap (K) and secure with the set screw (L).
10. Remove one end of the clip (M) from the ball rod (I) and slide the ball rod (I) into one of the lower holes.
Reassemble the clip (M).
11. Adjust the pop-up rod height by moving the strap screw (L) on the pop-up that is going through the spout.
12.
Attach P-trap assembly to drain body (F).
4. TEST INSTALLED FAUCE
T
1. With handles in off position, turn on water supplies and check all connections for leaks.
2. Remove spout aerator and operate both handles to flush water lines thoroughly. Reattach aerator spout after flushing lines.
3. Operate pop-up drain assembly and check for leaks.
5. CARE AND CLEANIN
G
Improper handling and cleaning can damage the surface of any metal finish. Use a soft cloth to wipe clean. Avoid harsh abrasive cleaners.
Water contains lime, calcium and other mineral deposits that will be left on the surface after the water has evaporated.
You can prevent these deposits from forming by always wiping the fitting dry immediatedly after use.
© Pilot Plumbing Products Inc.
33 West Beaver Creek Road
Richmond Hill, ON L4B 1L8
Toll Free Customer Service Assistance 1-877-557-4568
Monday to Friday, 8:30 a.m. to 5:00 p.m.
F3020-21 2011/03
(O)
(P)
(A)
(B)
(L)
(E)
(D)
(K)
( C)
(F)
(M)
(I) (J) (H) (G)
(P)
(N)
(O)
/