
SMART AIR CONDITIONER
USER MANUAL
IMPORTANT NOTE:
Read the manual carefully before installing or
connecting your. Make sure to save this
manual for future reference.
us.toshiba-lifestyle.com

CONTENTS Warning
2
3
4
5
6
7
8
9
10
1
CAUTIONS
This
Changes or modifications to this unit not expressly
approved by the party responsible for compliance
could void the user’s authority to operate the
equipment.
NOTE: This equipment has been tested and found
to comply with the limits for a Class B digital device,
pursuant to Part 15 of the FCC Rules. These limits
are designed to provide reasonable protection
against harmful interference in a residential
installation. This equipment generates uses and can
radiate radio frequency energy and, if not installed
and used in accordance with the instructions, may
cause harmful interference to radio communications.
However, there is no guarantee that interference will
not occur in a particular installation. If this
equipment does cause harmful interference to radio
or television reception, which can be determined by
turning the equipment off and on, the user is
encouraged to try to correct the interference by one
or more of the following measures:
• Reorient or relocate the receiving antenna.
• Increase the separation between the equipment
and receiver.
• Connect the equipment into an outlet on a circuit
different from that to which the receiver is
connected.
• Consult the dealer or an experienced radio/TV
technician for help.
device complies with Part 15 of the FCC Rules
and RSS 210 of Industry & Science Canada. Operation
is subject to the following two conditions: (1) this
device may not cause harmful interference, and (2)
this device must accept any interference received,
including interference that may cause undesired
operation.
Only operate the device in accordance with the
instructions supplied. This device complies with FCC
and IC radiation exposure limits set forth for an
uncontrolled environment. In order to avoid the
possibility of exceeding the FCC and IC radio frequency
exposure limits, human proximity to the antenna shall
not be less than 20cm (8 inches) during normal operation.
Changes or modifications not expressl
y approved by
the party responsible for compliance could void the
user's authority to operate the equipment.
DECLARATION OF CONFORMITY........................ 1
SPECIFICATION................................................... 1
PRECAUTIONS ....................................................1
SYSTEM OVERVIEW ............................................2
DOWNLOAD AND INSTALL THE APP ...................3
CREATE YOUR ACCOUNT ...................................4
SET UNIT TO ACCESS POINT MODE ................... 6
NETWORK CONFIGURATION................................7
HOW TO USE THE APP........................................20
SPECIAL FUNCTIONS..........................................22
User Manual User Manual

Model: OSK102
Standard:IEEE 802.11b/g/n
Antenna Type:Wxternal omnidirectional Antenna
Frequency:Wireless 2.4G
Maximum Transmitted Power: 15dBm Max
Dimension:55*24*8(mm)
O O O O
Operation Temperature:0 C~45 C/32 F~113 F.
Operation Humidity:10%~85%
Power Input:DC 5V/300mA
We hereby declare that this AC is in compliance
with the essential requirements and other relevant
provisions of Directive 1999/5/EC.
DECLARATION OF CONFORMITY
1
2
3
SPECIFICATION
PRECAUTIONS
1. Operating System: iOS 7+, Android 4+.
2. In the event of a OS update, there may be a delay between
the update of the OS and a related software update during
which your OS may or may not be supported until a new
version is released. Your specific mobile phone or problems
in your network may prevent the system from working and
Toshiba will not be responsible for any problems that could
be caused by incompatibility or network issues.
3. This smart AC only supports WPA-PSK/WPA2-PSK encryption
and or no encription.
WPA-PSK/WPA2-PSK encryption is recommended.
Please check Toshiba Lifestyle website for updated information
in case of doubt.
User ManualPage 1
SYSTEM OVERVIEW
4
Devices required to use the Smart AC:
1 Smart Phone with compatible iOS
or Android system.
2 Smart Air conditioner
3 Wireless Router
4.
5.
6. Due to unstable network connectivity, commands may time out.
If this happens, the smartphone app and the actual product may
display conflicting information. The information displayed on the
actual product is always the most accurate available. Refresh the
app to re-sync.
NOTE:Toshiba will not be responsible for any problems that could
be caused by incompatibility or network issues, your wireless
router and mobile phone.
The smart phone camera must have at least 5 million pixels to
ensure proper scanning of QR code.
Due to unstable network connectivity, request may time out. If this
happens, re-run the network configuration.
User Manual Page 2

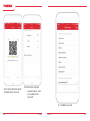
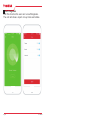
DOWNLOAD AND INSTALL THE APP
5
NOTE:All the images in this manual are for reference
only, your product and app may look slightly different.
The actual product and app instructions and indications
have to be considered.
You can also go to Google Play or App Store and
search for the latest compatible app. For more
information, please refer to Toshiba Lifestyle
website: us.toshiba-lifestyle.com.
Scan to download app.
Android QR code Apple QR code
User Manual Page 4
,
,
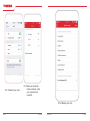
6.1 Click Create Account.
6.2 Enter your email
address and password.
CREATE YOUR ACCOUNT
6
Make sure your smartphone is connected to your wireless
router and your wireless router has a working internet
connection.
It is recommended to activate your account
immediately to be able to recover your password
by email.
User ManualPage 3

User ManualPage 5
,
,
6.3 Click Registration . 6.4 If password is lost,
proceed to password
recovery.
Make sure your smartphone is able to connect to the
wireless network which will be used. Make sure also
that the device is not connecting to other networks
in range.
SET UNIT TO ACCESS POINT MODE
7
Connect the unit to power supply, press and hold VENT ANGLE
/SWING (on Portable AC) or WIFI/WIRELESS (on Window AC)
buttons for 3-5 seconds. The unit will enter Access Point mode
and the display will show "AP". Proceed to the next step.
NOTE: On Portable AC, you can also use the remote controller
by pressing the LED button 7 times.
NOTE:
When the unit is in "AP" / Access Point mode, the
remote controller is inactive. It is necessary to finish
the network configuration, turn the AC off and on
again or wait for 8 minutes for the unit to leave "AP"
mode automatically.
User Manual Page 6

User ManualPage 7
NETWORK CONFIGURATION
8
8.1 Log in with your account.
8.2 Please press + on the apps appliance list screen, and select the
device category you need.
8.3 Choose network configuration method
Scan QR Code method:
- For Android user, please follow step 7.4 to
complete configuration.
- For IOS user, please follow step 7.5 to complete
configuration.
Alternative method without QR CODE:
- Please follow step 7.6 to complete configuration.
8.4 For Android ( Scan QR code method)
8.4.1 Choose Scan QR code
User Manual Page 8

8.4.2 Scan QR code which
is attached to the unit.
8.4.3 Selet your preferred
wireless network, enter
your password and
press OK
User ManualPage 9 User Manual Page 10
8.4.4 Name your unit.

User ManualPage 11
8.5 For IOS ( Scan QR code method)
8.5.1 Choose Scan QR code
8.5.2 Scan QR code which
is attached to the unit.
8.5.3 Read the instruction
above and press the home
button to go back to the smart
devices desktop.
'
'
User Manual Page 12

8.5.4 Select your unit.
8.5.5 Selet your preferred
wireless network, enter
your password and
press OK.
User ManualPage 13
8.5.6 Name your unit.
User Manual Page 14

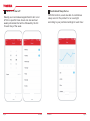
8.6 No need to Scan QR Code method.
8.6.1 Select your AC type. 8.6.2 Turn off the AC power
and turn on it again.
Waiting for 5 seconds and
then go to the next step.
User ManualPage 15
8.6.4 Go to your phone
wireless network settings,
connect to the network
named "nec_ac_xxxx"and
use default password
12345678.
8.6.3 Press and hold VENT
ANGLE/SWING (on Portable
AC) or WIFI/WIRELESS (on
Window AC) buttons for 3-5
seconds. The unit will enter
Access Point mode and the
display will show "AP". Proceed
to the next step.. On Portable
AC, you can also use the remote
controller by pressing the LED
button 7 times.
User Manual Page 16

8.6.5 Go back to your
wireless network settings,
select your preferred
network and type your
network password.
8.6.6 The app will show
you the progress. If there
is a failure, please retry
the procedure.
User ManualPage 17 User Manual Page 18
8.6.7 Name your unit.

NOTE:
When finishing network configuration, the app will
indicate sucess by displaying a message.
In unstable network connections, the products may
still appear on the app as "offline". If this happens,
wait for it to show up on the device list or turn the
AC power off and on again after 30 seconds, wait
for a few minutes and check once again.
User ManualPage 19 User Manual Page 20
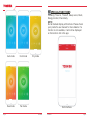
HOW TO USE THE APP
9
Log in and select your unit to control it
from wherever you are from your smart phone.
NOTE: Not all models display all functions. Please
check your product's user manual for more details.

User ManualPage 21
Auto mode
Cool mode
Dry mode
Heat mode
Fan mode
User Manual Page 22
SPECIAL FUNCTIONS
10
Including: Timer on, Timer off, Sleep curve, Check,
Energy monitor, Check body.
NOTE:
Not all models display all functions. Please check
your product's user manual for more details. If a
function is not available, it will not be displayed
on the function list in the app.
Exit interface

User ManualPage 23
Timer on / Timer off
Weekly, user can make an appointment to turn on or
off AC on specific times. Users can also workout
weekly schedules that will be followed by the AC
for each day of the week.
Customized Sleep Curve
With this function, users are able to customize a
sleep curve for the product to run overnight
according to your preferred settings for each hour.
User Manual Page 24

Self Diagnosis
With this function the user can run self diagnosis.
The unit will show a report on key items and status.
User ManualPage 25
-
 1
1
-
 2
2
-
 3
3
-
 4
4
-
 5
5
-
 6
6
-
 7
7
-
 8
8
-
 9
9
-
 10
10
-
 11
11
-
 12
12
-
 13
13
-
 14
14
-
 15
15


Toshiba RAC-PD1411CWU Operating instructions
- Type
- Operating instructions
- This manual is also suitable for
Ask a question and I''ll find the answer in the document
Finding information in a document is now easier with AI
Related papers
Other documents
-
GE GDT635HMMES FAQ
-
gosuna WP3 User manual
-
 Kaysun WiFi Controller FRIWF-USB-02 User manual
-
Carrier Smart Kit Module User manual
-
Midea Smart AC [CW058IU-AWIFI] User manual
-
mundoclima MUPR-H9M “MultiSplit Wall type” User manual
-
COMFORT-AIRE PSH-141C Owner's manual
-
-
COMFORT-AIRE PSH-141D Owner's manual
-
MRCOOL DIY-12-HP-CWMAH-115A WiFi User Manual
