Page is loading ...

1
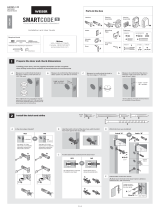
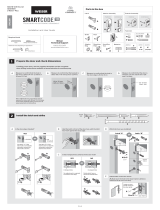
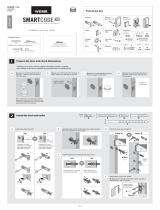
Quick Reference
●Referto“QuickReference”areaandillustrationstoidentifycomponents.
●Preparedoor,peradditionalinstructions(included)beforeinstallingunit.
●IMPORTANT:Readinstructionscompletelybeforebeginninginstallation.
Use the checklist below to assure completion of important steps.
□ATTACHCONNECTOR..........................................
□PROGRAMCODE(S).............................................
□VERIFYOPERATION.............................................
Section6
Section10a,b,c
Section10d
1 2
3 4
5 6
7 8
9 0
Copyright©2009Black&DeckerCorporation
40490-01SmartCodeLeverManual
Program
Button
Mounting
Holes
Turnpiece
Lock
Button
Cylinder
Settings
Switch
Panel
Keypad
LED
Cylinder
GettingStarted
Installation&ProgrammingManual
Interior
Assembly
Interior
Cover
Halfround
Spindle
Exterior
Assembly
Lever
Latch
Lever
Mounting
Plate
Mounting
Bolts
Interior
Assembly
Exterior
Assembly

2
2-3/8" (60mm)
or
2-3/4" (70mm)
1.InstalllatchandStrike.
Fig.1
Fig.2
d.Installstrikeplateontodoorjambusingtwosmallscrews.Minorloose
doortmaybereducedbyadjustingtang.Note,thelockwillnotlockprop-
erlyifthesmallerboltoflatchentersthestrikehole.Repositionstrikeplateif
required.
a.Determineyourbackset,seegure1.
b. Ifbacksetmeasured2-3/4”(70mm),adjustlatchas
follows:Usingngers,graspthespringpinandmove
itdownandovertothe2-3/4”(70mm)slot.(See
gure2).
Foradriveinlatch:
Aligncollaropeningwith
shapeofboltandslideit
onuntilthecatchpinsof
latchsnapintothepinholes
ofcollar.Installlatchwiththe
slantofboltfacinginthedirectionthatthedoorcloses.Usewoodblockto
installlatch.Note,shouldcollarrequireremoval,squeezecollarhardat
sidesandremove.
Foralatchwithfaceplate:
(1)Insertlatchintobackplate,
(2)Insertlatchand
backplateintodoorwith
theslantofboltfacingin
thedirectionthatthedoorcloses.
(3)Placedesiredfaceplateoverbackplateandfasten
withtwosmallscrews.
c.Preparelatch.
Faceplate
Spring
Pin
Backplate
CatchPin
Tang
Small
Bolt
Pin
hole
Collar

3
2.Removecoverandbatterycase.
3.InstallExteriorAssembly.
a.Removecoverfromassembly
byslidingcoverupandoff,see
gure.3
b.Removethebatterycasefrom
interiorassemblybyliftingthe
caseupandoutandsetaside,
seegure4.
Placetheexteriorassemblyushontodoor,
threadingthewireharnessunderthelatch.
Routetheconnectorofthewireharness
thoughtheslotattopofmountingplate.
Insertthelongscrewstoengageexterior
assembly.Tightenscrewstosecure-
makingsurethatboththeplateandthe
exteriorassemblyare
ushagainstthedoor
andverticallyaligned
withtheedgeofdoor.
4.InstallInteriorMountingplate.
Insertthehalfroundspindlethroughthelatch
fully-toengagewiththeexteriorassembly.
5.Installthehalfroundspindle.
Fig.4
Fig.3
Importantbeforeproceeding:
1.Verifythatposition#2ofthe“SettingsSwitch”isintheOFFposi-
tion.(Refertosection11.)
2. Workwiththedooropen(awayfromjamb)toavoidaccidental
lockout.
Wire
Harness
HalfRound
Spindle
Connector
LongScrews
MountingPlate

4
Important Note: To prevent damage, always handle the wire harness
at the connector (do not pull wires).
6.AttachtheConnectortotheInteriorAssembly.
ConnectorPort
Spindles
SmallScrews
SpindleOpenings
Interior
Assembly
Notch
Slot
a. Tuckinganyexcess
wirebackintoslotof
mountingplate,placethe
interiorassemblyondoor,
aligningthespindleswith
thespindleslotsofinterior
assembly.
7.InstallInteriorAssembly.
b.Onceushondoor,insertandtightensmall
screwstosecureassemblyontothemountingplate.
Note: To aid insertion of
screws, approach the screw
holes with the screw loaded
onto the screwdriver.
a.Aligntheconnectorwiththeconnectorportoftheinteriorassembly,
matchingnotchtoslot.
b.Oncealigned,pushtheconnectorinrmlytoconnect.
Connector

5
8.Mountthelevers.
a Checkboththeinteriorandthe
exteriorassemblies,tomakesure
thesetscrewislocatedontheoppositeside,
(thesidefurthestawayfromthelatchbolt).
Ifcorrectlypositionedproceedtostepc,ifitisnot
ontheproperside,removeandswitchtheset
screwasdirectedinthefollowingstep-stepb.
b. Usingtoolprovided,removesetscrewby
unscrewingitinaclockwisedirection(thisis
thereversedirectionofwhatmightfeelnormal).
Repositionsetscrewtotheothersideandscrew
itinfully,usingacounterclockdirection
(againthisisthereverseofthenormal
direction).
c. Installinterior
leverandtighten
setscrew
clockwise.
e.Insertthekeyintocylinder
androtate itclockwiseto
thehorizontalposition,then
presslevertoseat into
assembly.Withkeystill in the
horizontalposition,tightenthe
setscrewclockwisetosecurethelever.
SetScrew
(onoppositeside)
LatchBolt
d.Toinstallexteriorlever,rst
removethekeyfromcylinderand
insertthecylinderintothelever
shaft,makingsurethesleeveof
cylinderispositionednearkeyway.
Note that the cylinder will not seat
back fully at this time.Slidethe
leveronsmoothly,aligningribs
insidetheleverwiththelevershaft
(leverwillnotseatallthewayuntil
completingstepe).
Cylinder
Sleeve
Shaft
Continued

6
INTERIOR
Important note should you need to remove the exterior lever: 1. insert key into
exterior lever and rotate clockwise to a horizontal (unlocked) position.
2. Loosen set screw and pull the lever, cylinder and key - away from keypad
assembly.
1
1/4” (6mm)
2
180°
3
LEVER NOTES
9.Installbatteries
AlkalineBatteryWARNING:
Donotdisposeofinre,recharge,putin
backwards,disassemble,mixwithused
orotherbatterytypes.Mayexplodeor
leakandcausepersonalinjury.
a.Install4newAAAlkalinebatteriesintobatterypack.
Installthenewbatteriesasindicatedinillustration.
Makesurebatterieslieatinholder.Forbest
performance,rechargeablebatteriesarenot
recommended.
AA
1
2
-
+
b.Installbatterypackintounitasshown.Unitwill
beepandtheLEDwillashgreen.
8.Continued.....
Action of exterior lever: When the unit is in the locked position the exterior
lever is still allowed to turn, but it will not retract the latch. When the unit is in
the unlocked position, the exterior lever will turn rmly, retracting the latch for
entry.
f.Testthelockingandunlockingfunction.
Ifyoucannotlocktheunitfromtheexteriororcannotrotatetheinteriorturn-
piece,proceedwiththefollowingstepstoremedythesituation.1. Insert the
key and rotate clockwise to the horizontal position. 2. Loosen the set screw
and pull the lever away from the unit, about 1/4”. 3. Rotate the key 180°
clockwise. With the key remaining in the horizontal position, push the lever
back to seat and tighten the set screw. 4. Test the locking and unlocking
function and repeat these steps if required.
Important note: This product has a panic free interior, which will allow
interior lever to always retract the latch and allow exit. Caution: if you exit
and plan re-entry without a key or code, make sure the turnbutton on the
interior lever is in the unlocked (horizontal) position before exiting.

7
1 2
3 4
5 6
7 8
9 0
Howthekeypadworks:
Eachbuttonrepresentstwonumbers(i.e.1and2fortherstbutton).You
onlyneedtopushthebuttononcetogeteither1or2.Forexample:If
yourcodeis1-2-5-6-8,
■Pressthe
1 2
buttononcetogetnumber1.
■Pressthe
1 2
buttononcetogetnumber2.
■Thenpressthe
5 6
buttononcetogetnumber5.
■Thenpressthe
5 6
buttononcetogetnumber6.
■Finallypressthe
7 8
buttononcetogetnumber8.
1 2
3 4
5 6
7 8
9 0
10.ProgrammingaUserCode.
● A programmed code can be from four (4) to eight (8) digits long.
●For maximum security an 8 digit code is recommended.
●Up to 4 user codes can be entered.
●Excess delay in the programming steps once started will cause unit to
beep twice and will require you to restart from step (10a).
Note: Programming instructions can also be found on interior of lock.
a.Presstheprogrambuttonontheinteriorunitonce.
b.Enterin4to8digitcodeontothekeypad.
c.Pressthe“LOCK”buttontosavecode.
d.
a.Presstheprogrambuttonontheinteriorunittwice.
b.Enterin4to8digitcodeontothekeypad.
c.Pressthe“LOCK”buttontosavecode.
d.
Pressthe“LOCK”buttonandre-enterthecodetotest.Unitshouldgo
totheunlockedpositionallowingexteriorlevertoretractthelatch.Ifit
doesnotgototheunlockposition,repeatsteps(a)through(c).
Pressthe“LOCK”buttonandre-enterthecodetotest.Unitshouldgo
totheunlockedpositionallowingexteriorlevertoretractthelatch.Ifit
doesnotgototheunlockposition,repeatsteps(a)through(c).
Programmingthe1stusercode.
Programmingthe2ndusercode.
Program
Button
LOCK
Button
Continued

8
ON
1 2 3 4
11.SmartCodeUserSelectableSettings.
Switch#2 EnablestheAUTOLOCK
whenintheONposition.WithAutoLocken-
abled,SmartCodewillautomaticallyrelockthe
door30secondsafterunlocking.
Switch#1 StatusLEDblinksevery
5secondswhenintheONposition.Note:
The low battery RED LED cannot be
disabled.
Switch
Position
OFF
ON
LED
Color
Green
Orange
Red
Unlocked
Locked
LowBattery
Lock
Status
Red
LowBattery
Hint: for easier access, use a ball point pen to operate the switches.
Switch#4 ExtraswitchwithNOFUNCTION.
Switch#3 EnablestheAUDIOsound(Beeper)whenintheON
position.Keypadwillnowlightred/greenwhenbuttonsarepressed.
a.Presstheprogrambuttonontheinteriorunitfour times.
b.Enterin4to8digitcodeontothekeypad.
c.Pressthe“LOCK”buttontosavecode.
d.
a.Presstheprogrambuttonontheinteriorunitthree times.
b.Enterin4to8digitcodeontothekeypad.
c.Pressthe“LOCK”buttontosavecode.
d.
Pressthe“LOCK”buttonandre-enterthecodetotest.Unitshouldgo
totheunlockedpositionallowingexteriorlevertoretractthelatch.Ifit
doesnotgototheunlockposition,repeatsteps(a)through(c).
Pressthe“LOCK”buttonandre-enterthecodetotest.Unitshouldgo
totheunlockedpositionallowingexteriorlevertoretractthelatch.Ifit
doesnotgototheunlockposition,repeatsteps(a)through(c).
Programmingthe4thusercode.
Programmingthe3rdusercode.
CAUTION:Preventunauthorizedentry.Thislockcanbeopenedusingfour
differentcodesthatarerandomlysetatthefactory.Uponinstallationandset-up,
replaceall ofthesecodeswithyourown.Sinceanyonewithaccesstothepower
boardcanchangethesecodes,youmustrestrictaccesstothepowerboardand
routinelycheckbothcodestoassuretheyhavenotbeenalteredwithoutyour
knowledge.
10.Continued.....
LED
Switches

9
Whenthedoorisinthelockedposition,pressthelockbuttontolightup
thekeypad.Ina“verylowbattery”conditionthekeypadwillnotlightup.
b.Keypadlightsignals
a.KeypadBackLight
●
●
●
●
Switch3off–thekeypadwillashredeverytimeyoupressabutton.
LowBatteryWarning–Afteracorrectcodeisentered,thekeypadwill
ashredmultipletimesforapproximately3seconds.
IncorrectCodesEntered–whenthreeincorrectcodesareenteredinto
theSmartCodethekeypadwillashredandthebeeperwillsoundfor
15seconds.Thekeypadwillnotallowimputfor60secondsafterwhich
youcanre-enteracodeandtryagain.
12.InstallCover.
13.LowBatteryIndicators.
●Afteracorrectcodeisentered,thekeypadwillashredmultipletimes
forapproximately3seconds.
●Afteracorrectcodeisenteredtheunitbeepsmultipletimesforap-
proximately3seconds.
●Regardlessofswitch#1position,under“LowBattery”condition-red
LEDwillashevery5seconds.
1.TheinteriorLED
2.TheexteriorKeypad(whenswitch#3isOFF).
3.TheAudioIndicator(whenswitch#3isintheONposition).
Note:Forfuturebatteryreplacement,removebatterypack,replacebatter-
ies(seesection9)andsimplyreinsertbatterypackasshown,abeepanda
GreenLEDashwillindicateasuccess.
14.KeypadLights.
b. Optional:Toavoidtamperingyoumay
choosetosecurethecover
byinstallingasmallscrew
tobothsidesofthe
cover-usingthehex
wrenchsupplied.
a.Onceyouhavecompletedsetupandprogramming,youcaninstallthe
cover.Positioncoveroverunitandpressitontotopportionofunit.Onceitis
ushagainstthedoor,slideitdownintoplace.

10
Q:HowlongwilltheSmartCodeoperateonasetofbatteries?
A:Basedon15operationsperday,asinglesetofAlkalinebatterieswilloperatetheSmartCodefor
over2years.
Q:Whattypeofbatteriesdoyourecommend?
A:Forbestresults,usenewnon-rechargeableAlkalinebatteriesonly.
Q: IjustinstalledaSmartCodeonmydoorbutitdoesnotoperatecorrectly
A: Makesureyouhaveinstalledthecylinderproperly,reviewstep8.
Q: Iremovedthebatterypackmomentarilyandmylockdoesnotworkanymore.
A: Thesystemdidnotinitializeproperlyduetoremainingcharge.Tocorrectperformthefollowing:
a.Removebatterypack
b.Press“Program”buttonthreetimes
c.Wait10seconds.
d.Insertbatterypack.
e.ThesystemshouldashtheGreenLEDandbeep,indicatingproper
initialization
f.Repeata-difinitializationfailed
Q:Iamplanningtobeawayforseveralmonths;willmylockoperatewhenIgetback?
A:Whenthesystemisidling,itconsumesminimumpower(veryclosetobatteryshelflife.)With
alkalinebatteries,thelockshouldbeoperableafteryearsofidle.SeealsoQuestionsandAnswers
below.
Q:WhatsettingsshouldIusetogetthemaximumbatterylifeoutofmylock?
A:Set“StatusLED”(SW1)and“Auto-lock”(SW2)totheoffposition.
15.FrequentlyaskedQuestions(FAQs).
Forassistanceorwarrantyinformation:
ForKwiksetproduct,call
1-800-327-5625forUSA&CANADA
orvisit,www.kwikset.com
ForWeiserproduct,call
1-800-677-5625USA,1-800-501-9471CANADA
orvisit,www.weiserlock.com
WARNING:ThisManufactureradvisesthatnolockcanprovidecompletesecurityby
itself.Thislockmaybedefeatedbyforcibleortechnicalmeans,orevadedbyentryelsewhere
ontheproperty.Nolockcansubstituteforcaution,awarenessofyourenvironment,andcommon
sense.Builder’shardwareisavailableinmultipleperformancegradestosuittheapplication.
Inordertoenhancesecurityandreducerisk,youshouldconsultaqualiedlocksmithorother
securityprofessional.
This product is covered by one or more of the following patents or patents pending: 5123683 5317889 5335525 5335950 5441318 5452928 5482335 5490700 5496082 5513509 5513510
5529351 5540070 5570912 5662365 5761937 5810402 5816629 5857365 6058746 6128933 6151934 6398465 6401932 6412319 6443504 6532629 6536812 6568727 6598440
6662606 6695365 6702340 6745602 6828519 6860131 6860529 6862909 6871520 6880871 6948748 6951123 6959569 6971513 6973813 7007528 7100408 7104098 7114357
7117701 7152891 7156432 7162901 7213429 7234331 7308811 RE38693 D344011 D347564 D348602 D348821 D352888 D361488 D361489 D361706 D363872 D373063 D373523
D400777 D407292 D431443 D435423 D436933 D437216 D437771 D443194 D443808 D446122 D447927 D452131 D453897 D453898 D453899 D454049 D458839 D461700 D463968
D464565 D464877 D465989 D468636 D472794 D473780 D514921 D524630 D525512 D525516 D540140 D540147 D541621 D542115 D545169 D547830
/