Page is loading ...

Printed in China
ENGLISH
Quick Start Guide
www.lg.comMBM64519201 (1.0)
BC


1
TABLE OF CONTENTS
INTRODUCTION ................................................. 2
Your Phone ........................................................... 3
Getting Started .................................................... 5
Set Up Your Accounts ....................................... 10
Customize Your Phone ........................................ 11
Locking & Unlocking the Screen ......................12
Guest mode .........................................................14
Camera ................................................................16
Video camera ......................................................16
Browser ................................................................ 17
Transfer Music and Pictures ..............................18
Calls and Voicemail ............................................19
Text Messaging ..................................................20
Email ....................................................................21
Input Language Settings ..................................22
QSlide .................................................................23
Wi-Fi and Bluetooth
®
......................................... 24
Google Play™ Store ........................................... 25
For Your Safety ................................................... 26

2
INTRODUCTION
Support
This guide provides you with the information
you need to get started.
To download the latest full version of the user
guide, go to
LG.com
(http://www.lg.com/
us) on your PC or laptop and search for your
phone model in the support section.
NOTE
• Illustrations may differ from those you see on
actual phone.
• Available accessories may vary depending on your
region, country or service provider.
• Some features and service may vary by region,
phone, service provider and software version.
• All information in this document is subject to
change without notice.
Your Phone
Front view

3
INTRODUCTION
Support
This guide provides you with the information
you need to get started.
To download the latest full version of the user
guide, go to
LG.com
(http://www.lg.com/
us) on your PC or laptop and search for your
phone model in the support section.
NOTE
• Illustrations may differ from those you see on
actual phone.
• Available accessories may vary depending on your
region, country or service provider.
• Some features and service may vary by region,
phone, service provider and software version.
• All information in this document is subject to
change without notice.
Your Phone
Front view
7 3.5mm Headset
Jack
8 Microphone (Sub)
9 Charger/USB Port
10 Microphone (Main)
1 Earpiece
2 Proximity Sensor
3 Front Camera Lens
4 Back Key
5 Home Key
6 Menu Key
1
2
3
5 6
4
7
8
10
9

4
Getting Started
Before you start using the phone, you may
need to insert the Micro SIM card.
Installing the Micro SIM card
and battery
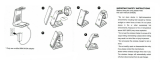
1 Insert your fingertip into the Charger/
USB Port and lift the back cover to
remove it.
2 Insert the Micro SIM card. Make sure the
gold contact area on the card is facing
downwards and the notched side is inserted
first (see image below).
Side view
Rear view
1 QuickButton Key
(Customizable)
TIP: QuickButton
Press for quick
access to your
favorite app.
2 Volume Keys
3 Power/Lock Key
2
1
3
5
1
6
2
7
3
4
1 Micro SIM Card
Slot
2 Back Camera
Lens
3
MicroSD Card Slot
4 Flash
5 Back Cover
6 Battery
7 External Speaker

5
Getting Started
Before you start using the phone, you may
need to insert the Micro SIM card.
Installing the Micro SIM card
and battery
1 Insert your fingertip into the Charger/
USB Port and lift the back cover to
remove it.
2 Insert the Micro SIM card. Make sure the
gold contact area on the card is facing
downwards and the notched side is inserted
first (see image below).
Side view
Rear view
1 QuickButton Key
(Customizable)
TIP: QuickButton
Press for quick
access to your
favorite app.
2 Volume Keys
3 Power/Lock Key
5
6
7
4 Flash
5 Back Cover
6 Battery
7 External Speaker

6
3 To insert the battery, align the gold contacts
on the phone and the battery and press it
down until it clicks into place.
4 Place the back cover over the battery
compartment and press it downwards until
it clicks into place.
Installing the memory card
To store multimedia files, such as pictures
taken using the camera, to an SD card, you
must insert a memory card into your phone.
1 Insert your fingertip into the Charger/
USB Port and lift the back cover to
remove it.
2 Insert the memory card into the slot.
Make sure the gold contact area is facing
downwards.
NOTE
The memory card is sold separately.
Warning!
Do not remove the memory card without first
unmounting it using the Storage menu. Otherwise
the memory card, as well as your phone, may

7
3 To insert the battery, align the gold contacts
on the phone and the battery and press it
down until it clicks into place.
4 Place the back cover over the battery
compartment and press it downwards until
it clicks into place.
Installing the memory card
To store multimedia files, such as pictures
taken using the camera, to an SD card, you
must insert a memory card into your phone.
1 Insert your fingertip into the Charger/
USB Port and lift the back cover to
remove it.
2 Insert the memory card into the slot.
Make sure the gold contact area is facing
downwards.
NOTE
The memory card is sold separately.
Warning!
Do not remove the memory card without first
unmounting it using the Storage menu. Otherwise
the memory card, as well as your phone, may

8
become damaged and the data stored on the
memory card may get corrupted. To unmount the
memory card safely, tap
Apps
> Apps tab >
Settings >
General
tab > Storage > Unmount SD card.
Charging your phone
A rechargeable Li-ion battery is used to power
your phone. A USB adapter, which is included
with your phone, is used to charge the battery.
Ask your your sales representative for further
details regarding approved batteries and
chargers.
Before using your phone for the first time,
make sure the battery is fully charged. An
uncharged battery will fully recharge after 3
hours.
USB Adapter
USB Cable
NOTE
Make sure the battery is installed before connecting
the USB adapter. If the battery is not installed and
the USB adapter is connected, the phone will not
operate properly due to prolonged power cycling.
Also, removing the battery with the USB adapter
connected may damage the device. Please unplug
the USB adapter before removing the battery.
Warning!
If the touch screen does not function while the
phone is in the process of charging, it may be
due to an unstable power supply. Make sure to
disconnect the USB cable from the device or unplug
the USB adapter from the power outlet.
1 Connect the USB adapter and USB cable
(as shown on the previous page).
2 Plug the USB cable (as shown on the next
image) into the phone’s Charger/USB Port.
NOTE
The battery must be fully charged initially to improve
battery lifetime.
NOTE
Your phone has an internal antenna. Be careful
not to scratch or damage this rear area, as that will
cause loss of performance.
Warning!
Use only LG-approved chargers, batteries and
cables. When using unapproved chargers or cables,
it may cause a battery charging delay or display
a pop-up message regarding slow charging.
Unapproved chargers or cables can also cause the
battery to explode or damage the device, which are
not covered by the warranty.

9
become damaged and the data stored on the
memory card may get corrupted. To unmount the
memory card safely, tap
Apps
> Apps tab >
Settings >
General
tab > Storage > Unmount SD card.
Charging your phone
A rechargeable Li-ion battery is used to power
your phone. A USB adapter, which is included
with your phone, is used to charge the battery.
Ask your your sales representative for further
details regarding approved batteries and
chargers.
Before using your phone for the first time,
make sure the battery is fully charged. An
uncharged battery will fully recharge after 3
hours.
USB Adapter
USB Cable
NOTE
Make sure the battery is installed before connecting
the USB adapter. If the battery is not installed and
the USB adapter is connected, the phone will not
operate properly due to prolonged power cycling.
Also, removing the battery with the USB adapter
connected may damage the device. Please unplug
the USB adapter before removing the battery.
Warning!
If the touch screen does not function while the
phone is in the process of charging, it may be
due to an unstable power supply. Make sure to
disconnect the USB cable from the device or unplug
the USB adapter from the power outlet.
1 Connect the USB adapter and USB cable
(as shown on the previous page).
2 Plug the USB cable (as shown on the next
image) into the phone’s Charger/USB Port.
NOTE
The battery must be fully charged initially to improve
battery lifetime.
NOTE
Your phone has an internal antenna. Be careful
not to scratch or damage this rear area, as that will
cause loss of performance.
Warning!
Use only LG-approved chargers, batteries and
cables. When using unapproved chargers or cables,
it may cause a battery charging delay or display
a pop-up message regarding slow charging.
Unapproved chargers or cables can also cause the
battery to explode or damage the device, which are
not covered by the warranty.

10
Internal
Antenna
Set Up Your Accounts
Adding accounts will populate email, contacts,
calendar, and other information on your
device. You may want to set up accounts over
Wi-Fi to save on your data plan usage.
1 On any screen, swipe down from the top
of the screen to display the Notifications
Panel.
2 Tap at the top right corner of the screen,
then tap the
General
tab >
Accounts &
sync
>
Add account
.
3 Select the type of account you would like to
add. Enter your information and follow any
additional on-screen instructions.
NOTE
Contact your IT administrator to help set up your
corporate Microsoft
®
Exchange account.
Customize Your Phone
Add widgets and apps to your Home screen,
change the wallpaper, and more.
Customize the Home Screen
1 Press and hold an empty spot on a Home
screen panel and choose a category:
•
Apps
: Add shortcuts to your favorite apps.
•
Widgets
: Add dynamically updating
widgets.
•
Wallpapers
: Change your wallpaper.
2 Tap the desired option to add it to the
Home screen. To move an item, press and
hold it and drag it to a new location. To
delete it, drag it to
Remove
at the top of
the screen.
Customize Your Sounds
From the Home screen, tap the
Menu Key
>
System settings
>
Sound
tab. You can
change your ringtones, set notification sounds,
and adjust your touch feedback options.

11
Internal
Antenna
Set Up Your Accounts
Adding accounts will populate email, contacts,
calendar, and other information on your
device. You may want to set up accounts over
Wi-Fi to save on your data plan usage.
1 On any screen, swipe down from the top
of the screen to display the Notifications
Panel.
2 Tap at the top right corner of the screen,
then tap the
General
tab >
Accounts &
sync
>
Add account
.
3 Select the type of account you would like to
add. Enter your information and follow any
additional on-screen instructions.
NOTE
Contact your IT administrator to help set up your
corporate Microsoft
®
Exchange account.
Customize Your Phone
Add widgets and apps to your Home screen,
change the wallpaper, and more.
Customize the Home Screen
1 Press and hold an empty spot on a Home
screen panel and choose a category:
•
Apps
: Add shortcuts to your favorite apps.
•
Widgets
: Add dynamically updating
widgets.
•
Wallpapers
: Change your wallpaper.
2 Tap the desired option to add it to the
Home screen. To move an item, press and
hold it and drag it to a new location. To
delete it, drag it to
Remove
at the top of
the screen.
Customize Your Sounds
From the Home screen, tap the
Menu Key
>
System settings
>
Sound
tab. You can
change your ringtones, set notification sounds,
and adjust your touch feedback options.

12
Locking & Unlocking the
Screen
After a period of inactivity, the screen you are
currently viewing will be replaced by the lock
screen to conserve battery power.
Unlocking the Screen
1 Press the
Power/Lock Key
to turn on
your screen. Your Lock Screen will appear.
2 From the center of the screen, swipe in any
direction to unlock it.
• Shortcuts can be added for quick access
to your favorite apps. To add shortcuts,
from the Home screen, tap the
Menu Key
>
System settings
>
Display
tab >
Lock screen
>
Shortcuts
.
• To use a shortcut, swipe the shortcut
icon at the bottom of the screen in any
direction. The screen will unlock and open
the application.
KnockON
The KnockON feature allows you to double-
tap the screen to easily turn it on and off. You
can enable/disable this feature in the Gestures
settings.
1 KnockON is enabled by default. To turn
it on or off, from the Home screen, tap
the
Menu Key
>
System settings
>
General
tab >
Gestures
>
Screen on/off.
2 With KnockON enabled and the screen off,
quickly double-tap the screen to wake the
phone.
3 Double-tap an empty are of the Home
screen or the Status Bar to turn the screen
off.
Knock Code
The Knock Code feature allows you to unlock
the screen when the screen is off by tapping
the correct area and sequence. It allows you
to define how many times and where on the
screen to tap to unlock your phone. You can
set this feature in the Lock Screen settings.
1 From the Home screen, tap the
Menu Key
>
System settings
>
Display
tab >
Lock screen
>
Select screen lock
>
Knock
Code
.
NOTE
If Knock Code is set, you cannot turn the screen on
using the KnockON feature.

13
Locking & Unlocking the
Screen
After a period of inactivity, the screen you are
currently viewing will be replaced by the lock
screen to conserve battery power.
Unlocking the Screen
1 Press the
Power/Lock Key
to turn on
your screen. Your Lock Screen will appear.
2 From the center of the screen, swipe in any
direction to unlock it.
• Shortcuts can be added for quick access
to your favorite apps. To add shortcuts,
from the Home screen, tap the
Menu Key
>
System settings
>
Display
tab >
Lock screen
>
Shortcuts
.
• To use a shortcut, swipe the shortcut
icon at the bottom of the screen in any
direction. The screen will unlock and open
the application.
KnockON
The KnockON feature allows you to double-
tap the screen to easily turn it on and off. You
can enable/disable this feature in the Gestures
settings.
1 KnockON is enabled by default. To turn
it on or off, from the Home screen, tap
the
Menu Key
>
System settings
>
General
tab >
Gestures
>
Screen on/off.
2 With KnockON enabled and the screen off,
quickly double-tap the screen to wake the
phone.
3 Double-tap an empty are of the Home
screen or the Status Bar to turn the screen
off.
Knock Code
The Knock Code feature allows you to unlock
the screen when the screen is off by tapping
the correct area and sequence. It allows you
to define how many times and where on the
screen to tap to unlock your phone. You can
set this feature in the Lock Screen settings.
1 From the Home screen, tap the
Menu Key
>
System settings
>
Display
tab >
Lock screen
>
Select screen lock
>
Knock
Code
.
NOTE
If Knock Code is set, you cannot turn the screen on
using the KnockON feature.

14
Notifications Panel
Swipe the top of the screen downwards to
open the Notifications Panel.
• To respond to a notification, tap it.
• To remove a notification, swipe it left or
right.
• To remove all notifications, tap
Clear
.
• Adjust the Quick Settings by tapping them
(i.e.,
Sound
).
• Tap at the top right corner of the
Notifications Panel to access the Settings
menu.
Guest mode
Use Guest mode when you let someone
else use your phone. They will only be
able to use the applications that you’ve
selected. Once you set it up, you can easily
put your phone in Guest mode by drawing
the guest pattern on the Lock screen,
which is different from your normal unlock
pattern.
NOTE
Guests can also use applications that your selected
applications link to.
Setting up Guest mode
1 From the Home screen, tap the
Menu Key
>
System settings
>
General tab
>
Guest mode
.
2 Tap
Set pattern
, then set the pattern you
want to use to put your device
in Guest
mode.
3 Tap
Set apps
to view which apps can be
accessed in Guest mode. Tap
the
Add
icon in the upper right corner of
the screen to change the Guest apps
list.
4 Tap the
Guest mode
switch to enable
this mode.
Using Guest mode
After you’ve set up and enabled Guest mode,
lock the screen so that you can enter your
Guest mode pattern. The Guest mode Home
screen is displayed with only the apps you’ve
selected for guest access. To exit Guest mode,
enter your normal unlock pattern on the Lock
screen.
NOTE
Guest mode is automatically disabled if your lock
sequence is changed from Pattern. Otherwise,
manually disable it if you no longer want to allow
guest access.

15
Notifications Panel
Swipe the top of the screen downwards to
open the Notifications Panel.
• To respond to a notification, tap it.
• To remove a notification, swipe it left or
right.
• To remove all notifications, tap
Clear
.
• Adjust the Quick Settings by tapping them
(i.e.,
Sound
).
• Tap at the top right corner of the
Notifications Panel to access the Settings
menu.
Guest mode
Use Guest mode when you let someone
else use your phone. They will only be
able to use the applications that you’ve
selected. Once you set it up, you can easily
put your phone in Guest mode by drawing
the guest pattern on the Lock screen,
which is different from your normal unlock
pattern.
NOTE
Guests can also use applications that your selected
applications link to.
Setting up Guest mode
1 From the Home screen, tap the
Menu Key
>
System settings
>
General tab
>
Guest mode
.
2 Tap
Set pattern
, then set the pattern you
want to use to put your device
in Guest
mode.
3 Tap
Set apps
to view which apps can be
accessed in Guest mode. Tap
the
Add
icon in the upper right corner of
the screen to change the Guest apps
list.
4 Tap the
Guest mode
switch to enable
this mode.
Using Guest mode
After you’ve set up and enabled Guest mode,
lock the screen so that you can enter your
Guest mode pattern. The Guest mode Home
screen is displayed with only the apps you’ve
selected for guest access. To exit Guest mode,
enter your normal unlock pattern on the Lock
screen.
NOTE
Guest mode is automatically disabled if your lock
sequence is changed from Pattern. Otherwise,
manually disable it if you no longer want to allow
guest access.

16
Camera
1 From the Home screen, tap Apps > Camera .
1
5
2
3
6
7
4
1
Flash
2
Swap camera
3
Shot mode
4
Settings
5
Mode switch
6
Capture
7
Gallery
Video camera
1 From the Home screen, tap Apps > Camera
.
2 Slide the Mode Switch icon down to to
toggle from Camera to Video camera mode.
1
5
2
3
6
7
4
1
Flash
2
Swap camera
3
Recording mode
4
Settings
5
Mode switch
6
Record
7
Gallery
NOTE
To access the front-facing camera or camcorder,
tap . Tap to view and change camera/
camcorder settings.
Share Photos or Videos
1 From the home screen, tap
Apps
>
Gallery
.
2 Tap an album.
3 Tap and then select the image(s) you
wish to share.
4 Tap Share.
5 Select the method you wish to use to share
and send it.
Browser
Use the Web browser to surf the Web with
ease.
Browsing the Web
1 From the Home screen, tap
Apps
>
Browser
.
2 Tap the URL bar at the top of the screen
and enter the web site address.
3 Tap Go on the keyboard.

17
Camera
1 From the Home screen, tap Apps > Camera .
1
5
2
3
6
7
4
1
Flash
2
Swap camera
3
Shot mode
4
Settings
5
Mode switch
6
Capture
7
Gallery
Video camera
1 From the Home screen, tap Apps > Camera
.
2 Slide the Mode Switch icon down to to
toggle from Camera to Video camera mode.
1
5
2
3
6
7
4
1
Flash
2
Swap camera
3
Recording mode
4
Settings
5
Mode switch
6
Record
7
Gallery
NOTE
To access the front-facing camera or camcorder,
tap . Tap to view and change camera/
camcorder settings.
Share Photos or Videos
1 From the home screen, tap
Apps
>
Gallery
.
2 Tap an album.
3 Tap and then select the image(s) you
wish to share.
4 Tap Share.
5 Select the method you wish to use to share
and send it.
Browser
Use the Web browser to surf the Web with
ease.
Browsing the Web
1 From the Home screen, tap
Apps
>
Browser
.
2 Tap the URL bar at the top of the screen
and enter the web site address.
3 Tap Go on the keyboard.

18
Transfer Music and Pictures
Transfer music and photos to and from your
phone in a few simple steps.
1 Connect your phone to your computer with
a USB cable. Steps may vary depending on
your operating system.
2 You may be prompted to install PC
programs. Tap
Media sync (MTP)
.
3 On your PC, choose open device to view
files using Windows Explorer.
4 Your phone will appear as another portable
device on your computer. Click on the drive
to view it.
5 Drag and drop your files* into the
corresponding folders, such as music,
videos, or pictures. You can also transfer
files from your PC to your phone.
* Files must be Digital Rights Management
(DRM) free.
Calls and Voicemail
It’s easy to make calls and access voicemail
and your call logs with your phone.
Make a Call
1 From the Home screen, tap
Phone
.
2 Enter a phone number or spell the name
of a contact. Tap the contact and then tap
to place the call.
Access Voicemail
1 From the Home screen, tap
Phone
.
2 Tap and hold .
3 Follow the voice prompts to listen to
messages.
Access Call Logs
1 From the Home screen, tap
Phone
.
2 Tap the
Call logs
tab.
3 Tap an entry to view it.
4 Ta p
to call or
to send a message.
/