HP 8550MFP User manual
- Category
- Laser/LED printers
- Type
- User manual
This manual is also suitable for

System
Ready
Reference
Guide
English
8550MFP
*C7835-90901*
*C7835-90901*
C7835-90901
Copyright 2000
Hewlett-Packard Co.
Printed in USA
©
Manual Part No.
C7835-90901
Printed on at least
50% Total Recycled Fiber with
at least 10% Post-Consumer Paper


System
Ready Reference
Guide
HP Color LaserJet
8550MFP

© Copyright Hewlett-Packard
Company 2000
All Rights Reserved.
Reproduction, adaptation, or
translation without prior written
permission is prohibited, except
as allowed under the copyright
laws.
Publication number
C7835-90901
First edition, April 2000
Warranty
The information contained in
this document is subject to
change without notice.
Hewlett-Packard makes no
warranty of any kind with
respect to this information.
HEWLETT-PACKARD
SPECIFICALLY DISCLAIMS
THE IMPLIED WARRANTY OF
MERCHANTABILITY AND
FITNESS FOR A PARTICULAR
PURPOSE.
Hewlett-Packard shall not be
liable for any direct, indirect,
incidental, consequential, or
other damage alleged in
connection with the furnishing or
use of this information.

EN
Contents 3
Contents
Overview Section
Loading media. . . . . . . . . . . . . . . . . . . . . . . . . . . . . . . . . . . 5
Media specifications. . . . . . . . . . . . . . . . . . . . . . . . . . . . 5
Loading the input trays . . . . . . . . . . . . . . . . . . . . . . . . . 7
Configuring the media type in the printer unit
control panel . . . . . . . . . . . . . . . . . . . . . . . . . . . . . . . . 13
Media jams. . . . . . . . . . . . . . . . . . . . . . . . . . . . . . . . . . . . . 15
Removing jammed media . . . . . . . . . . . . . . . . . . . . . . 15
Printing Section
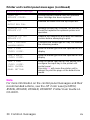
Common messages . . . . . . . . . . . . . . . . . . . . . . . . . . . . . 27
Printer unit control panel messages. . . . . . . . . . . . . . . 27
Job retention features . . . . . . . . . . . . . . . . . . . . . . . . . . . 31
Proof and hold feature . . . . . . . . . . . . . . . . . . . . . . . . . 31
Stored job feature . . . . . . . . . . . . . . . . . . . . . . . . . . . . 32
Private job feature . . . . . . . . . . . . . . . . . . . . . . . . . . . . 33
Quick copy jobs . . . . . . . . . . . . . . . . . . . . . . . . . . . . . . 34
Copying Section
Introduction. . . . . . . . . . . . . . . . . . . . . . . . . . . . . . . . . . . . 35
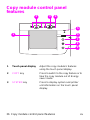
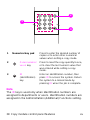
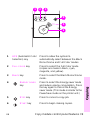
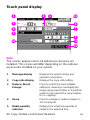
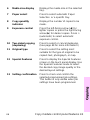
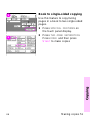
Copy module control panel features. . . . . . . . . . . . . . . . 36
Touch panel display. . . . . . . . . . . . . . . . . . . . . . . . . . . 40
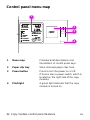
Control panel menu map . . . . . . . . . . . . . . . . . . . . . . . 42
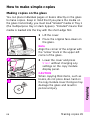
Making copies . . . . . . . . . . . . . . . . . . . . . . . . . . . . . . . . . . 43
Other features . . . . . . . . . . . . . . . . . . . . . . . . . . . . . . . 44
How to make simple copies. . . . . . . . . . . . . . . . . . . . . 45

4 Contents
EN
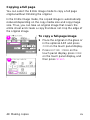
How to copy the entire original onto the available
media. . . . . . . . . . . . . . . . . . . . . . . . . . . . . . . . . . . . . . 47
How to make double-sided copies. . . . . . . . . . . . . . . . 49
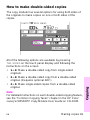
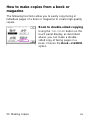
How to make copies from a book or magazine . . . . . . 50
How to enhance the image quality. . . . . . . . . . . . . . . . 56
For more information . . . . . . . . . . . . . . . . . . . . . . . . . . . . 60

EN
Loading media 5
Overview Section
Loading media
Media specifications
The following types and sizes of media can be used in the
HP Color LaserJet 8550MFP system.
Media types
• paper
• pre-punched media
• transparencies (0.1 to 0.13 mm or 4 to 5 mils thick)
• envelopes
• labels
Media sizes
• Executive
• Letter
• Legal
• Ledger
• A5
• A4
• A3
• Minimum (custom sizes): 99 by 190.5 mm (3.9 in by 7.5 in)
• Maximum (custom sizes): 305 by 470 mm (12 by 18.5 in)

6 Loading media
EN
Media weight
• Tray 1: 60 to 216 g/m
2
(16 to 58 lb)
• Other input trays: 60 to 105 g/m
2
(16 to 28 lb)
For complete information on media specifications for this
product, see the
HP Color LaserJet 8550, 8550N, 8550DN,
8550GN, 8550MFP Printer User Guide
on CD-ROM.
Note
Use Tray 1 (the stack bypass or multipurpose tray) whenever
you are copying rotated media. Rotated media are originals that
are loaded short-edge first on the glass or in the optional
automatic document feeder (ADF). Media must be loaded in
Tray 1
short edge first
for rotated copying.

EN
Loading media 7
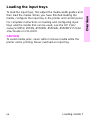
Overview
Loading the input trays
To load the input trays, first adjust the media-width guides and
then load the media. When you have finished loading the
media, configure the input tray in the printer unit control panel.
For complete instructions on loading and configuring input
trays and the media that can be used, see the
HP Color
LaserJet 8550, 8550N, 8550DN, 8550GN, 8550MFP Printer
User Guide
on CD-ROM.
CAUTION
To avoid media jams, never add or remove media while the
printer unit is printing. Never overload an input tray.

8 Loading media
EN
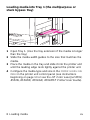
Loading media into Tray 1 (the multipurpose or
stack bypass tray)
1
Open Tray 1. (Use the tray extension if the media is longer
than the tray.)
2
Slide the media-width guides to the size that matches the
media.
3
Place the media in the tray and slide it into the printer unit
until the leading edge rests lightly against the printer unit.
4
Configure the media type and size in the
PAPER HANDLING
MENU
in the printer unit control panel (see instructions
beginning on page 13 or see the
HP Color LaserJet 8550,
8550N, 8550DN, 8550GN, 8550MFP Printer User Guide
).

EN
Loading media 9
Overview
Note
Filling the tray above the media-fill mark may cause paper jams.
The default mode for Tray 1 is Cassette
.
When Tray 1 is in
Cassette mode, the printer unit will pull media from this tray if
the appropriate media is found. Other modes for Tray 1 are
MANUAL
and
FIRST
.
Configure Tray 1 in the
PAPER HANDLING
MENU
on the printer
unit control panel. For more information on configuring the
Tray 1 mode, see the
HP Color LaserJet 8550, 8550N, 8550DN,
8550GN, 8550MFP Printer User Guide
on CD-ROM.
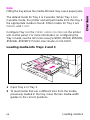
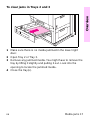
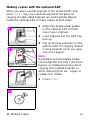
Loading media into Trays 2 and 3
1
Open Tray 2 or Tray 3.
2
To load media that are a different size from the media
previously loaded in the tray, move the two media-width
guides to the correct positions.

10 Loading media
EN
3 Load media up to the media-fill marks. Five hundred
sheets of 75 g/m
2
(20 lb) bond media will fit into either tray.
Note
Filling the tray above the media-fill mark may cause paper jams.
4 Push the tray into the printer unit.
5 Configure the media type in the
PAPER HANDLING MENU
in
the printer unit control panel (see instructions beginning on
page 13).

EN
Loading media 11
Overview
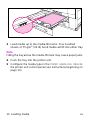
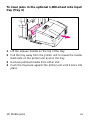
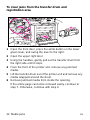
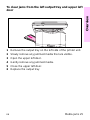
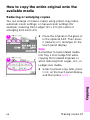
Loading media into the optional 1,000-sheet side
input tray (Tray 4)
1
Lift the tray cover.
2
Adjust the left and right media-width guides as necessary.
3
Place the media into the tray.
Note
Always bend the stack of paper before placing it into the tray,
as shown above. Doing so will help prevent misfeeds or paper
jams. Never fan a stack of paper before placing it into the tray.

12 Loading media
EN
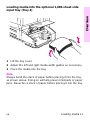
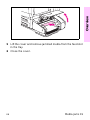
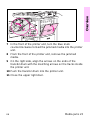
Note
Filling the tray above the media-fill mark may cause paper jams.
4 Close the cover.
5 The default media size for the optional 1,000-sheet side
input tray is A4. To change the default from A4 to Letter, set
the tab on top of the input tray cover to read LTR. This must
be done before the side input tray is pushed back against
the printer unit. Slide the tab out towards the back of the
side input tray, rotate it, and then slide it back in so that LTR
appears in the window.

EN
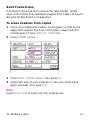
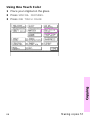
Loading media 13
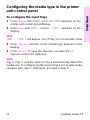
Overview
Configuring the media type in the printer
unit control panel
To configure the input trays
1
Press M
ENU
until
PAPER HANDLING MENU
appears on the
printer unit control panel display.
2
Press I
TEM
until
TRAY <NUMBER> TYPE =
appears on the
display.
Note
TRAY 1 TYPE =
will appear only if Tray 1 is in Cassette mode.
3
Press -V
ALUE
+ until the correct media type appears on the
display.
4
Press S
ELECT
to save the selection. An asterisk (
*
)
appears next to the selection.
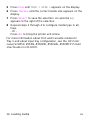
Note
Tray 2, Tray 3, and the optional Tray 4 automatically detect the
media size. To configure media size for Tray 1 in Cassette mode,
continue with step 5. Otherwise, proceed to step 8.

14 Loading media
EN
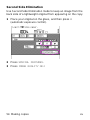
5 Press I
TEM
until TRAY 1 SIZE = appears on the display.
6 Press -V
ALUE
+ until the correct media size appears on the
display.
7 Press S
ELECT
to save the selection. An asterisk (*)
appears to the right of the selection.
8 Repeat steps 2 through 4 to configure media type in all
trays.
- Or -
Press G
O
to bring the printer unit online.
For more information about First and Cassette modes for
Tray 1 and about input tray configuration, see the
HP Color
LaserJet 8550, 8550N, 8550DN, 8550GN, 8550MFP Printer
User Guide
on CD-ROM.

EN
Media jams 15
Overview
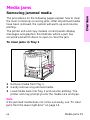
Media jams
Removing jammed media
The procedures on the following pages explain how to clear
the most commonly occurring jams. After all jammed media
have been removed, the system will warm up and resume
printing.
The printer unit and copy module control panels display
messages and graphics that indicate where a jam has
occurred and which doors to open to clear the jam.
To clear jams in Tray 1
1
Remove media from Tray 1.
2
Gently remove any jammed media.
3
Load media back into Tray 1 and resume printing. The
printer unit may prompt you for the media size and type.
Note
If the jammed media does not come out easily, see “To clear
jams from the lower right door” on page 16.

16 Media jams
EN
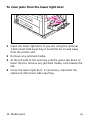
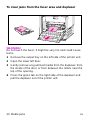
To clear jams from the lower right door
1
Open the lower right door. If you are using the optional
1,000-sheet side input tray, it must first be moved away
from the printer unit.
2
Remove any jammed media.
3
At the left side of the opening, pull the green tab down to
lower the bar, remove any jammed media, and release the
tab.
4
Close the lower right door. If necessary, reposition the
optional 1,000-sheet side input tray.

EN
Media jams 17
Overview
To clear jams in Trays 2 and 3
1
Make sure there is no media jammed in the lower right
door.
2
Open Tray 2 or Tray 3.
3
Remove any jammed media. You might have to remove the
tray by lifting it slightly and pulling it out. Look into the
opening to locate the jammed media.
4
Close the tray(s).

18 Media jams
EN
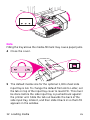
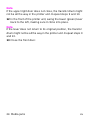
To clear jams in the optional 1,000-sheet side input
tray (Tray 4)
1
Lift the release handle on the top of the tray.
2
Pull the tray away from the printer unit to reveal the media
feed slots on the printer unit and on the tray.
3
Remove jammed media from either slot.
4
Push the tray back against the printer unit until it locks into
place.
Page is loading ...
Page is loading ...
Page is loading ...
Page is loading ...
Page is loading ...
Page is loading ...
Page is loading ...
Page is loading ...
Page is loading ...
Page is loading ...
Page is loading ...
Page is loading ...
Page is loading ...
Page is loading ...
Page is loading ...
Page is loading ...
Page is loading ...
Page is loading ...
Page is loading ...
Page is loading ...
Page is loading ...
Page is loading ...
Page is loading ...
Page is loading ...
Page is loading ...
Page is loading ...
Page is loading ...
Page is loading ...
Page is loading ...
Page is loading ...
Page is loading ...
Page is loading ...
Page is loading ...
Page is loading ...
Page is loading ...
Page is loading ...
Page is loading ...
Page is loading ...
Page is loading ...
Page is loading ...
Page is loading ...
Page is loading ...
Page is loading ...
Page is loading ...
-
 1
1
-
 2
2
-
 3
3
-
 4
4
-
 5
5
-
 6
6
-
 7
7
-
 8
8
-
 9
9
-
 10
10
-
 11
11
-
 12
12
-
 13
13
-
 14
14
-
 15
15
-
 16
16
-
 17
17
-
 18
18
-
 19
19
-
 20
20
-
 21
21
-
 22
22
-
 23
23
-
 24
24
-
 25
25
-
 26
26
-
 27
27
-
 28
28
-
 29
29
-
 30
30
-
 31
31
-
 32
32
-
 33
33
-
 34
34
-
 35
35
-
 36
36
-
 37
37
-
 38
38
-
 39
39
-
 40
40
-
 41
41
-
 42
42
-
 43
43
-
 44
44
-
 45
45
-
 46
46
-
 47
47
-
 48
48
-
 49
49
-
 50
50
-
 51
51
-
 52
52
-
 53
53
-
 54
54
-
 55
55
-
 56
56
-
 57
57
-
 58
58
-
 59
59
-
 60
60
-
 61
61
-
 62
62
-
 63
63
-
 64
64


HP 8550MFP User manual
- Category
- Laser/LED printers
- Type
- User manual
- This manual is also suitable for
Ask a question and I''ll find the answer in the document
Finding information in a document is now easier with AI
Related papers
-
HP Color LaserJet 8550 Multifunction Printer series User guide
-
-
HP Color LaserJet 8500 Printer series Reference guide
-
-
-
HP LaserJet 4200 Printer series Technical Reference
-
-
-
-
HP LASERJET 9500MFP User manual
