Trendnet TVIP322P User manual
- Category
- Security cameras
- Type
- User manual
This manual is also suitable for

TRENDnet User’s Guide
Cover Page

© Copyright 2012 TRENDnet. All Rights Reserved.
TRENDnet User’s Guide
Table of Contents
i
Contents
Product Overview .................................................................................... 2
Package Contents ...................................................................................................... 2
Features .................................................................................................................... 2
Product Hardware Features ....................................................................................... 3
Application Diagram .................................................................................................. 4
Installation ............................................................................................... 4
Hardware Installation ............................................................................................ 4
Camera Installation ............................................................................................... 7
Starting Camera Finder (IPSetup) ............................................................ 9
Configuration ......................................................................................... 11
Viewing Camera Basic Function................................................................................ 11
Configuring the Camera Setting ............................................................................... 13
Smart Wizard ........................................................................................................... 14
Basic ........................................................................................................................ 15
Network .................................................................................................................. 18
Video & Audio ......................................................................................................... 21
Event Server ............................................................................................................ 25
Motion Detect ......................................................................................................... 28
Event Config ............................................................................................................ 29
Tools ....................................................................................................................... 32
RS-485 ..................................................................................................................... 33
SD Card ................................................................................................................... 35
Device Info .............................................................................................................. 36
How to setup/access the camera behind a Router ................................ 37
Technical Specifications ......................................................................... 40
Troubleshooting ..................................................................................... 42

© Copyright 2012 TRENDnet. All Rights Reserved.
TRENDnet User’s Guide
TV-IP322P
2
Product Overview
TV-IP322P
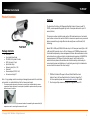
Package Contents
TV-IP322P
Quick Installation Guide
CD-ROM (Utility &User’s Guide)
GPIO Connector (2 pcs)
Spiral Cable Wrap
Network cable (1.5m / 5ft)
Desiccant*
Power adapter (12V DC, 1.5A)
Camera mounting kit**
Note: If any package contents are missing or damaged, please contact the retail store,
online retailer, or reseller/distributor that the item was purchased.
* The camera provides two packs of desiccant: one pack is pre-installed inside the camera
compartment before shipment; the extra pack is provided for replacement while you open
the back cover in the future.
** The provided screws included: (a) screws and washers for assembling the camera shield; (b)
expansion screws for mounting the camera to the wall.
Features
The SecurView Pro Outdoor PoE Megapixel Day/Night Internet Camera, model TV-
IP322P, provides powerful Megapixel night vision in complete darkness for up to 20
meters (66 feet).
This camera is outdoor installation ready with an IP66 rated weather proof and vandal
proof outdoor enclosure. No need to install this camera near a power source, power and
data are received through a single Ethernet cable using Power over Ethernet (PoE)
technology.
Record 1280 x 1024 pixel (SXGA) H.264 video at up to 15 frames per second (fps) or 640
x 480 pixel (VGA) resolution at up to 30 fps. Manage up to 32 TRENDnet cameras with
the included complimentary camera management software. Advanced features include
motion detection recording, email alerts, scheduled recording sessions, H.264/MPEG-4
image compression, 3GPP support, Samba client support, Input/Output ports to
network to alarm systems, date-and-time and other text overlays, mask overlays to
conceal sensitive areas, and digital zoom. A wall/ceiling mounting kit is included and a
sun visor shields the camera from direct sunlight.
* TRENDnet’s Mobile APP supports iPhone®, iPad®, iPod® Touch and
Android. Search for SecurView Mobile from iTunes® or Google Play™.
For future updates, please check www.trendnet.com/App for details.
** Monitoring multiple cameras may required a high performance CPU

© Copyright 2012 TRENDnet. All Rights Reserved.
TRENDnet User’s Guide
TV-IP322P
3
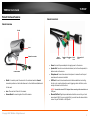
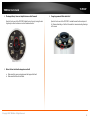
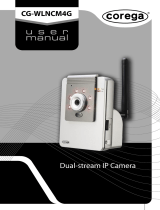
Product Hardware Features
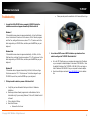
Camera Overview
Shield: It is used to protect the camera for the inclement weather. Several
screw holes positions on the shield allows user to the shield forward/backward
for the need.
Lens: There are four IR lens for this camera.
Camera Stand: the mounting stand to hold the camera.
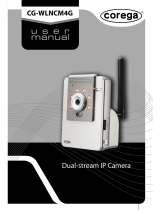
Camera Connectors
Power: Connects the power adapter to supply power to the camera.
Speaker Out: Connects an external audio device (such as the active speaker) to
deliver sound via the camera.
Microphone In: Connects an external microphone to receive the on-the-spot
sound where the camera is installed.
GPIO Port: Connects the external device that features additional controlling
function, such as motion detection, event triggering, alarm notification, and a
variety of external control functions.
NOTE: Connected the external GPIO adapters before connecting to the external device to
GPIO port.
Ethernet/PoE Port: Plugs the provided network cable to connect to your local
area network (LAN). If you are using the PoE, you must have the network cable
connect to your PoE switch or PoE Injector.
Lens
Shield
Camera
Stand
Camera Connectors
Power
Connector
Speaker
Out
Microphone
In
GPIO
Port
Ethernet /PoE
Port

© Copyright 2012 TRENDnet. All Rights Reserved.
TRENDnet User’s Guide
TV-IP322P
4
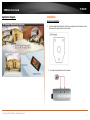
Application Diagram
Installation
Hardware Installation
1. Use the included drill template to drill three mounting holes on the desire location
and hammer the plastic anchors into the holes.
2. Secured the provided screws to the camera.

© Copyright 2012 TRENDnet. All Rights Reserved.
TRENDnet User’s Guide
TV-IP322P
5
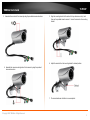
3. Assemble the sun visor to the camera by using the provided screws and washers.
4. Assemble the camera mounting bracket to the camera by using the provided
screws and washers.
5. Align the mounting bracket to the anchors that you hammer on step 1, and
then use the provided screws to secure it. Secure the camera to the mounting
bracket.
6. Adjust the swivel ball on the mounting bracket to desired position.
7. The camera hardware installation is now completed.

© Copyright 2012 TRENDnet. All Rights Reserved.
TRENDnet User’s Guide
TV-IP322P
6
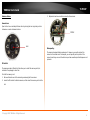
Hardware Feature
Camera Focus:
Open the front cover and adjust the lens focus by turning the lens ring slowly in either
clockwise or counter clockwise direction.
SD Card Slot
The camera provides a SD card slot that allows you to install the memory card (not
included in the package) to store files.
To install the memory card:
1. Remove the back cover of the camera by unscrewing the three screws.
2. Locate the SD card slot inside the camera, and then insert the memory card into the
slot.
3. Replace the back cover and then screw the three screws.
Waterproofing
The camera is designed featuring waterproof. However, you need to protect the
connectors from water soak. For example, you can tape the junction points of the
connectors while you connect the cables or purchase a weatherproof cable/power cord
protector.
Lens
SD Slot

© Copyright 2012 TRENDnet. All Rights Reserved.
TRENDnet User’s Guide
TV-IP322P
7
Camera Installation
1. Insert the Installation CD-ROM into your computer’s CD-ROM drive to initiate
the Auto-Run program.
2. Click the Install Camera.
3. Write down the MAC address of your camera.
4. If using PoE, please skip to the next step. For non-PoE user, please plug and
connect the power adapter to the camera. Please wait for 60 seconds for the
camera to boot up.

© Copyright 2012 TRENDnet. All Rights Reserved.
TRENDnet User’s Guide
TV-IP322P
8
5. Connect a network cable to the camera’s network port and then to your
network. If you are using PoE, please ensure the cable is connected to a PoE
switch or PoE injector.
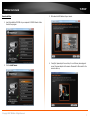
6. Wait while camera is searching.
7. The founded cameras will show on the screen. The camera already selected by
default if you have only one camera installed. If you have more than one
camera in the same Network, you will need to identify the camera by the MAC
address.
8. Type in the Password. The password is “admin” by default. We strongly
suggested changing the camera’s password. The Change Password option is
enable by default.

© Copyright 2012 TRENDnet. All Rights Reserved.
TRENDnet User’s Guide
TV-IP322P
9
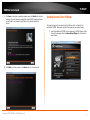
9. Click here on the screen to access the camera now or click Next button for later
accessing. If you will access the camera later and the DHCP mode was selected,
you will need to run Camera Finder (IPSetup) utility as described in next
section.
10. Click Finish to exit the program or click Home return to the main screen.
Starting Camera Finder (IPSetup)
The camera comes with a conveniently utility, IPSetup, which is included in the
Installation CD-ROM, allowing you to search the camera on your network easily.
1. Insert the Installation CD-ROM into your computer’s CD-ROM drive to initiate
the Auto-Run program. Click the Camera Finder (IPSetup from the Auto-Run
menu screen.

© Copyright 2012 TRENDnet. All Rights Reserved.
TRENDnet User’s Guide
TV-IP322P
10
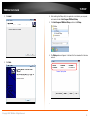
2. Click Install
3. Click Finish.
4. After installing the IPSetup utility, the application is installed to your computer,
and creates a folder in Start\Program\TRENDnet\IPSetup.
5. Click Start>Programs>TRENDnet>IPSetup, and then click IPSetup.
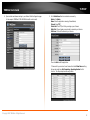
6. The IPSetup window will appear. It will search for the cameras within the same
network.
-
Camera Display Area

© Copyright 2012 TRENDnet. All Rights Reserved.
TRENDnet User’s Guide
TV-IP322P
11
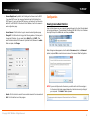
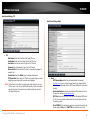
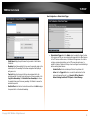
- Camera Display Area: By default, the IP setting on the Camera is set to DHCP.
If you have DHCP server, the camera will automatic get the IP address from
DHCP server. If you do not have DHCP server on your network, it will show the
default IP as 192.168.10.30. Double click the IP address; it will link to camera’s
web configuration page.
- Access Camera: Click this button to go to camera’s web configuration page.
- Change IP: Click this button to bring up the following window. It allows you to
change the IP Address. You can select either Static IP or click DHCP. Then,
enter the Administrator ID & Password. By default the ID/Password is: admin.
When complete, click Change.
- Search: Click this button to search the connected cameras in the same network
- Exit: Click this button to exit the program.
Configuration
Viewing Camera Basic Function
Open the Web browser on your computer (example showed in the User’s Guide is based
on the Internet Explorer). Type the default IP address (192.168.10.30) or the IP address
found by IPSetup in the Address bar, and then press Enter.
When the login window appears, enter the default User name (admin) and Password
(admin) and press OK to access to the main screen of the camera’s Web Configuration.
NOTE: If you are initially access to the camera, you will be ask to install a new plug-in
for the camera. Permission request depends on the Internet security settings of
your computer. Click Install or Yes to proceed.

© Copyright 2012 TRENDnet. All Rights Reserved.
TRENDnet User’s Guide
TV-IP322P
12
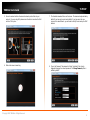
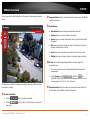
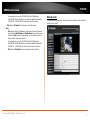
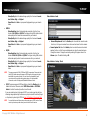
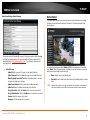
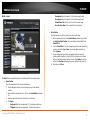
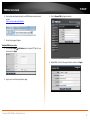
After you login into the Web Configuration of the camera, the main page will appear as
below:
The Main screen of the Web Configuration provides you with many useful information
and functions, including:
Live View/Setup Switch:
Click the button to configure the camera.
Click the button to return to the Main screen to view the live
view image.
Compression Buttons: Select to transmit and record the video using H.264, MPEG4,
or MJPEG compression.
Function Buttons:
Manual Record allows you manually record and save a video clip*.
Snapshot allows you to capture and save a still image*.
Browse allows you to assign the destination folder to store the video clips and
still images*.
Talk allows you to speak out through the camera. Please note only one user is
allowed to use this function at a time.
Listen allows you to receive the on-site sound and voice from the camera.
Multicast allows you to change the camera’s transmission type on multicast.
Live View: The Live View Image window displays the real-time image of the
connected camera.
The current compression mode of image is displayed above the Live View
Image window.
Click the Zoom In buttons ( for SXGA ) or ( for
VGA/QVGA/QQVGA/720p) above the Live View Image window to zoom in the
live view image by 1x, 2x, 3x, 1/2, 1/4, or full screen
Camera Information: Displays the camera’s location and the current date & time.
The information can be modified in the Web Configuration.

© Copyright 2012 TRENDnet. All Rights Reserved.
TRENDnet User’s Guide
TV-IP322P
13
* If you are using Microsoft 7/Vista platform, you may not be able to find the recorded
files by Snapshot or Manual Record. You will need to disable the protected mode of
Security in the IE browser before recording a video file or taking a snapshot.
Please follow the below steps:
1. Open IE Browser
2. Select ToolsInternet Options
3. Select Security
4. Uncheck the ”Enable Protected Mode” then press OK
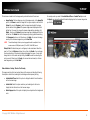
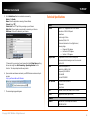
Configuring the Camera Setting
To configure the camera, click on the Main screen of Web
Configuration. The Web Configuration will start from the Basic page.
The Web Configuration contains the settings that are required for the camera in the left
menu bar, including Smart Wizard, Basic, Network, Video/Audio, Event Server, Motion
Detect, Event Config, Tools, RS-485, SD Card, and Device Info.

© Copyright 2012 TRENDnet. All Rights Reserved.
TRENDnet User’s Guide
TV-IP322P
14
Smart Wizard
The camera’s Smart Wizard lets you configure your camera easily and quickly. The
wizard will guide you through the necessary settings with detailed instructions on each
step.
To start the wizard, click Smart Wizard in the left menu bar.
Camera Setting
By default, the camera name is set as model number. Change the name if
necessary. Enter the location and administrator password twice.
IP Setting
Select the IP setting according to your network: DHCP, Static IP, or PPPoE.
Email Settings
Enter the required information to be able to send email with image.
For example, myserver.com. If you are using a free mail service (e.g. Google
Gmail®, Yahoo®, Hotmail®), please enter the SMTP server address and the
corresponding information (SSL and/or STARTTLS) from the service provider.

© Copyright 2012 TRENDnet. All Rights Reserved.
TRENDnet User’s Guide
TV-IP322P
15
Confirm Settings
The last step shows the configuration of your camera. When you confirm the
settings, click Apply to finish the wizard and reboot the camera. Otherwise,
click Prev to go back to the previous step(s) and change the settings; or click
Cancel to end the wizard and discard the changes.
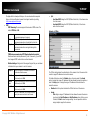
Basic
The Basic menu contains three sub-menus that provide the system settings for the
camera, such as the Camera Name, Location, Date & Time, and User management.

© Copyright 2012 TRENDnet. All Rights Reserved.
TRENDnet User’s Guide
TV-IP322P
16
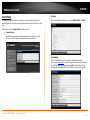
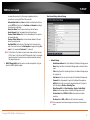
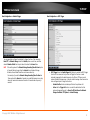
Basic >> System
Basic: This item allows you to assign the camera name and location information.
- Camera Name: Enter a descriptive name for the camera, which is helpful
to identify the camera easily while multiple cameras are connected within
the network.
- Location: Enter a descriptive name for the location where is monitored by
the camera.
- Language Default: Select the displayed language as default.
Indication LED: This item allows you to set the LED illumination as desired.
There are two options: Normal and OFF.
IR CUT & IR LED: The camera features ICR function (IR CUT Filter) and IR LED,
allowing you to capture clear image when environment light changed.
- IR CUT Control: Set the ICR function (IR CUT filter) for the camera: Auto
mode or Off mode.
In Auto mode, the lens filter will be switched automatically to capture
black and white image when the change of environment light is detected
by the camera’s light sensor.
- IR LED: Enable or disable the camera’s IR LED manually by selecting ON or
OFF.
Basic >> Date & Time
Date & Time: Enter the correct date and time for the system.
- TimeZone: Select the proper time zone for the region from the pull-down
menu.
- Automatically adjust clock for daylight saving time changes: select this
option for daylight saving
- Synchronize with PC: Select this option and the date & time settings of the
camera will be synchronized with the connected computer.
- Synchronize with NTP Server: Select this option and the time will be
synchronized with the NTP Server. You need to enter the IP address of the
server and select the update interval in the following two boxes.
- Manual: Select this option to set the Date and Time manually.

© Copyright 2012 TRENDnet. All Rights Reserved.
TRENDnet User’s Guide
TV-IP322P
17
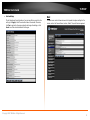
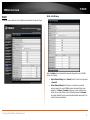
Basic >> User
Administrator: To prevent unauthorized access to the camera’s Web
Configuration, you are strongly recommend to change the default
administrator password. Type the administrator password twice to set and
confirm the password.
General User
- User Name: Enter the user’s name you want to add to use the camera.
- Password: Enter the password for the new user. When you are finished,
click Add/Modify to add the new user to the camera. To modify the user’s
information, select the one you want to modify from UserList and click
Add/Modify.
- UserList: Display the existing users of the camera. To delete a user, select
the one you want to delete and click Delete.
Guest
- User Name: Enter the guest’s name you want to add to use the camera.
- Password: Enter the password for the new guest.
- UserList: Display the existing guests of the camera. To delete a user, select
the one you want to delete and click Delete.
NOTE: The “General User” is allowed to access the camera and control the Function
buttons on the Main screen of the Web Configuration.; the “Guest” can only view the
live view image from the Main screen while accessing the camera. Only the
“Administrator” is allowed to configure the camera through the Web Configuration.
Direct Video Stream Authentication:
To steam the video directly without going through the configuration page, you
can access it via Internet.
- Enable: User needs to enter user name and password to stream the
camera.
- Disable: User can stream the camera without entering the user name and
password.
Examples of the direct link to video:
H.264 Mode
http://camera_ip_address:port number/h264view.htm
MPEG4 Mode
http://camera_ip_address:port number/mpgview.htm
MJPEG Mode
http://camera_ip_address:port number/jpgview.htm
NOTE: This feature is enabled by default, and for security reason, it is
recommended to have the feature enabled at all time.

© Copyright 2012 TRENDnet. All Rights Reserved.
TRENDnet User’s Guide
TV-IP322P
18
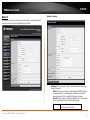
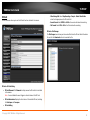
Network
The Network menu contains two sub-menus that provide the networking settings for
the camera, such as the IP Setting, DDNS Setting, and IP Filter.
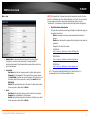
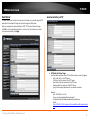
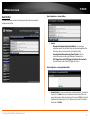
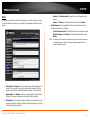
Network >> Network
IP Setting: This item allows you to select the IP address mode and set up the
related configuration.
- DHCP: Select this option when your network uses the DHCP server. When
the camera starts up, it will be assigned an IP address from the DHCP
server automatically. This is the default IP setting on the camera.
- Static IP: Select this option to assign the IP address for the camera directly.
You can use IP Setup to obtain the related setting values.
IP
Enter the IP address of the camera. The
default setting is 192.168.10.30.

© Copyright 2012 TRENDnet. All Rights Reserved.
TRENDnet User’s Guide
TV-IP322P
19
Subnet Mask
Enter the Subnet Mask of the camera. The
default setting is 255.255.255.0.
Default
Gateway
Enter the Default Gateway of the camera. The
default setting is 192.168.10.1.
Primary/
Secondary
DNS
DNS (Domain Name System) translates
domain names into IP addresses. Enter the
Primary DNS and Secondary DNS that are
provided by ISP.
- PPPoE: Select this option when you use a direct connection via the ADSL
modem. You should have a PPPoE account from your Internet service
provider. Enter the User Name and Password. The camera will get an IP
address from the ISP as starting up.
NOTE: Once the camera get an IP address from the ISP as starting up, it
automatically sends a notification email to you. Therefore, when you select
PPPoE as your connecting type, you have to set up the email or DDNS
configuration in advance.
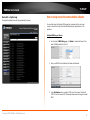
DDNS Setting: With the Dynamic DNS feature, you can assign a fixed host and
domain name to a dynamic Internet IP address. To set up the DDNS:
1. Select the Enable option to enable this feature.
2. Select the Provider from the pull-down list.
3. Enter the required information in the Host Name, User Name, and
Password boxes.
NOTE: You have to sign up for DDNS service with the service provider before configuring this
feature.
UPnP: The camera supports UPnP (Universal Plug and Play), which is a set of
computer network protocols that enable the device-to-device interoperability.
In addition, it supports port auto mapping function so that you can access the
camera if it is behind an NAT router or firewall. Select the Enable option to
enable this feature.
UPnP Port Forwarding: select this option to have the port forward to router.
Ports Number
- HTTP Port: The default HTTP port is 80.
NOTE: If the camera is behind an NAT router of firewall, the suggested to be used is from
1024 to 65535.
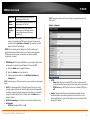
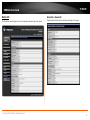
Network >> Advanced
HTTPS
- Enable: Select this option to enable HTTPS, which is a secure protocol to
provide authenticated and encrypted communication within your network.
- HTTPS Port: Assign a HTTPS port in the text box. The default HTTPS port is
443.
Bonjour: The devices with Bonjour will automatically broadcast their own
services and listen for services being offered for the use of others. If your
browser with Bonjour, you can find the camera on your local network without
knowing its IP address.
Page is loading ...
Page is loading ...
Page is loading ...
Page is loading ...
Page is loading ...
Page is loading ...
Page is loading ...
Page is loading ...
Page is loading ...
Page is loading ...
Page is loading ...
Page is loading ...
Page is loading ...
Page is loading ...
Page is loading ...
Page is loading ...
Page is loading ...
Page is loading ...
Page is loading ...
Page is loading ...
Page is loading ...
Page is loading ...
Page is loading ...
Page is loading ...
Page is loading ...
Page is loading ...
-
 1
1
-
 2
2
-
 3
3
-
 4
4
-
 5
5
-
 6
6
-
 7
7
-
 8
8
-
 9
9
-
 10
10
-
 11
11
-
 12
12
-
 13
13
-
 14
14
-
 15
15
-
 16
16
-
 17
17
-
 18
18
-
 19
19
-
 20
20
-
 21
21
-
 22
22
-
 23
23
-
 24
24
-
 25
25
-
 26
26
-
 27
27
-
 28
28
-
 29
29
-
 30
30
-
 31
31
-
 32
32
-
 33
33
-
 34
34
-
 35
35
-
 36
36
-
 37
37
-
 38
38
-
 39
39
-
 40
40
-
 41
41
-
 42
42
-
 43
43
-
 44
44
-
 45
45
-
 46
46


Trendnet TVIP322P User manual
- Category
- Security cameras
- Type
- User manual
- This manual is also suitable for
Ask a question and I''ll find the answer in the document
Finding information in a document is now easier with AI
Related papers
-
Trendnet RB-TV-IP422WN Owner's manual
-
Trendnet TVIP422WN User guide
-
-
Trendnet TV-IP422 Owner's manual
-
Trendnet TV-IP121W User guide
-
Trendnet TV-IP252P - SecurView PoE Dome Internet Camera Network User manual
-
Trendnet TV-IP345PI User guide
-
Trendnet TV-IP312WN User guide
-
Trendnet TV-IP410 User guide
-
Trendnet TV-IP322P User manual
Other documents
-
Zonet ZVC7610 User manual
-
Zavio B5010 User manual
-
 Eusso UNC7500-IR Owner's manual
-
Optiview VR Series Hi-Res IP C-Mount Camera IPCAM User manual
-
 Eusso UNC7500-IS Owner's manual
-
Asoni CAM641 User manual
-
 Corega CG-WLNCM4G User manual
-
 Corega CG-WLNCM4G User manual
-
Swann IP3G1000 Quick Installation Manual
-


