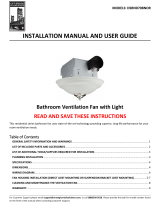
SoftAire SA-150S Operating instructions
- Category
- Household fans
- Type
- Operating instructions
This manual is also suitable for

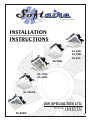
SA-150S
SA-200S
SA-90SL
SA-50D
SA-70D
SA-90S
SA-90SLM
SA-90SM
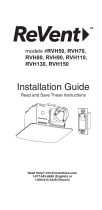
INSTALLATION
INSTRUCTIONS
b y A i r S p e c i a l t i e s
AIR SPECIALTIES LTD.
Toll Free: 1.866.890.6457
1.800.810.3473
1
j.tantay 10.07.09

READ AND SAVE THESE INSTRUCTIONS
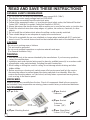
UNPACKING
Unpack the fan very carefully from the box. Check all components listed in the accessories
are included. If any components are missing, please contact factory or authorized distributor.
SA-150S,
SA-200S models
a) 1 pc. Grille
ACCESSORIES
c) 2 pcs.
Extension
Bracket
b) 2 pcs. Mounting Bracket
e) 8 pcs. Sheet Metal
Screws (1 1/4” long)
d) 4 pcs.
Screws (3/8”)
Bracket
Extension
SA-50D,SA-70D
SA-90S models
GENERAL SAFETY INFORMATION
1. Do not install this fan where air temperature may exceed 40 C (104 F).
2. The electric service supply voltage must be 120V/60HZ.
3. Do not kink or excessively bend the electrical wires.
4. Follow all the appropriate codes, i.e. local electrical and safety codes, the National Electrical
Codes (NEC) and the Occupation Safety And Health Act (OSHA) .
5. Always disconnect the electrical wires before working on or near the fan, motor, or junction box
6. Protect the electrical wires from sharp edges, oil, grease, hot surfaces, chemicals, or other
objects.
7. Do not install the unit where ducts where the airflow can be severely restricted.
8. There should always be an adequate air supply to the vented area.
9. This unit is acceptable for use over a bathtub or shower when installed with GFCI protected
branch circuit. The control device should not be installed within reach of the bathtub or shower.
CAUTION
- Do not use in cooking area or kitchens
- This unit must be grounded
- Do not use to exhaust hazardous or explosive materials and vapor
(For General Ventilation Only)
WARNING
1. Use this unit only in the manner intended by the manufacturer. If you have any questions,
contact the manufacturer.
2. Installation work and electrical wiring must be done by qualified person(s) in accordance with
all applicable codes and standards, including fire-rated construction.
3. When cutting or drilling into a wall or ceiling, do not damage electrical wiring and other
hidden utilities.
4. Before servicing or cleaning unit, switch power off at service panel and lock the service
disconnecting means to prevent power from being switched on accidentally. When the
service disconnecting means can’t be locked, securely fasten a prominent warning device,
such as a tag, to the service panel.
2
j.tantay 10.07.09

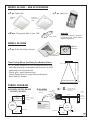
MODEL SA-90SL / SLM ACCESSORIES
b) 1 pc. Light Unita) 1 pc. Light Grille
Fan/Light
Motion Sensor
Grille
c) 2 pcs. Fluorescent Bulb, 2 pins, 13W
Fan/Light
Grille
Bulb contains Mercury, dispose it
according to local, state & federal
laws and regulations.
WARNING:
MODEL SA-90SM
a) 1 pc. Grille with Motion Sensor
- A PSC motor, designed to have an extended service life
and reduced energy consumption with thermal cut-off for
safety and over load protection
- Plastic grille - quick dismount type
- Plastic Blower wheel for super quiet performance
- Back draft O/L damper
These Ceiling Mount Ventilating Fan Models Utilizes:
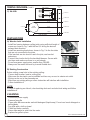
WIRING DIAGRAM
A) SA-50D, SA-70D, SA-90S
BLACK
WHITE
GREEN
WHITE
RED
CAPACITOR
FAN
MOTOR
120V AC
60 Hz.
SWITCH
NEUTRAL
GROUND
JUNCTION
BOX
SA-150S, SA-200S
3
(Model: 13WPL)
SA-90SL SA-90SLM
B) SA-90SM
(Fan with motion
sensor)
BLACK
WHITE
WHITE
RED
CAPACITOR
FAN
MOTOR
120V AC
60 Hz.
SWITCH
NEUTRAL
GROUND
JUNCTION
BOX
WHITE
RED
BLACK
Female
Connector
MOTION SENSOR
MOUNTED ON THE
FAN GRILLE
NOTE:
CONNECT / DISCONNECT
CAREFULLY WHILE
REMOVING / REPLACING
THE FAN GRILLE
GROUND
Motion
Sensor
Box
MALE
CONNECTOR
j.tantay 10.07.09
Motion
Sensor
Induction Area 77.42 Feet
2
Induction Area 97.99 Feet
2
Mounting Height 8.0 Feet
9’ Height
Motion Sensor
Floor

- Disconnect power supply
- Remove fan grille
- Clean grille with warm water and mild detergent (liquid soap). Do not use harsh detergent or
boiling water
- Dry grille with a cloth or towel
- Clean fan blades carefully
- Never allow water to enter into the motor
- Replace fan grille in place
CLEANING
B) Existing Construction
Before cutting a new hole in the existing ceiling:
- Choose best location (next to ceiling joist)
- Make sure the duct work can be installed and has easy access to exterior air outlet
- Wiring can be run to the planned area
- Make sure no existing wiring or other obstruction will interfere with installation
- Follow Installation A
NOTE:
In case of replacing an old unit, check existing duct work and electrical wiring and follow
installation A.
WIRING DIAGRAM: (cont.)
C) SA-90SL
FAN
MOTOR
CAPACITOR
TO SWITCH
LIGHT UNIT
TO SWITCH
TO NEUTRAL
TO NEUTRAL
TO GROUND
JUNCTION
BOX
BLACK
WHITE
GREEN
FAN HOUSING
Ballast
1
Ballast
2
BLACK
BLACK
WHITE
WHITE
A) Wooden Joist Installation
- Install fan housing between ceiling joists using sufficient length of
screws as shown in Fig. 1 with the fan O/L facing the desired
exhaust duct direction.
- Install fan mounting brackets as shown in Fig. 2 to the fan sides
that are not connected to the joists.
- If the brackets are too short to reach the joist, use bracket
extensions
- Connect the circular duct to the backdraft damper. Secure with
duct tape and make sure there is no air leakage.
- Do not use power supply wires smaller than 14 AWG.
- Always use the metal duct and try to avoid flexible duct
INSTALLATION
Fig. 1
4
visit: www.reversomatic.com
j.tantay 10.07.09
-
 1
1
-
 2
2
-
 3
3
-
 4
4


SoftAire SA-150S Operating instructions
- Category
- Household fans
- Type
- Operating instructions
- This manual is also suitable for
Ask a question and I''ll find the answer in the document
Finding information in a document is now easier with AI
Other documents
-
 Reversomatic SA-55E User manual
-
 Lift Bridge Kitchen & Bath DSRND70BNOR User manual
-
Delta Breez GBR100LED-DECOR Installation guide
-
ReVent RVLH80 Installation guide
-
 ReVent RVSH110-D Installation guide
-
-
Panasonic FV-08VKML2 User manual
-
-
 Delta Products SIG80D Installation guide
-


