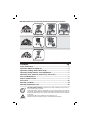
Mountain Buggy Breeze Single B1204 User manual
- Category
- Strollers
- Type
- User manual

INSTRUCTIONS: For the following model Mountain Buggy
®
strollers:
Note: Model and accessory availability may vary from country to country.
Contents Pg
Safety Instructions .................................................................................. 3
Operation (Wheel Assembly etc) ............................................................. 4
Operation (Folding, Brake, Wrist Strap) .................................................. 5
Operation (Safety Harness, Seat Adjustment) ........................................ 6
Operation (Seat, Sunhood, Storm Cover, Sun Cover) ............................. 7
Care and Maintenance ............................................................................ 8
Parts of Stroller Frame ............................................................................ 9
Accessories ...........................................................................................10
Warranty Conditions ................................................................................11
Warranty Registration Card ....................................................................12
All Mountain Buggy
®
models, including when a Carrycot and Carseat Clip are attached,
have passed the Australian/New Zealand Safety Standard AS/NZS 2088, and the British
Standard BS 7409. Models sold in North America have also passed American Standard
ASTM F833.
Designed and made in New Zealand for Mountain Buggy
®
Ltd.
Manufactured by Tritec Manufacturing Ltd, an ISO9002 credited supplier.
Terrain Single - T1204 Terrain Double - T2204
Urban Single - U1204
Urban Double - U2204 Urban Triple - U3204
Breeze Single - B1204
We take safety seriously. Compliance with safety standards for baby strollers is
NOT compulsory in all countries.

WARNING: Never
leave your child unattended
.
WARNING: Avoid
serious injury from falling or
sliding out. Use the harness
at all times. Always use the
crotch strap in combination
with the waist belt.
WARNING: A CHILD’S SAFETY IS
YOUR RESPONSIBILITY.
WARNING: FOLLOW THE MANU-
FACTURER’S INSTRUCTIONS.
WARNING: DO NOT CARRY EXTRA
CHILDREN OR BAGS ON THIS
STROLLER/ PRAM.
WARNING: MAKE SURE CHILDREN
ARE CLEAR OF ANY MOVING PARTS
IF YOU ADJUST THIS STROLLER/
PRAM, OTHERWISE THEY MAY BE
INJURED.
WARNING: CARE MUST BE TAKEN
WHEN FOLDING AND UNFOLDING
THE STROLLER TO PREVENT FINGER
ENTRAPMENT.
Ensure freedom of movement of
locking devices.
For all models, the seat is suitable for
newborn up to 4 years old (3 years for the
Breeze) or maximum of 35kg/77lb. For
use with a newborn (0-6mths) the seat
should be reclined fully. It is recommended
that a newborn headrest or similar is
used for babies 0-3 months.
Other newborn options include:
1. Mountain Buggy
®
Carrycot (available
for all models except Breeze)
2. Mountain Buggy
®
Carseat Clip
(available for all single models,
except Breeze)
Overloading, incorrect folding and the
use of non-approved accessories may
damage or break this stroller.
Please note it is unsafe to use accessories
other than those approved by the
manufacturer or distributor.
This stroller is designed for one child
in each seat.
WARNING: Any load attached to
the handle affects the stability of the
stroller.
To prevent the stroller from becoming
unstable, do not place parcels or
accessory items anywhere except in
storage basket and pockets provided.
Maximum seat loading for all model
strollers (including Double & Triple
models) is 35kg/77lb.
Maximum seat height capacity is
100cm.
Maximum loading for the storage
basket is 5kgs/11lb.
Maximum loading for the pocket is
300gms/10.5oz (i.e. small items such
as keys, wallets only).
Excessive weight may cause a hazardous
unstable condition to exist.
Do not use near an open fi re or exposed
fl ame.
Cover the stroller if it is exposed to
sunlight through glass, for example in
a car to avoid over heating.
Remove plastic wrapping and discard
to avoid a child suffocating.
Safety Instructions
3
IMPORTANT KEEP FOR FUTURE REFERENCE
Read these instructions carefully before use and keep for future reference.
Your child’s safety may be affected if you do not follow these instructions.

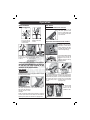
FRONT WHEEL ASSEMBLY
INSERT AXLE TIGHTEN KNOBS
URBAN SINGLE, DOUBLE & TRIPLE
INSERT AXLE. Also insert spacer
between front wheels.
TERRAIN DOUBLE
INSERT AXLE TIGHTEN KNOBS
TERRAIN & BREEZE SINGLE
1. Holding both knobs at the same time, unscrew
and pull out front axle.
2. Insert front wheel(s). FRONT WHEELS HAVE
NO BRAKE COG.
3. Re-insert axle and fi nger tighten both knobs.
TIGHTEN KNOBS
axle
knob
axle
knob
knob
axle
spacer
knob
knob
knob
4
Operation
REAR WHEEL ASSEMBLY
ALL MODELS
Push each wheel on until it clicks
into place. Pull wheels to check
they are secure.
Finished assembly. Push down on
brake lever to apply brakes. Check
brake lever inserts into brake cog on
both sides. DO NOT use stroller if
brakes are not functioning.
3
4
brake
lever
brake
cog
WARNING: TIGHTEN ALL KNOBS AND REGULARLY CHECK THEY REMAIN FIRM.
SWIVELLING FRONT WHEELS
Locking the front wheel swivel(s) is recommended for use
on uneven ground. There is still a small amount of left
and right movement when in the locked position.
URBAN
Check that brake cog is on the
inside next to stroller frame.
2
brake
cog
Slide wheels onto each end of
the axle.
2
brake
cog
axle
TO LOCK: Turn knob so locked
symbol is at the top. Then
swivel wheel under stroller until
it locks into place.
TO UNLOCK: Turn knob
1/4 of a turn so ‘Unlocked’
symbol is at the top.
Knob
Knob
1
ERECTING THE STROLLER
Grip stroller near sunhood
joints, and lift.
Place pressure on heel rest
to ensure sliding locks are
fully engaged.
2
1
WARNING: Ensure that all locking
devices are engaged before use.
ALL MODELS

WARNING: MAKE SURE CHILDREN
ARE CLEAR OF ANY MOVING PARTS
WHEN FOLDING OR ERECTING
THE STROLLER.
NOTE: Sliding lock on the left side has a secondary
safety catch.
5
Operation
ALL MODELS
FOLDING THE STROLLER
Pull up sliding lock on both
sides of heel rest.
Adjustable
Handle
Lift at heel rest so the handle
bar end goes down.
Fully folded. For an even
fl atter fold, remove wheels
(see wheel removal).
1
3
NOTE: On Urban model strollers, ensure front wheels
are unlocked and rotated forward before folding.
Fold adjustable handle
(if applicable).
Sliding
Lock
BRAKE
SAFETY WRIST STRAP
Care should be taken if the stroller is
used on stairs, escalators, down hills
or in strong winds.
Hold the safety wrist strap fi rmly in
all these situations.
Regularly check that the wrist strap
is securely attached to the stroller
handlebar and stitching is secure and
strong.
wrist
strap
To apply brake, push brake
lever completely down.
To release brake, lift brake
lever completely up.
brake
lever
brake
lever
WARNING: PUT ON THE BRAKE
WHENEVER YOU PARK THE
STROLLER/PRAM. ENSURE THE
BRAKE IS ON WHEN LOADING AND
UNLOADING CHILDREN.
URBAN
X
X
2
4
WRONG
CORRECT
REMOVING REAR WHEELS
De-press quick release clip
and slide wheel off axle.

SAFETY HARNESS
Shoulder straps should be
adjusted so they are located
just below or level with a
child’s shoulders. The older
the child, the further up the
seat these straps will go.
ADJUSTING SHOULDER STRAP HEIGHT
A separate safety harness conforming to
British Standard BS6684 may be attached
to the two “D” rings located at the
insertion of the waist harness.
POSITION OF CHILD IN SEAT
Make sure baby
is positioned
down as far as
possible in seat.
6
Operation
1
2
3
insertion
slit
buckle
shoulder
straps
SEAT ANGLE
Seat back can be reclined to any point between upright
and fully reclined position.
ALL MODELS
To adjust: Pull on buckles to
slide straps through buckles
and recline seat. Pull straps
through buckles to raise
seat angle.
Shows upright through to
fully reclined seat angle.
buckles
strap
The Zip Hammock has two
seat back positions. Seat
back is upright when zips
are up, and reclined when
zips are down.
To fasten waist strap
push both buckle
ends A & B into the
crotch buckle C.
Clip shoulder straps
D & E to waist strap
buckles.
2
1
push
B
A
C
D
E
clip
here
Adjust sliding
buckles so the
harness straps are
a fi rm fi t.
Move sliding buckles
up as far as possible
to reduce the amount
of strap hanging
loose, eliminating the
risk of chocking.
3
sliding
buckles
4
sliding
buckles
To release, press
sides of centre
buckle.
5
WRONG
CORRECT
X
X
SEAT ANGLE
TERRAIN ZIP HAMMOCK OPTION
REMOVING
INSERTING
With a hand inside the back of
the seat rotate the rectangular
shaped buckle and push short
side through the insertion
slot, while pulling strap at
the front.
Re-thread short side of buckle
through the most suitable insertion
slot for your child. Once buckle is
through, turn so it is fl at against
seat back, and check it is secure
by pulling on strap.
To locate buckle when adjusting
straps, slip your hand up the
inside back of the seat (or
inside the pocket on the Zip
Hammock model).
strap
short side
buckle
NOTE: The stroller would become unstable if a child was
to move up the seat. For this reason the seat retains a
slight angle to prevent the stroller from tipping back.

Operation
REFITTING SEAT
✓ CORRECT
ALL MODELS
Note:
Fasten seat onto frame making sure fabric wraps
over and around the top of the side tubes.
7
REMOVING SUNHOOD
Pull support wire out of
sunhood joint, while pushing
against frame.
Note: This operation is child
proof and therefore requires
a degree of force.
Repeat step 1 on other
side.
sunhood
support
wire
3
Unfasten the sunhood
fabric from the stroller
frame and seat near the
handle bar.
1
2
ALL MODELS
REMOVING SEAT
plastic joint
Push seat forward,
then slide fabric up seat
support wire.
Remove seat support
wire from stroller frame
at C and D.
2
2
C
D
seat
support
wire
3
A
B
Unfasten seat from frame along side tubes.
1
ALL MODELS
URBAN
Unfasten strap underneath seat at point A.
Unfasten frame straps at point B.
TERRAIN
X
STORM COVER AND SUN COVER
ACCESSORIES
These accessories fasten at the top, around the side
tubes . They fi t over the sunhood and under the footplate.
The lower elastic loops fasten onto the lug below the
footplate.
lug
lug
strap
WARNING: Do not leave Storm
Cover on stroller in warm conditions.
Check baby’s comfort frequently
when using Storm Cover.
STORM COVER SUN COVER
REFITTING SUNHOOD
Place sunhood in position
and push one side of wire
into plastic joint. Repeat on
other side by pulling wire
away from frame at the
top. Fasten sunhood fabric
to stroller frame and seat,
near handle bar.
Follow removing seat instructions above, in reverse
order.

FABRIC CARE AND CLEANING
This outdoor fabric should be cleaned regularly. Brush
off any excessive dirt and rinse with warm water. Fabric
can be removed and washed by hand using a mild
natural
soap solution in luke warm water (no more than
38˚C / 100˚F). Rinse thoroughly to remove soap. DO NOT
use detergents! Allow to air dry. DO NOT tumble dry.
WHEEL ALIGNMENT
It may be necessary to periodically adjust wheel
alignment if stroller steers to one side. The Terrain stroller
has angle struts on the rear axle for this purpose.
1 Loosen all four nuts A, B, C & D holding strut in
position.
2 Slightly tighten outside nut on the opposite side
to the direction it is steering (eg if steering to left
tighten nut D).
3 Test the stroller wheel alignment by pushing it on a
smooth fl at surface.
4 Re-test the stroller steering after every turn of the
nut until the stroller will run in a straight line.
5 When the correct steering is achieved, turn the
outside nut on the opposite side so it just touches
the side of the tube.
6 Tighten the inside nuts.
HANDLEBAR GRIP
Take care to protect the handlebar grip from abrasion
or sharp objects. Contact your authorised dealer or
distributor for replacement grips and instructions.
A wetsuit glue can be used to repair cuts.
Care and Maintenance
Wrist strap can be used
to hold stroller together
in its fully folded position.
Loop wrist strap around
rear axle then fasten.
Sunhood can be fastened
back by applying velcro on
sunhood window fl ap to the
velcro on edge of sunhood.
C
B
A
D
8
TYRES/TIRES & TUBES
If a puncture occurs, the inner tube can be repaired with
a bicycle repair kit, or replaced. If the tread becomes
completely worn the tyre/tire should be replaced.
Replacement tyres/tires, inner tubes and repair kits
are available from your authorised dealer or most
cycle stores.
Infl ating the tyres/tires: Infl ate to a pressure of 15psi.
(105 KPa) Do not exceed 20psi (140 KPa). The
valves are the same as a bicycle, or car tyre/tire valve.
WARNING: Over inflation may
damage wheel.
STROLLER FRAME
The main frame is aluminium/aluminum and corrosion
resistant. The Urban front assembly and some
components are steel and will corrode if exposed to
environments such as, salt water, salt spray or beach
sand.
If stroller is used in these environments, wash steel parts
in warm soapy water, dry thoroughly and protect by
spraying with light aerosol can oil eg WD40 or CRC.
BRAKE
STORAGE
Store inside in a dry place.
Make sure the stroller is dry before storing.
The brake cam may require
lubrication if it becomes
diffi cult to operate.
lubricate this surface
brake lever
wrist strap
velcro
TERRAIN ONLY
WARNING: It may be unsafe to
use replacement parts other than
those supplied or approved by the
manufacturer or distributor.
WARNING: This stroller requires
regular maintenance by the user.

Parts of Stroller Frame
9
Handlebar
Handle
Adjuster
Sunhood
Support Wire
Side Tube
Sunhood Joint*
Heel Rest
Sliding
Lock*
Footplate
Front Wheel Swivel*
(Urban Only)
Front Wheel
Accessory Lug
Rear Wheel
Rear Axle
Brake Cam*
Brake Cog
*Points to lubricate periodically
Under-Carriage Tube
Down Tube
Note: Diagram is Urban Single model
Fastener
Brake
Lever
Quick
Release Clip*
Sliding
Lock*
Swivel
Knob*

Accessories
Storm Cover
Sun Cover
Universal
Carseat Clip
Evenfl o
Carseat Clip
Travel Bag
Handlebar
Extension
Hand Brake
Sleeping Bag
Pump
KiddyBoard™
Bumper Bar
Carrycot
Urban Single
Urban Double
Urban Triple
Terrain Single
Terrain Double
Breeze
10
** Several Carseat Clips designed for specifi c model car seats are available to fi t Single, Double and Triple model
strollers. (These are not available in all countries, check with your authorised dealer or go to www.mountainbuggy.com).
Accessories
Model

Warranty Conditions
This warranty covers: Defects in workmanship
and materials for one year from date of purchase.
The distributor undertakes to repair or at their option,
replace any part, which is found to be defective within
warranty period.
This warranty does not cover:
• Pick up, delivery or service calls.
• Temporary replacement while stroller is being repaired
or assessed.
• Damage to tyres/tires, tubes and handlebar grips.
• Instruction or assistance with wheel assembly or setup
of stroller.
• Corrosion or fabric damage, if stroller has been used
or stored in extreme environmental conditions. e.g. high
humidity, salt spray.
• Deterioration due to lack of maintenance and cleaning
as specifi ed in manufacturer’s instructions.
• Normal wear and tear or damage to product caused
by accident, misuse or act of nature.
International Distributors
Send the Warranty Registration Card to the
distributor for the country of purchase.
(If there is no distributor please send it to New Zealand.)
• Repairs when product has been dismantled, repaired,
modified or serviced by other than an authorized
agent.
• Repairs when stroller has not been used for normal use
and in accordance with manufacturer’s instructions.
If the product fails within the warranty
period: Return it to the Authorized Dealer where
purchased from. They will arrange for assessment and
appropriate action during normal business hours. If you
are unsure where to take stroller contact distributor in
your country for instructions.
Repairs and replacement parts: If stroller
requires repair contact your authorised dealer or
distributor, to obtain information and spare parts. If you
are in a different country than where you purchased the
product, please contact the distributor for the country
where you purchased, as extra charges may apply.
Please make sure product is clean. Unacceptably dirty
products will not be handled.
11
NEW ZEALAND & HEAD OFFICE
Freepost 191-029 (within New Zealand)
P. O. Box 38-781, Wellington Mail Centre, New Zealand
Ph: (04) 568 1590 or 0800 428 449
Fax: (04) 569 6239
email: [email protected]
www.mountainbuggy.com
AUSTRALIA
Mountain Buggy Australia
223A East Boundary Road
East Bentleigh, Victoria 3165, Australia
Ph: (03) 9570 2833
Fax: (03) 9570 1362
email: info@mountainbuggy.com.au
www.mountainbuggy.com.au
U.K. & IRELAND
Mountain Buggy (UK) Ltd
Mill Farm, Fairmile, Ottery St Mary
Devon EX11 1LS, England
Ph: ++44 01 404 815 555 or 07000 4 BUGGY (07000 428 449)
Fax: ++44 01 404 815 444
email: info@mountainbuggy.co.uk
www.mountainbuggy.co.uk
EUROPE:
One Tree Hill
Postbus 4, 3130 AA Vlaardingen, The Netherlands
Ph: ++31(0) 182 551895
Fax: ++31(0) 182 551457
email: [email protected]
www.onetreehill.nl
JAPAN:
Offi ce U Corporation
2-22-8, Higashi Kawaguchi, Kawaguchi City,
Saitama Prefecture, Japan 333-0801
Ph: (048) 294 7211 Mob: (090) 3137 1234
Fax: (048) 297 7207
www.mountainbuggy.com
SINGAPORE & HONG KONG:
Mountain Buggy Asia
P.O. Box 603, 144 Upper Bukit Timah Rd #04-16-17,
Beauty World Centre, Singapore 588177
Ph: (09) 416 8617 Fax: (09) 416 8617
Email: [email protected]
www.mountainbuggy.com
USA:
Sycamore Kids Inc.
4562 Denrose Ct. Suite 2 Fort Collins, CO 80524 USA
Toll Free Phone/Fax: 866 524 8805
email: support@mountainbuggyusa.com
www.mountainbuggyusa.com
CANADA:
Mountain Buggy Canada Inc
4298 Capilano Road, North Vancouver, B.C. V7R 4J7, Canada
Toll Free Phone: 1866 MTNBUGGY (1866 686 28449)
email: info@mountainbuggy.ca
www.mountainbuggy.ca
SOUTH AFRICA:
Suffolk Trading CC
P.O. Box 46911, Glossderry 7702, South Africa
Ph: ++27 11 485 3458
Fax: ++27 11 485 5273
email: isacks@iafrica. com
www.mountainbuggy.com

Warranty Registration
Congratulations on purchasing a Mountain Buggy
®
. To register for your 12
month warranty, please return this registration form to your distributor (see
previous page).
Please take a few moments to review the additional questions about your
purchase. We would appreciate your replies so that we can continue to
improve our product.
Name: _____________________________________________________________
Address: ___________________________________________________________
___________________________________________________________________
Phone: ______________________Email: _________________________________
Model Number (under footplate):_______________________________________
Serial Number (under footplate): _______________________________________
Date of Purchase: ___________________________________________________
Purchased From: ____________________________________________________
Which accessories have you purchased for your Mountain Buggy
®
?
Sleeping Bag
KiddyBoard™
Bumper Bar
Carrycot
Carseat Clip
Storm Cover
Sun Cover
Travel Bag
Handlebar
Extension
Hand Brake
Pump
How did you find out about Mountain Buggy
®
?
Other (please explain) _____________________________________________
What activities have you purchased your Mountain Buggy
®
for?
Exercising
Shopping
Urban use
Farming lifestyle
Hiking
Other (please explain) ________________________
The family member most influential in purchasing a Mountain Buggy
®
Mother Father Both Parents
Other (please explain) _____________________________________________
How important were the following factors in your purchase?
1=Very Important 2=Important 3=Not Very Important 4= Not Important
Strength of Stroller
Weight of Stroller
Ease of Use
Ease of Folding
Accessories Available
NZ Made
Safety
General Appearance
Reputation of Brand/Product
Off-Road Capability
Additional Comments: _____________________________________________
___________________________________________________________________
___________________________________________________________________
This information will remain confidential to Mountain Buggy
®
only.
Tick here if you do not wish to receive future marketing material.
Magazine (Name) ____________ Show/Event (Name) ________________
Internet Friend/Family
What comes to mind when you hear the words Mountain Buggy
®
?
___________________________________________________________________
Grandparents
At time of purchase mother was _____________months pregnant, or had a
_____________month old child.
-
 1
1
-
 2
2
-
 3
3
-
 4
4
-
 5
5
-
 6
6
-
 7
7
-
 8
8
-
 9
9
-
 10
10
-
 11
11


Mountain Buggy Breeze Single B1204 User manual
- Category
- Strollers
- Type
- User manual
Ask a question and I''ll find the answer in the document
Finding information in a document is now easier with AI
Related papers
-
Mountain Buggy Terrain Operating instructions
-
-
 Mountain Buggy Buggy Range Outside Cover User manual
-
 Mountain Buggy Buggy Range Outside Cove User manual
-
 Mountain Buggy swift, urban jungle, terrain, duo single + duo twin Operating instructions
-
-
 Mountain Buggy Buggy Range Outside Cover User manual
-
 Mountain Buggy Everest Single Pram Instructions For Correct Use
-
 Mountain Buggy duet 2014 Operating instructions
-
 Mountain Buggy swift pre-2015 Operating instructions


Other documents
-
 Ventura 320070 Operating instructions
-
Kmart 43094899 User manual
-
Sunnydaze Decor HTS-BK Installation guide
-
Baby Jogger city ELITE User manual
-
 R for Rabbit LOLLIPOP LITE Instructional Manual
-
Kmart M6800 User manual
-
 ickle bubba Moon User manual
-
 Phil & Teds EVO User manual
-
-


