Page is loading ...

IQBoard ET & PS
User Manual
Copyright(C) 2003-2009 Returnstar Technology Co., Ltd.
Web: www.recoverystar.com; www.iqboard.net
Tel: +86-591-83385086, 87274373
Fax: +86-591-87274383
E-mail: master@recoverystar.com

Important Statements
This manual is for IQBoard ET and IQBoard PS.
The “Whiteboard” or “Interactive Whiteboard” in this manual all refer to IQBoard ET or
IQBoard PS. The “Electronic Pen” is used for IQBoard ET. The “Colorless Writing Pen
(Finger)” is used for IQBoard PS.
Use this product strictly according to detailed operation instruction in this manual so
as to ensure proper use. Before you install this product, please read this manual
carefully to save your time.
Opening the package means you have agreed to purchase this product, Returnstar
will not accept returns of opened packages.
The product specification may be subject to change without prior notice. The sample
pictures in this User Manual may differ from the real product.
Returnstar reserves all rights to charge the fee at anytime for product replacement,
revision and update. The content in this manual will be regularly revised without prior
notice, and the printed manual will be updated when new version is released.
Returnstar will make no guarantee for this product, both explicit and implicit, including
the salability and the adaptability to certain purpose, and will deny all guarantees
alike.
Copyright
Returnstar, IQBoard are registered trademarks of Returnstar Technology Co., Ltd.
Window is a registered trademark of Microsoft.
Environment Protection
When discarding this electronic device, please don’t treat it as normal trash. To
minimize the pollution and protect the environment, please recycle it.
Working Temperature and Humidity
Storage: Temperature: -40 degrees to 60 degrees; Humidity: 0% to 95%
Operation: Temperature: 0 degrees to 40 degrees; Humidity: 15% to 85%

Chapter 1 Product Introduction
IQBoard ET and IQBoard PS are the latest interactive presentation boards. Connect
IQBoard ET or PS with your computer and projector, then simply touch the projection
area with electronic pen or your finger, you can transform the electronic pen or your
finger to mouse and directly operate the computer on the projection area. The
difference between IQBoard ET and PS are IQBoard ET adopts electronic pen for
operation, and while IQBoard PS can be directly operated by your finger.
With IQBoard ET or PS, marvelous interactive communicating effect can be achieved
in various demonstrating and teaching situation, such as product exhibition, business
conference, video communication, news broadcast, securities evaluation, military
command, entertainment, medical consultation, engineering design, competition
tactics analysis, weather analysis, etc.
IQBoard ET and PS are provided with powerful IQBoard Software, which makes your
operation on interactive whiteboard more convenient. Its powerful functions include
writing, erasing, text editing, hand-writing recognition, on-screen keyboard, line, graph
and table editing, graph recognition, video and sound playing, dimension and angle
label, digital teaching tools, slide playing, operation review, dragging, revolving,
hyperlink, reveal screen, spotlight, screen capture, screen record and replay,
hand-writing saving in MS Office, page and file editing, printing and saving, etc.
IQBoard Software also includes 500M IQBoard Resource Library covering more than
30 subjects, such as math, physics, chemistry, biology, gymnasium, etc. User can
customize the installation by selecting subjects. Also provide common line, shape,
character, symbol, decoration graph, background template, Flash courseware, and
other resources. Support importing various picture files and DOC, PPT, XLS files. The
page and file created by IQBoard Software can be save as and freely converted to
various picture files as well as DOC, PPT, XLS, PDF, HTML files, etc.
We provide continuous upgrading service for IQBoard Software. For more information
and detailed operation about IQBoard Software, please refer to “IQBoard Software
V4.3 User Manual” in the installation CD.

Chapter 2 Specification
Performance: Effective resolution: 9600×9600, 300dpi; Signal tracking rate: 3m/s;
Processing rate for writing or clicking: 240 dot/s. Provide 9 or 20 points precise
orientation. Power consumption for electronic pen: ≤1 W. IQBoard ET provides sizes
of 80 inches, 60 inches, 50 inches (4:3), 100 inches, 120 inches (16:9) and
customized sizes. IQBoard PS provides sizes of 80 inches, 60 inches (4:3), 100
inches, 112 inches (16:9) and customized sizes.
Hotkeys: Provide 28 hotkeys to achieve frequently used functions of IQBoard
Software, 14 on each side of whiteboard surface or frame.
Flexible fixing and relocating methods: Fixing methods include wall hanging,
cabinets, and mobile stand. Provide optional height adjustable mobile stand for
50-120 inch whiteboards, the height can be adjust from 1.88M to 2.12M.
Durable surface, solid body: The surface adopts dedicated writing film made of
DuPont anti-abrasive coating. It features with anti-scratch, high luminance, high
definition, easy cleaning (can be cleaned by whiteboard detergent or wet cloth), and
can completely eliminate bright spots. The backboard adopts aviation aluminum
beehive-board, which is resistant to distortion, expansion and shrinkage (Provide
model supporting normal pen writing).
PC Connection: Provide 10M USB cable for connecting IQBoard with PC. External
power is not required. Provide optional USB signal amplifier for 25M USB cable.
Provide optional 2.4G radio frequency wireless module (Effective range: 10M).
Standard Configuration: 1 interactive whiteboard, 2 electronic pens (include battery)
or 2 colorless writing pen, 1 10M USB cable, 1 wall hanging suit, 1 driver CD (include
the latest driver and user manual), 1 IQBoard Software (include user manual).
About Model
Prompt: You can use either the physical hotkeys (hard hotkey) on each side of
whiteboard frame, or the virtual hotkeys (soft hotkey) on each side of whiteboard surface. In
the latter case, you need to you need to set these hotkeys at the first time you use the
interactive whiteboard.

System Requirement
Windows XP/2003/Vista operation system
Pentium166 CPU (PentiumII or higher recommended)
64 MB RAM (128 MB recommended)
1G free hard disk space (for full installation)
1 free USB port
1 projector (short focus or ultra-short focus projector recommended)

Chapter 3 Setup Hardware
3.1 Mount Whiteboard
3.1.1 For product with an “M” on its name
In case your product having an “M” on its name, you can select wall mounting.
Parts list:
Picture Name Quantity
Screw 4
Wall Anchor 2
Safety Bracket 2
Anchor Bolt 2
Wall Mounting Bar 1
Wall Mounting Bracket
(already mounted on
the backboard)
2
Installation Steps:
Step 1. Determine the installation height of the Wall Mounting Bar (190cm above floor),
then fasten bracket to wall using the two Anchor Bolts.

Step 2. Align the 2 Wall Mounting Brackets on the backboard with the Wall Mounting
Bar, and hang the whiteboard on the wall.
Step 3. Fasten the 2 Safety Brackets on each side of whiteboard lower frame using 2
Screws. According to the location of the Safety Brackets, drill 2 mounting holes on
the wall. Finally use Wall Anchors and Screws to fix the Safety Brackets on the wall.
3.1.2 For product with a “Y” on its name
In case your product having a “Y” on its name, you can select either wall mounting or
stand mounting.
Wall Mounting
Part list:
Note: When mounting the Wall Mounting Bar, mind its direction.

Picture Name Quantity
Screw
4
Wall Anchor
2
Safety Bracket
2
Anchor Bolt
4
Height Adjust Bracket (already
mounted on backboard)
4
Installation Steps:
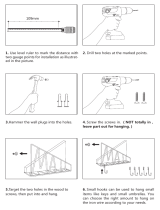
Step 1. Drill 4 holes at the location where you want to place the 4 Anchor Bolts, insert
the 4 Anchor Bolts in these holes, and leave 4mm clearance between bolt head and
nut for hanging whiteboard.

Step 2. Align the Anchor Bolts with the clip holes of Height Adjusting Bracket on
backboard, and then hang the whiteboard on the wall.
Step 3. Fasten the 2 Safety Brackets on each side of whiteboard lower frame using 2
Screws. According to the location of the Safety Brackets, drill 2 mounting holes on the
wall. Finally use Wall Anchors and Screws to fix the Safety Brackets on the wall.
Stand Mounting
Prompt: The distance from floor to the 2 anchor bolts on top (Distance X) is 190cm.
The vertical distance between 2 anchor bolts (Distance H) is 45cm for the 50" and 60"
whiteboards, and 75cm for the 80", 100", 112", and 120" whiteboards. For the horizontal
distance between 2 anchor bolts (Distance L), please measure horizontal distance of the 2
Height Adjust Brackets on the backboard.

Part List
Picture Name Quantity
Leg Bar 2
Column 2
Supporting
Bar
2
Caster 4
Moveable
Crossbeam
(Each
includes 2
Beams and a
U-Shaped
Groove)
2
Hexagon Bolt
A
2
Hexagon Bolt
B (M8 50,
with 08/22
washer)
4
Hexagon Bolt
C (M8 50)
8
Each set includes: 1 Hexagon Bolt, 1 Wind Nut, 1 M8 Nut, 1
Small Washer, 1 Big Washer
Hexagon Bolt
Set A (M8
50)
6

Each set includes: 1 Hexagon Bolt, 1 Wind Nut, 1 Small Washer, 1
Big Washer
Hexagon Bolt
Set B (M8
35)
4
Anchor Bolt
(M8 60)
4
Wrench 1
Installation Steps:
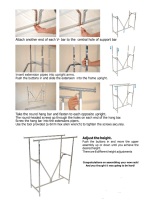
Step 1. Install Column on each Leg Bar using Hexagon Bolt B.
Step 2. Install one end of each Supporting Bar on each Leg Bar, using Hexagon Bolt
A.
Step 3. Install the other end of each Supporting Bar on each Leg Bar, using Hexagon
Bolt Set A. In this stage, please partially screw the bolt, leaving 4mm clearance
between bolt head and column for hanging whiteboard.

Step 4. Install 2 Casters on each Leg Bar.
Step 5. Install 2 Beams on each Column, using Hexagon Bolt C
Step 6. Laid down and connect the two leg assemblies with the U-Shaped Grooves.

Step 7. Secure the U-Shaped Grooves with Hexagon Bolt Set B. In this stage, do not
completely tighten the bolt in order to adjust the stand width later.
Step 8. Install 2 Hexagon Bolt Sets A on each Column, leaving 4mm clearance
between bolt head and nut for hanging whiteboard.

Step 9. Align the Hexagon Bolt on the Column with the clip holes of Height Adjusting
Bracket on backboard, and hang the one side of whiteboard on the stand. Then adjust
the stand width to fit the whiteboard, and hang other side of the whiteboard on the
stand. Finally, tighten the bolts on the U-Shaped Groove and Columns. on Hexagon
Bolts.

Fully assembled whiteboard is as follows:
3.2 Setup electronic pen
Prompt
1. You can use different clip holes of the Height Adjusting Bracket to adjust the whiteboard
height. Generally the bottom of the whiteboard should be 70-80cm above the ground.
2. For 50 and 60 inch whiteboard, you can hang the whiteboard on the first and second bolts
from top down on the Column. For 80, 100, 112, and 120 inch whiteboard, you can hang the
whiteboard on the first and third bolts from top down on the Column.

3.2.1 Install battery
1. Unscrew the end cap of signal pen turning it counterclockwise.
2. Remove the battery cover by pushing the cover back away from the pen tip.
3. Insert 1 AAA battery with the plus (+) side up.
4. Put the battery cover back and screw the cap back on clockwise.
3.2.2 Replace pen tip
The electronic pens have a removable tip, which can be replaced it is worn out. To
replace the pen tip:
1. Pull out the existing tip with your fingers or tweezers.
2. Insert the replacement tip and push into place fully.

Chapter 4 Connecting with Computer and
Projector
After fixing the whiteboard, find a connecting port on the backboard right bottom.
Plug the quadrate side of USB cable into the connecting port, and plug the flat side
into the available USB port of computer, as follows. External power source is not
required. And please connect the Projector into the VGA port of your PC video card.
Flat USB port for connecting the computer Quadrate USB port for connecting whiteboard
If your product model is with “B” letter (refer to “About model” for detailed explanation
for product model),
you also can use wireless Bluetooth for PC connection, the
connecting steps are as follows:
Step 1. After fixing the whiteboard, insert the round terminal of the 5V transformer into
a round jack on the backboard right bottom, and insert the power plug of the 5V
transformer into a power socket.
Step 2. Plug the Bluetooth adapter into an available USB port of computer. And please
connect the Projector into the VGA port of your PC video card.
Open the projector after connection, and adjust it to make its projection within the
active area and centered. Then use the trapezoid rectification function of the projector
Note: If your product model is with “N” letter (refer to “About model” for detailed
explanation for product model), the round jack is on the right bottom of the backboard.

to make the projection quadrate.
The blue areas are the maximum projection areas. For whiteboards without hotkey or with hard
hotkeys, there should be 2cm margin between projection area and whiteboard inner frame. For
whiteboards with soft hotkeys, the projection area should not exceed the hotkeys.
Note:
1. In case you use 16:9 whiteboard, please choose the projector supporting the 16:9
projection mode.
2. The projection image must be within the active area of the whiteboard, otherwise the
whiteboard cannot work normally.

Chapter 5 Install and Uninstall Drivers
5.1 Install Drivers
Run “IQBoard ET & PS Drivers.exe” in the installation CD, and install the drivers
according to the prompt. The computer will automatically find a new hardware and
install the drivers.
After the installation is completed, if the indicator beside the USB connecting port
turns green, the whiteboard can be used normally. If the indicator turns red, it means
the USB cable is not well connected, please re-connect the USB cable or restart
computer. If the indicator is not lighting, it means the USB cable is not connected.
Indicator is not lighting Indicator turns red Indicator turns right
USB cable is not connected. USB cable is not well
connected, or the drivers are
not correctly installed
The whiteboard works
normally.
5.2 Uninstall Drivers
Select “Start > Programs > IQBoard ET & PS Drivers >Uninstall” to uninstall. You also
can open Control Panel, select “Add/Remove Programs”, and in the list of currently
installed Programs, select “IQBoard ET & PS Drivers”, then press the
“Change/Remove” button to remove the drivers.
Prompt:
1. If it is the first time you connect the computer to the whiteboard, and the drivers are not
installed, the system prompt “Found New Hardware”, you can ignore or close the prompt,
and continue to install the driver accord to the above steps.
2. No restriction on Windows user account (Administrator, Guest, and Limited User).

Chapter 6 Orientation and Hotkey Setting
6.1 Orientation
At the first time you use the whiteboard, you need to orient it, so the moving track of
the electronic pen or writing pen (finger) can match the cursor. You can select 4 points,
9 points or 20 points orientation. Normally 9 points orientation is adopted. After the
whiteboard is oriented, you don’t need to re-orient at the same environment.
Operation steps are as follows:
Step 1. Select “Start > Programs > IQBoard ET & PS Drivers >Orient” to enter the
Orient Precision Selection window, as follows. If your product model is without H, N
and T, you also can press “
” in the hotkey bar.
Step 2. Select Orientation Points and click “Ok”, the orientation interface will appear.
According to the arrows instruction, use electronic pen or writing pen (finger) to
press the green center of the flickering red “+” on the surface. If the cursor is on
the same point, this point is successfully oriented. And the next point appears. The
whole orientation process is simply using your signal pen to click each orientation
point in sequence.
/