Roland SPD-SX Special Edition User manual
- Category
- Musical Equipment
- Type
- User manual


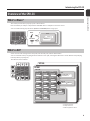
How to obtain a PDF of the owner’s manual
PDF les of the owner’s manual and supplementary material for this product can be obtained from the Roland website.
• SPD-SX Owner’s Manual (this document)
• Eect Guide (Explanation of the eect parameters)
Eect Guide is not included with the product; you may download them as necessary.
Visit the following URL, choose “owner’s manuals,” and search for the model name “SPD-SX.”
http://www.roland.com/support/en/
Owner’s Manual
Before using this unit, carefully read the sections entitled: “USING THE UNIT SAFELY” (p. 74), and “IMPORTANT NOTES” (p. 75). These
sections provide important information concerning the proper operation of the unit. Additionally, in order to feel assured that you
have gained a good grasp of every feature provided by your new unit, Owner’s Manual should be read in its entirety. The manual
should be saved and kept on hand as a convenient reference.
Copyright © 2011 ROLAND CORPORATION
All rights reserved. No part of this publication may be reproduced in any form without the written permission of ROLAND
CORPORATION.
Roland is a registered trademarks or trademarks of Roland Corporation in the United States and/or other countries.

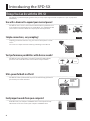
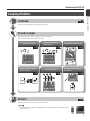
Things You Can Do with the SPD-SX
The SPD-SX is a powerful sampling pad that lets you easily sample original sounds and phrases so you can play them
immediately.
4
Use with a drum set to expand your musical power!
The SPD-SX can be used as a stand-alone instrument for live performances or
in the studio to play backing phrases or sound eects, or in combination with
your acoustic or electronic drum set to expand your musical potentials.
Simple connections, easy sampling!
Sampling your favorite sounds is easy; just connect a microphone or audio
source.
You can also re-sample onboard sounds by performing on the SPD-SX.
Vast performance possibilities with diverse sounds!
The SPD-SX comes loaded with a rich variety of sounds including drums,
percussion and sound eects that can be used for all styles of music.
Ultra-powerful built-in eects!
The SPD-SX contains powerful eects processors that will help go further to
personalize your sounds and music.
Easily import sounds from your computer!
Audio les from your computer or USB ash drive can be imported easily.
SPD-SX data can also be saved to your computer or USB ash drive.
p. 28
p. 20
p. 23
DISTORTION
REVERB
CHORUS
p. 39
Introducing the SPD-SX

Introducing the SPD-SX
Introducing the SPD-SX
5
Overview of the SPD-SX
What’s a Wave?
The sound you hear when you play a pad is called a “wave.”
Each sound that you sample or import from a USB ash drive or computer is stored as a wave.
You can simultaneously play two waves (WAVE and SUB WAVE) from a single pad.
WAVE
SUB WAVE
WAVE*****
WAVE00001
Wave
What’s a Kit?
A “kit” consists of all settings for the nine pads, four external pads, and two footswitches.
You can customize a kit by assigning the desired wave to each pad, selecting the eect to be used in that kit and specifying
how they will be played (p. 42).
The SPD-SX contains 100 kits.
*1: Volume of the kit
*2: Tempo of the kit
*3: Eects applied to the kit
KIT
KIT FX
PAD1
WAVE
SUB WAVE
WAVE
SUB WAVE
WAVE
SUB WAVE
WAVE
SUB WAVE
WAVE
SUB WAVE
WAVE
SUB WAVE
WAVE
SUB WAVE
WAVE
SUB WAVE
WAVE
SUB WAVE
WAVE
SUB WAVE
WAVE
SUB WAVE
WAVE
SUB WAVE
WAVE
SUB WAVE
WAVE
SUB WAVE
PAD2 PAD3
PAD4 PAD5 PAD6
PAD7 PAD8 PAD9
TRIG1 TRIG2 TRIG3
WAVE
SUB WAVE
TRIG4
FS1 FS2
KIT PAD
KIT TEMPO *2
KIT VOLUME *1
FX1 *3 FX2 *3
KIT001
KIT100

Introducing the SPD-SX
6
About the Eects
The SPD-SX includes a “MASTER EFFECT” processor (p. 22), which applies to all sounds being produced, and a “KIT FX” processor
(p. 23), which can be used on a per-kit basis.
Use these eects to modify and personalize the sounds as appropriate for the song or performance.
MASTER EFFECT KIT FX
Audio signal ow
SPD-SX
*1: OUTPUT (p. 43) parameter
*2: FX2 (p. 55) parameter
MASTER OUT
SUB OUT
PHONES
KIT
PAD1
KIT FX
FX1
FX2
SUB WAVE
WAVE
FS2
*1
*2
MASTER
EFFECT

Introducing the SPD-SX
Introducing the SPD-SX
7
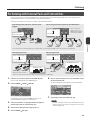
Sampling Workow
Get Ready
Connect your microphone or external audio device.
Record a Sample
The SPD-SX lets you create a sample in any one of six ways.
Use the method that’s best for your situation.
p. 34p. 32p. 29
Record your performance on
the SPD-SX
p. 38p. 36p. 35
Combine two waves into one
Sample successively to
dierent pads
Sample to one pad
Cut a wave (Chop)
Apply an eect to a wave
and resample it
Perform
Now you can perform using the waves you sampled.
MEMO
You can import sounds from a USB ash drive or your computer into the SPD-SX and
play them (p. 39).
p. 12
p. 20

8
Introducing the SPD-SX . . . . . . . . . . . . . . . . . . . . . . . . . . . . . . . 4
Things You Can Do with the SPD-SX . . . . . . . . . . . . . . . . . . 4
Overview of the SPD-SX . . . . . . . . . . . . . . . . . . . . . . . . . . . . . 5
What’s a Wave? . . . . . . . . . . . . . . . . . . . . . . . . . . . . . . . . 5
What’s a Kit? . . . . . . . . . . . . . . . . . . . . . . . . . . . . . . . . . . 5
About the Eects . . . . . . . . . . . . . . . . . . . . . . . . . . . . . . 6
Sampling Workow . . . . . . . . . . . . . . . . . . . . . . . . . . . . . . . . . 7
Get Ready . . . . . . . . . . . . . . . . . . . . . . . . . . . . . . . . . . . . . 7
Record a Sample . . . . . . . . . . . . . . . . . . . . . . . . . . . . . . 7
Perform . . . . . . . . . . . . . . . . . . . . . . . . . . . . . . . . . . . . . . . 7
Panel Descriptions . . . . . . . . . . . . . . . . . . . . . . . . . . . . . . . . . . . 10
Top Panel . . . . . . . . . . . . . . . . . . . . . . . . . . . . . . . . . . . . . . . . . . 10
Rear Panel (Connecting Your Equipment) . . . . . . . . . . . 12
Getting Ready to Play . . . . . . . . . . . . . . . . . . . . . . . . . . . . . . . . 14
Attaching to a Stand . . . . . . . . . . . . . . . . . . . . . . . . . . . . . . . 14
Using the SPD-SX with a Drum Set . . . . . . . . . . . . 14
Using the SPD-SX by Itself . . . . . . . . . . . . . . . . . . . . 14
Turning the Power On . . . . . . . . . . . . . . . . . . . . . . . . . . . . . . 15
Turning the Power On . . . . . . . . . . . . . . . . . . . . . . . . 15
Turning the Power O . . . . . . . . . . . . . . . . . . . . . . . . 15
Basic Editing Procedure . . . . . . . . . . . . . . . . . . . . . . . . . . . . 16
Using the Quick Menu . . . . . . . . . . . . . . . . . . . . . . . . . . . . . . 17
Using a USB Flash Drive. . . . . . . . . . . . . . . . . . . . . . . . . . . . . 18
Connecting Your Computer via USB . . . . . . . . . . . . . . . . . 19
Installing the USB Driver . . . . . . . . . . . . . . . . . . . . . . 19
Switching the USB Operating Mode
(USB MODE) . . . . . . . . . . . . . . . . . . . . . . . . . . . . . . . . . . 19
Connecting the SPD-SX to the Computer . . . . . . 19
Performing . . . . . . . . . . . . . . . . . . . . . . . . . . . . . . . . . . . . . . . . . . 20
Playing the Pads . . . . . . . . . . . . . . . . . . . . . . . . . . . . . . . . . . . 20
Stopping All Sounds . . . . . . . . . . . . . . . . . . . . . . . . . . 20
Using Headphones to Check Sounds . . . . . . . . . . 20
Selecting a Kit . . . . . . . . . . . . . . . . . . . . . . . . . . . . . . . . . . . . . . 21
Using the Master Eects . . . . . . . . . . . . . . . . . . . . . . . . . . . . 22
Controlling the Master Eect in Real Time . . . . . 23
Applying a Kit Eect (KIT FX SW) . . . . . . . . . . . . . . . . . . . . 23
Performing with a Click (Metronome) . . . . . . . . . . . . . . . 24
Changing the Tempo (TEMPO) . . . . . . . . . . . . . . . . . . . . . . 25
Adjusting the Pad Volume (PAD VOLUME) . . . . . . . . . . . 26
Performing with External Pads and Footswitches . . . . 27
Sampling . . . . . . . . . . . . . . . . . . . . . . . . . . . . . . . . . . . . . . . . . . . . 28
Sampling to a Single Pad (BASIC SAMPLING) . . . . . . . . 29
Successively Sampling to Multiple Pads
(MULTI PAD) . . . . . . . . . . . . . . . . . . . . . . . . . . . . . . . . . . . . . . . . 32
Combining Two Waves into One (MERGE) . . . . . . . . . . . 34
Resampling with Eects (WITH FX) . . . . . . . . . . . . . . . . . . 35
Dividing a Wave (CHOP) . . . . . . . . . . . . . . . . . . . . . . . . . . . . 36
Recording the Sound of an SPD-SX Performance
(PERFORM & RECORD) . . . . . . . . . . . . . . . . . . . . . . . . . . . . . . 38
Importing Audio Files . . . . . . . . . . . . . . . . . . . . . . . . . . . . . . . . 39
Importing Audio Files from a USB Flash Drive
(WAVE IMPORT) . . . . . . . . . . . . . . . . . . . . . . . . . . . . . . . . . . . . 39
Importing Audio Files from Your Computer . . . . . . . . . . 40
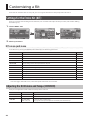
Customizing a Kit . . . . . . . . . . . . . . . . . . . . . . . . . . . . . . . . . . . . 42
Settings for the Entire Kit (KIT) . . . . . . . . . . . . . . . . . . . . . . 42
Adjusting the Kit Volume and Tempo
(COMMON) . . . . . . . . . . . . . . . . . . . . . . . . . . . . . . . . . . 42
Output Assignments (OUTPUT) . . . . . . . . . . . . . . . 43
MIDI Settings (MIDI) . . . . . . . . . . . . . . . . . . . . . . . . . . 43
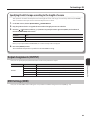
Specifying How a Wave Will Sound (KIT PAD) . . . . . . . . 44
Selecting the Wave Played by a Pad (MAIN) . . . . 45
Specifying How the Wave is Sounded (MODE) . 45
Playing the Second Wave (SUB) . . . . . . . . . . . . . . . 46
Applying a Kit Eect (KIT FX) . . . . . . . . . . . . . . . . . . . . . . . . 46
Copying Parameter Settings to All Pads
(SET ALL PAD) . . . . . . . . . . . . . . . . . . . . . . . . . . . . . . . . . . . . . . 47
Assigning a Name (NAME) . . . . . . . . . . . . . . . . . . . . . . . . . . 47
Copying Kits or Pads . . . . . . . . . . . . . . . . . . . . . . . . . . . . . . . . 48
Copying a Kit . . . . . . . . . . . . . . . . . . . . . . . . . . . . . . . . . 48
Copying a Pad . . . . . . . . . . . . . . . . . . . . . . . . . . . . . . . . 48
Exchanging Pads (PAD EXCHANGE) . . . . . . . . . . . . . . . . . 49
Initializing a Kit or Pad . . . . . . . . . . . . . . . . . . . . . . . . . . . . . . 49
Initializing a Kit (KIT INIT) . . . . . . . . . . . . . . . . . . . . . 49
Initializing a Pad (PAD INIT) . . . . . . . . . . . . . . . . . . . 49
Editing a Wave . . . . . . . . . . . . . . . . . . . . . . . . . . . . . . . . . . . . . . . 50
Specifying a Wave’s Start and End
(WAVE START/END) . . . . . . . . . . . . . . . . . . . . . . . . . . . . . . . . . 50
Normalizing a Wave’s Volume (WAVE NORMALIZE) . . . 50
Adjusting the Pitch of a Wave (WAVE PITCH) . . . . . . . . . 50
Creating a Wave That Plays in Reverse
(WAVE REVERSE) . . . . . . . . . . . . . . . . . . . . . . . . . . . . . . . . . . . 51
Deleting Unwanted Regions of a Wave
(WAVE TRUNCATE) . . . . . . . . . . . . . . . . . . . . . . . . . . . . . . . . . . 51
Assigning a Category to a Wave (WAVE CATEGORY) . . 51
Organizing the Waves (RENUMBER) . . . . . . . . . . . . . . . . . 52
Copying a Wave (WAVE COPY) . . . . . . . . . . . . . . . . . . . . . . 52
Deleting a Wave (WAVE DELETE) . . . . . . . . . . . . . . . . . . . . 52
Saving a Wave to USB Memory (WAVE EXPORT) . . . . . 52
Contents

Contents
Contents
9
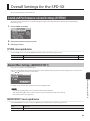
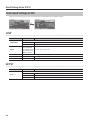
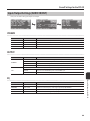
Overall Settings for the SPD-SX . . . . . . . . . . . . . . . . . . . . . . . 53
Sound and Performance-related Settings (SYSTEM) . . 53
Master Eect Settings (MASTER EFFECT) . . . . . . 53
Click Sound Settings (CLICK) . . . . . . . . . . . . . . . . . . 54
Input/Output Settings (AUDIO IN/OUT) . . . . . . . 55
Specifying the Kit Switching Order
(KIT CHAIN) . . . . . . . . . . . . . . . . . . . . . . . . . . . . . . . . . . 56
Using a Pad or Footswitch as a Switch
(PAD/FS CONTROL) . . . . . . . . . . . . . . . . . . . . . . . . . . . 57
Controlling Images (VISUAL CONTROL) . . . . . . . . 57
Initializing the System (SYSTEM INIT) . . . . . . . . . . . . . . . . 58
Display and Pad Settings (SETUP) . . . . . . . . . . . . . . . . . . . 59
Display Brightness and Indicator Settings
(LCD/LED) . . . . . . . . . . . . . . . . . . . . . . . . . . . . . . . . . . . . 59
Pad Sensitivity Adjustment (PAD SENS) . . . . . . . . 60
External Pad Settings (TRIG IN) . . . . . . . . . . . . . . . . 62
Footswitch Settings (FOOT SW) . . . . . . . . . . . . . . . 63
MIDI Settings (MIDI) . . . . . . . . . . . . . . . . . . . . . . . . . . 63
Other Settings (OPTION) . . . . . . . . . . . . . . . . . . . . . . 63
Initializing the Setup Parameters (SETUP INIT) . . . . . . . 64
Other Convenient Functions (UTILITY) . . . . . . . . . . . . . . 64
Viewing the Wave List (WAVE LIST) . . . . . . . . . . . . 64
Importing an Audio File from a USB Flash
Drive (WAVE IMPORT) . . . . . . . . . . . . . . . . . . . . . . . . 65
Loading Data from a USB Flash Drive
(LOAD (USB MEMORY)) . . . . . . . . . . . . . . . . . . . . . . . 65
Saving Data to a USB Flash Drive
(SAVE (USB MEMORY)) . . . . . . . . . . . . . . . . . . . . . . . . 66
Viewing Information About the SPD-SX Itself
(INFORMATION) . . . . . . . . . . . . . . . . . . . . . . . . . . . . . . 66
Connecting an External MIDI Device . . . . . . . . . . . . . . . . . . 67
MIDI Settings for Each Pad (MIDI) . . . . . . . . . . . . . . . . . . . 67
MIDI Settings for the Entire SPD-SX (MIDI) . . . . . . . . . . . 68
Appendix . . . . . . . . . . . . . . . . . . . . . . . . . . . . . . . . . . . . . . . . . . . . 69
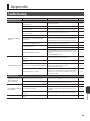
Troubleshooting . . . . . . . . . . . . . . . . . . . . . . . . . . . . . . . . . . . 69
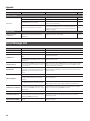
Error Message List . . . . . . . . . . . . . . . . . . . . . . . . . . . . . . . . . . 70
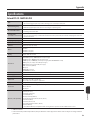
Specications . . . . . . . . . . . . . . . . . . . . . . . . . . . . . . . . . . . . . . 71
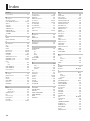
Index . . . . . . . . . . . . . . . . . . . . . . . . . . . . . . . . . . . . . . . . . . . . . . . . 72
USING THE UNIT SAFETY . . . . . . . . . . . . . . . . . . . . . . . . . . . . . 74
IMPORTANT NOTES . . . . . . . . . . . . . . . . . . . . . . . . . . . . . . . . . . 75

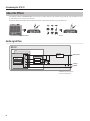
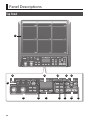
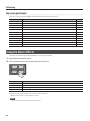
Top Panel
10
Panel Descriptions
1
9 10
12 1113
3
2 14
4 5 6 87

Panel Descriptions
Panel Descriptions
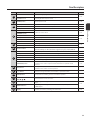
11
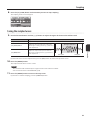
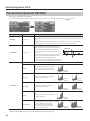
Number Name Explanation Page
1
Pad 1–9 Play pads 1–9 by playing them with sticks.
p. 20
Pad indicator 1–9
These indicators are located at the lower right of each pad.
They will light when the pad is struck.
2
[POWER] button Turns the power on/o. p. 15
3
[MASTER] knob Adjusts the volume of the MASTER OUT jacks. p. 15
[PHONES] knob Adjusts the volume of the PHONES jack. p. 15
[CLICK] knob Adjusts the volume of the click. p. 24
4
[CONTROL 1] knob
Modies the master eects. p. 23
[CONTROL 2] knob
[FILTER] button Turns the lter on/o.
p. 22
[DELAY] button Turns the delay on/o.
[S.LOOP] button Turns the short looper on/o.
[FX] button Turns FX on/o.
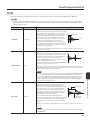
5
TEMPO indicator This will light in time with the performance tempo.
p. 24
[START/STOP] button Turns the click start/stop.
6
Function buttons
These execute the functions shown at the bottom of the display.
In this manual they are called, from left to right, the [F1], [F2], and [F3] buttons.
-
7
[KIT] button Displays the top screen. p. 21
[MENU] button Accesses various functions, such as overall settings for the entire SPD-SX. p. 16
[SAMPLING] button Captures a sample. p. 28
[QUICK] button Accesses a quick menu (QUICK MENU) specic to each screen. p. 17
[ALL SOUND OFF] button Stops all currently playing sounds. p. 20
[PAD CHECK] button
Auditions the sound of the struck pad through headphones.
This button is also used in conjunction with other buttons to perform various
operations.
p. 20
8
[EXIT] button
Returns you to the previous screen.
This button is also used to cancel an operation.
-
9
[-] [+] buttons Use these to change kit numbers, wave numbers, or parameter values. -
10
[ENTER] button When this button is blinking, press it to execute the operation. -
11
Cursor buttons
[ ] [ ] [ ] [ ]
Use these buttons to move the cursor. -
12
FOOT SW indicators
These will light when a signal is received from a footswitch connected to the FOOT
SW jack.
p. 27
13
TRIG IN indicators
These will light when a signal is received from an external pad or pedal connected to
the TRIG IN jacks.
14
Display Kit names, wave names, and settings are shown here. p. 21

Panel Descriptions
12
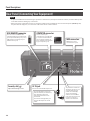
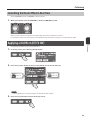
Rear Panel (Connecting Your Equipment)
COMPUTER connector
You can connect your
computer here via a USB cable
(p. 19). The included software
lets you import audio les (p.
40) or sample the sounds played
by your computer (p. 29).
USB MEMORY connector
You can connect a USB ash drive
(sold separately) here (p. 18). This allows
you to import audio les (p. 39), or save
SPD-SX waves and settings to your
USB ash drive (p. 66).
DC IN jack
Connect the included AC adaptor here.
To prevent the inadvertent
disruption of power to your
unit (should the plug be
pulled out accidentally),
and to avoid applying
undue stress to the DC IN
jack, anchor the power cord
using the cord hook, as
shown in the illustration.
NOTE!
• To prevent malfunction and/or damage to speakers or other devices, always turn down the volume, and turn o the power
on all devices before making any connections.
• When connection cables with resistors are used, the volume level of equipment connected to the inputs (AUDIO IN jacks)
may be low. If this happens, use connection cables that do not contain resistors.
Security slot ( )
http://www.kensington.com/
MIDI connectors
MIDI devices can be
connected here (p. 67).
Place the AC adaptor so the side
with the indicator (see illustration)
faces upwards and the side
with textual information faces
downwards.
The indicator will light when you
plug the AC adaptor into an AC
outlet.

Panel Descriptions
Panel Descriptions
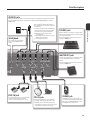
13
AUDIO IN jacks
When you want to sample, connect your microphone or digital audio player to these jacks.
The sound that’s input to these jacks will be output from the MASTER OUT jacks and the
PHONES jack.
PHONES jack
Headphones can be connected here.
Sound will still be output from the SUB
OUT jacks and MASTER OUT jacks even
if headphones are connected.
MASTER OUT jacks
These jacks output the sound. Connect them
to your amplied speakers or recording
device.
If you’re outputting in monaural, connect to
only the L/MONO jack.
FOOT SW jack
A footswitch (FS-5U, FS-6; sold separately)
can be connected here and used to
control a variety of things (p. 27, p. 57).
TRIG IN jacks
External pads (PD series; sold separately)
or acoustic drum triggers (RT series; sold
separately) can be connected here (p. 27).
* To make the connection, use the cable that
came with the product you’re using.
[GAIN] knob
This adjusts the volume that’s
input to the AUDIO IN jacks
(p. 29).
SUB OUT jacks
Connect them to your mixer or audio system.
These jacks output the sound of only the pads
you’ve specied (p. 43).
If you’re outputting in monaural, connect to
only the L/MONO jack.
* Use a monaural dynamic microphone.
The SPD-SX does not support condenser
microphones.
* Howling could be produced depending
on the location of microphones relative
to speakers. This can be remedied by:
1. Changing the orientation of the
microphone(s).
2. Relocating microphone(s) at a greater
distance from speakers.
3. Lowering volume levels.

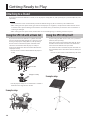
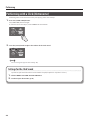
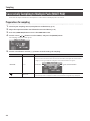
Attaching to a Stand
If you want to attach the SPD-SX to a stand, use an all-purpose clamp (APC-33; sold separately) or a pad stand (PDS-10; sold
separately).
NOTE!
• You must use the screws on the bottom panel of the SPD-SX. Using any other screws may cause malfunction.
• When turning the unit upside–down, get a bunch of newspapers or magazines, and place them under the four corners
or at both ends to prevent damage to the buttons and controls. Also, you should try to orient the unit so no buttons or
controls get damaged.
• When turning the unit upside–down, handle with care to avoid dropping it, or allowing it to fall or tip over.
14
Getting Ready to Play
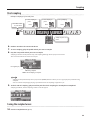
Using the SPD-SX with a Drum Set
If you want to attach the SPD-SX to a cymbal stand and
play it in conjunction with V-Drums or a drum set, secure
it using an all-purpose clamp (APC-33; sold separately).
Use the screws on the bottom panel of the SPD-SX to
attach the stand holder of the all-purpose clamp as
shown in the illustration. Then attach the SPD-SX to the
all-purpose clamp.
* Do not use the screws included with the all-purpose
clamp.
All-purpose clamp
Stand holder
* The all-purpose clamp can accommodate a rod with a
diameter in the range of 10.5–30 mm.
Example setup
Using the SPD-SX by Itself
If you’re using the SPD-SX on its own, use a pad stand
(PDS-10; sold separately).
Using the screws on the bottom of the SPD-SX, attach
the PDS-10 stand holder as shown in the illustration.
Then attach the SPD-SX to the pad stand.
For details on how to assemble the pad stand and use
the pad holder, refer to the owner’s manual of the pad
stand.
* Do not use the screws included with the pad stand.
Stand holder
Example setup

Getting Ready to Play
Getting Ready to Play
15
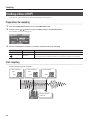
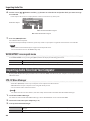
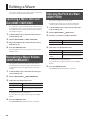
Turning the Power On
NOTE!
* Once the connections have been completed (p. 12), turn on power to your various devices in the order specied. By turning
on devices in the wrong order, you risk causing malfunction and/or damage to speakers and other devices.
* Before switching the power on/o, always be sure to turn the volume down. Even with the volume turned down, you
might hear some sound when switching the power on/o. However, this is normal and does not indicate a malfunction.
• With the factory settings, the SPD-SX’s power will automatically be switched o 4 hours after you stop playing or operating
the unit. If you don’t want the power to turn o automatically, change the AUTO OFF setting to “OFF” as described on p. 63.
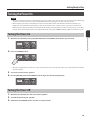
Turning the Power On
1. Minimize the volume by turning the [MASTER] knob and [PHONES] knob all the way to the left.
2. Press the [POWER] button.
* This unit is equipped with a protection circuit. A brief interval (a few seconds) after power up is required before the unit will
operate normally.
3. Turn on the power of your speakers.
4. Use the [MASTER] knob and [PHONES] knob to adjust the volume appropriately.
Turning the Power O
1. Minimize the volume of the SPD-SX and your speakers.
2. Turn o the power of your speakers.
3. Hold down the [POWER] button until the screen goes blank.

Getting Ready to Play
16
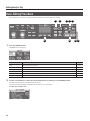
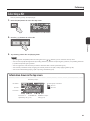
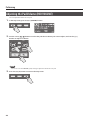
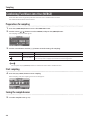
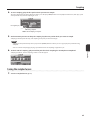
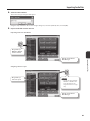
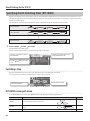
Basic Editing Procedure
Here’s the basic procedure for using the buttons and knobs to edit the SPD-SX’s settings.
15
2 34 4
2 3 4
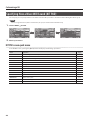
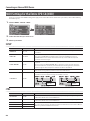
1. Press the [MENU] button.
The MENU screen will appear.
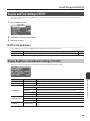
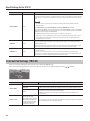
MENU Explanation Page
KIT Make settings for an entire kit. p. 42
KIT PAD Specify how the waves of each pad will sound. p. 44
KIT FX Make settings for the kit eects. p. 46
SYS (SYSTEM) Make overall sound and performance settings for the entire SPD-SX. p. 53
SETUP Make overall display, pad, and MIDI-related settings for the entire SPD-SX. p. 59
UTIL (UTILITY) View information about the SPD-SX, and transfer data with a USB ash drive. p. 64
2. Use the cursor buttons to select the desired menu item, and then press the [ENTER] button.
The edit screen for the selected menu item will appear.
If you selected “KIT,” “KIT PAD,” or “KIT FX” from the menu, proceed to step 4.
Example: The SYSTEM screen

Getting Ready to Play
Getting Ready to Play
17
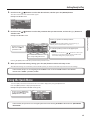
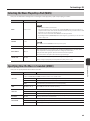
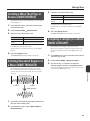
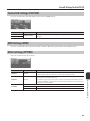
3. Use the cursor [ ] [ ] buttons to select the desired item, and then press the [ENTER] button.
The edit screen for the selected item will appear.
Example: The CLICK screen
4. Use the cursor [ ] [ ] buttons to select the parameter that you want to edit, and use the [-] [+] buttons to
edit the value.
Example: The KIT PAD screen
Use the cursor [ ] [ ]
buttons to select a
parameter to edit.
Use the [-] [+] buttons to edit the parameter.
MEMO
By holding down the [SHIFT] button and using the [-] [+]
buttons, you can select waves in steps of 10.
Use the function buttons to access
the corresponding edit screens.
To select the pad that you want to edit, play that pad.
MEMO
• You can also use the cursor [ ] [ ] buttons to select a pad.
• If desired, you can make settings so that a pad will not be
selected for editing when you play it (p. 63).
Pressing the [EXIT] button will take you back to the previous screen.
5. When you’ve nished making settings, press the [KIT] button to return to the top screen.
The SPD-SX’s settings are saved when you turn o the power; you don’t need to take any action to save the settings.
In this manual, the process of navigating from the MENU screen to select SYSTEM and then select CLICK is
abbreviated as “MENU SYSTEM CLICK.”
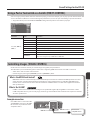
Using the Quick Menu
You can rapidly select menus relevant to the screen that’s displayed by using the Quick menu.
Press the [QUICK] button to display the Quick menu.
Example: The quick menu in the KIT screen (p. 42)
Use the cursor [ ] [ ] buttons
to select an item, and press the
[ENTER] button to conrm.
In this manual, the operation of accessing the quick menu and selecting KIT NAME is abbreviated as “QUICK MENU
KIT NAME.”

Getting Ready to Play
18
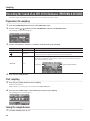
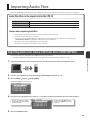
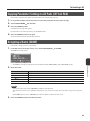
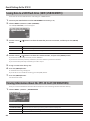
Using a USB Flash Drive
If a USB ash drive (separately sold) is connected to the SPD-SX, you’ll be able to do the following things.
• Import audio les from the USB ash drive (p. 39).
• Use the USB ash drive to save or load the SPD-SX’s waves or settings (p. 65, p. 66).
1. Connect your USB ash drive to the USB MEMORY connector.
USB ash drive
* Carefully insert the USB ash drives all the way in—until it is rmly in place.
* Use USB Flash Memory sold by Roland. We cannot guarantee operation if other USB ash drive is used.

Getting Ready to Play
Getting Ready to Play
19
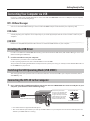
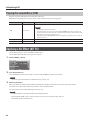
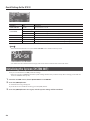
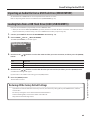
Connecting Your Computer via USB
If you use a commercially available USB cable to connect the SPD-SX’s COMPUTER connector to a USB port on your computer,
you’ll be able to do the following things.
SPD-SX Wave Manager
You can use the “SPD-SX Wave Manager” on the included CD-ROM to import audio les from your computer (p. 40).
USB Audio
Sounds played by your computer can be sampled (p. 29), or sounds played by the SPD-SX can be recorded as audio on your
computer.
USB MIDI
Performance data (MIDI data) from the SPD-SX can be recorded into DAW software on your computer.
Installing the USB Driver
In order to use USB audio and USB MIDI functionality, you must rst install the USB driver. (SPD-SX Wave Manager can be used
without installing the USB driver.)
1. Install the USB driver into your computer.
The USB driver is provided on the included CD-ROM.
For the operating requirements, refer to “ReadmeEN.txt” on the CD-ROM.
The procedure for installing the USB driver will depend on the system you’re using, so carefully read the “ReadmeEN.txt” le on
the CD-ROM before you proceed.
Switching the USB Operating Mode (USB MODE)
This setting species how operation will occur when the SPD-SX is connected via USB to your computer. For details, refer to
“USB MODE” (p. 63).
Connecting the SPD-SX to the Computer
1. Use a commercially available USB cable to connect the SPD-SX ‘s COMPUTER connector to a USB port on your
computer, you’ll be able to do the following things.
Computer
USB cable
(Supports USB 2.0 Hi-Speed)
Use the rear panel cable
hook to secure the USB cable
as shown in the illustration
at right. This will prevent USB
communication errors from
being caused by vibration
when the SPD-SX is struck.
For a thin USB cable
For a thick USB cable
* Use a USB cable that supports USB 2.0 Hi-Speed.
* Turn on the SPD-SX’s power before you start up the DAW software on your computer. Do not turn the SPD-SX’s power on/
o while your DAW software is running.

20
Performing
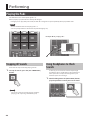
Playing the Pads
The SPD-SX has nine onboard pads (pads 1–9).
When you play a pad, the indicator of that pad will light.
* Though you can play with your hands, the SPD-SX is designed to respond optimally when played with sticks.
MEMO
• Use the shoulder of the stick to play pads 1–3.
• You can specify how the indicators for the pads will light (p. 59).
Pad 4
Pad 7
Pad 1 Pad 2 Pad 3
Pad 8
Pad 6
Pad 9
Pad 5
Example: When you play pad 7
Pad indicator 7 will light
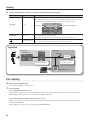
Stopping All Sounds
Here’s how to stop all currently playing sounds.
1. To stop all sounds, press the [ALL SOUND OFF]
button.
MEMO
You can also stop all currently playing sounds by
playing a pad or pressing a footswitch (p. 57).
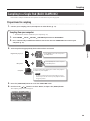
Using Headphones to Check
Sounds
If desired, you can check the sounds only through
headphones. This is useful during a live performance
when you want to verify sound assigned to a pad
without anyone else hearing it.
1. While holding down the [PAD CHECK] button,
play the pad whose sound you want to check.
Page is loading ...
Page is loading ...
Page is loading ...
Page is loading ...
Page is loading ...
Page is loading ...
Page is loading ...
Page is loading ...
Page is loading ...
Page is loading ...
Page is loading ...
Page is loading ...
Page is loading ...
Page is loading ...
Page is loading ...
Page is loading ...
Page is loading ...
Page is loading ...
Page is loading ...
Page is loading ...
Page is loading ...
Page is loading ...
Page is loading ...
Page is loading ...
Page is loading ...
Page is loading ...
Page is loading ...
Page is loading ...
Page is loading ...
Page is loading ...
Page is loading ...
Page is loading ...
Page is loading ...
Page is loading ...
Page is loading ...
Page is loading ...
Page is loading ...
Page is loading ...
Page is loading ...
Page is loading ...
Page is loading ...
Page is loading ...
Page is loading ...
Page is loading ...
Page is loading ...
Page is loading ...
Page is loading ...
Page is loading ...
Page is loading ...
Page is loading ...
Page is loading ...
Page is loading ...
Page is loading ...
Page is loading ...
Page is loading ...
Page is loading ...
Page is loading ...
Page is loading ...
Page is loading ...
Page is loading ...
-
 1
1
-
 2
2
-
 3
3
-
 4
4
-
 5
5
-
 6
6
-
 7
7
-
 8
8
-
 9
9
-
 10
10
-
 11
11
-
 12
12
-
 13
13
-
 14
14
-
 15
15
-
 16
16
-
 17
17
-
 18
18
-
 19
19
-
 20
20
-
 21
21
-
 22
22
-
 23
23
-
 24
24
-
 25
25
-
 26
26
-
 27
27
-
 28
28
-
 29
29
-
 30
30
-
 31
31
-
 32
32
-
 33
33
-
 34
34
-
 35
35
-
 36
36
-
 37
37
-
 38
38
-
 39
39
-
 40
40
-
 41
41
-
 42
42
-
 43
43
-
 44
44
-
 45
45
-
 46
46
-
 47
47
-
 48
48
-
 49
49
-
 50
50
-
 51
51
-
 52
52
-
 53
53
-
 54
54
-
 55
55
-
 56
56
-
 57
57
-
 58
58
-
 59
59
-
 60
60
-
 61
61
-
 62
62
-
 63
63
-
 64
64
-
 65
65
-
 66
66
-
 67
67
-
 68
68
-
 69
69
-
 70
70
-
 71
71
-
 72
72
-
 73
73
-
 74
74
-
 75
75
-
 76
76
-
 77
77
-
 78
78
-
 79
79
-
 80
80


Roland SPD-SX Special Edition User manual
- Category
- Musical Equipment
- Type
- User manual
Ask a question and I''ll find the answer in the document
Finding information in a document is now easier with AI
Related papers
-
Roland TD-30 Owner's manual
-
-
Roland TD-50KV Owner's manual
-
Roland TD-50KVX Owner's manual
-
Roland SPD-20 User manual
-
Roland OCTAPAD SPD-30 Versie 2 Owner's manual
-
Roland PM-100 Owner's manual
-
Roland SPD-SX PRO Owner's manual
-
-
Roland SPD::ONE PERCUSSION Owner's manual
Other documents
-
 AVATAR PD705 User manual
-
 Bleeplabs Delaydelus 2 User manual
-
Elektron Monomachine User manual
-
-
Alesis Strike MultiPad User manual
-
-
-
-
-

