Legrand XAP-310 Quick Installation guide
- Category
- Network switches
- Type
- Installation guide

Fo ld Fo ld Fo ld
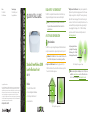
READ ME FIRST
QUICK INSTALL GUIDE
Standard Power Wireless 300N
Low Profile Access Point
XAP-310
Includes:
One: XAP-310 Wireless 300N AP
One: Mounting Bracket and Hardware
One: PoE Injector and Power Cord
One: Ethernet Cable
READ ME FIRST - AP COMPATIBILITY
This XAP-310 is compatible with the Luxul Wireless Controller for fast, easy
configuration and deployment of wireless networks with multiple APs.
n Note: If you’ll be using this AP with a Wireless Controller, refer to
the Quick Install Guide included with the Wireless Controller for
setup instructions.
AP SETUP AND CONFIGURATION
1
Physical Installation
The XAP-310 access point is designed for simple and ecient installation and
setup. It can be mounted on the ceiling, wall or placed on a desktop or shelf.
c Caution: Attach the rubber feet to the mount and attach the mount to
the AP for flat surface placement to avoid overheating and failure.
X
Single Access Point Placement: Because the signal generated by the
XAP-310 is omnidirectional, the unit should be located as near as possible to
the center of the desired coverage area.
XAP-310 Single AP Coverage Pattern
X
Multiple Access Point Placement: You may need to experiment with
AP placement to optimize the roaming experience. Place APs to ensure
adequate coverage, but not so far apart that there is no signal overlap.
Adjacent APs should overlap enough that the client device has a good
connection to the AP to which it is currently attached, but also sees the
next-nearest AP. Ideally, roaming clients should see signal strength of
two overlapping APs in the range of -60 to -70 dBm at the midway
point between two APs. To learn more about AP placement, visit
luxul.com/ap-placement.
Ideally, roaming clients should see
signal strength of two overlapping
APs in the range of -60 to -70 dBm at
the midway point between two APs
XAP-310 Multiple AP Coverage and Overlap
n Note: Consider using Ekahau HeatMapper to assist with this process,
available from www.ekahau.com. Luxul also oers an informative
“How-To” video on HeatMapper at luxul.com/how-to-videos.
Sales
P: 801-822-5450
Technical Support
P: 801-822-5450 Option 3
LUX-QIG-XAP-310-v7 01261710
Copyright and Trademark Notices
No part of this document may be modified or adapted in any way, for any purposes without permission
in writing from Luxul. The material in this document is subject to change without notice. Luxul reserves
the right to make changes to any product to improve reliability, function, or design. No license is granted,
either expressly or by implication or otherwise under any Luxul intellectual property rights. An implied
license only exists for equipment, circuits and subsystems contained in this or any Luxul product.
© Copyright 2016 Luxul. All rights reserved. The name Luxul, the Luxul logo, the Luxul logo mark and Simply
Connected are all trademarks and or registered trademarks of Luxul Wireless, Inc. All other trademarks and
registered trademarks are property of their respective holders.

Fo ld Fo ld Fo ld
READ ME FIRST
QUICK INSTALL GUIDE
Standard Power Wireless 300N
Low Profile Access Point
XAP-310
Includes:
One: XAP-310 Wireless 300N AP
One: Mounting Bracket and Hardware
One: PoE Injector and Power Cord
One: Ethernet Cable
READ ME FIRST - AP COMPATIBILITY
This XAP-310 is compatible with the Luxul Wireless Controller for fast, easy
configuration and deployment of wireless networks with multiple APs.
n Note: If you’ll be using this AP with a Wireless Controller, refer to
the Quick Install Guide included with the Wireless Controller for
setup instructions.
AP SETUP AND CONFIGURATION
1
Physical Installation
The XAP-310 access point is designed for simple and ecient installation and
setup. It can be mounted on the ceiling, wall or placed on a desktop or shelf.
c Caution: Attach the rubber feet to the mount and attach the mount to
the AP for flat surface placement to avoid overheating and failure.
X
Single Access Point Placement: Because the signal generated by the
XAP-310 is omnidirectional, the unit should be located as near as possible to
the center of the desired coverage area.
XAP-310 Single AP Coverage Pattern
X
Multiple Access Point Placement: You may need to experiment with
AP placement to optimize the roaming experience. Place APs to ensure
adequate coverage, but not so far apart that there is no signal overlap.
Adjacent APs should overlap enough that the client device has a good
connection to the AP to which it is currently attached, but also sees the
next-nearest AP. Ideally, roaming clients should see signal strength of
two overlapping APs in the range of -60 to -70 dBm at the midway
point between two APs. To learn more about AP placement, visit
luxul.com/ap-placement.
Ideally, roaming clients should see
signal strength of two overlapping
APs in the range of -60 to -70 dBm at
the midway point between two APs
XAP-310 Multiple AP Coverage and Overlap
n Note: Consider using Ekahau HeatMapper to assist with this process,
available from www.ekahau.com. Luxul also oers an informative
“How-To” video on HeatMapper at luxul.com/how-to-videos.
Sales
P: 801-822-5450
Technical Support
P: 801-822-5450 Option 3
LUX-QIG-XAP-310-v7 01261710
Copyright and Trademark Notices
No part of this document may be modified or adapted in any way, for any purposes without permission
in writing from Luxul. The material in this document is subject to change without notice. Luxul reserves
the right to make changes to any product to improve reliability, function, or design. No license is granted,
either expressly or by implication or otherwise under any Luxul intellectual property rights. An implied
license only exists for equipment, circuits and subsystems contained in this or any Luxul product.
© Copyright 2016 Luxul. All rights reserved. The name Luxul, the Luxul logo, the Luxul logo mark and Simply
Connected are all trademarks and or registered trademarks of Luxul Wireless, Inc. All other trademarks and
registered trademarks are property of their respective holders.

Fold Fold Fold
AP SETUP AND CONFIGURATION CONT.
2
Connecting Ethernet and Power
Ethernet and Power
With the XAP-310 properly mounted, plug the Ethernet cable into the RJ-45
connector on the Access Point.
The XAP-310 is PoE ready and supports 802.3af PoE. A PoE injector is includ-
ed with the device. To apply power, simply connect the opposite end of
the Ethernet cable to which the access point is connected to the provided
PoE injector or other PoE switch or injector. An Ethernet cable length of up
to 300 feet can be used.
n Note: Category-6 shielded twisted pair is recommended for best
results and stable data transmission at the highest data rates.
However, Category-5, super Category-5 or Category-6 unshielded
twisted pair (CAT5/CAT5e/CAT6 UTP) cable can also be used.
PoE Injector Setup
X
Data In: Connect an Ethernet cable from your router or switch to the
Data In port of the included PoE Injector
X
Data & PWR Out: Connect an Ethernet cable from the Data & PWR Out
port of the included PoE Injector to the PoE Port of the XAP-310
X
AC Power: Connect the included AC Cord to the Power Input of the
Included Injector first and then to the AC outlet.
Power
Source
From your
Router or Switch
Luxul AP
DATA IN
DATA &
PWR OUT
POE
Injector
PoE injector
3
Preparing for Access
IP Addressing
If the XAP-310 is connected to a network with a 192.168.0.X address scheme, and
your computer shares a similar address on the same network, you can skip to
the next step, Access and Setup
.
n Note: If another device on your network shares the 192.168.0.10 address,
you’ll need to temporarily reassign or remove that device while
you configure the XAP-310.
If your network uses an address scheme other than 192.168.0.X, you’ll need
to set a temporary static IP address on the computer you’re using for config-
uration. To do so, set the IP address of your computer to an address in the
192.168.0.X range, then set the Gateway/Router address to 192.168.0.10 (the
default IP address of the XAP-310).
Once you’re finished configuring the AP, you can return your computer’s IP
configuration to normal, typically “Obtain Automatically/DHCP.”
n Note: Visit http://luxul.com/ip-addressing to learn more about
changing your computer’s IP address and getting connected.
4
Access and Setup
Getting Connected
X
Connecting Via an Ethernet Device: Use Ethernet cable to connect
your computer to the PoE switch or PoE injector to which the XAP-310 is
connected. Ethernet is the preferred method of connection.
X
Connecting Via a Wireless Device: Connect your client device to the
XAP-310 default wireless network named Luxul310. The wireless network
will run in Open Security mode, so no passphrase is required until Wireless
Security is configured.
Logging In
To access the AP’s web configuration, open your web browser and enter the
AP’s default 192.168.0.10 IP address in the address field. Log in to the AP using the
default user name and password:
Default IP: 192.168.0.10
Username: admin
Password: admin
c Caution: If another device on your network shares the 192.168.0.10
address, you’ll need to temporarily reassign or remove that
device while you configure the XAP-310.
n Note: The XAP-310 is not a router and will need to be connected to a
network with a router in order to deliver Internet access.
5
Hardware Operation
LED Indicators
If the Power LED is On, the XAP-310 is powered and
working properly. If the Power LED is OFF, the XAP-310
is not receiving power or the LED has been turned o in
the AP’s software interface. If the Power LED is blinking,
the XAP-310 is booting.
PoE Injector LED Indicators
If the PWR LED is On, Power is Connected to the injector.
If the PWR LED is O, the injector is not receiving power.
Reset Button:
The Reset button is a black button marked RST located
underneath the mount. It can be used to reboot the AP,
or to restore factory default settings.
To Reboot the AP: With the XAP-310 powered on, simply
press and release the Reset button.
To Restore the Default Settings: With the XAP-310 powered on, press and
hold the Reset button for 15 seconds. Release the button and the XAP-310
will be set to factory defaults.
c CAUTION: Pressing and holding the Reset button will restore the AP
to factory default and remove any custom configuration.

Fo ld Fo ld Fo ld
READ ME FIRST
QUICK INSTALL GUIDE
Standard Power Wireless 300N
Low Profile Access Point
XAP-310
Includes:
One: XAP-310 Wireless 300N AP
One: Mounting Bracket and Hardware
One: PoE Injector and Power Cord
One: Ethernet Cable
READ ME FIRST - AP COMPATIBILITY
This XAP-310 is compatible with the Luxul Wireless Controller for fast, easy
configuration and deployment of wireless networks with multiple APs.
n Note: If you’ll be using this AP with a Wireless Controller, refer to
the Quick Install Guide included with the Wireless Controller for
setup instructions.
AP SETUP AND CONFIGURATION
1
Physical Installation
The XAP-310 access point is designed for simple and ecient installation and
setup. It can be mounted on the ceiling, wall or placed on a desktop or shelf.
c Caution: Attach the rubber feet to the mount and attach the mount to
the AP for flat surface placement to avoid overheating and failure.
X
Single Access Point Placement: Because the signal generated by the
XAP-310 is omnidirectional, the unit should be located as near as possible to
the center of the desired coverage area.
XAP-310 Single AP Coverage Pattern
X
Multiple Access Point Placement: You may need to experiment with
AP placement to optimize the roaming experience. Place APs to ensure
adequate coverage, but not so far apart that there is no signal overlap.
Adjacent APs should overlap enough that the client device has a good
connection to the AP to which it is currently attached, but also sees the
next-nearest AP. Ideally, roaming clients should see signal strength of
two overlapping APs in the range of -60 to -70 dBm at the midway
point between two APs. To learn more about AP placement, visit
luxul.com/ap-placement.
Ideally, roaming clients should see
signal strength of two overlapping
APs in the range of -60 to -70 dBm at
the midway point between two APs
XAP-310 Multiple AP Coverage and Overlap
n Note: Consider using Ekahau HeatMapper to assist with this process,
available from www.ekahau.com. Luxul also oers an informative
“How-To” video on HeatMapper at luxul.com/how-to-videos.
Sales
P: 801-822-5450
Technical Support
P: 801-822-5450 Option 3
LUX-QIG-XAP-310-v7 01261710
Copyright and Trademark Notices
No part of this document may be modified or adapted in any way, for any purposes without permission
in writing from Luxul. The material in this document is subject to change without notice. Luxul reserves
the right to make changes to any product to improve reliability, function, or design. No license is granted,
either expressly or by implication or otherwise under any Luxul intellectual property rights. An implied
license only exists for equipment, circuits and subsystems contained in this or any Luxul product.
© Copyright 2016 Luxul. All rights reserved. The name Luxul, the Luxul logo, the Luxul logo mark and Simply
Connected are all trademarks and or registered trademarks of Luxul Wireless, Inc. All other trademarks and
registered trademarks are property of their respective holders.
-
 1
1
-
 2
2
-
 3
3
-
 4
4
-
 5
5
-
 6
6
-
 7
7
-
 8
8


Legrand XAP-310 Quick Installation guide
- Category
- Network switches
- Type
- Installation guide
Ask a question and I''ll find the answer in the document
Finding information in a document is now easier with AI
Related papers
-
Legrand XAP-1510 Quick Installation guide
-
-
-
-
-
-
Legrand Apex Wave 2 Dual-Band Wireless Installation guide
-
Legrand RT-20 User guide
-
-
Other documents
-
Luxul XAP-310 Quick Install Manual
-
-
Sitecom WL-331 Datasheet
-
Luxul XAP-1510 Quick Install Manual
-
ICIDU NI-707534 Full Manual
-
ICIDU NI-707549 User manual
-
-
-
-
Simplicity XAP-1500 User manual