Midmark 630 Human Form® Procedures Chair (-010 thru -013, -020 thru -023) Installation guide

Category
Power distribution units (PDUs)
Type
Installation guide

Midmark 630 Human Form® Procedures Chair (-010 thru -013, -020 thru -023) is a versatile medical chair designed for various procedures and patient positioning. With its adjustable base, back, tilt, and footrests, it enables easy positioning of patients for examinations, treatments, and surgeries. The chair features a Quick Chair® function for quick and effortless patient positioning, as well as a foot control and hand control for convenient operation. It also includes a cord storage area to keep cables organized and out of the way.

Midmark 630 Human Form® Procedures Chair (-010 thru -013, -020 thru -023) is a versatile medical chair designed for various procedures and patient positioning. With its adjustable base, back, tilt, and footrests, it enables easy positioning of patients for examinations, treatments, and surgeries. The chair features a Quick Chair® function for quick and effortless patient positioning, as well as a foot control and hand control for convenient operation. It also includes a cord storage area to keep cables organized and out of the way.

English-1
© 2013 Midmark Corp. | 60 Vista Drive Versailles, OH 45380 USA | 1-800-643-6275 | 1-937-526-3662 |
TP200 Rev. A
MA8814i
Midmark 630 Human Form™ Procedures Chair
Applies to Models:
630 (-010 thru -013)
630 (-020 thru -023)
Special Tools:
Level
Language of origin: English
003-2620-00 Rev. AA1 10/29/18
Caution
This chair weighs approximately 475 lbs. (215 kg).
Use an assistant when lifting chair.
Step 1: Remove chair from skid.
A) Remove four nuts and clamps.
B) Carefully lift chair off of skid.
Clamp
Equipment Alert
The minimum door clearance for units with
a standard base is 28 inches and 34 inches
for units with rotational base. Use care in
moving chair through doorways.
Style A
midmark.com
English-2
© 2013 Midmark Corp. | 60 Vista Drive Versailles, OH 45380 USA | 1-800-643-6275 | 1-937-526-3662 |
TP200 Rev. A
MA8815i
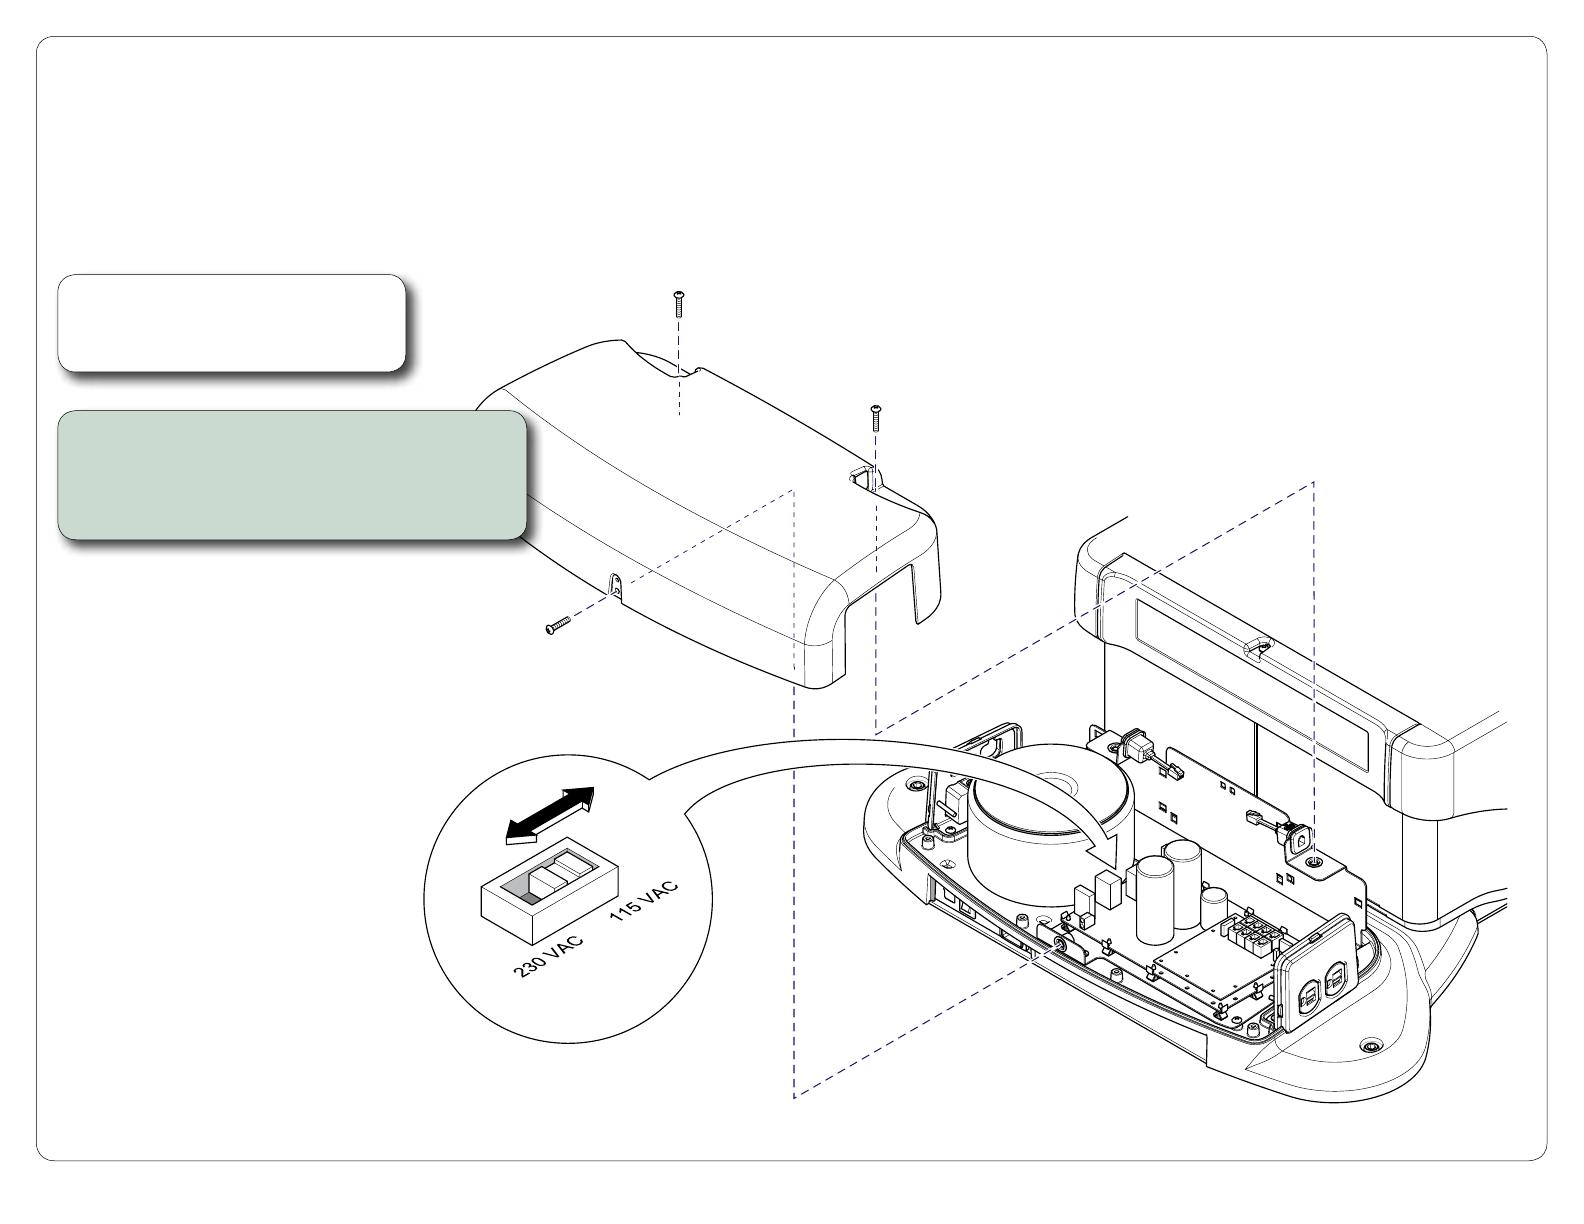
Step 2: Change voltage (if necessary).
A) Remove rear cover (three screws).
B) Set switch on PC board to correct voltage.
C) Reinstall cover.
Note
Unless specifically ordered for export,
units are set to 115 VAC at the factory.
Voltage
Switch
Before connecting the Midmark device power cord into an electrical power
source outlet, it is recommended to contact a local licensed electrician or a
local Authority Having Jurisdiction over the internal building power distribution
to verify that the device when powered up will comply with all local electrical codes.
Use the electrical power rating marked on the device when determining the
appropriate electrical branch circuit and outlet requirements. For 115V rated device
models with a current rating at or above 12 Amps, a dedicated branch circuit may be
required if the branch circuit protection is provided by a 15 Amp breaker.
midmark.com
English-3
© 2013 Midmark Corp. | 60 Vista Drive Versailles, OH 45380 USA | 1-800-643-6275 | 1-937-526-3662 |
TP200 Rev. A
MA8816i
MA8956i
Step 6: Connect Power Cord.
A) Plug square end into AC inlet at rear of chair.
B) Plug three pronged plug into wall outlet.
C) Coil excess power cord and place in cord storage area.
Step 4: Connect Foot Control.
A) Plug connector into modular jack
at front of chair.
Note: Some chairs have wireless controls.
Step 5: Connect Hand Control.
A) Plug connector into modular jack
on either side of rear cover.
Note: Some chairs have wireless controls.
Hand
Control
Foot
Control
Step 3: Install Hand Control Holster.
A) Install two mounting pins and secure with thumb screws.
B) Install holsters onto mounting pins.
Hand
Control
Holster
Mounting
Pin
Cord
Storage
Area
Thumb
Screw
midmark.com
English-4
© 2013 Midmark Corp. | 60 Vista Drive Versailles, OH 45380 USA | 1-800-643-6275 | 1-937-526-3662 |
TP200 Rev. A
Leveling Screw
Equipment Alert
The chair must be leveled to ensure proper operation.
Step 7: Level the chair.
A) Remove the allen wrench from shipping carton.
B) Using a level and the allen wrench, adjust leveling screws as necessary.
C) Install four hole plugs.
MA8817i
Hole
Plug
midmark.com
English-5
© 2013 Midmark Corp. | 60 Vista Drive Versailles, OH 45380 USA | 1-800-643-6275 | 1-937-526-3662 |
TP200 Rev. A
StopHome
Quick Chair
®
Button
Base
Function
Back
Function
Tilt
Function
Foot
Function
Step 5: Verify proper operation.
A) Use the foot control to activate the following functions:
Base UP / DOWN
Back UP / DOWN
Tilt UP / DOWN
Foot UP / DOWN
Quick Chair
®
Home
B) Activate the HOME function again. While the chair is moving,
press the STOP button. (All movement should stop)
C) Repeat A & B using the hand control.
Note: The Quick Chair
®
feature is on the foot control only.
Step 6: Install upholstered top (not shown).
Note: Installation instructions are packaged with the upholstery.
Note
If a malfunction is detected, contact Midmark Technical Service
by calling: 1-800-MIDMARK
midmark.com
  • Page 1 1
  • Page 2 2
  • Page 3 3
  • Page 4 4
  • Page 5 5

Midmark 630 Human Form® Procedures Chair (-010 thru -013, -020 thru -023) Installation guide

Category
Power distribution units (PDUs)
Type
Installation guide

Midmark 630 Human Form® Procedures Chair (-010 thru -013, -020 thru -023) is a versatile medical chair designed for various procedures and patient positioning. With its adjustable base, back, tilt, and footrests, it enables easy positioning of patients for examinations, treatments, and surgeries. The chair features a Quick Chair® function for quick and effortless patient positioning, as well as a foot control and hand control for convenient operation. It also includes a cord storage area to keep cables organized and out of the way.

Ask a question and I''ll find the answer in the document

Finding information in a document is now easier with AI