Page is loading ...

1
Westin Automotive Products, Inc.
320 W. Covina Blvd
San Dimas, Ca. 91773
Thank you for choosing Westin products
for additional installation assistance please call
Customer Service (800) 793-7846
www.westinautomotive.com
P.N.: 75-6211035-RevA ECO #: W18-0101 DATE: 03/19/19
INSTALLATION INSTRUCTIONS
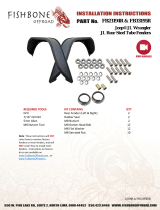
ITEM QUANTITY DESCRIPTION TOOLS NEEDED
1 1 DRIVER REAR INNER FENDER 10MM SOCKET
2 1 PASSENGER REAR INNER FENDER 10MM WRENCH
3 1 DRIVER FRONT BRACKET PRY TOOL
4 1 PASSENGER FRONT BRACKET ALLEN WRENCH
5 1 DRIVER REAR BRACKET RATCHET
6 1 PASSENGER REAR BRACKET TORQUE WRENCH
7 1 DRIVER UPPER BRACKET
8 1 PASSENGER UPPER BRACKET
9 8 M6 BUTTON HEAD SCREW (BLACK ZINC)
10 3 M6 HEX HEAD CAP SCREW (BLACK ZINC)
11 10 M6 FLAT WASHER (BLACK ZINC)
12 10 M6 SPLIT LOCK WASHER (BLACK ZINC)
13 4 M6 HEX NUT (YELLOW ZINC)
14 2 M6 SERRATED FLANGE NUT (YELLOW ZINC)
15 3 M6 HEX HEAD CAP SCREW (YELLOW ZINC)
16 8 M6 FLAT WASHER (YELLOW ZINC)
17 6 M6 SPLIT LOCK WASHER (YELLOW ZINC)
18 10 M6 U-CLIP
ANTI-SEIZE LUBRICANT MUST BE USED ON ALL STAINLESS STEEL FASTENERS TO PREVENT THREAD DAMAGE AND GALLING
CONTENT
REAR INNER FENDERS
APPLICATION:
2018-2019 Jeep Wrangler JL
PART NUMBER:
62-11035

2
Westin Automotive Products, Inc.
320 W. Covina Blvd
San Dimas, Ca. 91773
Thank you for choosing Westin products
for additional installation assistance please call
Customer Service (800) 793-7846
www.westinautomotive.com
P.N.: 75-6211035-RevA ECO #: W18-0101 DATE: 03/19/19
WARNING
Part # 62-11035 is designed to specifically fit with Westin Tube Fenders (Part # 62-1035). Modification may be
required for other aftermarket fenders
ITEM 1 ITEM 2 ITEM 3
ITEM 4 ITEM 5 ITEM 8 ITEM 7 ITEM 6
PROCEDURE
1. Remove contents from box, verify if all parts listed are present and free from damage.
Carefully read and understand all instructions before attempting installation.
Failure to identify damage before installation could lead to a rejection of any claim.
2. Beginning on the driver’s side, secure the Driver Front Bracket (3) to the bottom side of the fender well just tight enough
to still allow movement using the supplied M6 Har dware. Also, install U-Clips (18) to the bracket as well as to the ad-
jacent tab on the fender well. See Figure 1.
Note 1: OEM Inner Fender must be removed prior to Driver Side install.
Note 2: If necessary, bend the fender well tabs forwards to install U-Clips.
Fig. 1
Driver Side Front
Items 15,17,16,13 Item 3
Item 18

3
Westin Automotive Products, Inc.
320 W. Covina Blvd
San Dimas, Ca. 91773
Thank you for choosing Westin products
for additional installation assistance please call
Customer Service (800) 793-7846
www.westinautomotive.com
P.N.: 75-6211035-RevA ECO #: W18-0101 DATE: 03/19/19
3. Install another U-Clip (18) onto the tab next to the tab shown in Figure 1. See Figure 2.
4. Use the supplied M6 Hardware to install the Driver Upper Bracket (7) inside the fender well just above the shock.
See Figure 3. Note: Install bracket just tight enough to still allow movement.
U-Clip installed
in Step 2.
Install 2nd
U-Clip
Fig. 2 Fig. 3
Item 18
Item 7
Items 16,17,13
5. Install the Driver Rear Bracket (5) just behind the shock using the supplied M6 Hardware. See Figure 4.
Note: Install bracket just tight enough to still allow movement.
6. Loosely install the Driver Rear Inner Fender (1). Note: The tire may be removed from the vehicle to aid installation.
7. Adjust brackets as needed and tighten all reachable bracket mounting hardware to 8 ft-lbs.
8. Remove the Inner Fender.
9. Tighten all remaining bracket mounting hardware.
10. Use the black M6 Hardware to loosely secure the Driver Inner Fender (1) to the previously installed brackets and U-Clips.
See Figures 5 & 12 for hardware attachment reference.
Fig. 4
Item 5
Driver Side Center Driver Side Upper/Rear
Driver Side Rear
Item 18
Use Items 15,17,16,13 to
fasten bracket to vehicle.
Fig. 5
Driver Side Upper Bracket mount-
ing shown; all other driver side
mounting uses item 9 instead of 10.

4
Westin Automotive Products, Inc.
320 W. Covina Blvd
San Dimas, Ca. 91773
Thank you for choosing Westin products
for additional installation assistance please call
Customer Service (800) 793-7846
www.westinautomotive.com
P.N.: 75-6211035-RevA ECO #: W18-0101 DATE: 03/19/19
EXPLODED VIEW WITH BRACKETS FOR REFERENCE
11. Move to the passenger side of the vehicle and temporarily remove the OEM Inner Fender.
Note: Passenger side OEM Inner Fender will be used in this installation.
12. Install the Passenger Front Bracket (4) to the inside of the fender well towards the front using the supplied M6 Hardware.
See Figure 6.
Note: Install bracket just tight enough to still allow movement.
13. Attach two U-Clips (18) to the metal tabs on the middle of the fender well. See Figures 7 & 8.
Fig. 6 Fig. 7
Passenger Side Front Passenger Side Rear
Item 18
Item 4
Items 15,17,16,14
Item 18
This hole can be
used to secure the
wiring harness clip
Driver Side Only

5
Westin Automotive Products, Inc.
320 W. Covina Blvd
San Dimas, Ca. 91773
Thank you for choosing Westin products
for additional installation assistance please call
Customer Service (800) 793-7846
www.westinautomotive.com
P.N.: 75-6211035-RevA ECO #: W18-0101 DATE: 03/19/19
14. Use the supplied M6 Hardware to secure the Passenger Upper Bracket (8) to the bracket that secures the evap hoses. See
Figure 9.
Note 1: Install bracket just tight enough to still allow movement.
Note 2: The Passenger Upper Bracket should be positioned on top of the OEM evap hose bracket.
Fig. 9
Passenger Side Upper
Fig. 8
Passenger Side Center
Item
Item 8
Items 10,16,17,13
Fig. 10
Item 18
Items 11,12,13
Passenger Side Rear
15. Install the Passenger Rear Bracket (6) onto the factory stud just behind the top rear shock mount using the supplied M6
Hardware. See Figure 10.
Note: Install bracket just tight enough to still allow movement.
OEM Evap Hose
Bracket
16. Loosely install the Passenger Rear Inner Fender (2). See
Figures 11 & 12.
Note1: The tire may need to be removed from the vehicle to
aid installation.
Note2: Figure 11 is for the Passenger Upper Bracket only.
All other locations to fasten the Inner Fender will use the
hardware shown in Figure 12.
17. Adjust brackets as needed and tighten all reachable bracket
mounting hardware to 8 ft-lbs.
18. Remove the Inner Fender.
19. Tighten all remaining bracket mounting hardware.

6
Westin Automotive Products, Inc.
320 W. Covina Blvd
San Dimas, Ca. 91773
Thank you for choosing Westin products
for additional installation assistance please call
Customer Service (800) 793-7846
www.westinautomotive.com
P.N.: 75-6211035-RevA ECO #: W18-0101 DATE: 03/19/19
Fig. 11
Passenger Side Upper
EXPLODED VIEW WITH BRACKETS FOR REFERENCE
Passenger Side Only
20. Use the black M6 Hardware to loosely secure the Passenger Rear Inner Fender (2) to the previously installed brackets and
U-Clips. See Figures 11 & 12 for hardware attachment reference. Note: Figure 11 is for the Passenger Upper Bracket only.
All other locations to fasten the Inner Fender will use the hardware shown in Figure 12.
Fig .12
Passenger Side Center

7
Westin Automotive Products, Inc.
320 W. Covina Blvd
San Dimas, Ca. 91773
Thank you for choosing Westin products
for additional installation assistance please call
Customer Service (800) 793-7846
www.westinautomotive.com
P.N.: 75-6211035-RevA ECO #: W18-0101 DATE: 03/19/19
Fig. 14
Fig. 15
Passenger Side Center
Passenger Side Rear
Trim OEM Inner
Fender to fit the new
Westin Inner Fender.
Trim OEM Inner
Fender to fit the new
Westin Inner Fender.
Fig. 16
Passenger Side Front
Trim OEM Inner
Fender to fit the new
Westin Inner Fender.
21. Trim and reinstall the passenger side OEM Inner Fender. If installed with Westin Tube Fenders (P# 62-1035), the upper
edge of the OEM Inner Fender will fit over the lip of the tube fender. See Figure 13.
Note 1: Make sure to trim as little material from the OEM Inner Fender at this time.
Note 2: If installed with Westin Tube Fenders, rotate the fender liner as needed to fit the Westin Rear Inner Fender.
22. Mark the OEM Inner Fender and continue trimming until the bottom edge of the OEM Inner Fender rests between the
Westin Rear Inner Fender and the back of the fender well. See Figures 14, 15, & 16.
Fig. 13
Upper edge of OEM
Inner Fender fits over
tube fender lip
Upper edge of OEM
Inner Fender fits over
tube fender lip
Upper edge of OEM
Inner Fender fits over
tube fender lip
Westin Tube Fender

8
Westin Automotive Products, Inc.
320 W. Covina Blvd
San Dimas, Ca. 91773
Thank you for choosing Westin products
for additional installation assistance please call
Customer Service (800) 793-7846
www.westinautomotive.com
P.N.: 75-6211035-RevA ECO #: W18-0101 DATE: 03/19/19
CARE INSTRUCTIONS
REGULAR WAXING IS RECOMMENDED. DO NOT USE ANY TYPE OF POLISH OR WAX THAT MAY CONTAIN ABRASIVES.
STAINLESS STEEL PRODUCTS CAN BE CLEANED WITH MILD SOAP AND WATER. STAINLESS STEEL POLISH SHOULD BE USED TO POLISH SMALL SCRAT CHES.
GLOSS BLACK FINISHES SHOULD BE CLEANED WITH MILD SOAP AND WATER
INSTALLATION COMPLETE
Tube Fenders Sold Separately

9
Westin Automotive Products, Inc.
320 W. Covina Blvd
San Dimas, Ca. 91773
Thank you for choosing Westin products
for additional installation assistance please call
Customer Service (800) 793-7846
www.westinautomotive.com
P.N.: 75-6211035-RevA ECO #: W18-0101 DATE: 03/19/19
Failure to follow these instructions could lead to death, personal injury, and / or property damage.
WARNING
Failure to follow these instructions could lead to death, personal injury, and / or property damage.
FASTENERS:
All Westin supplied fasteners must be utilized and installed in accordance with the installation in-
structions and apply torque to the specifications as defined. DOUBLE CHECK ALL FASTENERS
BEFORE INITIAL USE, AND PERIODICALLY IN THE FUTURE TO ENSURE PROPER FUNCTION
AND SAFETY.
DRILLING:
Most Westin products do not require drilling for installation. If drilling is defined as required, use
caution when drilling a vehicle. FAILURE TO REVIEW AN AREA TO BE DRILLED MAY RESULT IN
PERSONAL INJURY AND/OR INJURY TO OTHERS AS WELL AS VEHICLE DAMAGE.
EYE PROTECTION:
ALWAYS WEAR SAFETY GLASSES OR GOGGLES DURING THE INSTALLATION PROCESS TO
AVOID PERSONAL INJURY.
MAXIMUM TOWING/CARRYING CAPACITY: (if applicable)
The Westin Receiver Hitches will have a visible tow rating label affixed directly on the product.
User should never exceed the vehicle manufacturers maximum tow and weight rating regardless
of the capacity of the hitch. FAILURE TO FOLLOW THESE GUIDELINES WILL VOID THE WESTIN
WARRANTY AND MAY RESULT IN PERSONAL INJURY AND/OR INJURY TO OTHERS AS WELL
AS VEHICLE DAMAGE.
FOR CALIFORNIA RESIDENTS ONLY-PROP 65 WARNING:
Some products may contain chemicals such as DEHP, which can cause cancer, birth defects or
other reproductive harm. For more info go to www.p65warnings.ca.gov
/