Page is loading ...

PAGE 1 of 4
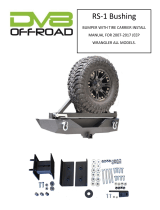
HARDWARE KIT:
8– 7/16-14 x 1 1/2” bolts
4– 7/16-14 x 4” bolts
24–7/16“ Flat Washers
12–7/16”-14 Crimp Nuts
2– Outer Frame Bracket
2– Inner Frame Bracket
4– Frame Sleeves
3– Wheel studs
3– 3/8”-16x1” Bolts
3– 3/8”-16 Crimp Nuts
6– 3/8” Flat Washers
Bearings, Seal, Nut, Washer, Cotter Pin, Dust Cap
MOUNTAIN OFF ROAD ENTERPRISES, Inc.
P O BOX 690, DELTA, CO 81416
970-625-0500 970-625-3747 Fax
E-mail: info@mountainoffroad.com
www.mountainoffroad.com
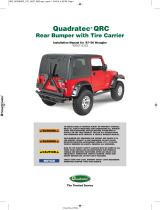
INSTALLATION INSTRUCTIONS FOR: JRB700CJ
FITS 76-86 JEEP CJ’s
PLEASE READ AND UNDERSTAND TERMS / POLICIES BEFORE PROCEEDING
TERMS / POLICIES:
FIT and TOLERANCES: All parts in M.O.R.E.™ products are the results of countless hours of research, testing, fitting and refining. Jeeps have a large tolerances from vehicle to vehicle. In
addition to the factory tolerances, most people install other then factory equipment (aftermarket add-ons). M.O.R.E.™ has done the best job we can to insure that our parts fit with some of the
possibilities. However, you may find it necessary to grind, elongate, bend, or force the parts you buy to fit on your rig. Be sure that you want to install them before you modify them. Please use
common sense when installing these parts and let us know how we can improve them.
DAMAGE CLAIMS: All orders are carefully packed, however, mishandling by the carrier can result in damage. The carrier has the responsibili ty for the shipment from the time it leaves our
warehouse until it is delivered to you. All claims for lost or damaged goods should be reported to the carrier, not to M.O.R.E.™ LLC.
RETURNS: No returns will be accepted without prior permission from M.O.R.E.™ LLC. After you receive a Return Goods Authorization (RGA) number, merchandise must be returned prepaid
and insured. A claim must be made with in 30 days from receipt of merchandise. The original invoice or a copy with the RGA nu mber written on must accompany all returns. A 20% restocking
fee will be charged on all parts returned for credit or refund unless merchandise is proven to be defective or was shipped wr ong by M.O.R.E.™ LLC. No merchandise will be issued credit or
refund if it has been installed, modified, used in any way or is in unsalable condition.
WARRANTY: All merchandise is warranted to be free from defects in materials and workmanship prior to installation. Any alteration or improper use will void this warranty. Because all parts we
sell are intended for use in heavy-duty applications it is not possible to warrantee or guarantee the performance of any items. M.O.R.E.™ LLC. products and the products manufactured by
others, which we sell may be subject to an infinite variety of conditions due to the manner in which they are used, serviced and/or installed. Purchasers and users of such products rely upon
their own judgment as to the suitable use selection, service and installation of such products.
PRODUCT DISCLAIMER: Modification of your vehicle to enhance performance with parts sold by M.O.R.E.™ LLC. may create a dangerous condition which could cause serious bodily injury,
and the buyer hereby expressly assumes all risks associated with any such modifications. All parts sold by M.O.R.E.™ LLC. are for racing or off road use only. Mountain Off Road Enterprises
LLC. will not accept responsibility for personal injury or property damage arising from the failure of any parts manufactured or sold by M.O.R.E.™ LLC.
Specifications are subject to change without notice.
Jeep®, AMC®, CJ®, YJ®, TJ®, LJ® ,JK® Wrangler®, are registered trademarks of DaimlerChrysler. M.O.R.E.™ is not affiliated with DaimlerChrysler.
M.0.R.E™, BombProof™, S.R.S.™, SlipLoc™, DoubleJointed™, RockProof™, are trademarks used by Mountain Off Road Enterprises, LLC. copyright©, 1999-2008.

PAGE 2 of 4
M.O.R.E.™ recommends pre-fitting this BUMPER into your Jeep® BEFORE you paint it. Make
sure that you Have no fit issues with any Aftermarket accessories and that you are happy with all
aspects of it. If you are, then paint it and re-install it. Once you modify it in any way, it is NON-
RETURNABLE !!!
1– Remove Factory rear bumperetts if equipped . Remove the 2 back factory Shackle hanger
bolts and save this hardware ( Figure 1) .
2– Install JRB700 rear bumper and install the 2 factory bolts back into the lower frame Shackle
hanger holes . Finger tighten these bolts at this time. ( Figure 2)
3– Insert the 7/16”-1 1/2” bolts w/ flat washer through the Outer Frame bracket, frame and
bumper and attach with flat washer and 7/16” crimp nut. ( Do not tighten at this time) ( Figure 3)
4– Insert the frame sleeves through the holes on the Inner frame ( it is easiest to start the
7/16”x4” bolts through the outer frame plate and then install the frame sleeves) ( Figure 4A & 4B).
5– Insert the 7/16”-1 1/2” bolts w/ flat washer through the Inner Frame plates, frame and bumper
and attach with flat washer and 7/16” crimp nut. Install the 7/16” flat washers and crimp nuts on
the 7/16”x4” bolts. ( Do not tighten at this time) ( Figure 5)
6– Center & Level bumper and tighten all bolts.
7– Now grease the bearings with a wheel bearing grease and install the seal in the bottom. Install
the carrier over the spindle and attach with the washer, nut , cotter pin and dust cap. ( Do not
over tighten the castle nut ) ( Figure 6)
8– You will need to press the wheel studs into the tire carrier, make sure to do this for the correct
wheel pattern (5 on 5 1/2” or 5 on 4 1/2” ) (Figure 7A & 7B)
9– When installing the spare tire you will want to slide the base so that when the tire is tight it is
pre loaded against the tube. ( Figure 8)
10– The High-Lift jack mount will work with both the cast base style and stamped base style
jacks. There are holes in the lower base to add a lock or bolt . The jack will be retained in the top
mount as shown in ( Figure 9)
11– The locking pin should be lubricated ( anti-seize) periodically and make sure that you pull it
before you try to open or close the carrier ! ( Figure 10)

PAGE 3 of 4
Figure 1, ( P.S. of Jeep) Figure 2
Figure 3 Figure 4A
Figure 4B Figure 5

PAGE 4 of 4
Figure 7A
Figure 7B
Figure 9
Figure 6
Figure 8
Figure 10
/