Page is loading ...

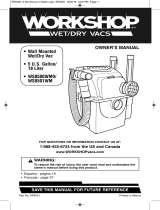
Filter Removal and Installation
Removal and Installation
of Qwik Lock™ Filter
Filter Removal:
1. Hold the filter tabs of the Qwik Lock™
filter in each hand.
2. With one thumb on the Qwik Lock™
stud, which protrudes through the
integrated filter plate, lift up on the filter
tabs while pushing down on the stud.
3. This action will cause the filter to
release from the filter cage. Slide filter
off cage.
Filter Installation:
1. Carefully slide the Qwik Lock™ filter
over the filter cage and press down on
the outside edge of the filter until the
rubber gasket on the bottom of the filter
seats securely around the base of the
filter cage and against the lid.
2. Align the small center hole in the top of
the filter over the Qwik Lock™ stud on
the filter cage. Press firmly on top of
the filter near the stud to allow the filter
to snap over the ball on the end of the
stud. The filter is now attached.
Filter
Tabs (2)
Integrated Filter
Plate with Center
Hole
PUSH
DOWN
PULL
UP
Lid
Rubber
Gasket at
Bottom of
Filter
(cutaway
view)
Qwik
Lock™
Stud
Filter
Cage
NOTE: Failure to properly seat the
bottom gasket could result in debris
bypassing the filter.
SP6755-1 RIDGID 5 Gallon ES_V8_SP6609 11/6/12 1:22 PM Page 5

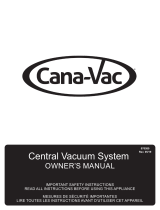
Storage Rack Assembly & Mounting
Assembling Upper and Lower
Rack
Align the tabs in the upper rack with
notches in lower rack. Slide upper rack
forward until the hooks on the lower rack
engages the bottom flange of the upper
rack. You will hear an audible click when
the locks engage.
Tab of
Upper
Rack
Notch of
Lower
Rack
Upper
Rack
Lower
Rack
Mounting Storage Rack to Wall
1. Choose a location that is indoors and
not exposed to rain. For best
performance and easy access, position
the storage rack so the center of the
vacuum inlet port is no more that five
feet from floor and no more than
eighteen feet from an electrical outlet.
5 Feet
Maximum
Vacuum Inlet
Port
Floor
WARNING: To reduce the risk of
injury:
• Do not mount storage rack over 5
feet from the ground.
• Do not attach screws to drywall
only.
• Do not sit or hang on storage
rack.
• Do not exceed maximum weight
limit of 40 pounds on storage
rack.
!
SP6755-1 RIDGID 5 Gallon ES_V8_SP6609 11/6/12 1:22 PM Page 6

Storage Rack Assembly & Mounting (cont.)
NOTE: Supplied wood screws are
intended for mounting to typical wall
construction consisting of 5/8 inch drywall
or less.
Storage Rack
Screw (4)
2. Locate wall stud and position the
storage rack so that all four screw
holes are over the stud. Level the rack
and mark the hole locations. Drill a 1/8
inch diameter pilot hole at each
location. Attach the storage rack to wall
studs using the four screws provided.
Make sure all four screws are driven
securely into the wall stud.
3. If the desired location does not align
with a wall stud or the studs are
exposed, a 1/2 inch thick plywood
panel wide enough to span at least two
studs, must be attached to the studs
with the four screws provided. The
storage rack may then be attached to
the plywood panel with four 1 inch #10
pan or round head wood screws (not
provided).
CAUTION: To prevent plywood,
Storage Rack, or Wet/Dry Vac from
falling, make sure you have selected
the proper length of fastener for the
secure mounting of storage rack to
the wall.
!
SP6755-1 RIDGID 5 Gallon ES_V8_SP6609 11/6/12 1:22 PM Page 7

Vac Assembly
Place Vac motor assembly onto Vac
canister assembly and secure with the
two side latches.
Side
Latches (2)
Accessory Storage Bin
Attach the Accessory Storage Bin to the
Vac assembly by inserting the tabs on the
Vac canister through the holes in the
storage bin and lowering the bin into
place.
Hose Storage
Slide each end of the Super Flex Hose
into the appropriate hose hooks located
on the Vac motor assembly.
Stor-N-Go Vac Assembly
Cord Wrap Storage
Wind the electrical cord clockwise (from
the rear) around the cord wrap area on
back of Vac motor assembly.
Cord Wrap
Area
Hose Hook
Hose
Hook
Super
Flex
Hose
Storage
Accessory
Bin
Tabs (2)
Tabs (2)
Holes (2)
SP6755-1 RIDGID 5 Gallon ES_V8_SP6609 11/6/12 1:22 PM Page 8

Hanging Vac on Storage Rack
5. Lower the Vac until the upper hook and
lower hook are engaged and the
bottom of the Vac canister rests on the
rack. The release tab will pop out over
the flange on the motor assembly.
6. Snap the power cord into the cord
retainer in the front surface of the rack.
The cord may exit on either the left or
right side. Plug the power cord into the
electrical outlet. Do not fasten power
cord to wall in any way.
1. Set the Vac on the floor near the
storage rack. Measure the distance
from center of storage rack to the
closest electrical outlet and add 18
inches.
2. Uncoil that amount of power cord from
the cord wrap. Drape the loose cord
over the top of the vacuum and down
the front.
Outlet
Distance
+
18 Inches
3. Grasp the handle with one hand and
the bottom of the Vac canister at the
front with the other hand. Always lift the
Vac with both hands. Lift the Vac up to
the storage rack.
4. Align the upper hook on the Vac with
the rectangular opening in the storage
rack. Push the Vac against the storage
rack.
Rectangular
Opening
Handle
Upper
Hook
Lower Hook
Release Tab
Storage Rack
Rectangular
Opening in
Storage Rack
Upper
Hook
Push
Vac
Against
Storage
Rack
Storage
Rack
Release
Tab
Upper
Hook
Lower
Hook
SP6755-1 RIDGID 5 Gallon ES_V8_SP6609 11/6/12 1:22 PM Page 9

Hanging Vac on Storage Rack (cont.)
Cord Storage
When your Stor-N-Go Wet/Dry Vac is not
in use, it should be unplugged from the
outlet. Excess cord should be wrapped
over the hose storage rack. Several loops
may be required to eliminate any tripping
hazard created by a loosely hanging
cord.
Removing Vac from Storage
Rack
1. Unplug the power cord from the
electrical outlet. Remove the cord from
the cord retainer. Drape the loose cord
over the top of the Vac.
2. With your right hand, grasp the carry
handle.
3. With your left hand depress the release
tab located on the left side of the
storage rack.
4. Lift up on the handle, and pull the Vac
up and out of the storage rack.
Cord Retainer
Cord
SP6755-1 RIDGID 5 Gallon ES_V8_SP6609 11/6/12 1:22 PM Page 10

14 Foot
Tug-A-Long Hose
Super Flex
Hose
Storage
Accessory Bin
Containing
2 Extension
Wands and
4 Cleaning Tools
7 Foot Super
Flex Hose
Storage
Accessory Bin
Containing 2
Extension Wands
and 4 Cleaning
Tools
Hose, Extension Wand, and
Cleaning Tool Storage
1. Slide the extension wands at the far
sides of the Accessory Storage Bin
located on the right side of the Stor-N-
Go Vac. Slide the car nozzle and the
crevice tool next to the extension
wands in the storage bin. Position the
dusting brush horizontal and slide it
into the storage bin’s accessory slot. It
is necessary to place the dusting brush
into the accessory slot first, as the
utility nozzle will not fit in this position.
Last, place the utility nozzle flush
against the accessory slot storage area
and slide down into storage position.
The storage bin accommodates both
extension wands and the four cleaning
tools.
Accessories
Crevice
Tool
Extension
Wands
Car Nozzle
Utility
Nozzle
Dusting Brush
Accessory
Slot Storage
Area
2. Insert the 7 foot Super Flex Hose ends
into the hooks on the left side of the
Stor-N-Go Vac, as shown below.
3. Form a double loop with the 14 foot
Tug-A-Long Hose and hang on hose
storage hook at the top of the rack.
SP6755-1 RIDGID 5 Gallon ES_V8_SP6609 11/6/12 1:22 PM Page 11

Hoses (14 Foot Tug-A-Long & 7 Foot
Super Flex)
The 14 Foot Tug-A-Long Hose and the
7 Foot Super Flex Hose have an adaptor
that can be used to connect the hose to
the vacuum port on the Vac or to the
male end of another hose. Both 7 foot
and 14 foot hoses can be used
connected together or independently from
one another.
Both the 7 foot and 14 foot hoses have a
locking adaptor at one end that will
connect to the Vac, and a friction fit
at the other end, which will connect to all
the 1-7/8 inch accessories or a second
hose.
To connect these two hoses together, first
connect the 14 foot hose to the wet/dry
Vac. Next connect the 7 foot hose to the
14 foot hose by inserting the friction end
of the longer hose into the larger locking
end of the shorter hose. This will create a
friction connection.
Diffuser Cap Assembly
Connect the lanyard to the attachment
tab on the Vac motor assembly to keep
the diffuser attached to Vac when using
the blower port. The diffuser cap can be
used in the exhaust port of the Wet/Dry
Vac. Installing the diffuser cap will allow
you to diffuse the exhaust air in any
direction and reduce the intensity of the
exhaust force.
Diffuser
Attachment Tab
Lanyard
Vacuum Inlet
Port
Tug-A-Long
Hose
Vacuum Inlet Port
Friction
End
Male End
of Hose
Accessories (cont.)
SP6755-1 RIDGID 5 Gallon ES_V8_SP6609 11/6/12 1:22 PM Page 12
/