Zelmer Roto VC1001.0 SF User manual
- Category
- Vacuum cleaners
- Type
- User manual
Page is loading ...
Page is loading ...
Page is loading ...
Page is loading ...
Page is loading ...
Page is loading ...
Page is loading ...
Page is loading ...
Page is loading ...
Page is loading ...
Page is loading ...
Page is loading ...
Page is loading ...
Page is loading ...
Page is loading ...
Page is loading ...
Page is loading ...
Page is loading ...
Page is loading ...
Page is loading ...
Page is loading ...
Page is loading ...
Page is loading ...
Page is loading ...
Page is loading ...
Page is loading ...
Page is loading ...
Page is loading ...
Page is loading ...
Page is loading ...
Page is loading ...

38 VC1001-001_v01
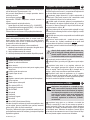
Dear Customers!
Congratulations on your choice of our appliance, and
welcome among the users of Zelmer products.
In order to achieve best possible results we recommend
using exclusively original Zelmer accessories. They have
been specially designed for this product.
Please read this instruction manual carefully. Pay special
attention to important safety instructions. Keep this User’s
Guide for future reference.
Important safety instructions
EN
sensory or mental capabilities or lack of experience
and knowledge if they have been given supervision or
instruction concerning use of the appliance in a safe
way and understand the hazards involved. Children
shall not play with the appliance. Cleaning and user
maintenance shall not be made by children unless they
are aged from 8 years and above and supervised.
Caution!
Not observance can result in damage to
possessions
Connect the vacuum cleaner only to a 230 V mains
●
supply equipped with a 16 A fuse.
Do not unplug by pulling on cord.
●
Do not run the vacuum cleaner or the brushes over the
●
cord, it may cause damage to the cord insulation.
Do not vacuum without the dust bag and the lters or if
●
they are damaged.
Do not pick up: matches, cigarette butts, hot ash. Avoid
●
picking up sharp objects.
Check the suction hose, the tubes and the nozzles –
●
remove the dirt from the inside.
Do not vacuum ne dust such as: our, cement,
●
gypsum, toners for printers and copy machines etc.
Suggestion
Information on the product and suggestions
for its use
The vacuum cleaner is for household use only.
●
Operate the appliance only in indoor spaces and
●
vacuum only dry surfaces. Before vacuuming dry the
carpets that were wet cleaned.
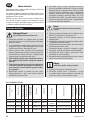
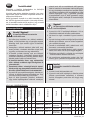
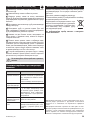
TYPES OF VC1001 VACUUM CLEANERS
Design and accessory
options:
Type
Max power
Suction power control
Full bag indicator
No bag safety feature
Bag/number
Intake lter
Suction pipe
Nozzle brush
Parquet brush “BNB”
Small nozzle
Crevice nozzle
Small brush
1 2 3 4 5 6 7 8 9 10 11 12 13
VC1001.0SP 1900 W + + +
2 (two) SAFBAG
type bags
HEPA H11
Telescopic with
a blocking mechanism
with metal base + + + +
VC1001.0SK 1900 W + + +
2 (two) SAFBAG
type bags
HEPA H11
Telescopic with
a blocking mechanism
with plastic base – + + +
VC1001.0SF 1500 W + + +
2 (two) SAFBAG
type bags
HEPA H11
Telescopic without
a blocking mechanism
with plastic base – + + +
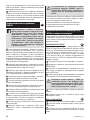
Danger! / Warning!
Health hazard
Do not operate the appliance if the cord, the housing or
●
the handle is visibly damaged. In such a case, return
the appliance to a service center.
If the supply cord is damaged, it must be replaced by
●
the manufacturer, a service agent or a qualied person
in order to avoid a hazard.
The appliance can only be repaired by qualied service
●
personnel. Improper servicing may cause a serious
hazard to the user. In case of defects please contact
a qualied service center.
Always unplug the appliance before cleaning,
●
assembling or dismantling.
Turn off the device and unplug it from an outlet
●
before replacing the equipment or approaching
moving parts during use.
Do not use the vacuum cleaner to clean people or
●
animals, pay special attention to keep the nozzles
away from eyes and ears.
This appliance can be used by children aged from
●
8 years and above and persons with reduced physical,

39VC1001-001_v01
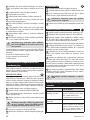
Technical parameters
The type of the vacuum cleaner and the technical parameters
are indicated on the rating label. Mains protection 16 A. Does
not cause interferences with audio/video devices.
Does not require grounding .
ZELMER vacuum cleaners meet the requirements of the
applicable norms.
The appliance is in conformity with the requirements of the
directives:
Low voltage appliance (LVD) – 2006/95/EC. –
Electromagnetic compatibility (EMC) – 2004/108/EC. –
Noise level: 83 dB/A.
The appliance was marked by a CE sign on the rating label.
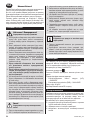
Static electricity
In the process of vacuuming of some surfaces in areas of
low air humidity the device may become electrically charged.
It is a natural phenomenon – it does not damage the device,
and it is not considered to be a fault.
In order to minimize the phenomenon, we recommend you to:
discharge the device by touching metal items in the room
●
with the pipe,
increase air humidity in the room,
●
use widely available antistatic agents.
●
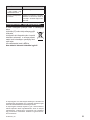
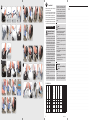
Design
A
1
Fastening for nozzle brush
2
Plug with the cord
3
Cord winder button
4
On/off button and suction power control knob in one
5
Full bag indicator
6
Fastening of the upper cover
7
Handle
8
Bolt – a mechanic controller of suction power
9
Suction hose
10
Telescopic suction pipe
11
Intake lter (HEPA 11)
12
Foam rubber cover
13
SAFBAGtype bag
14
Nozzle brush
15
Small nozzle
16
Crevice nozzle
17
Small brush
18
Parquet brush “BNB”
Is used to clean and polish hard, scratch sensitive surfaces
such as wooden oors, oor panels, parquet, marble,
tiles, etc.
Delicate and soft natural bristles ensure maximum vacuum
effectiveness and protects against scratching the cleaned
surface.
Before rst use
B
Before starting the vacuum cleaner make sure, whether the
SAFBAG is properly installed in the chamber of the vacuum
cleaner, and whether all lters are in place as well.
1
Place the end of the hose in the opening of the vacuum
cleaner, and gently press it. A characteristic “click” signalizes
the hose has been properly installed.
2
Connect the other end of the hose (handle) with the
telescopic suction tube. In order to do so press the locking
device “A” and slide the tube into the hose handle so that
the locking device “A” is blocked in opening “B”.
3
Select the needed length of the telescopic suction pipe
by sliding the slider according to the arrow, and pulling out/in
the pipe.
4
Install a nozzle or a brush on the other end of the suction
pipe.
5
For hard surfaces (wooden oors, plastic oors, ceramic
tiling, etc.) pull out the brush by pressing the switch on the
nozzle brush as it is shown on the picture .
6
Grab the plug of the cord (2), and pull it out of the vacuum
cleaner.
When pulling out the cord pay attention to
the yellow band which marks the end of the
cord.Anyattemptstounwindthecordfurther
(especiallyforcefullypullingonit)mayleadto
damagingit.
7
Put the plug of the cord in an electric socket.
8
Press the on/off switch to start the vacuum cleaner.
9
The vacuum cleaner is equipped with an electronic
controller of suction power, which enables smooth regulation
of suction power of the vacuum cleaner. By turning the knob
(4) clockwise or counterclockwise you may increase or
decrease the suction power.
10
The vacuum cleaner is also equipped with a mechanic
suction power controller (8), which is situated on the hose
handle. You may use it to slightly regulate the suction power
without the need to use the knob (4).
(De)installing the SAFBAG-type bag
C
The vacuum cleaner is equipped with safety
valve located in chamber of dust container
(bag). It opens automatically in case of total
stoppingof suctionhose or totalstopping of
equipmentelementsconnectedthereto,aswell
asincaseofoverllofdustbag.Afteropening
the valve one can hear characteristic “whirr”
soundinsidethevacuumcleaner.
1
The vacuum cleaner is equipped with a full bag indicator
(5). When the indicator light is on during work (a nozzle or
brush is over a cleaned surface), it means the bag needs to be
replaced. The full bag indicator (5) may also be on when the
suction hose or other accessories linked to it are clogged up.

40 VC1001-001_v01
2
Press the on/off switch (4) to stop the vacuum cleaner.
Remove the plug of the cord from the socket.
3
Press both of the side buttons situated on the end of the
hose, and remove the end of the hose from the inlet of the
vacuum cleaner.
4
Release the fastening of the upper cover (6), and open it.
5
Close the opening of the bag by means of a stopper.
6
Bend back the bag handle in the direction of the vacuum
cleaner handle (7).
7
Grab the bag plate, pull it out of the handle, and then
remove the entire bag upwards.
8
The SAFBAG number is placed on a label situated in the
chamber of the vacuum cleaner.
9
Place the bag plate of a new bag into the guides of the
SAFBAG handle, and slide it to the limit. The direction in
which you should install the bag is marked by an arrow on
the bag.
10
Bend back the bag handle in the direction of the control
knob (4).
11
Close the cover by pressing it, until you hear
a characteristic “click” – be careful not to trap the bag.
DonotstartvacuumingwithouttheSAFBAG-
type bag. No SAFBAG-type bag makes it
impossible to lock the upper cover of the
vacuumcleaner.
Zelmer vacuum cleaners are equipped with SAFBAGtype
bags in the amount given in the table. You have to replace
the bag, if:
a) the full bag indicator is on,
b) the vacuum cleaner works less efciently,
c) the bag is full.
(De)installing the HEPA inlet lter and the
foam rubber
Before replacing the HEPA inlet lter and the foam rubber,
make sure the vacuum cleaner is turned off, and the plug of
the cord is out of the electrical socket.
INTAKE FILTER (HEPA)
The vacuum cleaners are equipped with a High Efciency
Particulate Air (HEPA) H11class inlet lter. A HEPA lter
is produced of special bers, capable to highefciency
ltration, stopping almost all particles larger than 0.3 μm.
H11 is a class which determines the permeability of the lter.
The H11class HEPA lter stops 95.5% of particles larger
than 0.3 μm.
1
Release the fastening of the upper cover (6), and open it.
2
Remove the SAFBAGtype bag (13) from the chamber of
the vacuum cleaner.
3
Pull out the HEPA intake (11) from the guides situated at
the back wall of the chamber of the vacuum cleaner.
4
Put the new lter into the guides situated at the back wall
of the chamber of the vacuum cleaner.
D
Always replace a damaged HEPA intake lter
(11)withabrandnew,originalone.TheHEPA
intakelterisguaranteedtomakethevacuum
cleanertoworkefcientlyforca.ayear.
5
Place the SAFBAGtype bag into the chamber of the
vacuum cleaner.
6
Close the cover by pressing it, until you hear
a characteristic “click”.
FOAM RUBBER COVER
1
Release the fastening of the upper cover (6), and open it.
2
Remove the foam rubber cover (12) from the three
fastenings of the upper cover.
3
Replace the old foam rubber cover with a new one (12)
in such a way that the three incisions on the foam rubber
cover nd the three fastenings of the upper cover.
Alwaysreplaceadamagedfoamrubbercover
(12)withabrandnew,originalone.
4
Close the cover by pressing it, until you hear
a characteristic “click.”
After-work procedures, cleaning and
maintenance
1
Press the on/off switch (4) to stop the vacuum cleaner.
2
Remove the plug of the cord from the socket.
3
Wind the cord by pressing the cord winder button (3).
Hold the cord when doing it to avoid tangling the cord up or
letting the plug hit the vacuum cleaner.
4
Disconnect the telescopic pipe from the nozzle or brush.
5
Disconnect the telescopic tube from the hose. In order to
remove the tube from the hose handle press the “A” locking
device and pull the tube in the direction of the arrow.
6
Press both of the side buttons situated on the end of the
hose, and remove the end of the hose from the inlet of the
vacuum cleaner.
7
The vacuum cleaner together with its attached
accessories may be stored in a vertical or horizontal position.
In order to this, place the hook of the nozzle brush into the
fastening for the nozzle brush. The hose may stay attached
to the vacuum cleaner as long as it is not bent too much
during storage.
8
If necessary, clean the casing and the chamber of the
vacuum cleaner with a damp cloth (it may be damped in
dishwashing liquid), dry it off, and wipe it dry.
Donotuseanyscrubbingagentsorsolvents.
E
F

41
VC1001-001_v01
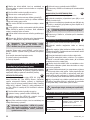
Examples of problems while operating the
vacuum cleaner
PROBLEM ACTION
A characteristic “uttering”
of the vacuum cleaner is
heard.
• Check the dust bag and the
accessories, remove the cause of the
clogging or replace the dust bag with
a new one.
• Clean the vacuum cleaner chamber
and the lter.
The dust bag is damaged. Remove the dust bag and the lters.
The electrical installation
fuse went out.
Check if other appliances are not
plugged to the same electrical circuit
as the vacuum cleaner. If the fuse
goes out repeatedly, return the vacuum
cleaner to a service point.
The vacuum cleaner does
not operate; the housing or
the cord is damaged.
Return the vacuum cleaner to
a service point.
The suction power of the
vacuum cleaner is weak.
Replace the dust bag and the lters,
check the suction tube, the hose and
the nozzle – remove the cause of the
clogging.
Ecology – Environmental protection
Each user can contribute to protect the
environment. It is neither difcult nor expensive.
In order to do so:
Return cardboard packages to recycling
points.
Throw polyethylene (PE) bags into appropriate
containers.
Return a worn out appliance to an appropriate collecting
point as the components of the appliance may pose a threat
to the environment.
Donotdisposeofwithhouseholdwaste!!!
The manufacturer/importer does not accept any liability for any
damages resulting from unintended use or improper handling.
The manufacturer/importer reserves his rights to modify the product
any time in order to adjust it to law regulations, norms, directives,
or due to construction, trade, aesthetic or other reasons, without
notifying in advance.
Page is loading ...

A
Odkurzacz
Vacuum cleaner
Roto
Odkurzacz
Vacuum cleaner
Roto
instrukcja
użytkowania
user
manual
VC1001-001_v01
www.zelmer.pl
www.zelmer.com
www.zelmer.pl
www.zelmer.com
Wariant kolorystyczny Colour variant
INSTRUKCJA UŻYTKOWANIA
ODKURZACZ
Typ VC1001
NÁVOD K POUŽITÍ
VYSAVAČ
Typ VC1001
NÁVOD NA OBSLUHU
VYSÁVAČ
Typ VC1001
6–9
10–13
14–17
PL
SK
CZ
HASZNÁLATI UTASÍTÁS
PORSZÍVÓK
VC1001 Típus
INSTRUCŢIUNI DE UTILIZARE
ASPIRATORUL
Tip VC1001
ИНСТРУКЦИЯ ПО ЭКСПЛУАТАЦИИ
ПЫЛЕСОС
Tип VC1001
18–21
22–25
26–29
RU
RO
HU
ИНСТРУКЦИЯ ЗА УПОТРЕБА
ПРАХОСМУКАЧКА
Тип VC1001
ІНСТРУКЦІЯ З КОРИСТУВАННЯ
ПИЛОСОС
Тип VC1001
USER MANUAL
VACUUM CLEANER
Type VC1001
30–33
34–37
38–41
UA
EN
BG
www.goldenservice.zelmer.com
PL
CZ
SK
HU
RO
RU
BG
UA
EN
PL
CZ
SK
HU
RO
RU
BG
UA
EN
PL
CZ
SK
HU
RO
RU
BG
UA
EN
VC1001.0SP VC1001.0SK VC1001.0SF
4
8
13
14
15 16
17
18
12
9
10
11
4
3
5
2
1
7
6
Wygodne, obrotowe 360° mocowanie węża
Pohodlné upevnění hadice, otočné o 360°
Pohodlné upevnenie hadice, otáčavá o 360°
A cső rögzítése kényelmesen, 360° fokban forgatható
Montură furtun confortabilă, rabatabilă 360°
Удобное, с углом вращения 360° крепление шланга
Удобно, ротационно 360° закрепване на маркуча
Зручне, з кутом обертання 360° кріплення шлангу
Convenient, 360°-swivel hose fastening
Page is loading ...
-
 1
1
-
 2
2
-
 3
3
-
 4
4
-
 5
5
-
 6
6
-
 7
7
-
 8
8
-
 9
9
-
 10
10
-
 11
11
-
 12
12
-
 13
13
-
 14
14
-
 15
15
-
 16
16
-
 17
17
-
 18
18
-
 19
19
-
 20
20
-
 21
21
-
 22
22
-
 23
23
-
 24
24
-
 25
25
-
 26
26
-
 27
27
-
 28
28
-
 29
29
-
 30
30
-
 31
31
-
 32
32
-
 33
33
-
 34
34
-
 35
35
-
 36
36
-
 37
37
-
 38
38


Zelmer Roto VC1001.0 SF User manual
- Category
- Vacuum cleaners
- Type
- User manual
Ask a question and I''ll find the answer in the document
Finding information in a document is now easier with AI
in other languages
Related papers
Other documents
-
ECG VP 2080 S User manual
-
ECG VP 3120 S User manual
-
ECG VM 3100 hobby User manual
-
ECG VP 3144 S User manual
-
ECG VM 2120 HOBBY User manual
-
ECG VP 2141 S User manual
-
Amica Viento VI2032 User manual
-
-
Amica Virason Turbo VM5021 User manual
-
Amica VM 7002 Suracon User manual