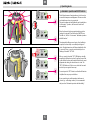
Stabila LAR 160 G is an easy-to-use rotation laser for horizontal and vertical leveling, with functions that cover many use cases. It offers automatic self-leveling within a range of ±5°, with a tilt function to warn of misalignment and automatic relevelling to adjust for interference. Additionally, it has a manual mode for full control, a 90° angle feature for creating right angles, and a plumb-line function for transferring points from floor to ceiling.
Stabila LAR 160 G is an easy-to-use rotation laser for horizontal and vertical leveling, with functions that cover many use cases. It offers automatic self-leveling within a range of ±5°, with a tilt function to warn of misalignment and automatic relevelling to adjust for interference. Additionally, it has a manual mode for full control, a 90° angle feature for creating right angles, and a plumb-line function for transferring points from floor to ceiling.


-
 1
1
-
 2
2
-
 3
3
-
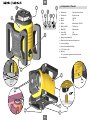 4
4
-
 5
5
-
 6
6
-
 7
7
-
 8
8
-
 9
9
-
 10
10
-
 11
11
-
 12
12
-
 13
13
-
 14
14


Stabila LAR 160 G is an easy-to-use rotation laser for horizontal and vertical leveling, with functions that cover many use cases. It offers automatic self-leveling within a range of ±5°, with a tilt function to warn of misalignment and automatic relevelling to adjust for interference. Additionally, it has a manual mode for full control, a 90° angle feature for creating right angles, and a plumb-line function for transferring points from floor to ceiling.
Ask a question and I''ll find the answer in the document
Finding information in a document is now easier with AI
Related papers
-
Stabila LAR 350 User manual
-
Stabila LAR 300 User manual
-
-
-
-
-
Stabila Laser LAX 300 G User manual
-
-
Stabila LD 320 User manual
-
Other documents
-
 COTTON COLORS BLKM038 User guide
-
Sola EVO 360 Operating instructions
-
Ryobi RLL10RD User manual
-
Topcon DS-105AC User manual
-
Parkside PKLL 7 A1 Operating Instructions Manual
-
Makita SK105DNAX User manual
-
-
Hilti PMP 45 Operating instructions
-
Hilti 411279 User guide
-
