Canon VB-M600D User manual

Category
Security camera accessories
Type
User manual
Network Video Recording Software
/ / /
Viewer Operation Guide
This guide describes the basic operation of RM Viewer. For a more detailed description of
the operation, see the “Administrator Manual” on the supplied CD-ROM.
Toolbar
The toolbar has buttons for accessing
commonly used functions.
Audio Panel
Lets you send/receive live audio for a camera
or play back recorded audio.
Camera Control
Controls the settings on the camera. See
“Controlling a Camera” on the other side of this
guide.
Timeline
Displays recording information and past events.
Playhead
Points to the time code being played. Drag the playhead to
change the time code of the video in the video window.
Video Window
Displays a live or a recorded video from a camera.
Viewing Area
Place and arrange video windows in this
area.
Live Events Log
Displays events that occurred within the last hour when
the log is first opened after starting the Viewer.
Camera Selector
Displays a list of cameras. Select the camera
you want to view from the list.
[Search for:] searches for cameras in the list
that meet the search criteria, such as the
camera name or tag.
Starting/Exiting the Viewer
1
Double-click the [RM Viewer] icon on the desktop.
The RM-Lite icon has a different appearance.
2
Enter the [Host Name], [User Name] and
[Password] and click [Connect].
The Viewer starts.
Record the user name and password here:
User name
Password
Viewer Features
Toolbar buttons
If you record your user name and password here, be sure to handle this
document carefully, so as not to reveal them to an unauthorized person.
Note
[Back]
Click t to return to the previously displayed layout. Click u to display the
next layout.
[Layouts]
Selects and switches to a different video window layout.
[Grids]
Displays a grid in the background of the viewing area.
[Zoom]
Zooms in and out of the viewing area.
[Control]
Displays the Camera Control dialog box, used for controlling a camera.
[Record Now]
Starts recording video.
[Capture]
Captures a still frame of the displayed video. The still frame can be saved.
[Viewer PTZ]
You can zoom a region of the camera video in the video window using
Viewer PTZ (pan/tilt/zoom).
[Search]
Searches for events. Video can be played back from an event in the search
results.
Tabs
Tabs allow different layouts to be open at the
same time for quick access.
(RM-Lite does not support the tabs function.)
3
Select [File] > [Exit].
The Viewer exits.
2
Searching
1
Searching for a Camera and Viewing Video
Search for a camera to view using various search criteria.
Click the search button ( ) on the
Camera Selector and select the type of
search criteria.
Type the search criteria to search for
the camera.
3
Selecting an Event and Viewing the Video
You can search for events and play back video from an event in the search results.
Double-click a camera in the search
results list to open a video window for
the camera.
2
3
1
Click [Search] on the Toolbar to display the
[Event Search] dialog box.
Specify the search criteria and click [Search]
to start searching.
Select the event you want to view and click
[Play Back Video].
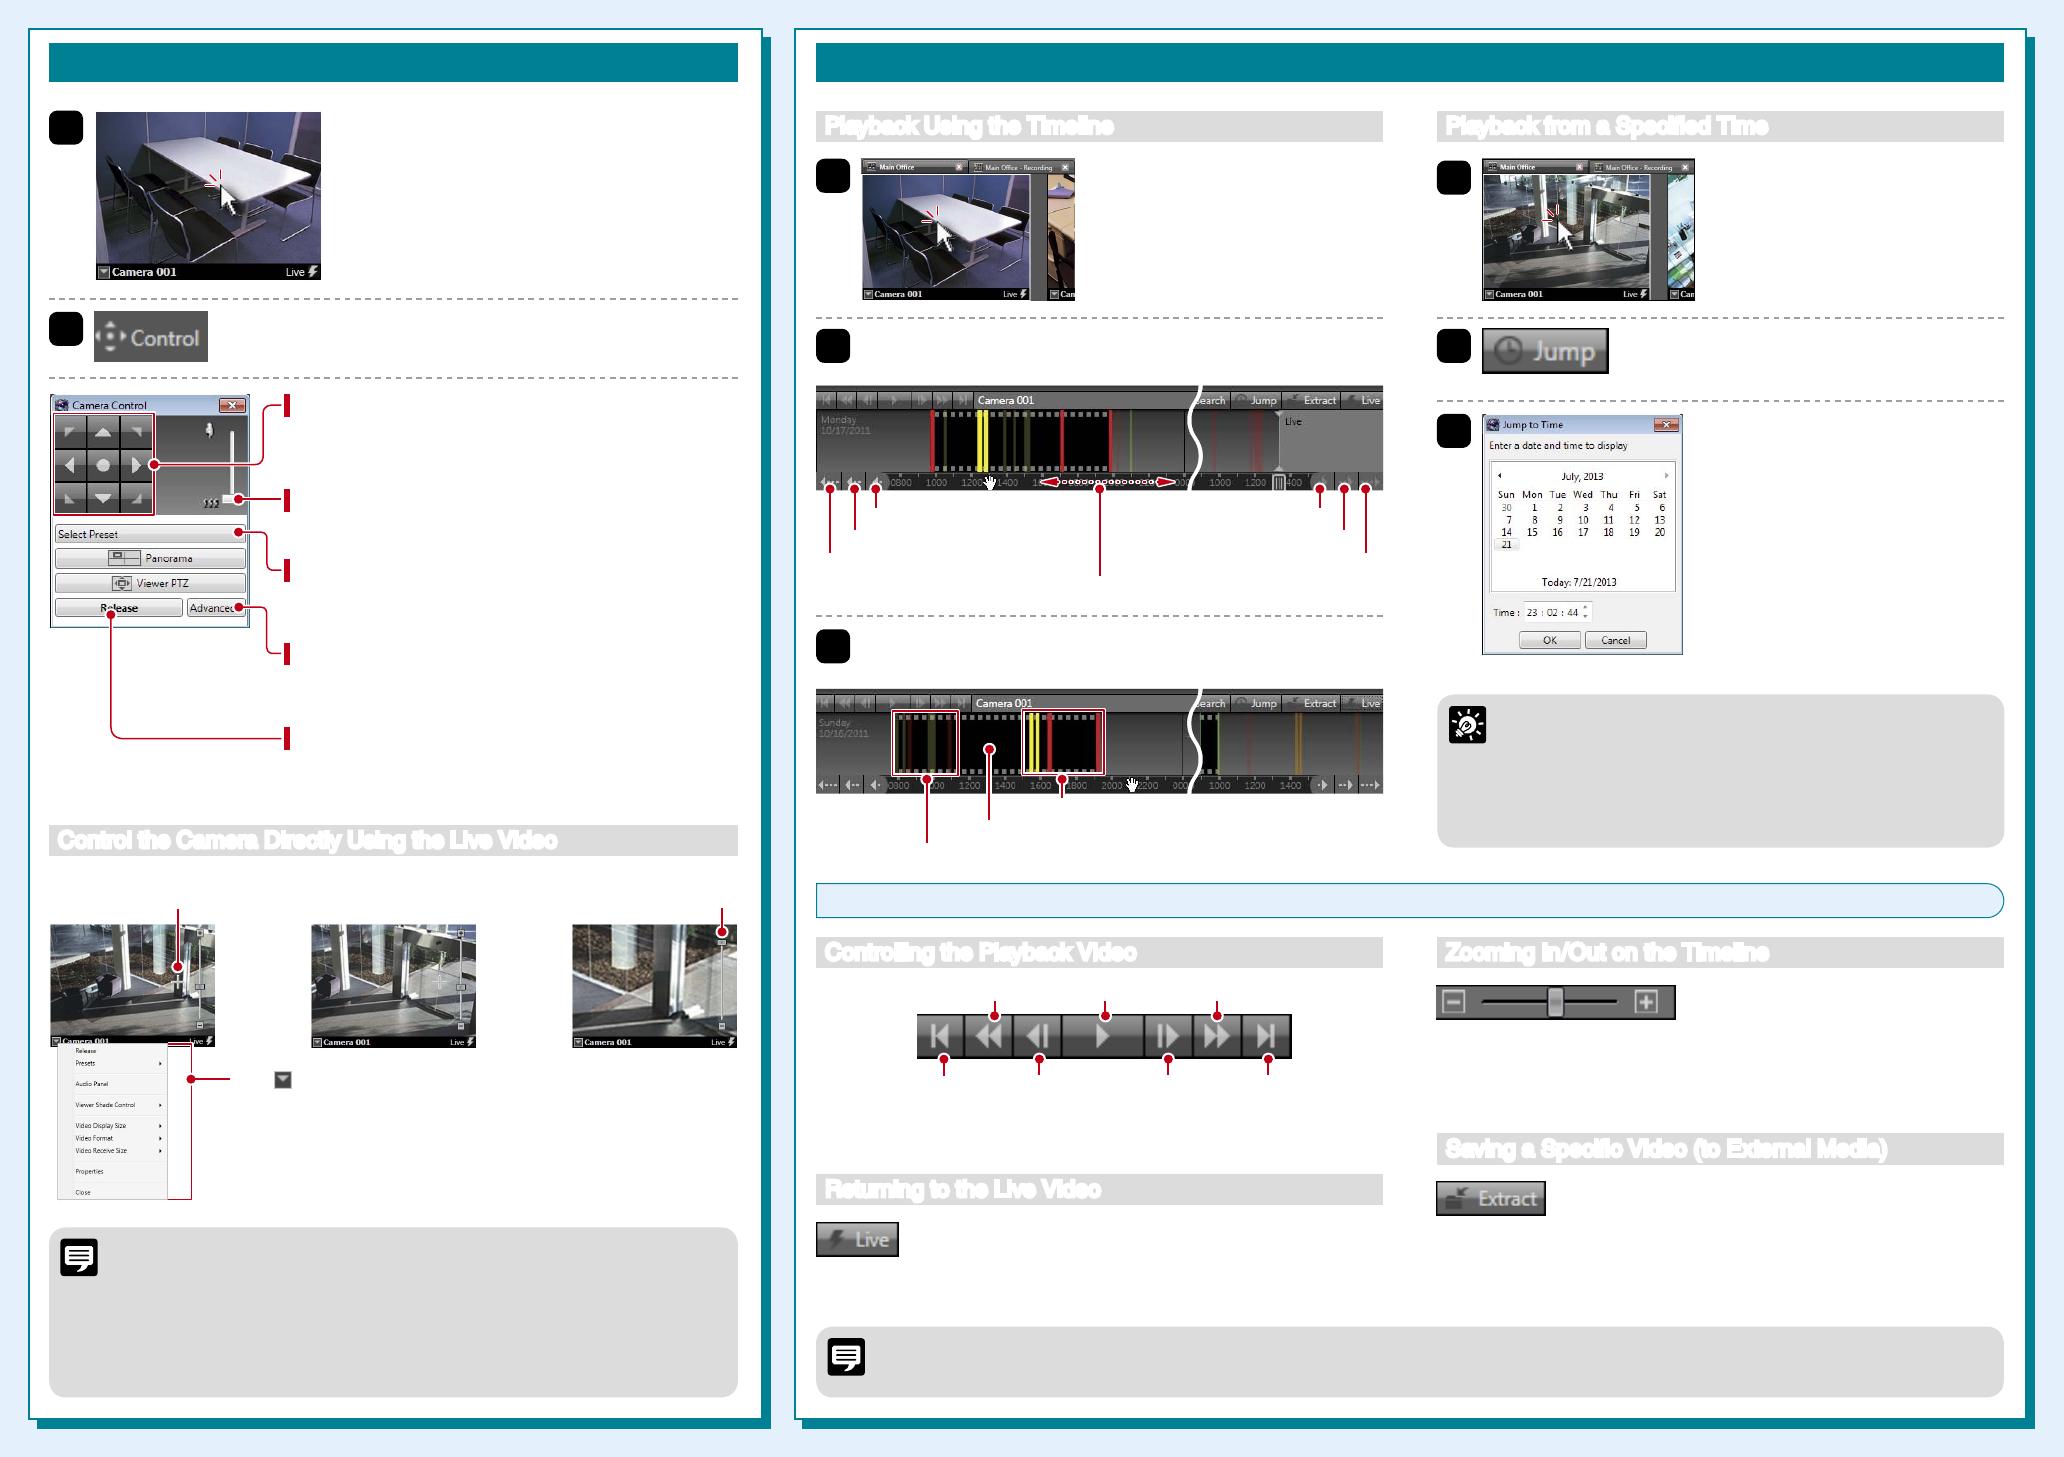
Playing Back Recordings
1
Fast reverse (each click changes the speed in sequence: 1x, 2x, 5x, 10x)
Fast forward (each click changes the speed in sequence: 2x, 5x, 10x)
Switch from the recorded video to the live video.
Saves a specific recorded video in Quicktime format (*.mov) to a
desired location.
Zoom in on the timeline to display more detail and zoom out to display
the entire timeline.
Controlling/Saving the Playback Video
Fast Reverse Play/Pause
Fast Forward
Next EventPrevious Event Next FramePrevious Frame
Click the video window of the
camera you want to use for
playback.
2
Click [Jump] to display the [Jump to Time]
dialog box.
3
Select a date and time, and click
[OK].
Playback starts in the video window.
Playback from a Specified Time
Controlling the Playback Video
Returning to the Live Video
Zooming In/Out on the Timeline
Saving a Specific Video (to External Media)
1
Click the video window of the
camera you want to use for
playback.
3
Click the time or event that you want to play back.
Playback starts in the video window.
2
Drag to move the time display on the timeline.
Playback Using the Timeline
You cannot use [Fast Reverse], [Previous Frame], and [Next Frame] for recordings in MPEG-4 or H.264 format.
 RM-Lite does not support MPEG-4 or H.264 recording.
Note
z Use “Playback Using the Timeline” to start playback at any
point, such as at events. Use “Playback from a Specified
Time” to start playback at a specific time.
z You can play back video from multiple cameras
simultaneously, or play back video recorded at different
times with the same camera.
Hint
Controlling a Camera
2
Click [Control] on the toolbar to display the [Camera
Control] dialog box.
1
Click the video window of the camera you
want to control.
z The [Cannot get camera control] message is displayed when another
Viewer with higher camera control privileges is controlling the camera.
Please contact your administrator.
z Depending on the type of camera, some functions might not be available.
For details, see the “Administrator Manual”.
z Ask your administrator in advance about how to operate a camera while it
is recording.
Note
Pan (Right/Left) / Tilt (Up/Down)
Use the arrow buttons to pan or tilt a camera that has
the pan/tilt feature.
Zoom
Drag the slider to change the zoom.
Select Preset
Select from a list of camera angles that you preset on
the camera.
Advanced
Adjust the camera image quality using the exposure or
smart shade control.
Control/Release
All buttons on the [Camera Control] dialog box become
active.
Click to display a menu.
To change the size of the video window, change [Video Display Size].
To make dark areas of the video lighter, adjust the level of [Viewer
Shade Control].
Back 1 Week
Events for non-selected cameras
Forward 1 Week
Drag this area to the left or right to change the time display
Back 1 Day
Recorded video
Forward 1 Day
Scroll Backwards
Events for the selected camera
Scroll Forwards
Center the video at a point by
clicking the [+] cursor there
Zoom the video in/out
with the slider
Control the Camera Directly Using the Live Video
BIE-7016-000 © CANON INC. 2013 The contents of this guide are subject to change without any prior notice.
  • Page 1 1
  • Page 2 2

Canon VB-M600D User manual

Category
Security camera accessories
Type
User manual

Ask a question and I''ll find the answer in the document

Finding information in a document is now easier with AI