Page is loading ...

Version 1.0
User manual

1
+31(0)78 - 615 20 33
info@altec.nl
www.altec.nl
+32(0)2 - 270 34 88
info@altec.
be
www.altec.
be
NL
BE
Contents
1 Introduction ...................................................................................................................... 3
1.1 Product features ................................................................................................................................ 5
1.1.1 Standard features .............................................................................................................................. 5
1.1.2 Optional features ............................................................................................................................... 6
1.2 General specifications ....................................................................................................................... 6
1.3 Print specifications ............................................................................................................................ 7
1.4 Ribbon specifications ........................................................................................................................ 7
1.5 Media specifications .......................................................................................................................... 7
2 Product overview .............................................................................................................. 8
2.1 Unpacking the printer ........................................................................................................................ 8
2.2 Printer overview ................................................................................................................................. 9
2.2.1 Front view ........................................................................................................................................... 9
2.2.2 Interior view ..................................................................................................................................... 10
2.2.3 Rear view ......................................................................................................................................... 11
3 Setup .............................................................................................................................. 12
3.1 Printer setup .................................................................................................................................... 12
3.2 Installing the ink ribbon ................................................................................................................... 13
3.3 Loading media ................................................................................................................................. 17
3.3.1 Placing media in the printer ........................................................................................................... 17
3.3.2 Sensor setup ................................................................................................................................... 20
4 LCD display menu ........................................................................................................... 21
4.1 LCD display ...................................................................................................................................... 21
4.2 Main menu ....................................................................................................................................... 21
4.3 Calibration ....................................................................................................................................... 22
4.3.1 Auto calibration ............................................................................................................................... 22
4.3.2 Manual Setup .................................................................................................................................. 23
4.3.3 Threshold detect ............................................................................................................................. 26
4.3.4 Maximum length ............................................................................................................................. 26
4.3.5 Advanced ......................................................................................................................................... 26
4.3.6 Minimum paper length (advanced) ................................................................................................ 27
4.3.7 Maximum paper length (advanced) ............................................................................................... 27

2
+31(0)78 - 615 20 33
info@altec.nl
www.altec.nl
+32(0)2 - 270 34 88
info@altec.
be
www.altec.
be
NL
BE
4.4 Settings ........................................................................................................................................... 27
4.4.1 1st label adjustment ....................................................................................................................... 27
4.4.2 Interface .......................................................................................................................................... 28
4.4.3 Diagnostics...................................................................................................................................... 30
4.4.4 Advanced ......................................................................................................................................... 33
4.4.5 Factory default ................................................................................................................................ 34
4.5 File manager .................................................................................................................................... 35
4.6 Info .................................................................................................................................................. 36
4.6.1 Instruction videos ........................................................................................................................... 36
4.6.2 Printer info ....................................................................................................................................... 37
4.6.3 Contact details ................................................................................................................................ 37
4.7 Errors and messages ....................................................................................................................... 38
5 Web interface ................................................................................................................. 39
5.1 Accessing the web interface ............................................................................................................ 39
5.2 Configuration ................................................................................................................................... 40
5.3 Tools ............................................................................................................................................... 43
6 Printer management tool (TPM) ...................................................................................... 45
6.1 TPM overview .................................................................................................................................. 45
6.2 Printer settings ................................................................................................................................ 46
6.2.1 Printer configuration ....................................................................................................................... 46
6.2.2 File manager .................................................................................................................................... 50
6.2.3 Command tool ................................................................................................................................ 50
6.2.4 RTC Setup ........................................................................................................................................ 51
6.2.5 Printer function ............................................................................................................................... 51
6.2.6 Bitmap Font Manager ..................................................................................................................... 52
6.3 Program settings ............................................................................................................................. 53
6.3.1 Users ................................................................................................................................................ 53
6.3.2 Alert ................................................................................................................................................. 53
6.3.3 Group ............................................................................................................................................... 54
6.3.4 Setup ................................................................................................................................................ 54
6.3.5 Manual name .................................................................................................................................. 54
7 Cleaning ......................................................................................................................... 55
7.1 Cleaning the printer ......................................................................................................................... 55
8 Support (FAQ) ................................................................................................................. 57

3
+31(0)78 - 615 20 33
info@altec.nl
www.altec.nl
+32(0)2 - 270 34 88
info@altec.
be
www.altec.
be
NL
BE
1 Introduction
Industrial Desktop Labelprinter
The ATP-300 Pro is Altec’s Industrial Desktop Label printer. This is the successor to the TTP-200/300 series.
This new label printer is technically improved and a lot more user-friendly. Placing media and printing labels is now
easier and more advanced. Print 1001 types of labels with one and the same label printer.
Copyright information
Copyright Information © 2020 ALTEC industrial identification B.V.
The copyright in this manual, the software and firmware in the printer are owned by ALTEC industrial identification
B.V. All rights reserved. Windows is a registered trademark of Microsoft Corporation. All other trademarks are the
property of their respective owners.
Information in this document is subject to change without notice and does not represent a commitment on the part
of ALTEC industrial identification B.V. No part of this manual may be reproduced or transmitted in any form or by
any means, for any purpose other than the purchaser’s personal use, without the expressed written permission of
ALTEC industrial identification B.V.
Compliance and approvals
EN 55022, Class B
EN 55024
EN 60950-1
FCC part 15B, Class B
UL 60950-1
EN 60950-1
GB 4943.1
GB 9254
GB 17625.1

4
+31(0)78 - 615 20 33
info@altec.nl
www.altec.nl
+32(0)2 - 270 34 88
info@altec.
be
www.altec.
be
NL
BE
Battery safety warning
• Do not throw the battery in fire
• Do not short circuit the contacts
• Do not disassemble the battery
• Do not throw the battery in municipal waste
FCC Statement
This equipment has been tested and found to comply with the limits for a Class B digital device, pursuant to part 15
of the FCC Rules. These limits are designed to provide reasonable protection against harmful interference in a
residential installation. This equipment generates, uses and can radiate radio frequency energy and, if not installed
and used in accordance with the instructions, may cause harmful interference to radio communications. However,
there is no guarantee that interference will not occur in a particular installation. If this equipment does cause
harmful interference to radio or television reception, which can be determined by turning the equipment off and on,
the user is encouraged to try to correct the interference by one or more of the following measures:
• Reorient or relocate the receiving antenna.
• Increase the separation between the equipment and receiver.
• Connect the equipment into an outlet on a circuit different from that to which the receiver is connected.
• Consult the dealer or an experienced radio/ TV technician for help.
This device complies with Part 15 of the FCC Rules. Operation is subject to the following two conditions: (1) This
device may cause harmful interference, and (2) this device must accept any interference received, including
interference that may cause undesired operation.
This Class B digital apparatus complies with Canadian ICES-003.
Cet appareil numérique de la classe B est conforme à la norme NMB-003 du Canada.
CAUTION
• Risk of explosion if battery is replaced by an incorrect type.
Dispose of used batteries according to the instructions.
• Any changes or modifications not expressly approved by the grantee of this device could void the user's
authority to operate the equipment.
• Hazardous moving parts, keep fingers and other body parts away.

5
+31(0)78 - 615 20 33
info@altec.nl
www.altec.nl
+32(0)2 - 270 34 88
info@altec.
be
www.altec.
be
NL
BE
1.1 Product features
1.1.1 Standard features
The printer offers the following standard features:
Thermal transfer printing / Direct thermal printing
3,5” TFT LCD with 6 buttons
32-bit RISC CPU
Gap transmissive sensor (position adjustable)
Black mark reflective sensor (position adjustable)
See-through ribbon end sensor
Head open sensor
128MB Flash memory
Micro SD card reader for memory expansion, up to SDHC 32GB
RS-232 interface (Max. 115,200 bps)
USB 2.0 interface (Hi-speed mode)
Internal Ethernet print server (10/100 Mbps) interface
USB host
Real time clock & Buzzer
Standard industry emulations right out of the box including Eltron
®
and Zebra
®
language support
Internal 8 alpha-numeric bitmap fonts
Fonts and barcodes can be printed in any one of the four directions (0, 90,180, 270 degree)
Internal Monotype Imaging® true type font engine with one CG Triumvirate Bold Condensed scalable font
Downloadable fonts from PC to printer memory
Clean print head warning
Barcodes, graphics and image printing

6
+31(0)78 - 615 20 33
info@altec.nl
www.altec.nl
+32(0)2 - 270 34 88
info@altec.
be
www.altec.
be
NL
BE
1.1.2 Optional features
The printer offers the following optional features:
Peel-off kit
Industrial heavy duty cutter
Keyboard / Barcode scanner
External label roll mount
1.2 General specifications
Physical dimensions
226 mm (W) x 200 mm (H) x 332 mm (D)
Weight
4,08 KG (8,99 lbs)
Mechanism
Clamshell with double-walled plastic
Power
External power adapter
- Input: AC 100-240V, 2.5A
- Output: DC 24V/5.41A
Environmental condition
Operation: 5 ~ 40°C (41 ~ 104°F), 25~85% non-condensing
Storage: -40 ~ 60 °C (-40 ~ 140°F), 10~90% non-condensing
Environmental concern
Comply with RoHS, WEEE

7
+31(0)78 - 615 20 33
info@altec.nl
www.altec.nl
+32(0)2 - 270 34 88
info@altec.
be
www.altec.
be
NL
BE
1.3 Print specifications
Print head resolution
(dots per inch/mm)
300 dots/inch
(12 dots/mm)
Printing method
Thermal transfer / Direct thermal
Dot size
0,084 x 0,084 mm (1 mm = 12 dots)
Print speed
Up to 6 inch/s (152 mm/s)
Max. print width
105,6 mm (4,15”)
Max. print length
2.540 mm (100”)
1.4 Ribbon specifications
Ribbon outside diameter
Max. 67 mm OD
Ribbon length
300 meter
Ribbon core inside diameter
25,4 mm (1”) ID core
Ribbon width
40 mm ~ 110 mm
Wind direction
Coated Side Out (CSO)
1.5 Media specifications
Media roll capacity
Max. 125 mm (5”) OD
Media core diameter
40 mm (1,5”) ID core
Media type
Continuous, die-cut, black mark, external fan-fold, notch
Wind direction
Coated Side Out (CSO) / Coated Side In (CSI)
Media width
19 mm ~ 112 mm
Media thickness
0,055 mm ~ 0,254 mm
Black mark
Min. 8 mm (W) x 2 mm (H)
Gap height
Min. 2 mm

8
+31(0)78 - 615 20 33
info@altec.nl
www.altec.nl
+32(0)2 - 270 34 88
info@altec.
be
www.altec.
be
NL
BE
2 Product overview
2.1 Unpacking the printer
This printer has been specially packaged to withstand damage during shipping. Please carefully inspect the
packaging and printer upon receiving the ATP-300 Pro printer. Please retain the packaging materials in case you
need to reship the printer. Please check if the following items are included:
• ATP-300 Pro printer unit 1X
• Quick installation sheet 1X
• Power cord 1X
• Auto switch power supply 1X
• USB interface cable 1X
• Ribbon spindles 2X
• Paper core 1X

9
+31(0)78 - 615 20 33
info@altec.nl
www.altec.nl
+32(0)2 - 270 34 88
info@altec.
be
www.altec.
be
NL
BE
2.2 Printer overview
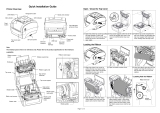
2.2.1 Front view
1. LCD display
2. Menu buttons
3. Metal tear-off bar
4. Top cover open lever
5. Power switch
1
3
4
2
5

10
+31(0)78 - 615 20 33
info@altec.nl
www.altec.nl
+32(0)2 - 270 34 88
info@altec.
be
www.altec.
be
NL
BE
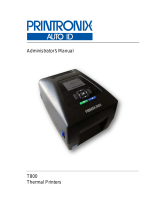
2.2.2 Interior view
1. Ribbon supply hub
2. Media holder
3. Ribbon access cover
4. Platen roller
5. Metal tear-off bar
6. Ribbon waste hub
7. Print head
8. Media holder locking switch
9. Media guide bar
10. Black mark sensor
11. Black media guides
12. Gap transmissive sensor
13. Media guide adjustment button
14. Ribbon supply cover
1
1
2
3
6
4
5
7
8
9
10
11
12
13
14

11
+31(0)78 - 615 20 33
info@altec.nl
www.altec.nl
+32(0)2 - 270 34 88
info@altec.
be
www.altec.
be
NL
BE
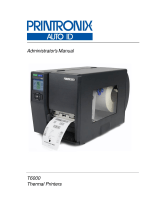
2.2.3 Rear view
1. Power jack socket
2. Serial port (RS-232)
3. Ethernet interface
4. Micro SD card socket
5. USB interface - connect to a PC
6. USB host - connect to a keyboard / barcode scanner
7. MAC address identification label
8. External label entrance
1
8
2
3
4
5
6
7

12
+31(0)78 - 615 20 33
info@altec.nl
www.altec.nl
+32(0)2 - 270 34 88
info@altec.
be
www.altec.
be
NL
BE
3 Setup
3.1 Printer setup
1. Place the printer on a flat and secure surface
2. Make sure the power switch is turned off
3. Connect the printer to the computer with the
provided USB cable (or an ethernet cable).
4. Plug the power cord into the power cord socket at
the rear of the printer.
Then plug the power cord into a properly grounded
power outlet.

13
+31(0)78 - 615 20 33
info@altec.nl
www.altec.nl
+32(0)2 - 270 34 88
info@altec.
be
www.altec.
be
NL
BE
3.2 Installing the ink ribbon
1. Open the top cover of the printer by pulling the green
levers - located on each side of the printer - and
lifting the top cover to the maximum open angle.
2. Open the ribbon access cover and the ribbon supply
cover.

14
+31(0)78 - 615 20 33
info@altec.nl
www.altec.nl
+32(0)2 - 270 34 88
info@altec.
be
www.altec.
be
NL
BE
3. Insert a ribbon spindle into the paper core.
4. Install the paper core with the right side first onto
the ribbon rewind hub first.
Then align the (yellow) notches on the left side to
mount it.

15
+31(0)78 - 615 20 33
info@altec.nl
www.altec.nl
+32(0)2 - 270 34 88
info@altec.
be
www.altec.
be
NL
BE
5. Insert a ribbon spindle into the ribbon core.
6. Install the ink ribbon with the right side first onto the
ribbon supply hub first.
Then align the (yellow) notches on the left side to
mount it.
Sticky edge

16
+31(0)78 - 615 20 33
info@altec.nl
www.altec.nl
+32(0)2 - 270 34 88
info@altec.
be
www.altec.
be
NL
BE
7. Stick the ink ribbon onto the (waste) paper core.
8. Turn the (waste) paper core with the (white) ribbon
rewind gear until the plastic leader is thoroughly
wound.
Close the top cover of the printer after installing the ink ribbon.
Instruction video
Learn how to install an ink ribbon with our instruction video.
Watch video

17
+31(0)78 - 615 20 33
info@altec.nl
www.altec.nl
+32(0)2 - 270 34 88
info@altec.
be
www.altec.
be
NL
BE
3.3 Loading media
3.3.1 Placing media in the printer
1. Open the top cover of the printer by pulling the green
levers - located on each side of the printer - and
lifting the top cover to the maximum open angle.
2. Make sure the (square) lock of the label holders is
set to open.
3. Separate and hold the media holders open.

18
+31(0)78 - 615 20 33
info@altec.nl
www.altec.nl
+32(0)2 - 270 34 88
info@altec.
be
www.altec.
be
NL
BE
4. Place a roll of labels between the holders and close
them onto the core.
5. Lead the media under the white label guide bar.
6. Place the media between the black media guides
and place the label leading edge onto the platen
roller.
Platen roller
Black media guides

19
+31(0)78 - 615 20 33
info@altec.nl
www.altec.nl
+32(0)2 - 270 34 88
info@altec.
be
www.altec.
be
NL
BE
7. Move the black media guides / gap sensor to fit the
media width by pushing the media guide adjustment
button.
Please ensure that the black media guides are placed correctly:
Too tight
Too wide
Correct
Instruction video
Learn how to place media with our instruction video.
Watch video
/