Page is loading ...

SOLARA
INDOOR/OUTDOOR WIRELESS
SOLAR POWERED SPEAKER
USER MANUAL
VER. PRELIM
MODEL: MNSOL-BLK

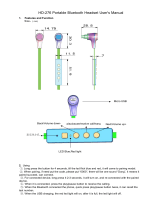
SOLARA HIGHLIGHTS
SOLAR PANEL
& SENSOR
360˚
LIGHT
360˚
SOUND
TIMER
& INPUTS
CARRY
HANDLE
SUB-WOOFER
CONNECT 8
SPEAKERS
2

TABLE OF CONTENTS
FOR QUESTIONS OR TECHNICAL SUPPORT PLEASE CALL: 1-800-976-0677
Please do not return this product to the store.
Package Contents 4
Controls & Connections 5
LED Indicators 6
Getting Started - Charging The Speaker 7
Bluetooth Connection 9
EZ-PLAY Wireless Connection 10
3.5 mm Aux Input 14
Specifications 15
Important Safety Instructions 17
Help & Troubleshooting 19
FCC Warning Statement 20
Limited Warranty 22
3

PACKAGE CONTENTS
1. MONSTER SOLARA: Wireless Solar Speaker 2. Power Adapter (5V/3A DC Adapter)
3. Aux Cable
4. User Manual
(incl. Limited Warranty Statement)
5. Quick Start Guide
(Not To Scale)
(Not To Scale)
If any items are missing, contact our customer service team at 1.800.976.0677.
4

CONTROLS & CONNECTIONS
Standby/Wake
& Battery Level
LED Color
& LED Timer
Brightness
Level
Light Timer
& Battery Level
AUX
Input
USB Charging
Port
DC Power
Input
Power
ON/OFF
Bluetooth Pairing
(When in Bluetooth mode)
Source
Selection
Source
Selection
EZ-Play
Pairing
Volume
DOWN/UP
5

LED INDICATORS
TX Mode (Transmit) RX Mode (Receive)
Slow Blink
Transmit Mode
Searching
Solid
Transmit Mode
Connected
Slow Blink
Receive Mode
Searching
Solid
Receive Mode
Connected
Bluetooth AUX
Slow Blink
Bluetooth On
Standby
Fast Blink
Bluetooth
Pairing mode
Solid
AUX Connected
Solid
Bluetooth
Connected
6

GETTING STARTED - CHARGING THE SPEAKER
1. Connect the power cable to the
Solara speaker.
2. Plug the power cable into a
wall outlet.
3. Flip the Power switch to ON
4. Solara will enter Bluetooth Pairing
mode automatically. Pair with your
Bluetooth device.
5. If AUX Input cable is plugged in,
the speaker will automatically
enter AUX mode.
When
unplugged,
the speaker
will enter
standby
mode after5
minutes of
inactivity.
(Not To Scale)
BEFORE FIRST USE:
Charge the unit for 6 hours.
Connect speaker to DC outlet via DC
power input to charge the battery.
When fully charged
RED LED will stay solid.
When low on battery
RED LED will flash rapidly.
7

8

1. Set the speaker source to Bluetooth (unpaired).
2. Make sure the Bluetooth function is enabled on
your device.
3. Place the Bluetooth device and speaker within pairing
distance (~3 feet).
4. Press and hold the Bluetooth button for 3 seconds
to enter pairing mode (BLUE LED will flash).
5. Search for Bluetooth connections on your device.
Select “Monster Solara.”
6. The speaker will confirm connection with an
audible message (BLUE LED will turn solid).
BLUETOOTH CONNECTION
(Not To Scale)
SOLARA
must be in
Bluetooth
Pairing Mode
(Fast Blink
Blue LED)
to connect
to device.
9

EZ-PLAY WIRELESS CONNECTION (ADDITIONAL SPEAKERS SOLD SEPARATELY)
The EZ-Play feature allows you to connect up to 8 compatible speakers and broadcast your favorite
music through all speakers simultaneously – without using a single wire! Speakers can sync and play up
to 100 feet apart from each other, and continue to function eectively through walls.
1. Make sure the speaker is powered on.
The Bluetooth BLUE LED and EZ-Play
TRANSMIT (TX) WHITE LED will flash slowly.
2. Press and hold the EZ-PLAY button for 3 seconds
to put the speaker into Transmit Pairing Mode. The
TRANSMIT (TX) WHITE LED will flash rapidly.
3. The TX speaker will automatically connect with RX
speakers that are in Receive Pairing Mode and
within pairing range (<10 ft).
SET TX SPEAKER (Transmit)
10

1. Make sure the speaker is powered on.
The Bluetooth BLUE LED and EZ-Play TRANSMIT (TX) WHITE LED will flash slowly.
4. The RX speaker will automatically connect with a TX speaker that is in Transmit Pairing Mode
and within pairing range (<10 ft). RECEIVE (RX)AMBER LED will flash rapidly.
5. Repeat steps to add up to 7 RX speakers. Play audio through up to 8 speakers at once
SET RX SPEAKER (RECEIVING)
2. Press the EZ-PLAY button to change the speaker mode from Transmit to Receive. The RECEIVE
(RX) AMBER LED will flash slowly.
3. Press and hold the EZ-PLAY button for 3 seconds to put the speaker into Receive Pairing Mode.
The RECEIVE (RX)AMBER LED will flash rapidly.
11

Lorem ipsum dolor sit amet, consectetur adipiscing elit. Integer
eget nibh in ex interdum mollis sit amet a ipsum. Quisque dapibus
sollicitudin pulvinar. Phasellus sed venenatis nibh, at congue magna.
Pellentesque auctor libero in libero pellentesque, eu sodales nibh
viverra. Sed nisi turpis, pretium ut urna a, vestibulum blandit est.
Curabitur ultrices pharetra scelerisque. Maecenas quis nulla auctor
ligula viverra vulputate. Donec eu massa bibendum, elementum
ipsum in, consectetur lectus. Phasellus fringilla orci id ante faucibus
rutrum. Curabitur et purus nec mauris sodales semper.
Nam at nisi felis. Proin sapien magna, lobortis nec sem vulputate,
ultricies luctus magna. Cras nec leo vestibulum, vulputate ex ut,
porta neque. Nulla ante libero, condimentum ac velit sed, dignissim
convallis nulla. Phasellus luctus vehicula lacus.
THE
HARNESS
SUN
12

13

3.5MM AUX INPUT
1. Plug a 1/2” (3.5mm) cable into the AUX port. The
speaker will automatically turn o
2. Bluetooth function and switch to AUX.
3. Connect any audio device to the AUX cable to play
audio through the speaker
4. Control volume on the speaker or use the connected
device’s playback functions.
SOLARA must
be in AUX
Pairing Mode
(Amber LED)
to connect
to music
Device.
14

SPECIFICATIONS
General
Buttons
Wake Up | HN/SA | Battery/Timer | Source | Play/Pause/Bluetooth | Share |
Pair(WPS/SAC) | Volume Up | Volume Down | Power
LED Indicators
Share (TX) (White) | Pair (RX) (Orange) | AUX (Green) | Bluetooth (Blue) |
Battery/Timer (Red x1, Green x3)
18650 2200mA 3.7V (x3)
5V/3A DC In
Turns off after 30 minutes of inactivity
3.5” Full Range (x4) | 6.5” Passive Radiator (x1)
??
Plastic
8.8” x 12.0” x 8.8”t
Battery
Power Input
Power Saving
Driver Layout
THD + Noise
Cabinet Materia
l
Dimensions (W x H x D)
Weight 9 lbs (4.1kg)
Operating Temperature
Operating Temperature Range 32F° - 104F°
Operating Humidity Range 40~90% RH
Storage Temperature Range -13F° to 158F°
15

Key
Wake Up
In Transmit Mode (TX), press and hold to power speaker ON/OFF.
In Receive Mode (RX), press and hold to power all speakers ON/OFF.
HN/SA 40~90% RH
Battery/Timer
Press to activate current battery level LED (100%, 75%, 50%, 25%, 0%).
Press and hold to adjust timer (6 hours, 7 hours, 8 hours).
Source ??
Play/Pause/Bluetooth
Press to PLAY/PAUSE audio.
Press and hold to enter Bluetooth pairing mode.
Share ??
Pair (WPS/SAC) ??
Volume Up Press (and hold) to increase volume.
Volume Down Press (and hold) to decrease volume.
Power Switch Switch to power ON/OFF.
16

IMPORTANT SAFETY INSTRUCTIONS
1. Read all instructions and save them for personal reference in the future.
2. Follow all directions for operating the product.
3. Heed all warnings on the product and in the operation instructions.
4. Clean with a dry cloth only. Always unplug the product from any power source before cleaning.
5. Do not use third-party attachments or non-recommended accessories with this product.
6. Do not place product on an unstable surface, such as a cart, stand, tripod, table, etc.
Unstable surfaces may cause the product to fall and cause serious injury to people
and serious damage to the product. Follow all manufacturer instructions for mounting
and accessories.
7. Do not block or cover ventilation slots. Openings in the product cabin ensure reliable
operation and prevent overheating. Avoid placing on beds, sofas, and rugs, or mounting
on racks or bookcases, unless proper ventilation is provided.
8. Do not use plug incorrectly. The product may come with a polarized, alternating-current line plug
(one blade is wider/larger than the other). This is a safety feature: the plug will only go into outlet
receptacles one way. Do not force the plug. If the plug does not fit, contact your electrician to re
place the outlet.
9. Prevent power cord hazards. Route cords to avoid walking on them or pinching them, especially at
plug ends and connection points to the product & power outlets.
17

10. Unplug power cord when not in use. The product should not be plugged into a power source when
not in use for long periods of time.
11. Do not use this product near bodies of water. The product is not waterproof and cannot be fully sub
merged in water. Power cords and electric currents should never be exposed to water.
12. Do not set up near heat sources. Avoid radiators, stoves, heat registers, amplifiers, and other devices
that produce heat. Avoid long exposure to sunlight and high temperatures.
13. Refer all service to qualified personnel. If the product becomes damaged during use or encounters a
malfunction, contact qualified service personnel. Do not attempt to service yourself.
14. To use wirelessly, disconnect AC plug completely. The plug must be completed disconnected from
the power outlet.
IMPORTANT SAFETY INSTRUCTIONS
18

HELP & TROUBLESHOOTING
You can also contact our support team at:
Phone: Telephone: 1-800-976-0677
Hours of Operation:
Monday - Friday: 7:00 am - 5:00 pm (PST)
Saturday - Sunday: CLOSED
No power / Wvill not turn on
Press battery button to view battery level, if to low please charge by plugging
directly into wall outlet.
No sound playing
1. Increase the volume on source device, press Volume Up (+). Ensure
device is not muted.
2. Increase the volume on speaker, press Volume Up (+).
3. Ensure speaker is properly paired with the source device.
4. Press Play/Pause button on speaker.
5. If source device is outside Bluetooth range move speaker closer.
Smartphone / Tablet remote
app isn’t working
Ensure source device is properly paired with speaker.
LED button is pulsing red ??
19

FCC WARNING STATEMENT
20
This device complies with part 15 of the FCC Rules. Operation is subject to the following
two conditions: (1) This device may not cause harmful interference, and (2) this device
must accept any interference received, including interference that may cause undesired operation.
This equipment has been tested and found to comply with the limits for a Class B digital
device, pursuant to part 15 of the FCC Rules. These limits are designed to provide
reasonable protection against harmful interference in a residential installation. This
equipment generates, uses and can radiate radio frequency energy and, if not installed
and used in accordance with the instructions, may cause harmful interference to radio
communications. However, there is no guarantee that interference will not occur in a
particular installation. If this equipment does cause harmful interference to radio or
television reception, which can be determined by turning the equipment off and on, the
user is encouraged to try to correct the interference by one or more of the following
measures:
—Reorient or relocate the receiving antenna.
—Increase the separation between the equipment and receiver.
—Connect the equipment into an outlet on a circuit different from that to which the
receiver is connected.
—Consult the dealer or an experienced radio/TV technician for help.
Caution: Any changes or modifications not expressly approved by the party responsible
for compliance could void the user's authority to operate the equipment.
This equipment complies with FCC radiation exposure limits set forth for an uncontrolled environment.
This equipment should be installed and operated with minimum distance 20cm between the radiator& your body.
This transmitter must not be co-located or operating in conjunction with any other antenna or
transmitter.
/