aquaBUBBLER Universal 2 Pre-Installation Manual
- Type
- Pre-Installation Manual

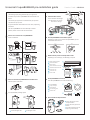
Universal 2 aquaBUBBLER pre-installaon guide
What locaon is best?
Access to water and drainage
Note: Blue depicts areas that are
either water or drainage
UA 2 aquaBUBBLER lid orientaon opons
Depending on where you install the UA aquaBUBBLER, you can
orientate the lid to best suit
WA L KWAY
WA L L WA L L
The following step by step guide will help you organise the
installaon of your UA 2 aquaBUBBLER with water bole re-fill
staon.
This will help you prepare for consultaon with your plumber
and eliminate any surprises!
A typical installaon should take three to four hours, depending
on locaon.
The UA 2
aquaBUBBLER must be installed by a cerfied
plumber; failure to do this will void all warranes.
P L A Y G R O U N D
F O Y E R
C O R R I D O R
UA 2 aquabubbler plumbing opons
What can the UA 2 aquaBUBBLER be installed onto?
Concrete pad or mber floor
Where can I install an UA 2 aquaBUBBLER?
Indoor and Outdoor
W A S T E
W A T E R
Product Code : AB2UA14
What materials /tools will the plumber need?
Depending on the install type, the following is required
UA aquaBUBBLER kit contents
Your UA aquaBUBBLER comes with the following…
UA aquaBUBBLER
S-Trap, waste pipe
Security drill bit
Base mounng plate
Isolaon valve
How to aach the UA protrusion?
retro fit through the side up through the center
Connect the Flexi hose to the
compressed elbow
Connect the waste pipe to black
director
Screw the wheelchair pod to the
body using a 5mm allan key
1
1
1
1
2
2
3
3
4
5
4
1
2
3
4
5
6
7
8
5
2
2
2
3
3
3
2
1
Timber boxing foundaon
Screws and washers
Bag of cement
10 mm threaded rod and nuts
Flexible head ratchet wrench
40 mm hole saw
15 mm hole saw
10 mm socket
1
2
3
4
5
6 7 8

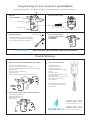
Using your
UA 2 aquaBUBBLER
At mes the water flow may fluctuate depending
on your local water supply pressure. Re-adjusng
is simple using a 6mm flat head screw driver.
Read water meter via slot
Adjusng water flow
Adjust Water Flow
Dome Head Bolt
One hundred twenty three thousand
four hundred and fiy six litres
Trouble Shooting
Water Meter Slot
Water flow will need adjusng 1-2 days aer installaon
What to do if the UA 2 aquaBUBBLER becomes blocked?
You will need to unblock the S-Trap.
This means removing the stainless steel (S/S) dish.
Use the security key provided unfasten the four security screws.
Remove S/S dish.
Remove the S-Trap and unblock it.
Reaach the S-Trap.
Reaach the S/S dish and re-fasten the security screws.
What to do if the water bole pod becomes blocked?
Use the security key provided.
Unfasten the security screws.
Remove the S/S mesh.
Unblock the pod.
What to do if the tap leaks?
Remove the S/S dish.
Turn off the isolaon valve.
Disconnect the flexi hose.
Undo the hex connector at the base of
the tap.
Remove the spring.
Use an 8mm flat head screw driver to
remove the spindle.
Wash spindle or replace broken o-ring.
Don't forget to lube top o-ring.
Re-assemble tap.
(For beer purchase, do not remove
tap from S/S dish or from body of
aquaBUBBLER.)
Ensure the water-bole
pod is full of water before
using the UA 2
aquaBUBBLER
(The water meter is an oponal extra.)
> > > IMPORTANT
We highly recommend regular cleaning, to ensure your UA 2 aquaBUBBLER is hygienic and aracve to drink from.
www.aquabubbler.com.au
0800 213 774
1300 213 774
www.aquabubbler.co.nz
Using & Caring for Your Universal 2 aquaBUBBLER
-
 1
1
-
 2
2


aquaBUBBLER Universal 2 Pre-Installation Manual
- Type
- Pre-Installation Manual
Ask a question and I''ll find the answer in the document
Finding information in a document is now easier with AI
Other documents
-
Weil-McLain Evergreen Gas Boiler User manual
-
-
-
Weil-McLain WM97+ CT Wall Mount Gas Boiler User manual
-
 ZLINE KITCHEN & BATH DW7714-18 User guide
-
-
Weil Mclain 383100045 User guide
-
andrews MAXXflo EVO Installation guide
-
-
LG Electronics LFXS24663S User manual
