Page is loading ...
INSTRUCTION
MANUAL
SC-52
VACUUM CLEANER

Thank you for your purchase of the Sanyo Vacuum Cleaner.
Please read these instructions carefully before using.
CARE AND MAINTENANCE
A FEW PRECAUTIONS
1. Operating without the filter in place will allow dust to enter the
motor and could damage the vacuum cleaner.
2. Keep the vacuum cleaner away from stoves and other heat sources.
Heat can deform and discolor the plastic parts of the unit.
3. Keep the vacuum cleaner free of insecticides. Do not wipe with
benzine, thinner, petrol or other oils which might cause discoloration
or cracking. To clean the body and hose, dampen a cloth with a mild
detergent and wipe clean.
4. Blocking the suction inlet or allowing the dust to clog the hose will
decrease the efficiency of the motor.
5. Be sure not to push the clamp button while carrying the vacuum
cleaner,
& Never try fd WCUUm the fdk)whg
objects, They may damage the
unit or cause a fire.
* Wet things, mud, soil, and fluids
* Burning cigarettes
k Needles and razor blades
“ Inflammable materials such as gasoline and thinner
7. The following kinds of treatment shorten hose life:
● Bending hose at an acute angle when storing
● Pulling the hose with excessive force
* Placing heavy objects on, or stepping on the hose
8. Pull
out the plug from the power source after use, Grasp the plug W-
not the cord –
when pulling out the plug.
Pulling on the cord may lead to shortcircuiting.
9. Long and continuous use causes the exhaust air and the body of the
vacuum cleaner to become warm. This, however, does not denote
malfunction.
If you have a problem with your vacuum cleaner, consult the handy guide
below. If the vacuum cleaner is malfunctioning, do not operate it. Contact
your dealer or the nearest Sanyo
Service Center.
Problem
(1)Cleaner won’t
run.
(2) Suction does
not increase
after cleaning
out the dirt.
(3) Cot9ddoesn’t
fully rewind.
Possible cause
Possible solution
1. Not firmly plugged in.
1. Plug unit in firmly.
2. No voltage in wall outlet.
2. Check fuse or breaker.
1. Filter dirty.
1. Clean out the filter.
2. Clogged floor nozzle or
2. Clean out floor nozzle or
hose.
hose.
1.
Cord twisted m’ uneven.
1.
Puli Gut cord and rawind.
CAUTION
(For Special area only, Australia, New Zealand and Singapore)
If the supply cord of this appliance i6 damwd, it must only be rrwkwd by a
wpa
shop appointed by the manufaettirer, be~tili%ea special PWPOW tool is required.
10. When vacuuming places that are very dusty, and also when vacuuming
regularly, empty the dust compartment before it becomes completely
filled.
Frequent emptying lengthens the life of the motor and maintains
strong suction power,
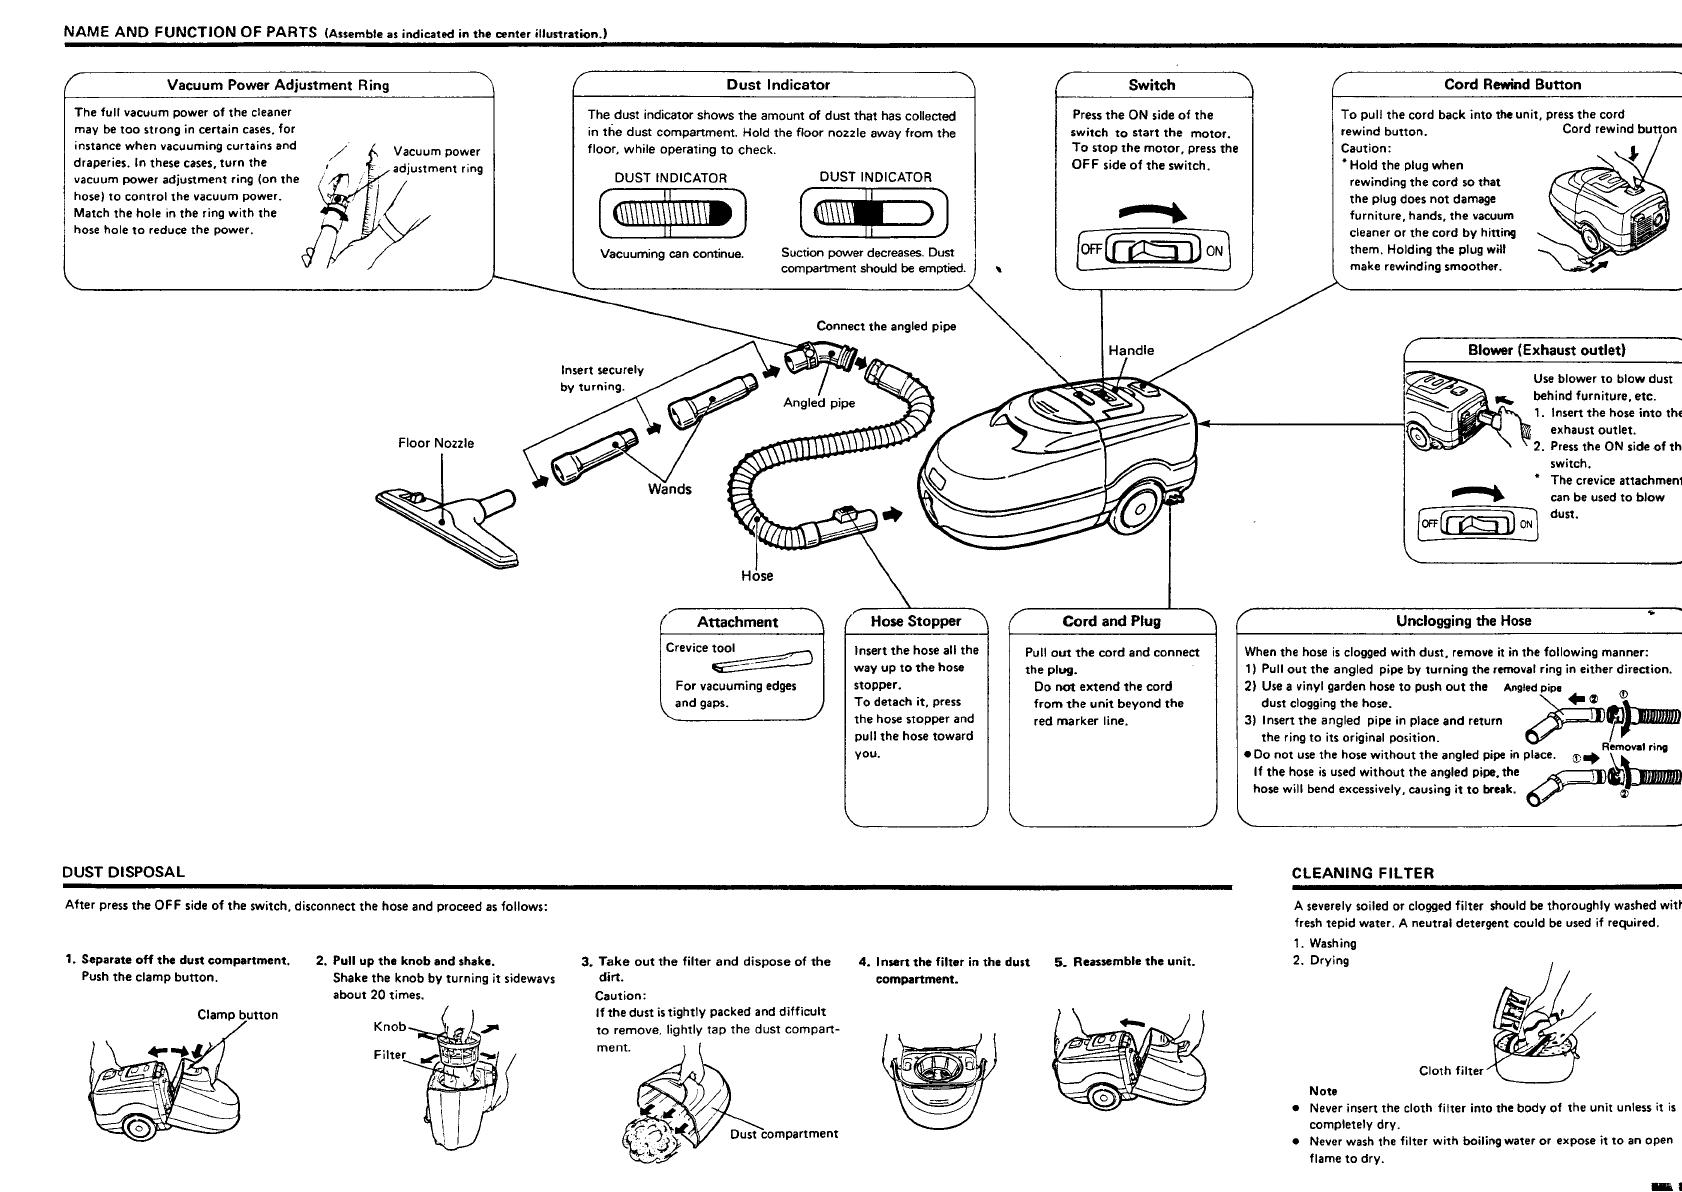
NAME AND FUNCTION OF PARTS (Assemble as indiwtad in the center illustration.)
Vacuum PowerAdjustment Ring
\
The full vacuum power of the cleaner
may be too strong in certain cases. for
instance when vacuuming curia ins and
,/
t
Vacuum power
draperies. In these cases, turn the
adjustment ring
B
vacuum power adjustment ring (on the I ;
hose) to control the vacuum Power.
Match the hole m the ring with the
hose hole to reduce the power.
Dust Indicator
Switch
The dust indicator shows the amount of dust that hss collectsd
in the dust companment, Hold the floor nozzle sway from the
floor, while operating to check.
DUST INDICATOR
DUST INDICATOR
)
Vacuuming can continue.
Suction power dscreasas. Dust
compartment should be emptied
Press the ON side of the
switch to start the motor.
To stop the motor, press the
OFF side of the switch.
Floor Nozzle
*
Connect the angled pips
h \r/
{
Blower(Exhaustoutlet)
H&e
\
For vacuuming edgas
and gaps.
,-
HoseStopper 7
Insert the hose all the
way up to the hosa
stopper.
To detach it, press
the boss stoppsr and
pull the boss toward
you.
IE?%3.
Use blower to blow dust
bahind furniture, etc.
Q
1. Inssn the hose into the
exhaust outlet.
~/Y I
1~
2. Press the ON sida of th
Cord and Plug ‘
Pull out the cord and connect
the plug.
Do not extend the cord
from the unit beyond the
red marker Iinc.
switch.
● The crevice attachment
* ‘:”sedtob’”w
Uncloggingthe Hose
.
When the hose is clogged with dust, remove it in the following manner:
1) Pull out the angled pipe by turning the removal ring in either direction.
2) Use a vinyl garden hose to push out the Angled pipe
dust clogging the hose.
*a @
3) Insert the angled pipe in place and return
the ring to its original position.
*?P
Removal rirq
● Oo not use the hose without the angled pips in Place. O+
If the hose is used without the angled pips. the
hose will bend excessively, causing it to break.
F&b
Q!
DUST DISPOSAL
CLEANING FILTER
After press the OFF side of the switch, disconnect the hose and proceed as follows:
1. Separate off the dust compartment.
2. Pull up ths knob and shake.
3. Take out the filter and dispose of the
4. I mart the filter in the dust
Push the clamp button.
5. Reassemble the unit.
Shake the knob by turning it sidewavs
dirt.
compartment.
about 20 times.
Caution:
Clamp button
If the dust is tightly packed and difficult
Kn
to remove, lightly tap the dust compan-
Fil
ment.
%
*‘z
+
<> ,
L>
““’?yJ’
Dust compartment
A severely soiled or clogged filter should be thoroughly washed witt
fresh tepid water. A neutral detergent could be used if required.
1. Washing
2
●
●
Drying-
)
C’”th’’teru
Note
Never insert the cloth filter into the body of the unit unless it is
completely dry.
Never wash the filter with boiling water or expose it to an open
flame to dry.
ml
913F-6-Pi 11-20703 1094-@
Siijllllmio
SANYO Electric Co., Ltd.
OSAKA, JAPAN
Printed in Japan
/