Metra. The World’s Best Kits.® MetraOnline.com © COPYRIGHT 2017 METRA ELECTRONICS CORPORATION REV. 4/20/22 INST99-8265HG
INSTRUCCIONES DE INSTALACIÓN
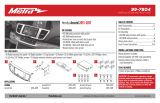
99-8265HG
¡Atención! Deje que el vehículo se asiente con la
llave fuera del encendido durante unos minutos antes
de quitar la radio de fábrica. Al probar el equipo del
mercado de accesorios, asegúrese de que todo el
equipo de fábrica esté conectado antes de encender
el llave de encendido.
HERRAMIENTAS REQUERIDAS
• Herramienta para quitar paneles
• Destornillador Phillips
• Llave de tubo de 10 mm
CABLEADO Y CONEXIONES DE ANTENA
(se venden por separado)
Arnés de cableado: Visite metraonline.com
para las opciones de arnés de cableado
Adaptador de antena: Visite metraonline.com
para las opciones de adaptador de antena
CARACTERÍSTICAS DEL KIT
• Provisión de radio ISO DIN con cavidad
• Pintura negra de alto brillo
COMPONENTES DEL KIT
• A) Soportes del radio • B) Panel de moldura para carcasa de radio • C) Cavidad • D) (4) tornillos Phillips #6 x 3/8” • E) (2) tornillos Phillips #8 x 3/8”
Visite MetraOnline.com para obtener información más detallada sobre el producto y aplicaciones
actualizadas específicas para vehículos.
INDICE
Desmontaje del tablero ........................................2
Ensamble del kit ....................................................3
Toyota C-HR 2018 y mas
A B C D E