Refer to www.hayward-pool.com for latest manual
revisions, additional information and helpful service.
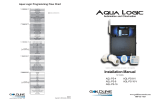
ELECTROLYTIC CHLORINE GENERATOR
BASIC POOL MAINTENANCE REQUIREMENTS
WEEKLY
MONTHLY
QUARTERLY
Remote Display
for
PrPr
PrPr
Pr
o Lo L
o Lo L
o L
ogicogic
ogicogic
ogic
and
Aqua LogicAqua Logic
Aqua LogicAqua Logic
Aqua Logic
Installation/Operation Manual
for model
®
AQL2-WB-PS-4 AQL2-WW-PS-4
AQL2-WB-PS-8 AQL2-WW-PS-8
AQL2-WB-PS-16 AQL2-WW-PS-16
black white
Free Chlorine 1.0 - 3.0 ppm Turn output dial up to increase,
pH 7.2 - 7.8
down to decrease -OR- increase
Too low - add soda ash.
or decrease pump filtration time.
Too high - add muriatic acid
Alkalinity 80 - 120 ppm
Salt 2700 - 3400 ppm Add salt as required to increase.
Add baking soda to increase.
Stabilizer 60 - 80 ppm Add cyanuric acid to increase.
Calcium 200 - 400 ppm Add calcium to increase.
Electrolytic Cell inspect & clean Refer to section in manual.
TEST IDEAL RANGE ADJUSTMENT REQUIRED
Drain and add water to decrease.
A
dd acid as required to decrease.
®
092147C RevD
Copyright © 2010 Hayward
www.hayward-pool.com

COMPATIBILITY: This display/keypad is compatible with all Pro Logic PS-4/8/16
models and for all Aqua Logic PS-4/8/16 systems running main software r2.00 or
higher.
INSTALLATION
Mounting
The AQL2-Wx-PS-x Remote Display/Keypad must be mounted indoors or in a weather
protected area (rain should never hit the display/keypad). Up to 3 remote display/
keypads can be installed. The display/keypad is designed to mount onto a standard
electrical utility box (same size as used for a triple light switch) or can be mounted
directly onto any wall surface. When selecting a location, note that the wire to the Pro
Logic/Aqua Logic main unit must be no more than 500 feet long. Follow the steps
below:
1. Remove display/keypad baseplate from the cover by inserting a screwdriver in
the slot shown below. Lift up on the cover while pushing gently with the screw-
driver.
2. If bezel will be used, snap baseplate into bezel before mounting.
3. Screw the baseplate in the desired position (screws supplied by installer).
1 6
Push Screwdriver
blade through slot
and pull up
cover
Bezel
(use is optional)
LIMITED WARRANTY (effective 04/01/09) Hayward/Goldline warrants its Pro Logic and
E-Command pool automation products as well as its Aqua Rite, Aqua Rite Pro, Aqua Plus and
SwimPure chlorination products to be free of defects in materials and workmanship, under
normal use and service, for a period of three (3) years. Hayward/Goldline also warrants its
Aqua Trol chlorination products to be free of defects in materials and workmanship, under
normal use and service for a period of one (1) year. These warranties are applicable from the
initial date of installation on private residential swimming pools in the US and Canada.
Hayward/Goldline warrants all the above-identified pool automation and chlorination prod-
ucts installed on commercial swimming pools and on swimming pools outside of the US and
Canada for a period of one (1) year. Likewise, Hayward/Goldline warrants all accessories
and replacement parts for the above-identified pool automation and chlorination products for
a period of one (1) year. Each of these warranties is not transferable and applies only to the
original owner.
Proof of purchase is required for warranty service. If written proof of purchase is not
provided, the manufacturing date code will be the sole determinant of the date of installation
of the product. To obtain warranty service or repair, please contact the place of purchase or
the nearest Hayward/Goldline authorized warranty service center. For more information on
authorized service centers please contact the Hayward/Goldline Technical Service Support
Center (61 Whitecap Road, North Kingstown RI, 02852) or visit the Goldline web site at
www.goldlinecontrols.com or the Hayward website at www.haywardnet.com.
WARRANTY EXCLUSIONS:
1. Material supplied or workmanship performed by others in process of installation.
2. Damage resulting from improper installation including installation on pools larger than the
product rating.
3. Problems resulting from failure to install, operate or maintain the product(s) in accordance
with the recommendations contained in the owners manual(s).
4. Problems resulting from failure to maintain pool water chemistry in accordance with the
recommendations in the owners manual(s).
5. Problems resulting from tampering, accident, abuse, negligence, unauthorized repairs or
alternations, fire, flood, lightning, freezing, external water, degradation of natural stone used in
or immediately adjacent to a pool or spa, war or acts of God.
DISCLAIMER. THE EXPRESS LIMITED WARRANTIES ABOVE CONSTITUTE THE
ENTIRE WARRANTIES WITH RESPECT TO THE ABOVE-IDENTIFIED HAYWARD/
GOLDLINE POOL AUTOMATION AND CHLORINATION PRODUCTS AND IS IN
LIEU OF ALL OTHER WARRANTIES, EXPRESS OR IMPLIED, INCLUDING WAR-
RANTIES OF MERCHANTABILITY OR FITNESS FOR A PARTICULAR PURPOSE.
THESE WARRANTIES GIVE YOU SPECIFIC LEGAL RIGHTS, AND YOU MAY ALSO
HAVE OTHER RIGHTS OF EQUIPMENT, LOST PROFITS OR REVENUE, COSTS
OF RENTING REPLACEMENTS, AND OTHER ADDITIONAL EXPENSES, EVEN IF
THE SELLER HAD BEEN ADVISED OF THE POSSIBILITY OF SUCH DAMAGES.
SOME STATES DO NOT ALLOW THE EXCLUSION OF LIMITATION OF INCI-
DENTAL OR CONSEQUENTIAL DAMAGES, SO THE ABOVE LIMITATION OR
EXCLUSION MAY NOT APPLY TO YOU.
NO WHOLESALER, AGENT, DEALER, CONTRACTOR OR OTHER PERSON IS
AUTHORIZED TO PROVIDE, SUPPLEMENT OR MODIFY ANY WARRANTY ON
BEHALF OF HAYWARD/GOLDLINE.
THESE WARRANTIES ARE VOID IF THE PRODUCT HAS BEEN ALTERED IN ANY
WAY AFTER LEAVING THE FACTORY. FOR THE ABOVE-IDENTIFIED CHLORI-
NATION PRODUCTS, THESE WARRANTIES ALSO ARE VOID IF, DURING THE
WARRANTY PERIOD, YOU USE A REPLACEMENT CHLORINATOR CELL OTHER
THAN AN UNMODIFIED, NEW HAYWARD/GOLDLINE CHLORINATOR CELL PUR-
CHASED FROM HAYWARD/GOLDLINE. IF A WARRANTY BECOMES VOID, YOU
STILL MAY PURCHASE SERVICE AND/OR TELEPHONE TECHNICAL SUPPORT
AT THE THEN CURRENT TIME AND MATERIAL RATES.

25
Wired Remote
Display unit
A
qua Logic Control Center
500 ft max
1
2
3
4
Connect screw terminal
s
“1” to “1”, “2” to “2”, etc.
1234
Wiring
The Pro Logic or Aqua Logic main unit can connect to a maximum of 3 remote
display/keypads. Use four conductor cable (typically phone cable) to connect
the remote display keypad with the Pro Logic/Aqua Logic Control Center as
shown below. The maximum wiring distance is 500ft. (160m). Note that the
terminals on both the Pro Logic/Aqua Logic main unit and the remote display/
keypad are numbered: Connect 1 to 1, 2 to 2, etc.
If multiple remote display/keypads are installed: Never connect more than 2
wires to any terminal block. Two remotes can be wired back to the Pro Logic/
Aqua Logic main unit or the second display/keypad (and third, if applicable) can
be “daisy chained” with one display/keypad wired to the next. The maximum
wire run from the Pro Logic/Aqua Logic main unit to the furthest remote display/
keypad is 500 ft. (160m).
6.
Communication 3
call
Err
908-355-7995
The display/keypad is receiving data from the main Pro Logic/Aqua Logic
control unit however that data contains errors and is unusable. The most
likely cause of this problem is that wires "2" and "3" in the cable between the
control unit and the display/keypad are crossed. If you are unable to find
the problem, contact the Hayward Tech support department Monday through
Friday, from 8AM to 8PM eastern time.
7.
Display Error 1
call 908-355-7995
Display Error 2
call 908-355-7995
An internal problem has occurred in the display/keypad. Remove the dis-
play/keypad from the wall mount base (see diagram on page 1) and write
down the model number and serial number of the display/keypad. Next, call
the Hayward Tech support department (Monday through Friday, from 8AM
to 8PM eastern time) to find out how to obtain a replacement display/key-
pad.
Wired Remote
Display unit
Pro Logic Control Center
500 ft max
1
2
3
4
Connect screw terminals
“1” to “1”, “2” to “2”, etc.
1234
OR

When power is turned on, all the LED indicators will flash briefly, the display back-
light will illuminate, and the following display will appear for a short period of time:
The "r4.00" is the software revision level. The actual revision level for your display/
keypad may be different.
Refer to the Pro Logic or Aqua Logic Operation Manual for complete operating in-
structions.
43
TROUBLESHOOTING
1. Display/keypad not functioning (no display, no LEDs illuminated)
If the display/keypad located on the main unit is working correctly, the most
likely cause is that wires 1 and 4 are either open circuited or reversed. Check
wiring. If none of the displays are working, check that 120V power is being
applied to the main control and that the 3A fuse (violet) is not blown.
2. Display backlight turns off after a period of time
The display backlight should always illuminate when you press any key on
the unit. If it turns off after a period of time, you can stop this by pressing the
menu key (possibly multiple times) until “Settings Menu” appears. Next
press the “<” or “>” key (possibly multiple times) until “Display Light”
appears. At this point, pressing either “+” or “-“ will allow you to select
either “Always On” or “On for 60 sec.”. After you have selected the desired
operation, press the “Menu” button to lock in your setting. Note that this
selection applies to this display/keypad only. Repeat the process of each
display/keypad in the system.
3. Display backlight always on
The display backlight should always illuminate when you press any key on
the unit. If it remains on after 60 seconds have elapsed since the last button
push, you can stop this by pressing the menu key (possibly multiple times)
until “Settings Menu” appears. Next press the “<” or “>” key (possibly
multiple times) until “Display Light” appears. At this point, pressing either
“+” or “-“ will allow you select either “Always On” or “On for 60 sec.”. After
you have selected the desired operation, press the “Menu” button to lock in
your setting. Note that this selection applies to this display/keypad only.
Repeat the process for each display/keypad in the system.
4.
Communication Err 1
call 908-355-7995
The display/keypad received data from an Aqua Logic system running
software earlier than r2.00. This keypad is not compatible with these sys-
tems. Another cause for this problem may be that the local display/keypad
in the main Pro Logic/Aqua Logic control unit is not connected or not
functioning. If this is the case, connect and/or replace the local display/
keypad and then cycle power to the Pro Logic/Aqua Logic off and then back
on to reset the system. Call the Hayward Tech support department.
5.
Communication 2
call
Err
908-355-7995
The display/keypad is not receiving any communication from the Pro Logic/
Aqua Logic main control unit. The most likely cause of this problem is a
broken wire or "open circuit" in wires "2" and/or "3" in the cable between
the display/keypad and the Pro Logic/Aqua Logic main control unit. If you
are unable to find the problem, contact the Hayward Tech support depart-
ment Monday through Friday, from 8AM to 8PM eastern time.
Goldline Aqua Logic
Display r4.00
Goldline Pro Logic
Display r4.00
/