Page is loading ...

-1 - EN-
Thank you for purchasing this product.
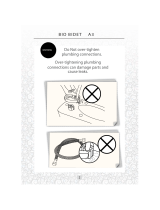
CAUTION
● Carefully read this
installation manual to install
this product correctly.
● Be sure to test operation
after installation has been
completed.
Installation Manual
Advanced Clean 3.0 SpaLet
®
Bidet Seat
Model: 8018A60GRC
PCW-1361(19010)
Installation Procedure
1 Check the "Installation Requirements" ........................................ P. 6
↓
2Installthejunctiontting ............................................................. P. 11
↓
3 Installation of water supply hose to the SpaLet
®
seat .............. P.12
↓
4 Installation of the SpaLet
®
seat ................................................... P.13
↓
5Installthewatersupplyhose(junctionttingside) .................. P.14
↓
6PositioningandMountingtheRemoteControl ......................... P.15
↓
7 Test Operation .............................................................................. P.17
760296-100EN

-2 - EN-
1. Important Safeguards
When using electrical products, especially when children are present, the basic safety precautions should
always be observed.
READ ALL THE INSTRUCTIONS BEFORE USING THIS PRODUCT
The following safety terms are used in this manual to warn against different
hazardous situations:
DANGER indicates an imminently hazardous situation which, if not
avoided, will result in death or serious injury.
WARNING indicates a potentially hazardous situation which, if not
avoided, could result in death or serious injury.
CAUTION indicates a potentially hazardous situation which, if not
avoided, may result in minor or moderate injury or in damage to the
product or other property.
DANGER
To reduce the risk of electric shock:
1. All electrical installation work must be carried out by a qualified electrician.
2. Install a secure ground connection, following the grounding instructions
(see page 7)
3. Do not place or store product where it can fall or be pulled into a tub or
sink.
4. Do not place on or drop into water or any other liquid.
5. Do not pour water or cleanser inside this product. Do not splash water or
cleanser on the body or the power plug.
6. Do not reach for a product that has fallen into water. Unplug immediately.
7. Do not allow anyone except an authorized service technician to
disassemble, repair or modify this product. If repairs are necessary, contact
our company.
WARNING
To reduce the risk of burns, electrocution
fire, or injury to persons:
1. When small children, elderly persons, persons with limited mobility or
people with illness are using this product, ensure that the proper operating
procedures are followed at all times to ensure the user's safety.
2. When you are using this product for a long period of time, set the seat
temperature to "Off".
For the following persons, be sure to set the seat temperature to "Off"
when they are using this product.
(Children, elderly persons, persons with illness, persons with limited
mobility, persons with sensitive skin, persons who are taking medicines
that cause drowsiness, persons who are intoxicated, or persons who are
extremely fatigued.)
* Using the SpaLet
®
seat for a long period of time without setting the seat
temperature to "Off" may result in low temperature burns.

-3 - EN-
Low Temperature Burns
A low temperature burn may occur when the skin has been in contact for
some time with an object at relatively low temperature (about 104 °F
[40 °C]). Susceptibility to burns also depends on an individual's skin
sensitivity and other factors.
3. This product should be used only as described in this manual. Do not use
attachments that are not recommended by the manufacturer.
4. Never operate this product if it has a damaged cord or plug, if the plug is
loose in the outlet, if it is not working properly, or if it has been dropped or
damaged. Please contact our company for instructions on resolving any of
the above issues.
5. Keep the cord away from heated surfaces. (Example: Panel Heater)
6. Never block the air openings of the product. If lint or hair, etc. is stuck
in the air openings, remove it immediately.
7. Never use while sleeping or feeling drowsy.
8. Never drop or insert any object into any opening or hose.
9. Do not use outdoors or operate where aerosol (spray) products are being
used or where oxygen is being administered.
10. Connect this product to a properly grounded outlet only. See Grounding
Instructions.
11. This product should only be connected to a potable water supply line.
Failure to do so will cause problems in the operation.
12. Do not pull out or insert the power plug with wet hands.
13. Disconnect the power plug periodically and clean it with a dry cloth.
Dust accumulated on the power plug may cause fire.
CAUTION
To reduce the risk of minor injury or property damage:
1. This product should only be connected to a 120 V AC, 60 Hz GFCI-
protected outlet.
2. Be sure to set the dry temperature to "Low" when the following persons
use the SpaLet
®
seat.
(Children, elderly persons, persons with illness, persons with limited
mobility, persons with sensitive skin, persons who are taking medicines
that cause drowsiness, persons who are intoxicated, or persons who are
extremely fatigued.)
* If the dryer is used for a long period of time on a setting higher than
"Low", the user may risk a low temperature burn. For this reason, our
company recommends setting the dryer temperature to "Low" during
use.

-4 - EN-
3. For care of the plastic parts, our company recommends the use of a
mild, liquid, all-purpose cleaner. Avoid using abrasive products (such as
powdered cleansers) and chlorine-based products (such as bleach), as
these products can damage the anti-bacterial properties of the plastic
components.
4. If the SpaLet
®
seat or the body cover is damaged, pull the power plug out
of the outlet and contact our company to request repairs.
5. Do not stand on the seat lid, as it may break.
6. Do not lean back against the seat lid during use, as this may damage or
break the seat lid.
7. Install this product according to this installation manual. Improper
installation may result in electrocution, fire, or a water leak.
8. If it is necessary to change the electrical wiring or plumbing (including
items for which installation is not restricted, such as a ground fault circuit
breaker), have an electrician or plumber who has undergone training
in accordance with federal, state or local laws and regulations and has
obtained the proper license, perform the required construction work.
9. If you will not be using this product for an extended period of time, close
the water shut-off valve and drain the water from the SpaLet seat. In
addition, disconnect the power plug from the outlet.
10. Avoid using front and back cleansing functions excessively or for long
periods of time as such overuse may increase the possibility of washing
away desirable resident bacteria and causing an imbalance of bacteria
in your body. If you are pregnant, are being treated for a gynecological
condition, develop excessive irritation in the area of use, or if you have
questions, please speak to your doctor before beginning or continuing use
of the product.
SAVE THESE INSTRUCTIONS

-5 - EN-
This product incorporates a set of features to improve personal toilet hygiene and comfort.
These features include back cleansing, front cleansing, a warm air dryer and a seat heater as
well as the required controls for these features.
This product includes a SpaLet seat
®
unit (with heated SpaLet seat, seat lid, and power
cord), hardware for installing the SpaLet seat unit on a toilet bowl and connecting it to the
water supply and this installation and user manual.
This product incorporates the following features:
•
back cleansing with water flow strength controls
•
front cleansing with water flow strength controls
•
warm air dryer with air temperature controls
•
seat heater with heat level control
•
back and front cleansing water temperature control
•
seat and water temperature indicators
•
back and front nozzle self-cleaning
•
stop button for back cleansing, front cleansing and dryer
2. Product Description
Note:
•
When transporting the product, take care not to inadvertently bump or drop it.
•
This product has been already inspected using tap water. A small amount of water
may be detected when installing the unit; this should not be a cause for concern.

-6 - EN-
Remove the parts from the box and make sure all the parts in the parts list (below) are
present. Inspect the parts carefully to make sure they are in good condition.
If any part is damaged or missing, do not install this product. Contact the nearest customer
service representative for the part(s) you need.
The following parts are included:
•
SpaLet
®
seat unit (with heated seat, seat lid and power cord)
•
Mounting plate
•
Manual set
•
Mounting bolts, washers, and bushings (2 pieces each)
•
Junction fitting (with a packing)
•
SpaLet seat unit water supply hose (with 2 clips)
•
Remote control
•
Holder
•
Batteries
•
Wood screw
•
Plastic anchors
3. Installing This Product
Installation Requirements
Before installing this product, ensure that each of the following installation
requirements are met.
Contents
SpaLet seat unit
Packing
2 mm (0.08")
thick
Junction fitting
Manual set
Clip
Clip
water supply
SpaLet
seat unit
hose
(37.40'' (950 mm) long)
Mounting bolt
Bushing
Mounting plate
(This plate attaches to the SpaLet seat unit.)
Mounting
bracket
Washer
Batteries (2) Wood screws
Plastic anchors
Holder
Remote control unit
*Remote control unit and holder are
packed in the box.
For remote control unit

-7 - EN-
A ground fault circuit breaker must be installed in the circuit that supplies power to this product.
Ground Fault Circuit Breaker
Power Supply
Grounding
Installation Location
Water Supply
Unit : inch (mm)Remote control
1.18" (30 mm) or more
1.18" (30 mm) or more
8.15"
(207 mm)
8.62"
(219 mm)
47.24" (1200 mm) or more
15.75" (400 mm) or more
16.77"
(426 mm )
Elongated type: 21.5 (547 mm)
Round type: 20.8 (527 mm)
Checking the Bathroom
The dimensions required for mounting this product
on a toilet bowl are shown in the figure below.
Check to make sure there is sufficient space inside
the bathroom and that there are no obstructions.
DANGER:Improper use of the grounding plug may cause an electric shock.
Use only the tap water line to supply water to this product. The use of any other type of
water i.e. ground water may cause improper operation of this product.
The tap water pressure must be 8.5 to 106.7 psi (0.06 to 0.74 MPa, 0.6 to 7.5 kgf/cm
2
).
This product is for use on a nominal AC120 V circuit. Use a AC120 V, 60 Hz power supply. The
maximum power consumption is 1300W. Electrical wiring must be installed that meets these
specifications. The plug outlet shall be placed in an accessible location after installation.
This product must be grounded. In the event of an electrical short circuit, grounding reduces the risk of
electric shock by providing an escape wire for the electric current. The power cord has a grounding wire
and a three-prong grounding plug (shown below). Do not use an adapter with the product's power plug,
or use any other unauthorized method to connect the plug to an improperly configured outlet.
The outlet to which the product is connected must be AC120 V, 60 Hz, with a minimum electrical rating of
3 A. The outlet must be properly installed and grounded, and it must be a three-slot outlet (shown below).
In order to prevent damaging the electronic components, install this product at a location
that minimizes the possibility of it getting wet. In extremely humid conditions, provide
adequate ventilation by operating an exhaust fan or opening a window or door.
541 mm
(21-5/16")
414 mm
(16-5/16")
195 mm
(7-11/16")
219 mm
(8-5/8")
30 mm
(1-3/16")
or more
30 mm
(1-3/16")
or more

-8 - EN-
Checking the toilet bowl
1. Measure the size of the toilet bowl.
Depending on the size of the toilet bowl, it may
not be possible to mount this product on it.
Make sure the toilet bowl's dimensions are as
shown in the figure on the right.
2. Conditions for using SpaLet
®
seat
unit water supply hose (included)
The length of the SpaLet seat unit water supply
hose included with this product is 37.40" (950
mm), but a length of 31.50" (800 mm) from the
junction fitting to the SpaLet seat unit's water
supply socket is appropriate. (Refer to the figure
on the right)
31.50" (800 mm)
or less
18.50" (470mm) or more
5.51" to 6.18"
(140 to 157 mm)
15.35" (390 mm)
or less
1.97" (50mm) or more

-9 - EN-
Filter
Power save LED
Power LED
Toilet bowl
Toilet seat
Nozzle (for front cleansing)
Toilet seat lid
Nozzle (for rear cleansing)
Power plug
Water shuto valve
Tank
Marking label
Filter
(See below.)
Junction fitting
Seat unit
Seat sensor
Caution label
Remote control unit
(See page 11)
Water
supply
hose
Illustrated Parts Breakdown
Overview
Indicator Panel
Filter
Remote control unit
(See page 10)
Toilet tank
Water supply pipe or tank
water supply hose
SpaLet
®
seat unit water
supply hose
Water shut-off valve
Power plug
Junction tting
Large nozzle shutter
Toilet bowl
Nozzle (front cleansing)
Nozzle (back cleansing)
SpaLet seat
Caution label
Seat sensor switch
(built into the SpaLet seat
unit)
Seat lid
Product model nameplate
SpaLet seat unit indicator
section
(See the enlarged view below.)
Power indicator
Power save indicator

-10 - EN-
Mounting Plate
Remote Control
Mounting plate
SpaLet
®
seat unit
Lock leverToilet bowl
* The mounting plate is used to remove the
SpaLet seat unit from the toilet bowl for cleaning
and maintenance. (
+
Page 13)
Bidet
Dryer
Mild
Water Temp. Power
Cleansing
Deodorizer
Massage
Seat Temp. Power Save
Stop
Nozzle Cleaning
Transmitter TransmitterNozzle Position
Spray Strength

-11 - EN-
Installation
1. Required tools
Have the following tools for installing this
product: adjustable end wrench, Phillips head
screwdriver, flat-blade screwdriver.
2. Install the junction fitting
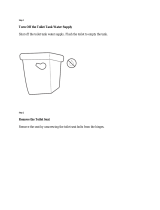
(1) Close the toilet water shut-off valve fully.
(2) Flush the toilet and empty all the water
from the toilet tank.
(3) Place a wash bowl or other container
underneath the tank water supply hose.
Then loosen the box nut on the toilet tank
inlet side and remove it.
(4) Place the packing in the junction fitting
box nut and connect the toilet tank inlet
to the junction fitting.
(5) Insert the packing in the tank water
supply hose box nut and connect the tank
water supply hose to the junction fitting.
CAUTION
• Do not overtighten the nut.
CAUTION
• Do not overtighten the nut.
CAUTION
•
Be careful not to damage the tank water supply hose.
Water
Shut-off
Valve
Tank Water
Supply Hose
Packing
Junction Fitting
Tank Inlet
Box Nut
Packing
Tank Water Supply
Hose
Water
Shut-off
Valve
Close
Bowl Cock Side Box Nut

-12 - EN-
Water supply connection socket
Protective cover
Water supply
socket
O-ring
Water supply
hose for the seat
Clip
Clip
Bend here
Water supply
socket
Clip
O-ring
Installation diagram
SpaLet seat unit water supply hose
Flathead
screwdriver
Water supply connection socket
Protective cover
Water supply
socket
O-ring
Water supply
hose for the seat
Clip
Clip
Bend here
Water supply
socket
Clip
O-ring
Installation diagram
SpaLet seat unit water supply hose
Flathead
screwdriver
3.
Installation of SpaLet
®
seat unit water supply hose to the SpaLet seat
1)
Remove the protective cover
from the end of the SpaLet seat
unit water supply hose, and
pull out the cap from the water
supply connection socket.
2)
Connect the SpaLet seat
unit water supply hose for
the SpaLet seat to the water
supply connection socket.
3)
Insert the attachment clip onto the
SpaLet seat unit water supply hose
to attach it to the SpaLet seat and
water supply connection socket.
* The attachment clip can be attached
in any direction.
CAUTION
• Firmly insert the clip.
* If the clip is not firmly inserted,
it may cause water to leak.
4) Bend the clip end and firmly
clip together both the feeding
hose for the SpaLet seat and
the feeding socket. After you
install the clip, twist it in both
directions to verify that it is
firmly attached.
CAUTION
•
Be careful not to damage the O-ring.
Damaged O-ring may cause water to leak.
CAUTION
• Insert the clip until
you feel the clip
edge click.
* If not firmly inserted,
it may cause water to
leak.
• When removing the clip, hold
the clip with your fingers, and
using a flathead screwdriver,
push the clip downward to
remove it as shown in the
figure below.
Water supply connection socket
Protective cover
Water supply
socket
O-ring
Water supply
hose for the seat
Clip
Clip
Bend here
Water supply
socket
Clip
O-ring
Installation diagram
SpaLet seat unit water supply hose
Flathead
screwdriver
Water supply connection socket
Protective cover
Water supply
socket
O-ring
Water supply
hose for the seat
Clip
Clip
Bend here
Water supply
socket
Clip
O-ring
Installation diagram
SpaLet seat unit water supply hose
Flathead
screwdriver

-13 - EN-
Seat mounting bolts
Rounded packing
Existing seat
Slip washer
Nut
Loosen
Bushings
Seat mounting
holes
1
CAUTION
•When installing the SpaLet
seat, make sure to use the
parts provided in the
installation kit.
Installation diagram
SpaLet seat
Toilet seat mounting guide holes
Mounting plate
Bushing
Mounting brackets
Washer
Seat mounting bolts
Mounting bolts for the SpaLet seat
Mounting
brackets
Mounting
plate
2
Mounting plate
SpaLet seat
Washer
4. Installation of the SpaLet
®
seat
(1) Remove the existing
seat.
1) Remove the nuts from
the seat mounting bolts,
the slip washers, and
rounded packing.
2) Raise the seat and
remove it by lifting the
seat mounting bolts.
References
• Some toilet seats may
require different methods of
removal that differ from our
example.
• The removed toilet seat
should be stored in your
home in case you remove
the SpaLet seat.
1) Insert the bushings
into the seat mounting
holes.
2) Insert the mounting
bracket into the
mounting plate and
use the mounting bolts
to attach the slide
plate to the toilet bowl.
(2) Install the slide plate onto the toilet bowl.
1) Place the SpaLet seat on the toilet bowl and
align the mark on the mounting plate with the
mark on the rear section of the SpaLet seat.
2) Slightly raise the front side of the SpaLet seat,
slide it until the slide plate is fully inserted,
and then press the locking lever to secure the
SpaLet seat.
(3) Install the SpaLet seat.

-14 - EN-
5. Install the SpaLet
®
seat
unit water supply hose
(junction fitting side)
CAUTION
• Be careful not to damage the O-ring.
* Water may leak if the O-ring is broken or damaged.
• Fit the clip by engaging its ends until a click is
heard.
* Loose fitting may cause water leakage.
(1) Remove the protective cover from the end
of the SpaLet seat unit water supply hose,
and insert it in the junction fitting.
(2) As with the body side, fit the clip on the hose
and junction fitting and lock it. Turn it to make
sure it is fastened securely.
Junction
Fitting
Clip
SpaLet seat unit
Water Supply
Hose
Junction Fitting
Protective
Cover
O-ring
SpaLet seat unit Water Supply Hose
Clip
Bend
Clip
O-ring

-15 - EN-
6. Positioning and Mounting the Remote Control
● Remote control installation position
Install the remote control to a position where the
user can reach and operate it.
Install the remote control in the area shown as “Suggested
installation area” in the gure below, and ensure to install the
remote control on a position where it can be operated easily
while the user is seated on the SpaLet
®
seat.
900 mm (35-7/16")
600 mm (23-5/8")
800 mm (31-1/2")
1200 mm (47-1/4")
Suggested installation area
●
Sit on the SpaLet seat and ensure the installation
position.
[See Note 7-1]
Temporarilyinstalltheremotecontroltothetargetposition,and
sit on the SpaLet seat unit and press the [Stop] button
(ensure
toperformatestoperationafterinstallation).
Then, stand in front of the toilet bowl
and push the [Stop] button to ensure
that a beep sound is generated from
the SpaLet seat unit.
• Do not push the [Cleansing] or [Bidet]
button: water would come out from
the SpaLet seat unit.
• Ensure that there is enough space above the remote con-
trol installation position to allow easy removal and mount of
the remote control.
2.MountingtheRemoteControl
Installation Procedure
1.
Remove the holder from the remote control.
2. Install the holder to the installation
positionusinganappropriatemethodfor
the wall.
[See Note 7-2]
* Out of 4 slots, use the outer 2 slots (with A
marks). If the holder can
be installed only with a
hole pitch at 100 mm (3-
15/16"), use the inner 2
slots.
[Foraplywoodwall(>5mm(3/16")thick)]
Afx the holder rmly with the supplied wood
screws.
[Foraplywoodwall(<5mm(3/16")thick)
or a plaster board wall]
Make the pilot holes with 6 mm (1/4") diameter.
(5 mm (3/16")
diameter for a plaster
board wall)
Use a hammer to
insert the supplied
plastic anchors gently.
Afx the holder rmly
with the wood screws.
The wood screws are tight at the beginning, and then
loosened once and tightened again.
[For a concrete wall]
Make the pilot holes
with 6 mm (1/4")
diameter and ap-
prox. 33 mm (1-5/16")
depth.
Use a hammer to
insert the supplied
plastic anchors gently.
Afx the holder rmly
with the wood screws.
3. Aligntheremote
controltotheholder,
and push downward
to mount the remote
control.
Φ 6 mm (1/4")
Plastic
anchors
Holder
Wood screws
Φ 6 mm
(1/4")
33 mm
(1-5/16")
Plastic anchors
Holder
Wood screws
Holder
Remote
Control
1.
InstallingtheBatteriesandConfirmingtheRemoteControlInstallationPosition
1. Openthebackcoveroftheremotecontrol,and
installtheincludedbatteries(AAx2).
[See Note 7-1]
* Use a tool such as a at-blade screwdriver to push the
hook (lock) to remove the cover.
2. Conrmtheremotecontrolinstallationposition.
Batteries
Hook (lock)
Remote control
Back cover
100mm
200mm
Holder
Wood
screws

-16 - EN-
[Note 7-1]
● Ensure to install the batteries in the correct
direction(notethenegativeandpositive).
● Do not mix old and new batteries.
● Use the supplied batteries.
[Note 7-2]
● Ensurethatthereisenoughspaceabovetheremote
control installation position to allow easy removal
andmountoftheremotecontrol(seethegure
below).
Remote control space
80 mm
270 mm
When multiple SpaLet
®
seat units are installed:
When multiple SpaLet seats are installed, a SpaLet seat in other booth may also respond to the signal and
cause malfunction. To prevent this, you can change the signal using the remote control unit you purchased.
Change both the emitting signal (remote control unit) and receiving signal (SpaLet seat).
1. Changingemittingsignal(remote
controlunit)
(1) Remove the batteries from the remote control
unit.
(2) Refer to the signal table on the right, hold
down the desired button, insert the batteries
and wait for six seconds (twenty seconds for
Cleansing and Bidet button) with the button
held down.
(3) When the emitting signal has been changed,
the battery mark on the lower right of the re-
mote control ashes.
(The number of ashes differs depending on
the signal that has been changed.)
2. Changingreceivingsignal
(SpaLetseat)
(1) Remove the power plug of the SpaLet seat for
which the signal is to be changed.
(2) Insert the power plug again, and then press
the [Stop] button at least 10 times within 10
seconds after insertion.
NOTE: Do not turn on and off the indoor (equip-
ment) breaker to perform the above operation.
* If power is turned on simultaneously for multiple
SpaLet seats, the receiving signal of other bidets
may be changed.
* Some signals cannot be set on some products.
Signal
Number
Operation Button Battery Mark
No. of Flashes
Signal 1 Water Temp Once
Signal 2 Seat Temp Twice
Signal 3 Power save Three times
Signal 0 Nozzle Cleaning Four times
Signal 4 Spray Strength - Five times
Signal 5 Spray Strength + Six times
Signal 6 Cleansing Seven times
Signal 7 Bidet Eight times
*Signal0isthedefaultsetting.

-17 - EN-
Adjusts the water
pressure during rear
and front cleansing.
SPRAY STRENGHT
Stops rear cleansing,
front cleansingand
drying operations.
STOP
Conserves energy by
lowering the toilet seat
temperature.
POWER SAVE
Adjusts the toilet seat
temperature.
SEAT TEMP.
Controls the power
for the seat.
POWER
Adjusts the temperature of
the front and rear cleansing
water.
WATER TEMP.
Dries the user after
cleansing.
DRYER
When pressed during
rear cleansing,
provides a massage
effect by alternating
the spray strength
between high
and low.
PULSATING
Power plug
*Due to the seat sensor function, the product’s
back cleansing, front cleansing and deodorizer
will not operate unless you touch the seat.
Seat sensor switch
CAUTION
When removing the filter, be sure to
close the water shut-off valve. When
attaching the filter, firmly tighten it
until the end of the filter is hidden in
the SpaLet seat unit.
* Water will leak from the filter.
Confirm that the power LED on the SpaLet
®
seat unit is lit.
1. Insert the power plug into the outlet.
2.Check the front and
back cleansing spray.
Test Operation
Follow the procedure below after the installation work
has been completed.
(1) Check the cleansing operation.
1) With your forearm resting on the
SpaLet seat, press the Cleansing
button.
The spray automatically stops two
minutes after the switch is turned on.
2) When the nozzle extends, cover the
tip of the nozzle with your hand to
catch the spray.
3) Press the [Stop] button to stop the
cleansing spray.
(2) Perform the same check using the
front cleansing spray function.
Filter
End
Power save indicator
Power indicator

-18 - EN-
(1) Turn the water shut-off valve clockwise to close it.
As the water shut-off valve is pre-adjusted, keep track
of the turns so that you can return to the original
position.
(2) Remove the filter located on the left side of the SpaLet
®
seat unit.
Place a wash bowl or similar item underneath the Filter.
(3) Rinse the filter.
(4) Firmly tighten the filter.
(5) Open the water shut-off valve by turning it back to its
original position.
(1) Close the water shut-off valve to shut-off the water
supply.
* If the open/close knob is difcult to turn, grasp it with a dry cloth
and turn.
(2) Move the flush lever to drain water from the toilet tank.
(3) Drain the water from the water supply side.
Place a basin or similar beneath the strainer.
Remove the strainer, rinse away dirt that has attached to the
strainer and O-ring, and then completely remove the part.
Insert the power plug into an outlet.
Press and hold both the [Massage] and [Nozzle Position ]
buttons for at least 2 seconds.
* Remaining water in the toilet body will drain over a 15-second
period.
Disconnect the power plug from the outlet.
After the water has been drained, securely reattach the strainer.
(4) Check for leaks from the water shut-off valve.
Water
Valve
Water
Valve
Turn
clockwise
Turn
counterclockwise
mark of the mounting plate
Convex part of the
back of the seat unit
Filter
Filter
Lock Lever
Turn
counterclockwise
Strainer
Water supply
socket
Flat-blade
screwdriver
3.
If the flushing begins to weaken, or if the nozzle spray
seems to be getting weaker, clean the filters.
4.
If freezing weather is anticipated, drain the water.
Water
Valve
Water
Valve
Turn
clockwise
Turn
counterclockwise
mark of the mounting plate
Convex part of the
back of the seat unit
Filter
Filter
Lock Lever
[Massage]+[NozzlePosition ]
Turn
clockwise
Tighten until the end surface
of the strainer is flush with
the socket end surface.
/