
rrrr
-
electronic
6250
.‘
PFAFF
eiectro
20
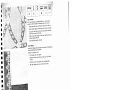
Instruction
book

I
For
easier
understanding
of
this
instruction
book
I
-
please
fold
this
page
open
when
reading
it.
I
LL
I
Safety
rules
:
For
the
United
Kingdom
only
The
leads
must
definitely
not
be
connected
to
the
safety-lead
terminal
I
nor
to
a
plug
with
three
pins.
I
The
wires
in
the
mains
lead
are
coloured
according
to
the
following
code:
Blue:
Neutral
I
Brown:
Live
As
the
colours
of
the
wires
in
the
mains
lead
of
this
appliance
may
not
correspond
I
with
the
colour
coding
of
the
terminals
in
your
plug,
proceed
as
follows:
The
wire
which
is
coloured
blue
must
be
connected
to
the
terminal
which
is
i
marked
with
the
lettter
N
or
coloured
black
I
The
wire
which
is
coloured
brown
must
be
connected
to
the
terminal
which
is
marked
with
the
letter
L
or
coloured
red.
I
Cut-oft
mains
plugs
are
definitely
not
to
be
used,
but
disposed
of
immediately.
Defective
mains
leads
must
be
replaced
complete.
I
Only
3
A
spare
fuses
must
be
used
as
approved
by
ASTA
according
to
BS
1362
and
the
fuse
cover
must
be
marked
3
A
or
with
the
corresponding
colour
code.
I
The
plug
must
never
be
used
without
fuse
cover.
Spare
fuse
covers
are
available
I
froiii
electrical
suppliers
or
the
PFAFF
agencies.
i
Please
also
observe
the
general
safety
notes
on
page
2.
I
I
I
Contents
on
pages
4
and
5
I
-
-
-
I
I

Important
safety
instructions
For
the
United
States
only
Li
This
sewing
machine
is
designed
and
manufactured
for
HOUSEHOLD
use
only
When
you
use
an
electric
appliance,
basic
safety
precautions
should
always
be
adhered
to
as
follows
Li
Read
all
instructions
before
using
this
sewing
machine.
DANGER
To
reduce
the
risk
of
electric
shock:
L
1
The
sewing
machine
should
never
be
left
unattended
when
plugged.
Always
unplug
this
appliance
from
the
electnc
outlet
irrirriediately
after
usiiig
and
before
cleaning.
2.
Always
unplug
before
relamping.
Replace
bulb
with
same
type
rated
1
5
Watts.
3.
Do
not
reach
for
a
sewing
machine
that
has
fallen
into
water
Unplug
immediately.
4.
Do
not
place
or
stoie
a
sewing
machine
where
it
can
fall
or
be
pulled
into
a
tub
or
sink.
Do
not
place
in
or
drop
into
water
or
other
liquid.
L
I
AIARNING
To
reduce
the
risk
of
burns,
tire,
electric
shock,
or
injury
to
persons
LI
1
Do
not
allow
to
be
used
as
a
toy.
Close
attention
is
necessary
when
this
sewing
machine
is
used
by
or
near
children.
2.
Use
this
sewing
machine
only
for
its
intended
use
as
described
ii
tIns
manual.
Use
oilli
attachments
L
recommended
by
the
manufacturer
as
contained
in
this
manual.
I
3.
Never
operate
this
sewing
machine
if
it
has
a
damaged
cord
or
plug,
it
it
is
not
working
pioperly,
if
it
has
been
dropped
or
damaged,
or
dropped
into
water,
Return
the
appliance
to
the
nearest
authorized
dealer
or
service
center
for
examinatron.
repair.
electrical
or
mnechirncal
adjustment.
U
4
Never
operate
the
sewing
machine
with
any
air
openings
blocked.
Keep
ventilatmon
openings
of
the
sewing
machine
and
foot
control
free
from
the
accumulation
of
lint,
dust
and
loose
cloth
k
1
5
Never
drop
or
mnsett
any
object
into
any
opening.
6
Do
not
use
out
of
doors.
U
7.
Do
not
operate
where
aerosol
(spray>
products
are
being
used
or
where
oxygen
is
being
administered.
8
To
disconnect
turn
all
controls
to
off
(“0”)
position,
then
remove
plug
horn
outlet
L
9
Never
operate
on
a
soft
suttace
such
as
a
bed
or
couch
where
the
air
openings
may
be
blocked.
I
l
0.
Dv
riot
unplug
by
pulling
on
cord.
To
unplug,
grasp
the
pIng,
not
the
cord.
L
11.
Keep
lingers
away
from
all
rnovmnq
patts
Special
care
is
required
around
the
sewing
machine
needle
1
2.
Always
use
the
proper
needle
plate.
The
wrong
plate
can
cause
the
needle
to
break.
1
3.
Do
not
use
bent
or
blunt
needles
Use
needles
recommended
by
the
nianufacturer
only.
1
4
Do
not
pull
or
push
fabric
while
stitching.
It
niay
deflect
the
needle,
causing
it
to
break
15.
Switch
the
sewing
machine
of[(”O’>
when
making
any
adjustments
in
the
needle
area,
such
as
threading
needle,
changing
needle,
threading
bobbin,
or
changing
presser
foot,
etc.
1
6
Always
unplug
sewing
machine
from
the
electric
outlet
when
removing
covers,
lubricating,
or
when
making
any
othei
user
servicing
adjustments
mentioned
in
the
instruction
manual.
1
7.
Hold
plug
when
rewinding
into
cord
reel.
Do
not
allow
plug
to
whip
when
rewinding.
Please
also
observe
the
general
safety
notes
on
page
2.
SAVE
THESE
INSTRUcTIONS

9
1
2345
22
23
p;16
,
24
I
F
6
7
8
J
!i
‘i
—10
12
PFAFF
ertronic
6250
14
—15
25
1W
38
-_
16
37
26
27
26
29
V
4
I
•
PFAFF
electro
cc
6250
30

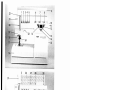
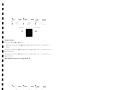
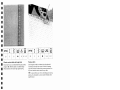
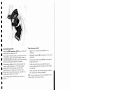
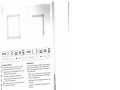
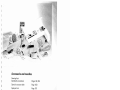
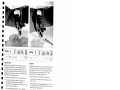
Parts
of
the
sewing
machine
(1)
Key
for
“slow
sewing”
(2)
Key
for
“needle
up/down
position”
(3)
Key
for
“tacking/buttonhole/single
pattern”
(4)
Key
for
“reverse
sewing”
(5)
Twin
needle
indicator
(6)
Stitch
width
slide
key/needle
positions
(7)
Stitch
length
slide
key/buttonhole
length
(8)
Balance
slide
key/pattern
length
(9)
Carrying
handle
(10)
Hand
wheel
(11)
Handwheel
release
disk
(12)
Program
keys
0
to
7/0
to
9
(13)
Liquid
crystal
display
(14)
Clear
key
“beginning
of
pattern”
(15)
Main
switch
(16)
Accessory
box
(17)
Sewing
foot
holder
with
sewing
foot
(18)
Needle
threader
(19)
Thread
guide
(20)
Threading
slot
(21)
Needle
thread
tension
(22)
Takeup
lever
(23)
Presser
bar
lifter
(24)
Needle
holder
with
fixing
screw
(25)
Thread
guide
for
bobbin
winding
(26)
Program
table
(27)
Reel
holder
with
unwinding
disk
(28)
Second
spare
reel
holder
(29)
Bobbin
winder
(30)
Connection
socket
“mains
cord”
(31)
Connection
socket
“foot
control”
(32)
Base
plate
(33)
Hook
cover
(34)
Free
arm
(35)
Sewing
lamp
(36)
Thread
trimmer
(37)
Top
cover
(38)
Dual
feed
(top
feed)
(39)
Needle
plate

/
I.
Notes
on
safety
Notes
on
safety
for
domestic
sewing
machines
according
to
DIN
57
700,
Section
28
or
IEC
335,
Section
28
1.
The
user must
exercise
adequate
caution
with
regard
to
the
up-
and
down
moving
needle
and
constantly
observe
the
sewing
area
during
work
2.
When
leaving
the
machine,
during
maintenance
work
or
when
changing
mechanical
parts
or
accessories,
always
disconnect
the
machine
from
the
mains
by
pulling
out
the
mains
plug.
3.
The
maximum
permissible
wattage
for
the
sewing
lamp
is
1
5
Watts.
4.
The
tension
of
the
drive
belt
must
only
be
adjusted
by
a
Ptaff
mechanic.
5
The
machine
must
be
put
into
operation
according
to
the
indications
on
the
specification
plate.
6.
Do
not
place
any
objects
in
openings
on
the
machine
7.
Do
not
use
the
sewing
machit
te
if:
—
there
is
visible
damage,
—
its
function
is
disturbed,
—
it
is
wet,
e.g.
with
condensation.
8
Do
not
pull
the
mains
plug
out
of
the
socket
by
its
cord.
9.
If
this
appliance
is
used
for
another
purpose
than
that
intended
or
if
it
is
wrongly
operated,
we
will
not
accept
any
liability
for
any
damage
caused.
1
0.
To
avoid
the
risk
of
electric
shock,
do
not
open
the
machine.
There
are
rio
parts
inside
the
machine
which
the
user
can
repair,
This
is
solely
the
responsibility
of
our
qulified
service
staff.
Environment
The
recommended
environn
ient
is.
Ambient
temperature
1
0
C
to
40
C
Humidity
20%
to
80%
This
sewing
machine
is
a
high-quality
electronicmechanical
appliance;
it
is
a
machine
for
supervised
use
in
the
home.
It
should
be
operated
in
such
a
way
that
it
is
not
subjected
to:
dust,
severe
dampness,
direct
sunlight,
static
electricity,
heat-producing
objects,
corrosive
chemicals
or
liquids.
rhe
machine
must
be
used
on
a
free
surface,
for
ventilation
purposes,
which
is
both
firm
and
even.
Treatment
Always
protect
the
machine
against
damage
by
hitting
or
dropping.
Cleaning
H
onsi
ii
g:
To
clean
the
housing,
use
a
dry,
clean
and
soft
cloth
which
is
free
of
fluff
To
remove
any
stubborn
dirt,
use
a
soft
cloth
with
alcohol
or
paraffin.
Please
Note!
Do
not
use
any
insecticides
or
chemical
products
such
as
petrol
(gas)
or
thin
cheniicals
for
cleaning
the
housing.
11.
Be
sure
to
use
only
original
PFAFF
parts.

Modern,
uncomplicated
—
Sewing
by
touch-key
control
—
Congratulations!
You
have
bought
a
high-quality
product
that
offers
unique
advantages.
Your
new
sewing
machine
can
take
any
material
in
its
stride
and
will
sew
through
thick
and
thin
for
you.
It
features
the
ver’
latest
in
desgin
and
technology,
and
this
instruction
book
is
just
as
uncomplicated
as
your
PFAFF
sewing
machine.
If
you
now
take
time
enough
to
study
the
instruction
book,
nothing
can
go
wrong.
After
all,
this
is
the
only
way
to
learn
all
the
things
the
machine
can
do,
and
to
make
full
use
of
them.
If
you
have
any
further
questions,
that
is
no
problem!
Your
PFAFF
dealer
will
be
at your
service
with
any
help
or
advice
you
need.
So
now
you
can
get
started!
We
wish
you
many
enjoyable
hours
of
creating
your
fashion
ideas.

Contents
95
107
Accessory
compartment
Adjusting
,lide
keys
.
.
.,...,....
.....
.
.
35—37
Applique
foot
101
Automatic
dirning
.
48+82
Balance
61
+65
Balance
slide
key
37
Basting
stitch
.
.
45
Bias
tape
binder
.
.
.
104
Blind
stitch
.
.
.
.
.
.
47
Bobbin
case
20
Bobbin
thread
.
.
24
Bobbin
thread
tension
21
Bobbin
winding
1
7—19
Borders
.
66
Suspenders
Ibraces)
.
.
70
Buttonhole
balance
61
Buttonhole/tacking/single
pattern
.
.
39
Buttonholes
59—62
Changing
a
sewing
foot
25
Changing
the
needle
. .
28
Changing
the
needle
plate
112
Cleaning
and
oiling
.
11
2
Clear
key
34
Closed
overlock
stitch
54
Closed
overlock
stitch
with
edge
thread
55
Cordingfoot
.
.
102+105
Covering
stitches
.
.
.
.
.
.
56—58
Cross
stitch
.
.
57+68
Darning
81
83
Darning
tears
83
Darning
with
elastic
stitch
82,
83
Darning
with
straight
stitch
81
Decorative
stitches
63—11
Detachable
work
support
16
Dual
fabric
feed
.
26,
2/
Elastic
stitch
.
. .
.
53
Elastic
stitches
.
51
—58
Electrical
connection
. .
.
.
1
4,
1
5
Electronics
.
.
34
-40
Embroidery
techniques
89—93
Eyelet
embroidery
.
.
.
.
.
91
Eyelets
.
50
Fagoting
stitch
.
.
56
Fancy
eldstic
stitch
57
Fancy
stitch
table
.
.
.
.
.
8
Faults
.
114,115
Foot
control
.
1
5
Free
arm
1
6
Fringe
foot
1
05
Function
keys
38,
39
Gathering
foot
. .
.
103
Gathering
with
elastic
threads
79
Gathering
with
straight
stitch
78
General
notes
on
sewing
.
.
.
76,
71
Hand
wheel
relcise
disk...
.
.
1
7
Heni
with
the
twin
needle.
.
.
.
77
Hemstitching
.
.
.
.
.
.
.
92,
93
Honeycomb
stitch
.
.
.
53
Inserting
patches
.
.
.
.
.
83
Inserting
the
bobbin
21
Inserting
zippers
.
84,
85
Knit-edge
foot
1
03
Lace
work
86
Lap-feller
.
.
.
.
1
01
Large-area
embroidery
68
Leather
eribroidery
69

Left
needle
position
Light—kiit
nending
stitch
.
Linen
butiunhole
with
ginip
thread
Linen
buttonhole,
progran
i
mable
Linen
embroidery
Lowering
the
feed
dog
Maintenance
and
sewing
Monograms
Needle
chart
. .
Needie
pcsitions
Needle
thredd
tension
Needle
threader
Needle
up/down
position
Non
elastic
stitches
Oiling
.
Open
Ovui
luck
stitch
Overlock
stitches
Pattern
Iuigth
Pattern
sldfl
fclcar
key)
Pattern
width
Plain
stcni
stitch
Practical
sewing
Presser
bar
lifter
Progiam
keys
.
Pullover
stitch
.
Quilting
Reverse
sewing
Richelieu
Right
needle
position
Roll
hemming
Saddle
stitch
.
Safety
notes
Semi
automatic
(buttonhole)
Semiautomatic
sewing
of
second
tack
.
Serging
with
the
ovuriock
foot
.
.
.
Serging
with
zigzag
stitch
. .
.
Sewing
and
emhroidenng
Sewing
chart
Sewing
taults
and
their
remedies
Sewing
feet
(special
accessoriesl
Sewing
feet
(stdnddrd
occessones)
.
Sewing
Limp
.
Sewing
on
buttons
.
Shell
edging
Single
pattern
.
.
.
Slow
sewing
Smocking
Special
accessory
table
...
Stitch
density
.
. .
.
Stitch
length
slide
key
Stitch
width
slide
key
Straight
stitch
Stretch
buttonhole
...
Stretch
triple
straight
stitch
.
.
Stretch
triple
zigzag
stitch
.
Tacking
Technical
section
Thread
reel
Fhread
tension
Thread
trimmer
Threading
Threading
the
needle
threarh
.
Threading
the
sewing
machine
Top
feed
Topstitching
Trouble
shooting
Twin
needle
Twin
needle
indicator
Utility
anrl
fancy
stitches
Utility
stitch
table
Winding
from
a
second
reel
holder
Zigzag
stitch
•
.
.
.
35+45
.
58
62
.
.
.
60
89
29
109—il
104
106,10
35
29
23
38
45-50
112
54
.
54.55
37+64
.
.
34
35+65
52
.
73-88
.
.
24
34
55
90
40
89
35+45
.
.
.
86
48
.
.
60
60
46+54,
.
.
46
41
71
44
‘
.
114,11
.
.
100
.
.
.
.
.
98,
99
.
.
.
.
.
.
.
.
.
.
113
49
88
39
38
80
100
.
.
36
3664
5+65
45
62
51
52
.
39
11
29
.
.
18
202J
4
2
2)
.
lb
(13(1
hll!
.
.
41
Il
1
I
1
9
.
4t,
faults
a
I
a
a
a
a
a
a
I
I
I
I
a
I
U
a
I
a
a
a
a
I
a
a
a
a
I
a
I

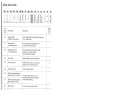
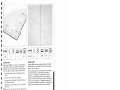
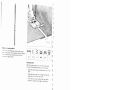
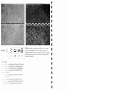
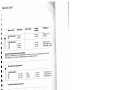
Utility
stitch
table
11
1213i14
15
I
I
I
//
III
IIIIIIIIH
ii>
/
‘
I
i
Bllllll
<>
><:
Pro-
Width
gram
Description
Application
up
to
No.
mm
00
Straight
stitch
For
all
straight-stitch
and
lockstitch
sewing
job,
—
Middle
needle
position
6
mm
stitch
length.
01
Straight
stitch
For
all
sewing
and
top-stitching
work
—
Left
needle
position
requiring
left
needle
position.
02
Straight
stitch
with
For
sewing
jobs
requiring
other
needle
—
1
3
needle
positions
positions,
e.
g.
zipper
insertion,
and
especially
top-stitching.
03
Grass
stitch
Both
top-stitching
and
fancy
stitching.
—
04
Plain
stem
stitch
Durable
elastic
seam,
e.
g.
for
sewing
3
leggins,
and
for
embroidery
work.
05
Triple
stem
stitch
Ornamental
utility
stitch.
—
06
Stretch
triple
straight
stitch,
stitch
length
1
.5
to
4.5
mm
For
highly
durable
seams,
a
g.
for
inseams,
sportswear
and
workwear,
—
07
Stretch
triple
straight
stitch,
and
for
fancy
stitching.
stitch
length
3
to
6
mm
08
Basting
stitch
For
basting
your
sewing
cuttings.
—
09
Darning
program
For
reinforcing
damaged
places
or
darning
6
small
holes.
10
Zigzag
stitch
For
sewing
and
appliqué
work
6
1 1
Zigzag
stitch,
needle
position
changeable
from
right
to
left
—-
——--—---
For
eyelet
embroidery
and
cording.
6
1
2
Zigzag
stitch,
needle
position
changeable
from
left
to
toight
1
3
Elastic
stitch
For
sewing
on
elastic,
darning
tears
6
and
inserting
patches.
1
4
Blind
stitch
For
securing
seams
invisibly.
6
1
5
Elastic
blind
stitch
For
sewing
seams
invisibly
and
serging
(3
an
edge
at
the
same
time.
Also
for
stretch
materials.

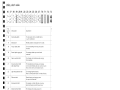
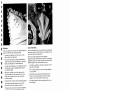
Utility
stitch
table
16
17
18 19
20
21
22 23
24
25
26
27
70
71
72
73
:
Pro-
V
gram
Description
Application
No.
1
6
Shell-eding
stitch
For
decorative
hems
on
light
fabrics,
j
e.
g.
for
underwear.
1
7
Blind
stitch
Needle
position
changeable
to
the
right.
1
8
Fancy
elastic
stitch
For
over
stitching
two
butt
joined
plies
of
fabric,
1
9
Stretch
triple
zigzag
stitch
For
sewing
elastic
tape
onto
elastic
materials.
20
Open
overlock
stitch
For
closing
and
simultaneously
serging
materials.
21
losed
overlock
stitch
For
simultaneously
closing
and serging
with
edge
thread
one
or
several
labric
plies.
An
overlock
seam
L._
Lthat
comes
next
to
an
industrial
seam.
22
Light-knit
patchwork
stitch
For
sewing
light-knit
fabrics
Also
as
a
fancy-stitch
seam
on
knitted
fabrics.
23
Pullovei
stitch
Elastic
closing
and
serging
seam
for
open
knit
materials.
24
Honeycomb
stitch
For
sewing
on
elastic
threads,
covering
terry-cloth
seams
and
for
fancy
hems
ft
-
-
-
-
25
Closed
overlock
stitch
For
closing
and serging
seams
for
materials
that
fray
easily.
26
Fagoting
stitch
For
joining
corsetry
pans
and
for
overstitching
that
fray
easily
27
1
Cross
stitch
Flat
joining
seam
for
elastic
butt
joined
fabric
plies.
Also
suitable
as
a
fancy
hem
70
Fully
automatic
linen
The
buttonhole
is
stored
in
three
buttonhole
pro
set
lengths,
e.
g.
for
bed
linen,
underwear
and
blouses
71
Linen
buttonhole
Stitch
length
and
width
adjustable,
thus
very
suitable
for
difficult
matendls
such
as
silk
or
viscous
fabrics
—
72
-
f
Stretch
buttonhole
For
stretch
materials,
73
I
Fully
automatic
eyelet
Can
be
re-called
in
different
sizes
74
Button
sewing program
Fully
automatic
sewing
of
bullons
in
various
sizes.

L1JFi
1
rriw
hI’’’I’’J
Ii
hulk
0
Ill
Ill(1
a,
—iIIIIIilI—ihiIIIIitI—
a,
IIIfIIIHIIIjIIIF
‘‘‘II’’1V’’’’
a
tilillihi
0,
101
IIi
IIIHmp
1
I
il
01
III
lIiJ
%%J
‘iIIIIIui’’iiIIIIIii
z
g5
-€4_
)*)))
g
----
a,
P%J
‘I II
II
liii!
II
01
111111!
‘‘liii
jJIil’’hiiIIIih
a,
‘qi
qr—’ip
qr
a,
II
_
.•.
.•.•.•
.•.•
11111
11101
111111
11111

S
S
S
S
S
S
S
S
S
S
S
S
I.....
5
S
S
I..’
I..’.’
•iI....
5:
a’
S..
I.’
5:
U..’
S
II
S
S

/
..-

Operating
the
sewing
machine
Tedmb&
secdon
Pages
11
to29

I
I
I
I
I
I
I
I
I
I
I
I
I
I
I
I
I
I
I
I
I
I
I
I
I
I
I
I
I
I

Technical
section
Electrical
connection
Detachable
work
support
Winding
the
bobbin
Bobbin
case
Bobbin
thread
tension
Threading
the
needle
thread
Needle
threader
Drawing
up
the
bobbin
thread
Presser
foot
lifter
Thread
trimmer
Changing
the
sewing
foot
Dual
feed
Top
feed
Changing
the
needle
Needle
thread
tension
Lowering
the
bottom
feed
Pages
14,
15
Page
16
Pages
17
18,
19
Page
20
Page
21
Page
22
Page
23
Page
24
Page
24
Page
24
Page
25
Pages
26,
27
Page
27
Page
28
Page
29
Page
29

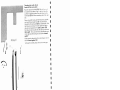
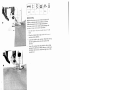
Place
the
enclosed
mains
cord,
foot
control
and
instruction
book
in
the
compartment
of
the
cover-
case.
I
rhe
programs
of
the
sewing
machine
are
illustrated
n
the
inside
of
the top
cover.
Connect
the
mains
cord
between
socket
(30)
of
the
sewing
machine
and
the
wall
socket
Cover-case
Top
cover
Open the
folding
cover
(37)
upwards.
Programs
Electrical
connection

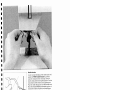
Connecting
the
foot
control
Connect
the
plug
of
the
foot
control
with
the
connec
tion
socket
(31)of
the
sewing
machine.
The
sewing
speed
is
regulated
by
pressing
the
pedal.
Main
switch
When
the
main
switch
(1
5)
is
switched
on,
the
sewing
lamp
lights
up
The
sewing
machine
i
now
ready
to
use.

Accessory
compartment
Open
the
accessory
compartment
(16).
Sorting
the
accessories
The
enclosed
accessones
are
marked
with
numbers.
Sort
them
into
the
corresponding
compartments
of
the
accessory
box.
Swing
out
the
detachable
work
support
(1
6)
to
the
left
using
both
hands.
In
order
to
sew
using
the
free-arm,
swing
the
clutch
able
work
support
to
the
left
and
lift
it
upwards
out
of
the
hole.
When
you
replace
and
swing
it
in
again
make
u1:
the
detachable
work
support
is
flush
with
the
tree
arm
of
the
sewing
machine
A
Detachable
work
support
Removing
the
detachable
work
support
(free-arm)
Page is loading ...
Page is loading ...
Page is loading ...
Page is loading ...
Page is loading ...
Page is loading ...
Page is loading ...
Page is loading ...
Page is loading ...
Page is loading ...
Page is loading ...
Page is loading ...
Page is loading ...
Page is loading ...
Page is loading ...
Page is loading ...
Page is loading ...
Page is loading ...
Page is loading ...
Page is loading ...
Page is loading ...
Page is loading ...
Page is loading ...
Page is loading ...
Page is loading ...
Page is loading ...
Page is loading ...
Page is loading ...
Page is loading ...
Page is loading ...
Page is loading ...
Page is loading ...
Page is loading ...
Page is loading ...
Page is loading ...
Page is loading ...
Page is loading ...
Page is loading ...
Page is loading ...
Page is loading ...
Page is loading ...
Page is loading ...
Page is loading ...
Page is loading ...
Page is loading ...
Page is loading ...
Page is loading ...
Page is loading ...
Page is loading ...
Page is loading ...
Page is loading ...
Page is loading ...
Page is loading ...
Page is loading ...
Page is loading ...
Page is loading ...
Page is loading ...
Page is loading ...
Page is loading ...
Page is loading ...
Page is loading ...
Page is loading ...
Page is loading ...
Page is loading ...
Page is loading ...
Page is loading ...
Page is loading ...
Page is loading ...
Page is loading ...
Page is loading ...
Page is loading ...
Page is loading ...
Page is loading ...
Page is loading ...
Page is loading ...
Page is loading ...
Page is loading ...
Page is loading ...
Page is loading ...
Page is loading ...
Page is loading ...
Page is loading ...
Page is loading ...
Page is loading ...
Page is loading ...
Page is loading ...
Page is loading ...
Page is loading ...
Page is loading ...
Page is loading ...
Page is loading ...
Page is loading ...
Page is loading ...
Page is loading ...
Page is loading ...
Page is loading ...
Page is loading ...
Page is loading ...
Page is loading ...
-
 1
1
-
 2
2
-
 3
3
-
 4
4
-
 5
5
-
 6
6
-
 7
7
-
 8
8
-
 9
9
-
 10
10
-
 11
11
-
 12
12
-
 13
13
-
 14
14
-
 15
15
-
 16
16
-
 17
17
-
 18
18
-
 19
19
-
 20
20
-
 21
21
-
 22
22
-
 23
23
-
 24
24
-
 25
25
-
 26
26
-
 27
27
-
 28
28
-
 29
29
-
 30
30
-
 31
31
-
 32
32
-
 33
33
-
 34
34
-
 35
35
-
 36
36
-
 37
37
-
 38
38
-
 39
39
-
 40
40
-
 41
41
-
 42
42
-
 43
43
-
 44
44
-
 45
45
-
 46
46
-
 47
47
-
 48
48
-
 49
49
-
 50
50
-
 51
51
-
 52
52
-
 53
53
-
 54
54
-
 55
55
-
 56
56
-
 57
57
-
 58
58
-
 59
59
-
 60
60
-
 61
61
-
 62
62
-
 63
63
-
 64
64
-
 65
65
-
 66
66
-
 67
67
-
 68
68
-
 69
69
-
 70
70
-
 71
71
-
 72
72
-
 73
73
-
 74
74
-
 75
75
-
 76
76
-
 77
77
-
 78
78
-
 79
79
-
 80
80
-
 81
81
-
 82
82
-
 83
83
-
 84
84
-
 85
85
-
 86
86
-
 87
87
-
 88
88
-
 89
89
-
 90
90
-
 91
91
-
 92
92
-
 93
93
-
 94
94
-
 95
95
-
 96
96
-
 97
97
-
 98
98
-
 99
99
-
 100
100
-
 101
101
-
 102
102
-
 103
103
-
 104
104
-
 105
105
-
 106
106
-
 107
107
-
 108
108
-
 109
109
-
 110
110
-
 111
111
-
 112
112
-
 113
113
-
 114
114
-
 115
115
-
 116
116
-
 117
117
-
 118
118
-
 119
119


Ask a question and I''ll find the answer in the document
Finding information in a document is now easier with AI
Related papers
-
Pfaff ClassicStyle 1529 Owner's manual
-
-
-
-
-
-
-
Pfaff select 4.0 Owner's manual
-
-
Pfaff selectline series Owner's manual
Other documents
-
Baby Lock BLE-CF5 Operating instructions
-
Sears 385.12514 User manual
-
Brother XL-2220 Datasheet
-
-
Husqvarna Viking Owner's manual
-
White 1409 white Owner's manual
-
-
Natco Products 5602.86.19STME Installation guide
-
 Baby Lock BLE Series Operating instructions
-
SINGER 27 User manual
