Johnson Controls S1-CVD090T01 User manual

Type
User manual

This manual is also suitable for

S1-CVD090T01 / S1-CVD135T01
Central Ventilating Dehumidifier
Owner’s Manual
READ AND SAVE THESE INSTRUCTIONS
Johnson Controls
Unitary Products
Thank you for your purchase of the Central Ventilating Dehumidifier. Your dehumidifier is designed to remove humidity from your home,
maintaining the humidity at a comfortable level and reducing the unwanted effects of high humidity. Use your Central Ventilating Dehumidifier to
control the humidity that comes into the home from opening doors and infiltration (i.e. outdoor air entering through the building envelope). You
can reduce the amount of humidity that enters the home by closing windows, doors and/or fireplace flues when the outdoor humidity is high and
by drying clothes outside. Whirlpool tubs and saunas will also increase the amount of humidity in the home. Direct exhaust from kitchen vents
and bath fans is the best means of controlling humidity due to cooking and showers/baths. Your Central Ventilation Dehumidifier is not designed
to eliminate or reduce condensation on windows in the winter and works best when the indoor temperature is above 65°F (18°C).
WHOLE HOME DEHUMIDIFICATION
The Central Ventilating Dehumidifier controls the humidity level in your entire home. A powerful blower inside the dehumidifier draws air into the
cabinet, filters and removes moisture from the air, and then discharges the dry air to the home. Inside the cabinet, a sealed refrigeration system
removes moisture by moving the air through a series of tubes and fins that are kept colder than the dew point of the incoming air. The dew point
is the temperature at which moisture in the air will condense, much like what occurs on the outside of a cold glass on a hot summer day. The
condensed moisture drips into the dehumidifier drain pan to a drain tube routed to the nearest floor drain – no need to empty a tub every day.
After the moisture is removed, the air moves through a second coil where it is reheated before being sent back into the home. It is normal for the
air leaving the dehumidifier to be warmer than the air entering the dehumidifier.
SETTING THE DESIRED HUMIDITY LEVEL
At the inlet side of the unit, a humidity control knob sets the desired
humidity level between 1 (less dry, dehumidifier runs less) and
7 (more dry, dehumidifier runs more), or can be used to turn the
dehumidifier OFF. The ON/OFF switch on the front of the unit should
be left ON and only be used to turn the dehumidifier off when
performing maintenance (see page 3 for maintenance requirements).
Set the control at a Normal level, between 3 and 4, when first
installed. Allow the dehumidifier to run for 24 hours before deciding if
you want to change the setting.
Humidity Control Knob
90-1327
Filter
Access
Humidity
Control
Inlet
Drain
Line
On/Off
Switch
Filter
Access
Outlet
1
SETTING THE DESIRED HUMIDITY LEVEL (CONTINUED)
• If you prefer the air to be more dry, increase the setting; this
will increase the amount of time that the dehumidifier runs.
• If you prefer the air to be less dry, decrease the setting; this
will reduce the amount of time that the dehumidifier runs.
The settings on the dial can be approximated to relative humidity (RH)
using the table to the right.
Your comfort is the best measure of how to adjust your setting. When
first installed, your dehumidifier has to remove all the moisture that
is initially in your home. The home acts like a sponge so the moisture
in the materials of your home is at the same level as the air. After
drying the air, the materials of the home will release moisture back
into the air until they are again at the same level. As a result, it is
not uncommon for the dehumidifier to operate for an extended period
when first installed.
Control Knob Setting
Indoor Temperature (°F)
65 70 75 80
1 84% 71% 60%
2 86% 73% 61% 52%
3 74% 63% 53% 45%
4 64% 54% 45% 39%
5 55% 46% 39% 33%
6 47% 39% 33% 28%
7 40% 34% 28% 24%
Note: This table is for reference only.
ENERGY SAVINGS TIP
Adjust the setting to be as low as is comfortable to reduce dehumidifier run time – if it feels clammy or smells damp, raise the setting.
To save energy, turn the dehumidifier setting to OFF when you open your windows just as you would with air conditioning.
WHEN DOES THE DEHUMIDIFIER TURN ON?
The dehumidifier turns on the first time that the blower in your home heating and cooling system turns on (i.e. air conditioning comes on or you
run the fan continuously) within the Cycle Period. Your installing contractor set the Cycle Period when the dehumidifier was first installed; it
may be set for once every 30 minutes, once per hour, once every two hours or once every three hours. If the heating and cooling system blower
does not turn on within the Cycle Period, the dehumidifier will turn itself on at the end of the Cycle Period. The Cycle Period setting determines
how frequently the dehumidifier measures the humidity level in the air; once per hour is usually sufficient to maintain comfort. If you want the
dehumidifier to check the humidity level more or less often, contact your installing contractor.
An optional thermostat, S1-TTSCC01, can be mounted directly in the home for easy access to the humidity setting, and continuously measures the
humidity level to turn on the dehumidifier on-demand. Consult your installing contractor for more information about the S1-TTSCC01 thermostat.
OPTIONAL – CONVERTIBLE MODE: WHOLE HOME AND SPOT DEHUMIDIFICATION
The dehumidifier can be installed to dehumidify the whole home and separately
dehumidify a spot location such as a basement or crawl space. In this
arrangement ductwork connects the dehumidifier to the heating and cooling
system and to the spot location. Dampers in the ductwork are opened and closed
to direct where air is drawn from and to where it is sent. One example of how this
might look is shown to the right (if you are unsure of whether your dehumidifier
has been installed for Convertible operation, contact your installing contractor).
If installed in Convertible configuration, the dehumidifier turns on and opens/
closes the dampers to dehumidify the whole home the first time that the blower
in your home heating and cooling system turns on within the Cycle Period. If not
actively dehumidifying the whole home three minutes before the end of the Cycle
Period, the dehumidifier will turn on and open/close dampers to dehumidify the
spot location. If your dehumidifier is actively drying the whole home at the end of
the Cycle Period, spot dehumidification is put off until the next Cycle Period.
90-1536
2
HOW DOES THE DEHUMIDIFIER WORK?
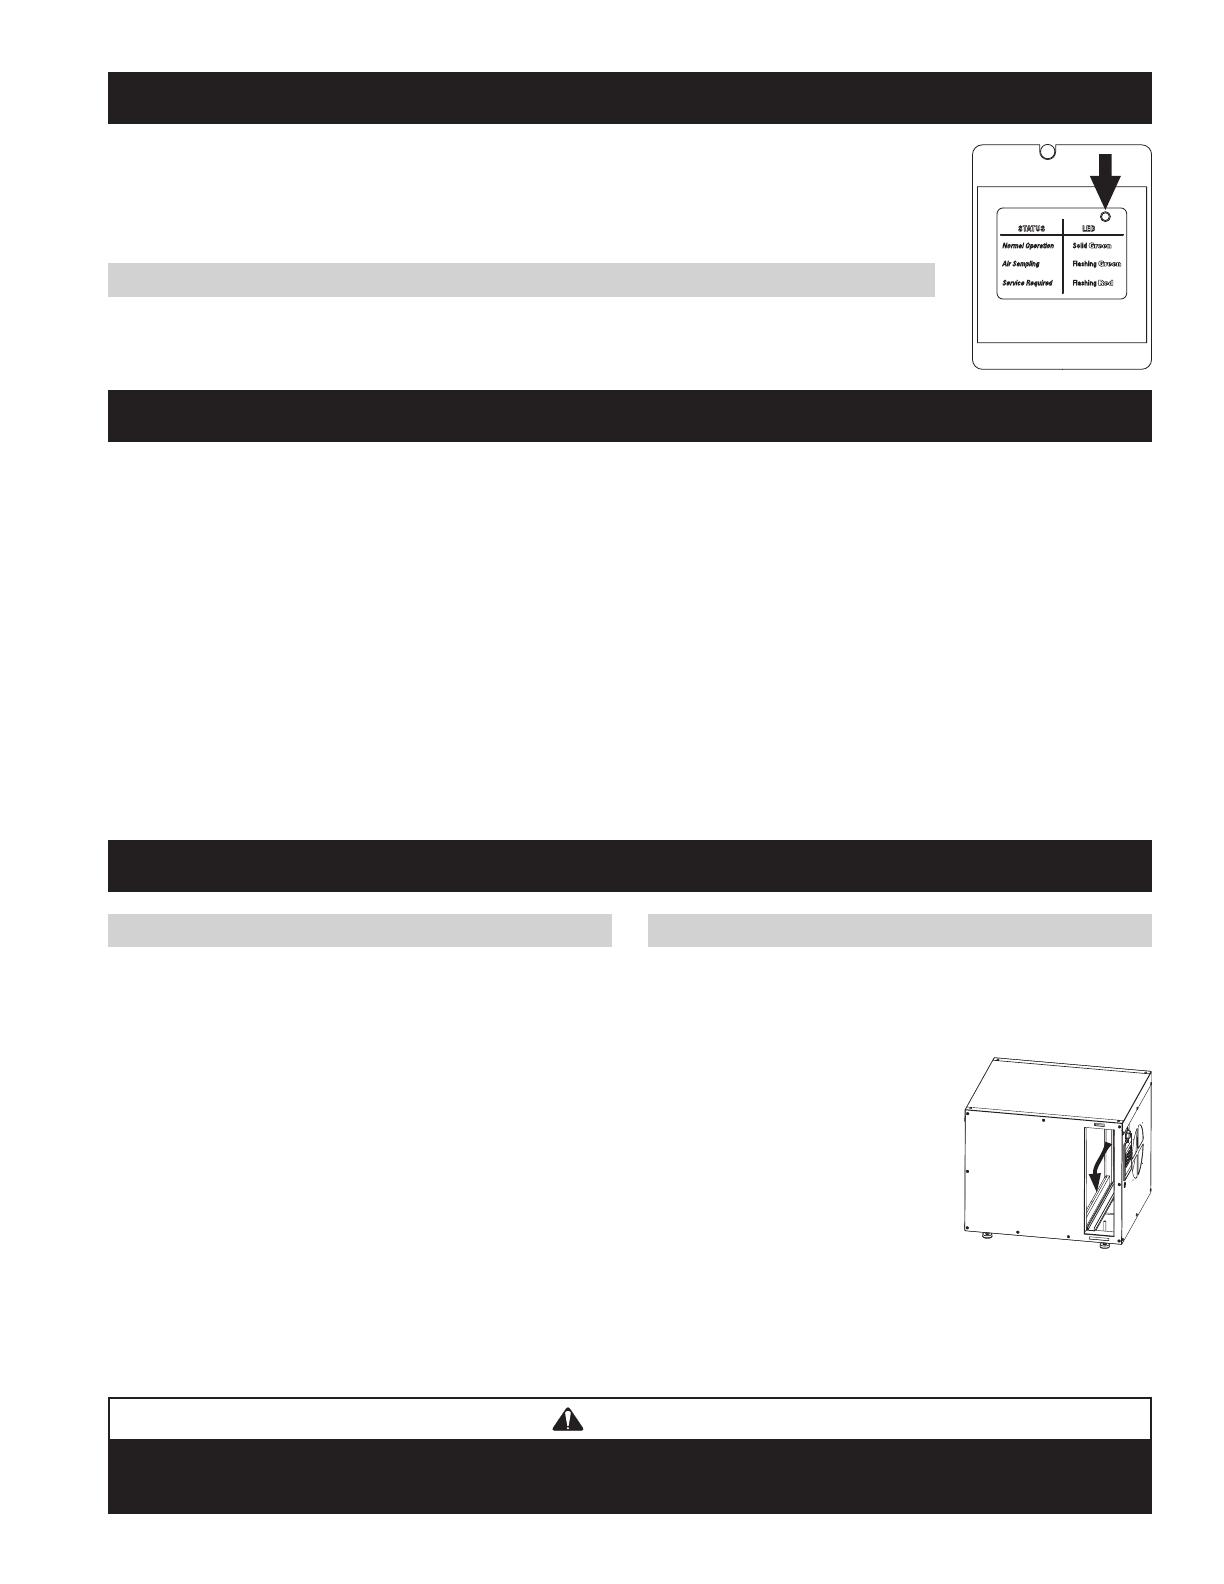
When the dehumidifier turns on, the blower circulates the air for three (3) minutes before measuring the humidity
level of the air. The green status light below the control setting flashes when the dehumidifier is circulating the
air. If the humidity of the air is higher than the setting, the compressor turns on and the green Status light is lit
continuously. The dehumidifier turns off after the humidity level of the air has dropped below the setting.
OPTIONAL – HEATING AND COOLING SYSTEM BLOWER OPERATION
Your installing contractor may have configured the dehumidifier to turn on the heating and cooling system
blower when the dehumidifier turns on to allow for improved circulation of the dry air.
HOW DOES THE OPTIONAL VENTILATION WORK?
With the ventilation option installed (if you are unsure if this option has been installed, contact your installing contractor), the dehumidifier will
bring in outside air for the amount of time set on the Cycle Time adjustment during the set Cycle Period.
Your dehumidifier will work with your heating and cooling system blower to satisfy the ventilation requirements that have been set. For example, if
the Cycle Time is set for 20 minutes and the Cycle Period for 1 hour, you will get outdoor air introduced to your home for 20 minutes every hour. When
your heating and cooling system blower operates the dehumidifier blower will turn on and will open a normally-closed damper in the duct that brings
in outdoor air. If it is getting close to the end of the Cycle Period and your heating and cooling system blower has not operated, the dehumidifier
will turn on the system blower. Using the 20 minute per hour settings as an example, if the heating or cooling comes on for only 10 minutes, the
dehumidifier control will turn on the system blower for the final 10 minutes of the 1-hour cycle period to deliver the required amount of fresh air.
Outdoor air that is brought in will mix with the air circulating through your heating and cooling system. The dehumidifier will continuously
monitor the mixed air and if the humidity level gets higher than the setting, it will turn on the compressor to remove the moisture.
An outdoor sensor, if installed with the ventilation option, will monitor the temperature of the outdoor air and if the temperature exceeds 100°F
(38°C) or drops below 0°F (-18°C) ventilation will not occur. If the outdoor temperature is between 20°F (-7°C) and 0°F (-18°C), ventilation will
only occur when your heating system operates.
90-1561
CAUTION
Do not use spray solvents or cleaners on or near the inlet side of the dehumidifier.
If desired, apply cleaner to a cloth and use to clean the cabinet.
MAINTENANCE
CLEAN OR REPLACE THE AIR FILTER
After initial installation, check the air filter after 6 months. If it
appears matted with dust, pet hair or other debris, maintain a
6-month cleaning schedule. If it appears clean or lightly loaded,
maintain a 12-month cleaning schedule. Replacement filters,
S1-4510, can be purchased from your installing contractor.
Filter Cleaning Procedure
1. Turn the ON/OFF switch OFF.
2. Remove the filter access door from either side of the dehumidifier.
3. Slide the filter out of the dehumidifier.
4. Flush the filter with warm water and a mild detergent solution.
5. Shake off the excess water from the filter.
6. Replace the filtermake sure the filter seats in both the top and
bottom filter rails.
7. Replace the filter access door.
8. Turn the ON/OFF switch ON.
CHECK THE DRAIN
The drain should be checked annually to ensure there is no blockage
or air lock in the drain system. If the unit is not properly draining,
have it checked by a qualified service professional.
Procedure to Check Drain System
1. Turn the ON/OFF switch OFF.
2. Remove the filter access door from
either side of the dehumidifier.
3. Slide the filter out of the dehumidifier
to expose the evaporator coil.
4. Slowly pour a pint of water into the
dehumidifier drip pan near the bottom
of the evaporator coil so that the water flows into the drain pan.
5. Check where the drain piping flows into the floor drain. If water
does not flow out, the unit is not properly draining.
6. Turn on the ON/OFF switch ON.
90-1558
3
Johnson Controls
Unitary Products
5005 York Drive, Norman, OK 73069
Form 665505-UUM-A-1210
10008492 B2204830A 12.10
LIMITED WARRANTY
UPG warrants this product to be free from defects in factory workmanship and material under normal use and service and will, at its option, repair or replace any
parts that prove to have such defects according to the terms outlined on this warranty. This warranty covers only the equipment described by the Product Model
Number and Serial Number on the unit and associated receipts from the equipment installation.
In the absence of an installation receipt, the warranty period will begin upon product shipment from UPG.
This warranty extends only to the original consumer purchaser and is non-transferable. For this warranty to apply, the product must be installed according to UPG
recommendations and specifications, and in accordance with all local, state, and national codes; and the product must not be removed from its place of original
installation. The warranty period for repair or replacement parts provided hereunder shall not exceed beyond the warranty period stated below.
PREMIUM CENTRAL AND CENTRAL VENTILATING DEHUMIDIFIERS
PARTS
5 yrs
UPG strongly recommends regular periodic preventative maintenance on this equipment. The person most familiar with the equipment in your HVAC system is a
UPG dealer. The UPG dealer can ensure your maintenance program meets the conditions of the “UPG Warranty,” maximize the efficiency of the equipment, and
service your unit within the mandated guidelines. This warranty applies only to products installed in the United States and Canada.
EXCLUSIONS
This warranty does not cover any:
1. Shipping, labor, or material charges.
2. Damages resulting from transportation, installation, or servicing.
3. Damages resulting from accident, abuse, fire, flood, alteration, or acts of God (tampering, altering, defacing or removing the product serial number will serve
to void this warranty).
4. Damages resulting from use of the product in a corrosive atmosphere.
5. Damages resulting from inadequacy or interruption of electrical service or fuel supply, improper voltage conditions, blown fuses, or other like damages.
6. Cleaning or replacement of filters.
7. Damages resulting from operation with inadequate supply of air or water.
8. Damages resulting from use of components or accessories not approved by UPG (vent dampers, etc.).
9. Increase in fuel or electric cost.
10. Disposable filter which will have to be replaced from time to time depending on the amount of use.
THIS WARRANTY IS IN LIEU OF ALL OTHER WARRANTIES, EXPRESSED OR IMPLIED, INCLUDING THE IMPLIED WARRANTIES OF MERCHANTABILITY AND
FITNESS FOR A PARTICULAR PURPOSE.
SOME STATES DO NOT ALLOW THE DISCLAIMER OF IMPLIED WARRANTY, SO THAT THE ABOVE DISCLAIMER MAY NOT APPLY TO YOU.
SOME STATES ALLOW ONLY A PARTIAL LIMITATION ON IMPLIED WARRANTIES TO LIMIT THE DURATION OF IMPLIED WARRANTIES TO THE DURATION OF
THE EXPRESS WARRANTY. IN SUCH STATES, THE DURATION OF IMPLIED WARRANTIES IS HEREBY EXPRESSLY LIMITED TO THE DURATION OF THE EXPRESS
WARRANTY ON THE FACE HEREOF.
IN NO EVENT, WHETHER AS A RESULT OF BREACH OF WARRANTY OR CONTRACT, TORT (INCLUDING NEGLIGENCE) STRICT LIABILITY OR OTHERWISE,
SHALL UPG BE LIABLE FOR SPECIAL, INCIDENTAL, OR CONSEQUENTIAL DAMAGES, INCLUDING BUT NOT LIMITED TO LOSS OF USE OF THE EQUIPMENT OR
ASSOCIATED EQUIPMENT, LOST REVENUES OR PROFITS, COST OF SUBSTITUTE EQUIPMENT OR COST OF FUEL OR ELECTRICITY. THE ABOVE LIMITATIONS
SHALL INURE TO THE BENEFIT OF UPG’S SUPPLIERS AND SUBCONTRACTORS. THE ABOVE LIMITATION ON CONSEQUENTIAL DAMAGES SHALL NOT APPLY TO
INJURIES TO PERSON’S IN THE CASE OF CONSUMER GOODS.
SOME STATES DO NOT ALLOW THE EXCLUSION OR LIMITATION OF LIABILITY FOR CONSEQUENTIAL OR INCIDENTAL DAMAGES, OR FOR STRICT LIABILITY IN
TORT, SO THAT THE ABOVE EXCLUSIONS AND LIMITATIONS MAY NOT APPLY TO YOU.
UPG DOES NOT ASSUME, OR AUTHORIZE ANY OTHER PERSON TO ASSUME FOR UPG, ANY OTHER LIABILITY FOR THE SALE OF THIS PRODUCT.
THIS WARRANTY GIVES YOU SPECIFIC LEGAL RIGHTS. YOU MAY ALSO HAVE OTHER RIGHTS WHICH VARY FROM STATE TO STATE.
For Owner’s Information:
PRODUCT MODEL NO. _________________________________________ INSTALLATION DATE _____________________________________________
UNIT SERIAL NO. _____________________________________________ INSTALLING DEALER _____________________________________________
Subject to change without notice. Printed in U.S.A.
Copyright © by York International Corp. 2010. All rights reserved.
4
  • Page 1 1
  • Page 2 2
  • Page 3 3
  • Page 4 4

Johnson Controls S1-CVD090T01 User manual

Type
User manual
This manual is also suitable for

Ask a question and I''ll find the answer in the document

Finding information in a document is now easier with AI