Page is loading ...

INSTRUCTION MANUAL
HI98190, HI98191
Calibration Check
Waterproof
pH/mV/ISE/Temperature Meters

Thank you for choosing a Hanna Instruments product.
Please read this instruction manual carefully before using the instrument.
This manual will provide you with the necessary information for correct
use of the instrument, as well as a precise idea of its versatility.
If you need additional technical information, do not hesitate to e‑mail
us at [email protected] or view our worldwide contact list at
www.hannainst.com.
All rights are reserved. Reproduction in whole or in part is prohibited without the written consent of
the copyright owner, Hanna Instruments Inc., Woonsocket, Rhode Island, 02895, USA.
Dear Customer,

3
PRELIMINARY EXAMINATION ..............................................................................................
GENERAL DESCRIPTION ......................................................................................................
FUNCTIONAL DESCRIPTION ................................................................................................
HI98190 SPECIFICATIONS .................................................................................................
HI98191 SPECIFICATIONS .................................................................................................
OPERATIONAL GUIDE .........................................................................................................
pH CALIBRATION ...............................................................................................................
pH BUFFER TEMPERATURE DEPENDENCE ............................................................................
RELATIVE MV CALIBRATION ................................................................................................
ISE CALIBRATION HI98191 ................................................................................................
GOOD LABORATORY PRACTICE (GLP) ...................................................................................
SETUP ..............................................................................................................................
LOGGING ..........................................................................................................................
AUTOEND .........................................................................................................................
mV AND TEMPERATURE CALIBRATION (FOR TECHNICAL PERSONNEL ONLY) ...........................
PC INTERFACE ...................................................................................................................
BATTERIES REPLACEMENT ..................................................................................................
TEMPERATURE CORRELATION FOR pH SENSITIVE GLASS ......................................................
ELECTRODE CONDITIONING AND MAINTENANCE .................................................................
TROUBLESHOOTING GUIDE ...............................................................................................
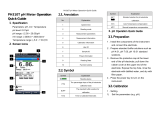
TABLE OF CONTENTS
4
5
8
10
23
25
31
45
49
55
58
6
9
14
24
29
44
46
54
56

4
Remove the instrument from the packing material and examine it carefully to make sure that no
damage has occurred during shipping. If there is any damage, please contact your local Hanna
Instruments Office.
Each instrument is supplied with:
• HI12963 Amplified Combined pH temperature electrode (HI98190)
• HI72911B Combined pH temperature electrode (HI98191)
• HI7662 Temperature Probe (HI98191)
• pH 4.01 & 7.01 Buffer Solutions (230 mL each)
• HI700601 General Purpose Cleaning Solution (3 pcs.)
• 100 mL Plastic Beaker (2 pcs.)
• 1.5V AA Batteries (4 pcs.)
• HI920015 Micro USB cable
• Instruction Manual and Quick Reference Guide
• Certificate
PRELIMINARY EXAMINATION
Note: Save all packing material until you are sure that the instrument functions correctly. All
defective items must be returned in the original packing with the supplied accessories.

5
GENERAL DESCRIPTION
The HI98190 and HI98191 instruments are state‑of‑the‑art, heavy‑duty pH meters, designed to
provide laboratory results and accuracy under harsh industrial conditions.
They are provided with a series of new diagnostic features which add an entirely new dimension
to the measurement of pH, by allowing the user to dramatically improve the reliability of the
measurement:
• seven standard buffers (pH 1.68, 4.01, 6.86, 7.01, 9.18, 10.01 and 12.45) for calibration.
• pH calibration up to five calibration points (see instrument specifications).
• Custom calibration with up to five custom buffers.
• Messages on the graphic LCD for an easy and accurate calibration.
• Cal Check™ Diagnostic features to alert the user when the electrode needs cleaning.
• Optional user enabled “Outside Calibration Range” warning.
• Monitoring of the electrode aging.
• User selectable “Calibration Time Out” to remind when a new calibration is necessary.
Moreover, they offer an extended temperature range from ‑20 to 120 °C (‑4 to 248 °F), using a
temperature sensor inside pH electrode.
These instruments can also measure with ORP electrodes, thanks to their capability to measure mV
with a resolution up to 0.1 mV.
HI98191 can also measure with ISE electrodes. The electrode type unit selection capability and the
ISE calibration in up to five calibration standard solutions make this instrument very useful for a large
range of concentration solutions measurements.
Other features include:
• Relative mV measurements
• Log on demand up to 300 samples for HI98191 and 200 samples for HI98190
(100 samples on each range ‑ pH, mV, ISE only HI98191)
• Auto Hold feature, to freeze first stable reading on the LCD
• GLP feature, to view last calibration data for pH, Rel mV, or ISE
• PC interface

6
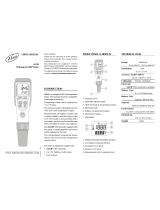
1) Liquid Crystal Display (LCD).
2) Functional keys.
3)
/ keys to manually increase/decrease the parameters or to scroll between the parameter
list.
4) ON/OFF (
) key, to turn the instrument ON and OFF.
5) LIGHT (
) key to toggle display backlighting.
6) GLP key, to display Good Laboratory Practice information.
7) CAL key, to enter/exit calibration mode.
8) SETUP key, to enter/exit SETUP mode.
9) RCL key, to enter/exit view logged data mode.
10) MODE key to change pH resolution or to toggle between mV and Rel mV mode.
11) RANGE key, to switch between pH and mV range (HI98190) or pH, mV and ISE range
(HI98191).
12) HELP key to enter/exit contextual help.
13) ESC to leave current mode, exit calibration, setup, help. etc.
FRONT VIEW
FUNCTIONAL DESCRIPTION

7
14) Electrode DIN connector.
15) USB connector.
TOP VIEW HI98190
FUNCTIONAL DESCRIPTION
TOP VIEW HI98191
14) BNC electrode connector.
15) Input for Reference electrode.
16) Input for Temperature probe.
17) USB Connector.

8
HI98190 SPECIFICATIONS
pH
Range ‑2.0 to 20.0 pH / ‑2.00 to 20.00 pH / ‑2.000 to 20.000 pH
Resolution 0.1 pH / 0.01 pH / 0.001 pH
Accuracy ±0.1 pH / ±0.01 pH / ±0.002 pH
mV
Range ±2000 mV
Resolution 0.1 mV
Accuracy ±0.2 mV
Temperature
Range ‑20.0 to 120.0 °C (‑4.0 to 248.0 °F)
Resolution 0.1 °C (0.1 °F)
Accuracy ±0.4 °C (±0.8 °F) (excluding probe error)
Rel mV Offset Calibration ±2000 mV
pH Calibration
Up to five point calibration, seven standard buffers available
(pH 1.68, 4.01, 6.86, 7.01, 9.18, 10.01, 12.45), and five custom
buffers
Slope Calibration From 80 to 110%
Temperature Compensation Manual or Automatic from ‑20.0 to 120.0 °C (‑4.0 to 248.0 °F)
pH Electrode HI12963 pH & temperature
LOG On demand, 200 samples (100 samples on each range)
Input Impedance 10¹² Ω
Battery Type/Life 1.5V AA batteries (4 pcs.) / approx. 200 hours of continuous use
without backlight (50 hours with backlight)
Auto Power Off User selectable: 5, 10, 30, 60 minutes or disabled
PC Interface opto‑isolated USB
Dimensions 185 x 93 x 35.2 mm (7.3 x 3.6 x 1.4”)
Weight 400 g (14.2 oz)
Environment 0 to 50 °C (32 to 122 °F) max. RH 100% IP67

9
HI98191 SPECIFICATIONS
pH
Range ‑2.0 to 20.0 pH / ‑2.00 to 20.00 pH / ‑2.000 to 20.000 pH
Resolution 0.1 pH / 0.01 pH / 0.001 pH
Accuracy ±0.1 pH / ±0.01 pH / ±0.002 pH
mV
Range ±2000 mV
Resolution 0.1 mV
Accuracy ±0.2 mV
ISE
Range From 1.00 E
‑7
to 9.99 E
10
concentration
Resolution 3 digits 0.01, 0.1, 1, 10 concentration
Accuracy ±0.5% of reading (monovalent ions)
±1% of reading (divalent ions)
Temperature ‑20.0 to 120.0 °C (‑4.0 to 248.0 °F)
Rel mV Offset Range
±2000 mV
pH Calibration
Up to five point calibration, seven standard buffers available
(pH 1.68, 4.01, 6.86, 7.01, 9.18, 10.01, 12.45), and five custom
buffers
Slope Calibration From 80 to 110%
ISE Calibration
Up to five point calibration points six standard solutions
available
(0.1, 1, 10, 100, 1000, 10000 ppm)
Temperature Compensation Manual or Automatic from ‑20.0 to 120.0 °C (‑4.0 to 248.0 °F)
pH Electrode HI72911B pH & temperature (included)
LOG On demand, 300 samples (log samples on each range)
Input Impedance 10¹² Ω
Battery Type/Life 1.5V AA batteries (4 pcs.) / approx. 200 hours of continuous use
without backlight (50 hours with backlight)
Auto Power Off User selectable: 5, 10, 30, 60 minutes or disabled
PC Interface opto‑isolated USB
Dimensions 185 x 93 x 35.2 mm (7.3 x 3.6 x 1.4”)
Weight 400 g (14.2 oz)
Environment 0 to 50 °C (32 to 122 °F) max. RH 100% IP67

10
OPERATIONAL GUIDE
INITIAL PREPARATION
The instrument is supplied complete with 1.5V AA (4 pcs.) batteries. For placing the batteries inside
the meter, see page 54.
To prepare the instrument for field measurements close the serial communication socket and all
unused connector sockets with proper stopper (to ensure waterproof protection). Use the holed
temperature rubber cork for the temperature socket when temperature probe is connected.
For HI98191 connect the pH electrode and the temperature probe to the BNC and temperature
sockets on the top of the instrument. Push the pH electrode sleeve to cover the connector
accommodation.
The temperature probe is used in conjunction with the pH electrode to utilize the instrument's ATC
capability, but it can also be used independently to take temperature measurements. If the probe is
disconnected, temperature can be set manually with the / keys.
For HI98190 connect the pH/temperature electrode to the DIN connector.
Turn the instrument ON by pressing ON/OFF key.
At start‑up the display will show the Hanna Instruments logo for a few seconds followed by the
percentage indication of the remaining battery life, then enters the measurement mode.
After measurement switch the instrument off, clean the electrode and store it with a few drops of
HI70300 storage solution in the protective cap (see page 57).
The Auto Power Off feature turns the instrument off after a set period (default 30 min) with no button
pressed to save battery life. To set another period or to disable this feature, see SETUP menu on
page 31.
The Auto Light Off backlight feature turns the backlight off after a set period (default 1 min) with
no buttons pressed. To set another period or to disable this feature, see SETUP menu on page 31.
pH MEASUREMENTS
To take a pH measurement remove the electrode protective cap and simply submerge the tip of the
electrode (4 cm/1½") into the sample to be tested.
Press RANGE key until the display changes to the pH range, if necessary.
Use MODE key to select the pH resolution.
Allow for the electrode to adjust and reading to stabilize (hourglass symbol turns off).

11
OPERATIONAL GUIDE
• pH reading with the selected resolution.
• Temperature reading in the selected unit (°C or °F).
• Temperature compensation mode (MTC ‑ manual, ATC ‑ automatic). While in MTC mode the
indicate that the temperature can be manually changed using / keys.
• Electrode condition during the calibration day.
• The buffers used in last pH calibration (if feature is enabled in SETUP).
• Battery level indicator.
• Available functional keys in accordance with the model.
In order to take more accurate pH measurements, make sure that the instrument is calibrated
(see page 14 for calibration details).
It is recommended that the electrode is always kept moist and rinsed thoroughly with the sample to
be measured before use.
The pH reading is directly affected by temperature. For accurate pH measurements, temperature
must be taken into consideration. If the sample temperature is different from the temperature at
which the pH electrode was kept, allow a few minutes to reach thermal equilibrium.
To use the instrument's Automatic Temperature Compensation (ATC) feature, submerge the
temperature probe into the sample as close to the electrode as possible and wait for a few seconds.
If manual temperature compensation (MTC) is desired, the temperature probe must be
disconnected from the instrument (HI98191 only).
The display will show the default temperature of 25 °C, the last measured temperature reading, or
the last set temperature, with the “MTC” indication.
The “MTC” indication and the symbol light up on the LCD to indicate that the instrument is in MTC
mode and the / keys can be used to enter the desired temperature value.
Note: When in MTC the user can press and hold the / keys, and the instrument will
start incrementing /decrementing the temperature value. The instrument keeps measuring
and the display is updated periodically.
On the pH screen are displayed:

12
ORP MEASUREMENTS
To perform ORP measurements, connect an optional ORP electrode to the instrument and turn it ON.
Press RANGE key until mV range is displayed, if necessary.
Submerge the ORP electrode tip (4 cm/1½”) into the sample to be tested and wait a
few seconds for the reading to stabilize.
Measurements are displayed with 0.1 mV resolution.
The “ATC” (or “MTC”) message is turned off because mV readings are not temperature
compensated.
For accurate ORP measurements, the surface of the electrode must be clean and smooth.
Pretreatment solutions are available to condition the electrode and improve its response time.
RELATIVE mV MEASUREMENTS
To enter Relative mV mode, press MODE while in mV measurement mode. The relative mV reading
will be displayed along with the Absolute mV value and the current temperature readings.
The relative mV reading is equal to the difference between the absolute mV input value and relative
mV offset established in the relative mV calibration.
Note: If using the pH electrode while in mV mode, the instrument will measure the mV
generated by the pH electrode.
ISE MEASUREMENTS (HI98191 only)
To perform ion concentration measurements, connect an optional ISE electrode and
the corresponding reference (if necessary) to the instrument and turn it ON.
Enter the ISE mode by pressing RANGE until the display changes to ISE range.
Submerge the ISE electrode tip (4 cm/1½”) into the sample to be tested and wait a
few seconds for the reading to stabilize.
OPERATIONAL GUIDE

13
OPERATIONAL GUIDE
The ISE reading will be displayed along with the current temperature reading.
The “ATC” (or “MTC”) message is turned off because ppm readings are not temperature
compensated.
In order to take accurate ISE measurements, make sure that the appropriate ISE electrode type and
ISE unit were set in SETUP menu and the instrument was calibrated (see ISE CALIBRATION for
details, page 25).
Notes: When the reading is out of range, the display will flash the closest full-scale value.
The instrument will display “----” on the primary LCD if it is not calibrated. Perform at least
a one point calibration in order to take ISE measurements.
Changing the ISE electrode or the ion charge will need ISE range calibration.
TEMPERATURE MEASUREMENTS
For HI98190 the temperature sensor is connected through DIN socket.
Connect the temperature connector to the appropriate socket (HI98191). Immerse the pH electrode
into the sample and allow the reading on the secondary LCD to stabilize.
Note: The temperature can be displayed in Celsius degrees (°C) or in Fahrenheit degrees
(°F) (see SETUP for details, page 31).
BACKLIGHT FEATURE
The instrument is provided with a Backlight feature, which can be easily toggled on and off through
the keyboard by pressing LIGHT.
Note: The backlight automatically shuts off after a set period (see SETUP for details,
page 31) with no buttons pressed.

14
pH CALIBRATION
It is recommended to calibrate the instrument frequently, especially if high accuracy is required.
The pH range should be recalibrated:
• Whenever the pH electrode is replaced.
• At least once a week.
• After testing aggressive chemicals.
• When calibration alarm time out is expired ‑ “CAL DUE” blinks (if feature is enabled in
SETUP).
• If “Outside Cal Range” message blinks during pH measurement (the measurement range is
not covered by current calibration, if feature is enabled in SETUP).
PROCEDURE
HI98190 and HI98191 instruments offers a choice of seven standard buffers (pH 1.68, 4.01, 6.86,
7.01, 9.18, 10.01 and 12.45). The meters allow the user to set up to five custom buffers. The set
custom buffers are the buffer values at 25 °C.
When a custom buffer is selected during calibration, the Custom functional key is displayed on the
LCD. Press Custom key in order to enter custom buffer changing mode. Use / keys to change
the value in a ±1.00 pH window, in according with the temperature reading and then Accept. Press
ESC to leave custom buffers value unchanged.
For accurate pH measurements, it is recommended to perform a calibration in maximum allowed
points. However, at least a two point calibration is suggested.
The instrument will automatically skip the buffers used during calibration and the buffers which are
in a ±0.2 pH window around one of the calibrated buffers.
• Pour small quantities of selected buffer solutions into clean beakers. For accurate calibration use
two beakers for each buffer solution, the first one for rinsing the electrode and the second one
for calibration.
• Remove the protective cap and rinse the electrode with some of the buffer solution to be used for
the first calibration point.
FIVE POINT CALIBRATION
• Immerse the pH electrode approximately 4 cm (1½”) into a buffer solution of
your choice (pH 1.68, 4.01, 6.86, 7.01, 9.18, 10.01, 12.45 or a custom buffer)
and stir gently. The temperature probe (HI98191 only) should be close to the
pH electrode.

15
pH CALIBRATION
• Press CAL. The instrument will display the measured pH, the LCD first expected buffer and the
temperature reading.
• If necessary, press the / keys to select a different buffer value.
• The “ ” tag will blink on the LCD until the reading is stable.
• When the reading is stable and within range of the selected buffer, CFM functional key is
displayed.
• Press CFM to confirm first point.
• The calibrated value and the second expected buffer value is then displayed on the LCD.
• After the first calibration point is confirmed, immerse the pH electrode and the temperature
probe approximately 4 cm (1½”) into the second buffer solution and stir gently. The tempera‑
ture probe should be close to the pH electrode.
• If necessary, press the / keys to select a different buffer value.
• The “ ” tag will blink on the LCD until the reading is stable.
• When the reading is stable and within range of the selected buffer, the CFM functional key is
displayed.

16
pH CALIBRATION
• Press CFM to confirm calibration.
• The calibrated value and the third expected buffer value will be displayed.
• After the second calibration point is confirmed, immerse the pH electrode and the temperature
probe approximately 4 cm (1½”) into the third buffer solution and stir gently. The temperature
probe should be close to the pH electrode.
• If necessary, press the / keys to select a different buffer value.
• The “ ” tag will blink on the LCD until the reading is stable.
• When the reading is stable and within range of the selected buffer, the CFM functional key is
displayed.
• Press CFM to confirm calibration.
• The calibrated value and the fourth expected value will be displayed.
• After the third calibration point is confirmed, immerse the pH electrode and the temperature
probe approximately 4 cm (1½”) into the fourth buffer solution and stir gently. The temperature
probe should be close to the pH electrode.
• If necessary, press the / keys to select a different buffer value.
• The “ ” tag will blink on the LCD until the reading is stable.

17
pH CALIBRATION
• When the reading is stable and within range of the selected buffer, the CFM functional key is
displayed.
• Press CFM to confirm calibration.
• The calibrated value and the fifth expected buffer will be displayed.
• After the fourth calibration point is confirmed, immerse the pH electrode and the temperature
probe approximately 4 cm (1½”) into the fifth buffer solution and stir gently.
The temperature probe should be close to the pH electrode.
• If necessary, press the / keys to select a different buffer value.
• The “ ” tag will blink on the LCD until the reading is stable.
• When the reading is stable and within range of the selected buffer, the CFM functional key is
displayed.
• Press CFM to confirm calibration.
• The instrument stores the calibration values and returns to normal measurement mode.

18
FOUR, THREE or TWO POINT CALIBRATION
• Proceed as described in “FIVE POINT CALIBRATION” section.
• Press CAL or ESC after the appropriate accepted calibration point. The instruments will return to
measurement mode and will memorize the calibration data.
ONE POINT CALIBRATION
Two SETUP selectable options are available for one point calibration: Replace and Offset.
If the Replace option is selected, the slopes between current buffer and nearest lower and higher
buffers will be reevaluated.
If the “Offset” option is selected, an electrode offset correction is performed keeping unchanged
the existing slopes.
• Proceed as described in “FIVE POINT CALIBRATION” section.
• Press CAL or ESC after the first calibration point was confirmed. The instruments will
memorize the one point calibration data and will return to measurement mode.
Notes: Press MTC or MODE key to toggle between pH buffer selection and the temperature
reading during calibration while temperature probe is not connected (MTC mode).
The displayed arrow is moving to the temperature value. Use / keys in order to
change the temperature.
ERROR SCREENS
Wrong buffer
The calibration cannot be confirmed.
The pH reading is not within range of the selected buffer. Select another buffer using the / keys
or change the buffer.
pH CALIBRATION

19
pH CALIBRATION
Electrode Dirty/Broken alternatively with Buffer Contaminated
The calibration cannot be confirmed.
The offset of the electrode is not in the accepted range. Check if the electrode is broken or clean it
following the Cleaning Procedure (see page 57). Check the quality of the buffer. If necessary, change
the buffer.
Wrong slope
The calibration cannot be confirmed.
The evaluated slope is less than the lowest accepted value (80% of default slope).
The evaluated slope is more than the highest accepted value (110 % of default slope).
Wrong old slope
An inconsistency between new and previous (old) calibration is detected. Clear old calibration
parameters and proceed with the calibration from the current point. The instrument will keep all
confirmed values during current calibration.
Note: For one point calibration the electrode condition is not displayed in the measurement
screen. Each time a buffer is confirmed, the new calibration parameters replace the old
calibration parameters of the corresponding buffer.

20
pH CALIBRATION
If the current confirmed buffer has no correspondence in the existing stored calibration and this is
not full, the current buffer is added to the existing stored calibration.
If the existing stored calibration is full (five calibration points), after confirming the calibration point,
the instrument will ask which buffer will be replaced by current buffer.
Press / keys to select another buffer to be replaced.
Press CFM to confirm the buffer that will be replaced.
Press CAL or ESC to leave replace mode. In this case, the buffer will not be memorized.
Note: The replaced buffer is not removed from calibration list and it can be selected for the
next calibration points.
WORKING WITH CUSTOM BUFFERS
If at least one custom buffer was set in SETUP menu, it can be selected for calibration by pressing
the / keys. The Custom functional key will be displayed.
Press Custom if you want to adjust the buffer value according with current temperature.
Use the / keys to change the buffer value.
Press Accept to accept new value or ESC to exit changing mode.
Note: Custom buffer value can be adjusted in a ±1.00 pH window, around the set value.
/